TFA 30.3032.10.IT User manual

Category
Digital body thermometers
Type
User manual

TFA 30.3032.10.IT is a compact wireless weather station that displays atomic time, date, indoor and outdoor temperature. It features 868 MHz wireless transmission, receiving signals up to 100 meters. With two keys, you can adjust settings, including 12/24-hour format, Celsius/Fahrenheit, and manual time setting. It can display minimum and maximum records for both indoor and outdoor temperatures, and you can reset them with a button. The weather station can receive data from up to three outdoor transmitters and display the temperatures on separate channels.

TFA 30.3032.10.IT is a compact wireless weather station that displays atomic time, date, indoor and outdoor temperature. It features 868 MHz wireless transmission, receiving signals up to 100 meters. With two keys, you can adjust settings, including 12/24-hour format, Celsius/Fahrenheit, and manual time setting. It can display minimum and maximum records for both indoor and outdoor temperatures, and you can reset them with a button. The weather station can receive data from up to three outdoor transmitters and display the temperatures on separate channels.

41
WIRELESS 868 MHz TEMPERATURE STATION
Instruction Manual
INTRODUCTION:
Congratulations on purchasing this compact 868MHz Temperature Station which displays
radio controlled time, date, indoor and outdoor temperature. In addition, the daily minimum
and maximum indoor and outdoor temperature are shown in the normal display. With only
two keys, this product is ideal for use in the home or office.
42
FEATURES:
The Temperature Station
Foldout
Stand
Battery
compartment
cover
Function
Keys
LCD
Display
Hanging hole
43
Atomic Time function (DCF-77 Radio controlled time) or manual time setting options
Atomic Time reception On/Off
Hour and minute display
Calendar display
Time zone option ±12 hours
Wireless transmission at 868 MHz
Outdoor signal reception intervals at 4-second
Temperature display in degrees Celsius (°C) or Fahrenheit (°F) selectable
Indoor and Outdoor temperature display with MIN/MAX recording (records can be
reset)
Can receive up to 3 outdoor transmitters
Daily minimum and maximum indoor temperature display
Daily minimum and maximum outdoor temperature display
Low battery indicator
LCD contrast adjustable
Table standing/ Wall mounting
44
The Outdoor Temperature Transmitter
Remote transmission of outdoor temperature to
Temperature Station by 868 MHz signals
Dual channel transmitter*: one internal channel
and one probe channel
Shower proof casing
Wall mounting and table stand
*DUAL CHANNEL TRANSMITTER -
There are an internal channel and an external probe channel in the transmitter.
The data measured by the internal sensor and the measuring probe will be shown on the
transmitter's display as Channel "1" and "2" respectively. The two readings will be
This socket is only for the
external probe. Do not
apply power plug to it.
Optional external
probe
45
automatically toggled to display. However, if the probe is unplugged, the transmitter' s
display will only show the reading from the inner transmitter.
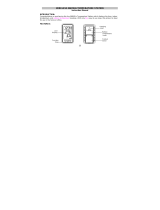
Once the transmitter is successfully recognized by the temperature station, Channel 1 of
the Temperature station will display the temperature data measured by internal sensor and
Channel 2 will display the temperature estimated by the probe.
If the measuring probe is unplugged, the "probe channel" on Temperature station will show
"---", yet the data from the internal transmitter will still be shown on Channel 1 .
The probe can be connected to the remote temperature transmitter anytime after initial
setup. There is no need to reset the units, should the probe be unplugged or re-plugged
again. The Temperature Station will automatically detect the temperature probe data and
will display the temperature data on Channel 2 after the probe is plugged.
SETTING UP:
When one transmitter is used:
1. First, insert the batteries into the transmitter (see “Install and replace batteries in
the Temperature transmitter” below).
2. Within 30 seconds of powering up the transmitter, insert the batteries to the
Temperature Station (see “Install and replace batteries in the Temperature
Station” below). Once the batteries are in place, all segments of the LCD will light
up briefly. Then the indoor temperature and the time as 0:00 will be displayed. If
they are not shown on LCD after 60 seconds, remove the batteries and wait for at
46
least 60 seconds before reinserting them. Once the indoor data is displayed, user
may proceed to the next step.
3. After the batteries are inserted, the Temperature Station will start receiving data
signal from the transmitter.
4. If the optional probe has been plugged to the dual channel transmitter, the outdoor
temperature should then be displayed on the Temperature Station on channel 1 and
2. Also, the signal reception icon will be displayed. If this does not happen after 2
minutes, the batteries will need to be removed from both units and reset from step 1.
Note:
Channel 1 will show the reading from the internal sensor of the dual channel transmitter;
Channel 2 will show the reading sensed by the probe. If the probe is not plugged to the
transmitter, " - -" will be shown on Channel 2.
5. In order to ensure sufficient 868 MHz transmission, the final position between the
Temperature Station and the transmitter should not be more than 100 meters (see
notes on “Positioning” and “868 MHz Reception”).
6. Once the remote temperature has been received and displayed on the Temperature
Station, the DCF time code reception is automatically started. This takes typically
between 3-5 minutes in good conditions—but may take up to 4 nights.
When two transmitters are used
1. User shall remove all the batteries from the Temperature Station and transmitters and
47
wait 60 seconds (if setting has been done with one transmitter before).
2. Insert the batteries into the first transmitter.
3. Within 30 seconds of powering up the first transmitter, insert the batteries into the
Temperature Station. Once the batteries are in place, all segments of the LCD will
light up briefly. Then the indoor temperature and the time as 0:00 will be displayed. If
they are not shown on the LCD after 60 seconds, remove the batteries and wait for at
least 60 seconds before reinserting them.
4. The outdoor temperature readings from the first transmitter (Channel 1 and 2) should
then be displayed on the Temperature Station (if probe sensor has been installed
onto the first transmitter). If this does not happen after 2 minutes, the batteries will
need to be removed from both units and reset from step 1.
5. Insert the batteries into the second transmitter as soon as the outdoor temperatures
from the first transmitter are displayed on the Temperature Station.
Note:
User must insert the batteries into the second transmitter within 30 seconds of
reception of the first transmitter.
6. The outdoor temperature reading from the second transmitter will be shown on the
LCD and the Channel No. will shift back to "1", indicating that all three channels are
running successfully. If this does not happen after 2 minutes, the batteries will need to
be removed from all the units and reset from step 1.
48
Note: After the Temperature Station has successfully received the second transmitter,
Channel 3 will display the data measured by the internal sensor of the second dual channel
transmitter. Yet the probe data from the second transmitter will not be displayed on the
Temperature Station.
7. Once the remote temperature has been received and displayed on the Temperature
Station, the DCF time code reception is automatically started. This takes typically
between 3-5 minutes in good conditions—but may take up to 4 nights.
IMPORTANT:
Transmission problems will arise if the setting for additional transmitters is not
followed as described above. Should transmission problems occur, it is necessary to
remove the batteries from all units and follow the set-up from step 1.
If after 10 minutes, the Atomic auto-set time (DCF time) has not been received, press
the SET key to manually enter a time initially.
Daily DCF reception is done at 02:00 and 03:00. If the reception at 03:00 is not
successful, then at 04:00 and 05:00 and 06:00 there are other tries, until one is
successful. If the reception at 06:00 is still not successful, then the next try takes
place at 02:00 next day. (Please refer also to notes on “DCF-77 Radio Controlled
Time” and “Manual Time Setting”).
49
BATTERY INSTALLATION
INSTALL AND REPLACE BATTERIES IN THE TEMPERATURE STATION
The Temperature Station uses 2 x AAA, IEC LR3, 1.5V batteries. To install and replace the
batteries, please follow the steps below:
1. Remove the cover at the back of the Temperature Station.
2. Insert batteries observing the correct polarity (see marking).
3. Replace compartment cover.
50
INSTALL AND REPLACE BATTERIES IN THE TEMPERATURE TRANSMITTER
The temperature transmitter uses 2 x AAA, IEC LR3, 1.5V battery. To install and replace
the batteries, please follow the steps below:
1. Remove the battery compartment cover.
2. Insert the batteries, observing the correct polarity (see marking).
3. Replace the battery compartment cover.
Note:
In the event of changing batteries in any of the units, all units need to be reset by following
the setting up procedures. This is because a random security code is assigned by the
transmitter at start-up and this code must be received and stored by the Temperature
Station in the first 3 minutes of power being supplied to it
51
BATTERY CHANGE:
It is recommended to replace the batteries in all units regularly to ensure optimum accuracy
of these units (Battery life see Specifications below).
Please participate in the preservation of the environment. Return used
batteries to an authorized depot.
FUNCTION KEYS:
Temperature Station:
The Temperature Station has four easy to use function keys.
SET key
MIN/
MAX key
+ key
CH/- key
52
SET key (Manual Setting):
Press and hold to enter the setting mode for the following settings: LCD contrast,
Time zone, Atomic Time Reception (RCC) ON/OFF, 12/24 hr format, Manual time,
Year, Month, Day and °C/°F settings.
MIN/ MAX key
To toggle between the minimum/ maximum indoor and outdoor temperature records
Press to exit the setting mode
Press to reset the minimum and maximum or temperature records of the indoor and
the outdoor channel (will reset all records to current level)
+ key
To make a "positive" adjustment for various settings
In normal display, press to toggle between the display of the calendar data and
second of time in the time display of LCD
CH/- key
To make a "negative" adjustment for various settings
To toggle between different outdoor channel display (when more than 1 outdoor
transmitter is adopted)
53
LCD SCREEN AND SETTINGS:
Ind
oor
Temperature
Time
display
"Weekday + Day" or Day
+ Month" or "Second"
display
Receiver low
battery icon
Outdoor
Temperature
Time reception icon
Outdoor signal
Sensor low battery
icon
Daily indoor max
temp
Daily outdoor max
temp
Daily outdoor
min temp
Daily indoor
min temp
Channel No.
(Outdoor Sensor ID)
54
*When the outdoor signal is successfully received by the temperature station, this icon will
be switched on. (If not successful, the icon will not be shown in LCD) So user can easily
see whether the last reception was successful (icon on) or not (icon off). On the other hand,
the short blinking of the icon shows that a reception is currently taking place.
Note:
The Channel No. (Outdoor Transmitter No.) will be shown when more than one outdoor
transmitter is adopted.
For better distinctness the LCD screen is split into 3 sections displaying the information for
time and date, Indoor data and outdoor data.
Section 1 - TIME AND CALENDAR
In normal mode, display the time and "weekday + day". Press the + key once to
display the "day + month"; twice to display the second of time.
A signal reception symbol is shown indicating that Atomic auto-set time (DCF time)
signal is received.
Section 2 - INDOOR TEMPERATURE
Display current indoor temperature
Display daily minimum and maximum indoor temperature
55
Section 3 - OUTDOOR TEMPERATURE
Display current outdoor temp
Display daily maximum and minimum outdoor temperature
DCF-77 RADIO CONTROLLED TIME:
The time base for the radio controlled time is a Cesium Atomic Clock operated by the
Physikalisch Technische Bundesanstalt Braunschweig which has a time deviation of less
than one second in one million years. The time is coded and transmitted from Mainflingen
near Frankfurt via frequency signal DCF-77 (77.5 kHz) and has a transmitting range of
approximately 1,500 km. Your radio-controlled Weather (Temperature) station receives this
signal and converts it to show the precise time in summer or wintertime. The quality of the
reception depends greatly on the geographic location. In normal cases, there should be no
reception problems within a 1,500 km radius around Frankfurt.
Once the outdoor temperature is displayed on the station after initial set-up, the DCF tower
icon in the clock display will start flashing in the upper left corner. This indicates that the
clock has detected that there is a radio signal present and is trying to receive it. When the
time code is received, the DCF tower becomes permanently lit and the time will be
displayed.
56
If the tower icon flashes, but does not set the time or the DCF tower does not appear at all,
then please take note of the following:
Recommended distance to any interfering sources like computer monitors or TV sets
is a minimum of 1.5 - 2 metres.
Within ferro-concrete rooms (basements, superstructures), the received signal is
naturally weakened. In extreme cases, please place the unit close to a window and/or
point its front or back towards the Frankfurt transmitter.
MANUAL SETTINGS:
The following manual settings can be done in the setting mode:
LCD Contrast setting
Time zone setting
Atomic Time reception ON/OFF setting (RCC)
12/24 hour time format setting
Manual time setting
Calendar setting (Year, Month, Date)
°C/ °F temperature unit setting
Press and hold the SET key for about 3 seconds to advance to the setting mode:
57
LCD CONTRAST SETTING
The LCD contrast can be set to 8 different levels (0 to 7) to suit the user’s needs (default
LCD contrast setting is LCD 4). To set the desired contrast level:
1. The above display will be seen. Press the + key or CH/- key to select the level of
contrast desired.
2. Press the SET key to confirm and enter the “Time Zone setting” or exit the setting
mode by pressing the MIN/MAX key
TIME ZONE SETTING:
flashing
flashing
58
The time zone default of the Temperature Station is 0 hr. To change to another time zone:
1. Using the + key or CH/- key, set the time zone. The range runs between -12 to +12
hour.
2. Press the SET key to confirm and enter the “Time reception On/Off setting” or exit
the setting mode by pressing the MIN/MAX key.
TIME RECEPTION ON/OFF SETTING
In area where reception of the atomic time is not possible, the time reception function can
be turned OFF. The clock will then work as a normal Quartz clock. (Default setting is ON).
1. The digit “ON” and the time reception icon will start flashing on the LCD.
2. Use the + key or CH/- key to turn OFF the time reception function.
3. Confirm with the SET key and enter the “12/24-Hour Display setting” or exit the
setting mode by pressing the MIN/MAX key.
flashing
59
Note:
If the Time Reception function is turned OFF manually, the clock will not attempt any
reception of the DCF time as long as the Time Reception OFF function is activated.
The Time Reception icon will not be displayed on the LCD.
12/24 HOUR TIME DISPLAY SETTING
1. After setting time reception ON/OFF, press the SET key, “12 h” or “24 h” flashes in
the LCD. (default 24 h)
2. Press the + key or CH/- to select the “12 h” or “24 h” display mode.
3. Press the SET again to confirm and to enter the “Manual Time setting” or exit the
setting mode by pressing the MIN/MAX key.
Note:
When 24 h mode display is selected, the calendar format will be "date and month"
display. When 12 h mode display is selected, the calendar format will be "month and
date" display.
flashing
60
MANUAL TIME SETTING
In case the Temperature Station is not able to detect the Atomic time (DCF) signal
(disturbances, transmitting distance, etc.), the time can be manually set. The clock will then
work as a normal Quartz clock.
To set the clock:
1. The hour digits start flashing in the time display section.
2. Use the + key or CH/- key to adjust the hours and then press SET key to go to the
minute setting.
3. The minute will be flashing. Press the + key or CH/- key to just the minutes.
4. Confirm with the SET key and enter the “Calendar Setting” or exit the setting mode
by pressing the MIN/MAX key.
Minutes (flashing)
Hours (flashing)
  • Page 1 1
  • Page 2 2
  • Page 3 3
  • Page 4 4
  • Page 5 5
  • Page 6 6
  • Page 7 7
  • Page 8 8
  • Page 9 9
  • Page 10 10
  • Page 11 11
  • Page 12 12
  • Page 13 13
  • Page 14 14
  • Page 15 15
  • Page 16 16
  • Page 17 17
  • Page 18 18
  • Page 19 19
  • Page 20 20
  • Page 21 21
  • Page 22 22
  • Page 23 23
  • Page 24 24
  • Page 25 25
  • Page 26 26
  • Page 27 27
  • Page 28 28
  • Page 29 29
  • Page 30 30
  • Page 31 31
  • Page 32 32
  • Page 33 33
  • Page 34 34

TFA 30.3032.10.IT User manual

Category
Digital body thermometers
Type
User manual

TFA 30.3032.10.IT is a compact wireless weather station that displays atomic time, date, indoor and outdoor temperature. It features 868 MHz wireless transmission, receiving signals up to 100 meters. With two keys, you can adjust settings, including 12/24-hour format, Celsius/Fahrenheit, and manual time setting. It can display minimum and maximum records for both indoor and outdoor temperatures, and you can reset them with a button. The weather station can receive data from up to three outdoor transmitters and display the temperatures on separate channels.

Ask a question and I''ll find the answer in the document

Finding information in a document is now easier with AI