Toshiba DVR20DTKB Owner's manual
- Category
- DVD players
- Type
- Owner's manual

1
EN
PA L
VCR
DVD
Introduction Connections Playback Editing OthersFunction SetupRecording VCR Functions
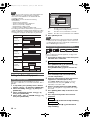
Basic Setup /
TV View Operation
DVD / VIDEO CASSETTE RECORDER
DVR20KB
© 2010 Toshiba Corporation
For Customer Use:
Carefully read the Model No. and Serial No. located at the
back of the unit and enter the information below. Retain
this information for future reference.
Model No. __________________________
Serial No. __________________________
OWNER’S MANUAL
E9TK4BD_EN.book Page 1 Wednesday, January 6, 2010 10:05 PM

2
EN
.
Precautions
Laser Safety
This unit employs a laser. Only qualified service personnel
should remove the cover or attempt to service this unit, due to
the possibility of eye injury.
Power Supply
The power supply is connected and the unit is live when the
mains cable is plugged into a 220 - 240 V~, 50 Hz AC outlet.
To operate the unit, press [B ON\STANDBY].
Caution
1. Do not attempt to open the cabinet. There are no parts
inside you can service. Refer all servicing to qualified
service personnel.
2. Slots and openings in the cabinet at the sides and
underneath are provided for ventilation. To ensure reliable
operation and to protect the unit from overheating, these
openings must not be blocked or covered.
Avoid installation in enclosed spaces such as bookcases
unless suitable ventilation is provided.
3. Keep the unit away from radiators and other heat sources.
4. Avoid use near strong magnetic fields.
5. Do not push objects of any kind into the unit through the
cabinet slots or openings as they could touch electrically
live parts or short circuit parts resulting in a fire or electric
shock.
6. To prevent fire or shock hazard, do not expose this
apparatus to dripping or splashing, no objects filled with
liquids, such as vases, should be placed on the
apparatus.
7. Do not stand the unit vertically. Use the unit in a horizontal
(flat) position only.
8. Before attempting to operate the unit, make sure that the
timer recording mode is off.
9. This product is in Stand-by mode when turned off while
the mains cable is connected.
The front panel display will not light up. This is a
Power Saving Mode (ECO) for standby.
10. Do not place any combustible objects on the device
(candles, etc.).
11. Before moving the unit, be sure to remove any media and
unplug the mains cable from the AC outlet.
12. Disconnect the mains plug to shut off the unit, if you
suspect a fault has developed, or if it will not be used for
an extended period.
13. The mains plug shall remain readily operable.
14. Read the instruction manual, and QSG to ensure correct
and safe installation and interconnection of the unit in
multimedia systems.
15. Keep a distance of 20 cm around the ventilation openings
of the apparatus.
Introduction
WARNING:
TO REDUCE THE RISK OF FIRE OR ELECTRIC SHOCK, DO NOT EXPOSE THIS
APPLIANCE TO RAIN OR MOISTURE.
The important note is located on the rear of the cabinet.
CAUTION:
TO REDUCE THE RISK OF ELECTRIC SHOCK, DO NOT
REMOVE COVER (OR BACK). NO USER SERVICEABLE PARTS
INSIDE. REFER SERVICING TO QUALIFIED SERVICE
PERSONNEL.
RISK OF ELECTRIC SHOCK
DO NOT OPEN
CAUTION
The lightning flash with arrowhead
symbol, within an equilateral triangle, is
intended to alert the user to the presence
of uninsulated “dangerous voltage” within
the product’s enclosure that may be of
sufficient magnitude to constitute a risk of
electric shock to persons.
The exclamation point within an
equilateral triangle is intended to alert the
user to the presence of important
operating and maintenance (servicing)
instructions in the literature
accompanying the appliance.
The symbol for CLASS II (Double Insulation)
CAUTION: USE OF CONTROLS OR ADJUSTMENTS OR
PERFORMANCE OF PROCEDURES OTHER
THAN THOSE SPECIFIED HEREIN MAY
RESULT IN HAZARDOUS RADIATION
EXPOSURE.
CAUTION: VISIBLE AND INVISIBLE LASER RADIATION
WHEN OPEN AND INTERLOCK DEFEATED.
DO NOT STARE INTO BEAM.
LOCATION: INSIDE, NEAR THE DECK MECHANISM.
WARNING: LIVE PARTS INSIDE.
DO NOT REMOVE ANY SCREWS.
A NOTE ABOUT RECYCLING
This product’s packaging materials are recyclable and can
be reused. Please dispose of any materials in accordance
with your local recycling regulations.
This product consists of materials which can be recycled
and reused if disassembled by a specialised company.
E9TK4BD_EN.book Page 2 Wednesday, January 6, 2010 10:05 PM

3
EN
Introduction Connections
Basic Setup /
TV View Operation
Playback Editing OthersFunction SetupRecording VCR Functions
Make your contribution to the environment!!!
• Exhausted batteries do not belong in the
dustbin.
• You can dispose of them at a collection point for
exhausted batteries or special waste.
• Contact your council for details.
Connection to Power
Before Switching on make sure that the voltage of your
electricity supply is the same as that indicated on the rating
plate.
Mains Cord
This appliance may be fitted with a non-rewireable plug. If it is
necessary to change the fuse in a nonrewireable plug the fuse
cover must be refitted. Do not use the plug if the fuse cover is
lost or damaged. If a replacement fuse cover cannot be found,
the plug must be changed with another carrying the same
value fuse.
It is important that the colour of the replacement fuse cover
corresponds with the rating marking on the base of the plug.
If the plug has to be changed because it is not suitable for
your socket, or becomes damaged, it should be cut off and an
appropriate plug fitted following the wiring instructions below.
The plug removed must be disposed of safely as insertion into
a 13A socket is likely to cause an electrical hazard.
For your own safety read the following instructions carefully
before attempting to connect this unit to mains.
The wires in this mains lead are coloured in accordance with
the following code:
BLUE=NEUTRAL, BROWN=LIVE
Important
As the colours of the wires in the mains lead of this appliance
may not correspond with the coloured markings identifying the
terminals in your plug, proceed as follows:
The wire which is coloured blue must be connected to the
terminal which is marked with the letter N or coloured black.
The wire which is coloured brown must be connected to the
terminal which is marked with the letter L or coloured red.
No connection is to be made to the earth terminal of the plug.
If a 13 Amp (BS 1363) Plug is used, a 5 Amp Fuse must be
fitted, or if any other type of Plug is used a 3 or 5 Amp Fuse
must be fitted, either in the Plug or Adaptor, or on the
Distribution Board.
Mains Supply: 220 - 240 V~ 50 Hz - AC only
Do not make any connection to the larger pin marked with the
letter “E” or by the symbol or coloured green or green and
yellow.
Installation Location
For safety and optimum performance of this unit:
• Install the unit in a horizontal and stable position.
• Keep the unit away from electronic equipment such as an
amplifier, TV, etc. to prevent warping,damage, fire and
malfunction.
• Do not place anything directly on top of the unit.
• Shield the unit from direct sunlight and keep away from
sources of intense heat. Avoid dusty or humid locations.
Avoid locations with insufficient ventilation for suitable heat
dissipation. Do not block the ventilation holes on the sides of
the unit. Avoid locations subject to strong vibration or strong
magnetic fields.
Avoid the Hazards of Electrical Shock and Fire
• Do not handle the mains cable with wet hands.
• Do not pull on the mains cable to disconnect it from the AC
outlet. Grasp it by the plug.
• If, by accident, water is spilled on the unit, unplug the mains
cable immediately and take the unit to an authorised service
centre for servicing.
Moisture Condensation Warning
Moisture condensation may occur inside the unit when it is
moved from a cold place to a warm place, after heating a cold
room, or under conditions of high humidity. Do not use the unit
for at least 2 hours to allow the inside to dry.
About Copyright
Unauthorised copying, broadcasting, public performance and
lending of discs are prohibited. This product incorporates
copyright protection technology that is protected by U.S.
patents and other intellectual property rights. Use of this
copyright protection technology must be authorised by
Macrovision, and is intended for home and other limited
viewing uses only unless otherwise authorised by
Macrovision. Reverse engineering or disassembly is
prohibited.
Following information is only for EU-member states:
The use of the symbol indicates that this product may not
be treated as household waste. By ensuring this product is
disposed of correctly, you will help prevent potential
negative consequences for the environment and human
health, which could otherwise be caused by
inappropriate waste handling of this
product. For more detailed information
about recycling of this product, please
contact your local city office, your
household waste disposal service or the
shop where you purchased the product.
Following information is only valid EU-member States:
Disposal of batteries and/or accumulators
The crossed out wheeled dust bin symbol indicates that
batteries and/or accumulators must be collected and
disposed of separately from household waste
. If the battery
or accumulator contains more than the specified values of
lead (Pb), mercury (Hg), and/or cadmium (Cd) defined in
the Battery Directive (2006/66/EC), then the chemical
symbols for lead (Pb), mercury (Hg) and/or cadmium (Cd)
will appear below the crossed out wheeled dust bin
symbol. By participating in separate collection of batteries,
you will help to assure the proper disposal of products and
batteries and thus help to prevent potential negative
consequences for the environment and
human health. For more detailed
information about the collection and
recycling programmes available in your
country, please contact your local city office
or the shop where you purchased the
product.
Do not place the unit on the furniture that is capable of
being tilted by a child and an adult leaning, pulling,
standing or climbing on it. A falling unit can cause serious
injury or even death.
Pb, Hg, Cd
FUSE
BLUE
(Neutral)
BROWN
(Live)
CORD GRIP
OUTER SHEATH OF THE WIRE
E9TK4BD_EN.book Page 3 Wednesday, January 6, 2010 10:05 PM

4
EN
Notice for the Progressive Scan Outputs
Consumers should note that not all high definition television
sets are fully compatible with this product and may cause
artifacts to be displayed in the picture. In case of picture
problems with 480 or 576 progressive scan output, it is
recommended that the user switch the connection to the
‘standard definition’ output. If there are questions regarding
your TV set compatibility with this 480p or 576p product,
please contact our customer service centre.
EU Conformity Statement
“This product is marked with “CE” and complies therefore with
the applicable harmonized European standards listed under
the Low Voltage Directive 2006/95/EC, the EMC Directive
2004/108/EC and ErP Directive 2009/125/EC(2005/32/EC).”
Responsible for CE-marking is
TOSHIBA INFORMATION SYSTEMS (U.K.) LTD, Toshiba
Court, Weybridge Business Park, Addlestone Road,
Weybridge, Surrey, KT15 2UL, United Kingdom
Maintenance
CLEANING THE UNIT
Use a soft cloth slightly moistened with a mild detergent
solution. Do not use solutions containing alcohol, spirits,
ammonia or abrasives.
CLEANING DISCS
If a disc becomes dirty, clean it with a cleaning cloth. Wipe the
disc from the centre out. Do not wipe in a circular motion.
Do not use solvents such as benzine, thinners, commercially
available cleaners, detergent, abrasive cleaning agents or
antistatic spray intended for analogue records.
DISC HANDLING
Handle the discs so that fingerprints and dust do not adhere
to the disc surfaces.
Always store the disc in its protective case when it is not in
use.
SERVICING
If the unit becomes inoperative, do not try to correct the
problem by yourself. There are no user serviceable parts
inside. Turn the unit off, unplug the mains cable, and consult
your dealer or an authorised service centre.
CLEANING THE DISC LENS
If the unit does not perform correctly even though you have
referred to “Troubleshooting” and the relevant sections in the
Owner’s Manual, the laser optical pickup unit may be dirty.
Consult your dealer or an authorised service centre for
inspection and cleaning of the laser optical pickup unit.
AUTO HEAD CLEANING
• Automatically cleans video heads as you insert or remove a
cassette, so you can see a clear picture.
• Playback picture may become blurred or interrupted while
the TV programme reception is clear. Dirt accumulated on
the video heads after a long period of use, or the usage of
rental or worn tapes can cause this problem. If a streaky or
snowy picture appears during playback, the video heads in
the unit may need to be cleaned.
1 Please visit your local Audio / Video store and purchase a
good quality VCR Video Head Cleaner.
2 If a Video Head Cleaner does not solve the problem,
please consult your dealer or an authorised service centre.
Note
• Remember to read the instructions along with the video
head cleaner before use.
• Clean video heads only when problems occur.
Manufactured under license from Dolby
Laboratories. Dolby and the double-D
symbol are trademarks of Dolby
Laboratories.
“Dolby
®
Digital Recording enables consumers to record
high-quality video with stereo sound on recordable DVD
discs. The technology, when utilised instead of PCM
recording, also saves recordable disc space, allowing for
higher video resolution or extended recording time on
each DVD. DVDs created using Dolby Digital Recording
will play back on all DVD-Video players.”
Note: This is true when the players are compatible with
actual recordable DVD discs.
Manufactured under license under U.S.
Patent #: 5,451,942 & other U.S. and
worldwide patents issued & pending. DTS
and the Symbol are registered trademarks
and DTS Digital Out and the DTS logos
are trademarks of DTS, Inc. Product
includes software.
© DTS, Inc. All Rights Reserved.
HDMI, the HDMI Logo, and
High-Definition Multimedia
Interface are trademarks or
registered trademarks of HDMI
Licensing LLC in the United
States and other countries.
DivX
®
, DivX Certified
®
and associated
logos are registered trademarks of
DivX, Inc. and are used under license.
DVB is a registered trademark of the DVB
Project
MPEG Layer-3 audio coding technology licensed from
Fraunhofer IIS and Thomson.
THIS PRODUCT IS LICENSED UNDER THE MPEG-4
VISUAL PATENT PORTFOLIO LICENSE FOR THE
PERSONAL AND NON-COMMERCIAL USE OF A
CONSUMER FOR (i) ENCODING VIDEO IN
COMPLIANCE WITH THE MPEG-4 VISUAL STANDARD
(“MPEG-4 VIDEO”) AND/OR (ii) DECODING MPEG-4
VIDEO THAT WAS ENCODED BY A CONSUMER
ENGAGED IN A PERSONAL AND NON-COMMERCIAL
ACTIVITY AND/OR WAS OBTAINED FROM A VIDEO
PROVIDER LICENSED BY MPEG LA TO PROVIDE
MPEG-4 VIDEO. NO LICENSE IS GRANTED OR SHALL
BE IMPLIED FOR ANY OTHER USE. ADDITIONAL
INFORMATION INCLUDING THAT RELATING TO
PROMOTIONAL, INTERNAL AND COMMERCIAL USES
AND LICENSING MAY BE OBTAINED FROM MPEG LA,
L. L. C. SEE HTTP://WWW.MPEGLA.COM
10_Intro.fm Page 4 Friday, January 8, 2010 4:40 PM

5
EN
Introduction Connections
Basic Setup /
TV View Operation
Playback Editing OthersFunction SetupRecording VCR Functions
• Remote control with 2 R6 (1.5 V) batteries
•RF cable
• Owner’s Manual
• Quick Setup Guide
• Helpline Sheet
Features
The following features are available with this unit.
• Recording up to 12 programmes
• One-touch timer recording:
•PDC: [E Page 34]
• Automatic chapter mark setting: [E Page 31]
• Automatic Playlist making (VR mode DVD-RW discs
only)
• Automatic finalising (video mode DVD-RW/-R, DVD+R
discs only): [E Page 42]
• Automatic title menu making (video, +VR mode only):
[E Page 42]
• DV dubbing:
• Dubbing mode: [E Page 41]
• Theatre surround sound: [E Page 19]
• Quick search: [E Pages 51-52]
• Playback from Original or a Playlist (VR mode DVD-RW
discs only): [E Page 43]
• Virtual Surround System: [E Page 54]
• Playing back data files recorded in a USB device:
[E Page 45]
• Chasing playback during recording and simultaneous
playback and recording: [E Page 50]
• Playing back MP3 / JPEG / DivX
®
files: [E Pages 44-46]
• Quick search: [E Pages 71-72]
• Adding or deleting chapter marks manually:
[E Page 57]
• Creating titles to a Playlist (VR mode DVD-RW discs
only): [E Page 59]
• Deleting titles: [E Page 56]
• Deleting a scene of a title (VR mode DVD-RW discs
only): [E Page 60]
• Editing title name: [E Page 57]
• Combining titles (VR mode DVD-RW discs only):
[E Page 59]
• Dividing titles (VR mode DVD-RW, DVD+RW discs only):
[E Page 59]
• Protecting titles (VR mode DVD-RW discs only):
[E Page 58]
• Adding or deleting chapter marks at once
(video mode DVD-RW discs only): [E Page 58]
• Hiding chapters (+VR mode only): [E Page 58]
• Playing back discs recorded in video mode in any
regular DVD player: [E Page 42]
• Progressive scan system: [E Pages 17, 67]
• HDMI (High-Definition Multimedia Interface):
[E Pages 18, 68]
Accessories Supplied
Recording
DVD VCR
(DVD) [E Page 32]
(VCR) [E Page 71]
DVD
Dubbing
DVD VCR
(DVD) [E Pages 39-40]
(VCR) [E Page 71]
Playback
DVD
VCR
Editing
DVD
Compatibility
DVD
Others
DVD
E9TK4BD_EN.book Page 5 Wednesday, January 6, 2010 10:05 PM

6
EN
Table of Contents
Introduction ...................................................... 2
Precautions ........................................................................ 2
Features ............................................................................. 5
Guide to the Owner’s Manual ............................................. 7
Functional Overview......................................................... 10
Installing Batteries in the Remote Control........................ 12
Switching DVD / VCR mode ............................................. 12
Guide to On-Screen Displays........................................... 13
Front Panel Display Guide................................................ 16
Connections ................................................... 17
Connecting to a TV........................................................... 17
Connecting to External Equipment................................... 19
Digital Audio for Better Sound Quality .............................. 19
Basic Setup / TV View Operation.................. 20
Initial Setting..................................................................... 20
Channel Setting................................................................ 20
TV View Operation ........................................................... 23
Recording........................................................ 28
Information on DVD Recording......................................... 28
Formatting a Disc ............................................................. 30
Selecting the Audio Mode ................................................ 31
Basic Recording and One-touch
Timer Recording (OTR) ................................................. 32
Timer Recording............................................................... 33
Timer Recording (EPG).................................................... 36
Series Link Timer Recording ............................................ 37
Satellite Link ..................................................................... 37
Settings for External Equipment....................................... 38
Information on DV Dubbing .............................................. 39
DVC to DVD Dubbing ....................................................... 40
Dubbing Mode .................................................................. 41
Setting a Disc to Protect................................................... 42
Finalising Discs ................................................................ 42
Playback.......................................................... 43
Basic Playback ................................................................. 43
PBC Function for Video CDs............................................ 47
Special Playback .............................................................. 48
Search .............................................................................. 51
Repeat / Random / Programme Playback / Slide Show ...52
Selecting the Format of Audio and Video......................... 53
Editing ............................................................. 55
Guide to a Title List .......................................................... 55
Editing Discs .................................................................... 56
Function Setup ............................................... 61
General Setting ................................................................ 63
VCR Functions................................................70
Playback........................................................................... 70
Basic Recording and One-touch
Timer Recording (OTR) ................................................. 70
Search.............................................................................. 71
Other Operations.............................................................. 72
Hi-Fi Stereo Sound System ............................................. 72
Others .............................................................. 73
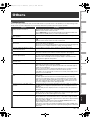
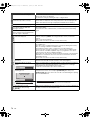
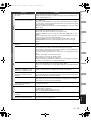
Troubleshooting................................................................ 73
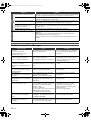
Troubleshooting for Error Messages ................................ 76
Language Code ............................................................... 78
Specifications................................................................... 79
E9TK4BD_EN.book Page 6 Wednesday, January 6, 2010 10:05 PM

7
EN
Introduction Connections
Basic Setup /
TV View Operation
Playback Editing OthersFunction SetupRecording VCR Functions
Guide to the Owner’s Manual
To show what recording mode or media type applies to each
function, the following symbols appear at the beginning of
each operating item.
The following is the description for the symbols for tuner
setting used in this manual.
Symbols Used in the Owner’s Manual
Symbol Description
Available to DVD-videos
Available to DVD-RW discs in video mode
Available to DVD-RW discs in VR mode
Available to DVD-R discs in video mode
Available to DVD+RW discs
Available to DVD+R discs
Available to audio CDs
Available to video CDs
Available to CD-RW/-R discs and USB device with
MP3 files
Available to CD-RW/-R discs and USB device with
JPEG files
Available to DVD-RW/-R, DVD+RW/+R, CD-RW/-R
discs and USB device with DivX
®
files
(DivX
®
files in USB device are not guaranteed.)
Available to VHS tapes
Use only cassettes marked VHS ( )
Symbols for Tuner Setting and
Recording
ANALOG : Settings only for the analogue mode
DVB : Settings only for the DVB mode
DVD-V
DVD-V
DVD-V
DVD-RW
DVD-RW
DVD-RW
Video
DVD-RW
DVD-RW
DVD-RW
VR
DVD-R
DVD-R
DVD-R
DVD+RW
DVD+RW
DVD+RW
DVD+R
DVD+R
DVD+R
CD
CD
CD
VCD
VCD
VCD
MP3
MP3
MP3
JPEG
JPEG
JPEG
DivX
DivX
®
DivX
®
VCR
VCR
VCR
PAL
E9TK4BD_EN.book Page 7 Wednesday, January 6, 2010 10:05 PM

8
EN
DVD players with are capable of playing DVD-RW recorded in VR mode.
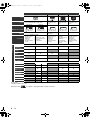
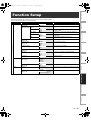
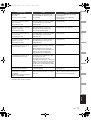
Discs for Recording / Playing
Disc Type DVD-RW DVD-R DVD+RW DVD+R
Logo
Format Can be formatted in VR or video mode
Automatically
formatted in video
mode
Automatically
formatted in +VR
mode
Automatically
formatted in +VR
mode
Video Mode VR Mode
Icon
Maximum Record Time
480 min (12 cm)
144 min (8 cm)
480 min (12 cm)
144 min (8 cm)
480 min (12 cm)
144 min (8 cm)
480 min (12 cm)
144 min (8 cm)
480 min (12 cm)
144 min (8 cm)
Recordable/Playable
Versions
1×-6×
Ver. 1.1/1.2
Ver. 1.1/1.2 CPRM compatible
1×-16×
Ver. 2.0/2.1
1×-4× 1×-16×
Compatibility
Playable on most
DVD players.
Finalisation
necessary.
(Title menu will be
created)
Playable only on VR
mode compatible unit.
Finalisation
recommended.
Playable on most
DVD players.
Finalisation
necessary.
(Title menu will be
created)
Playable on
DVD+RW
compatible players.
Finalisation
recommended.
(Title menu will be
created)
Playable on most
DVD players.
Finalisation
recommended.
(Title menu will be
created)
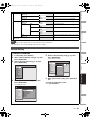
Available Features
Recording Features
Record TV
Programmes
✔ ✔ ✔✔✔
Reuse by Deleting
the Current
Contents
✔✔ ✔
Record 16:9 Size
Pictures
✔✔✔
Record Copy-once
Programmes
✔*
Create Chapters at
Fixed Intervals
(auto chapter)
✔ ✔ ✔✔✔
Editing Features
Playlist Original
Scene Delete
✔✔
Edit Title Name
✔✔✔✔ ✔ ✔
Create Chapters
Wherever You Like
(chapter mark)
✔✔ ✔✔
Divide a Title
✔ ✔
Combine Titles
✔
Hide Chapters
✔✔
Delete a Title
✔✔✔✔ ✔ ✔
Create a Playlist
✔
Protect a Title
✔
✔: Available Grey: Not available
* CPRM compatible disc only.
DVD-RW
DVD-RW
DVD-RW
Video
DVD-RW
DVD-RW
DVD-RW
VR
DVD-R
DVD-R
DVD-R DVD+RW
DVD+RW
DVD+RW DVD+R
DVD+R
DVD+R
E9TK4BD_EN.book Page 8 Wednesday, January 6, 2010 10:05 PM

9
EN
Introduction Connections
Basic Setup /
TV View Operation
Playback Editing OthersFunction SetupRecording VCR Functions
is a trademark of DVD Format/Logo Licensing Corporation.
• ABOUT DIVX VIDEO: DivX
®
is a digital video format created
by DivX,Inc. This is an official DivX Certified device that
plays DivX video. Visit www.divx.com for more information
and software tools to convert your files into DivX video.
• ABOUT DIVX VIDEO-ON-DEMAND: This DivX Certified
®
device must be registered in order to play DivX Video-on-
Demand (VOD) content. To generate the registration code,
locate the DivX VOD section in the device setup menu. Go
to vod.divx.com with this code to complete the registration
process and learn more about DivX VOD.
• DivX Certified
®
to play DivX
®
video, including premium
content.
• Media containing the DivX
®
files with the DivX
®
GMC (Global
Motion Compensation) playback feature, which is DivX
®
supplemental function, cannot be played back on this unit.
The following discs will not play back on this unit.
On the following disc, the sound may not be heard.
• Super audio CD - Only the sound on the CD layer can be
heard. The sound on the high-density super audio CD layer
cannot be heard.
This unit uses the PAL system. However, it is also possible to
play back DVDs using other colour systems, such as NTSC.
This unit has been designed to play DVD with
region 2. If these region symbols do not appear on
your DVD, you cannot play back the DVD in this unit.
The number inside the globe refers to region of the
world.
Following discs are recommended for good recording quality
and are proven to be compatible with this unit.
However, depending on the media condition the unit may not
read the disc properly.
Performance of any other discs are not guaranteed.
Discs for Playing
Disc Type DVD-VIDEO CD-DA Video CD CD-RW CD-R
Logo
Icon
Files for Playing
Type of title MP3 JPEG DivX
®
Icon
Media
CD-RW/-R
USB device
CD-RW/-R
USB device
CD-RW/-R
DVD-RW/-R
DVD+RW/+R
USB device (not guaranteed)
DVD-V
DVD-V
DVD-V CD
CD
CD VCD
VCD
VCD CD
CD
CD CD
CD
CD
MP3
MP3
MP3
JPEG
JPEG
JPEG
DivX
DivX
®
DivX
®
Unplayable Discs
• CD-ROM • Compact Disc-Interactive
(CD-I)
• Video Single Disc (VSD) • DVD-ROM
• DVD-audio • Unfinalised disc
• DVD or CD contains Windows Media™ Audio files
• DVD-RW/-R recorded in non compatible recording format
•Blu-ray Disc •HD DVD
Colour Systems
Region Codes
2
Verbatim DVD+R 8x, DVD+RW 4x, DVD-R 8x, DVD-RW 2x
JVC DVD-RW 4x
Maxell DVD+R 4x/8x/16x, DVD-R 8x/16x
SONY DVD+R 4x/8x/16x, DVD+RW 4x
TDK DVD+R 4x/8x/16x
• Toshiba is not liable for any damage or loss caused
directly or indirectly by the malfunction of this unit,
including, without limitation, any one of the following:
• Failure to record contents intended to be recorded by
the consumer.
• Failure to edit contents as intended by the consumer.
• When a DVD-RW/-R, DVD+RW/+R disc created on
this unit is used (e.g., insertion, playback, recording or
editing) in another DVD player, recorder or personal
computer drive.
• When a DVD-RW/-R, DVD+RW/+R disc that is used in
the manner described in the immediately preceding
bullet point is used again in this unit.
• When a DVD-RW/-R, DVD+RW/+R disc that was
recorded in another DVD recorder, or in a personal
computer drive is used in this unit.
• Some functions may not work with personal computer
discs.
• Discs recorded in this unit may not operate as expected
on other DVD players, recorders or personal computer
drives.
Because of problems and errors that can occur during the
creation of DVD and CD software and/or the manufacture of
DVD and CD discs, Toshiba cannot guarantee that product
will play every feature of every DVD bearing the DVD logo
and/or every CD bearing the CD logo. As one of the
creators of DVD technology, Toshiba DVD players are
manufactured using the highest standards of quality, and as
a result, such incompatibilities are rare.
E9TK4BD_EN.book Page 9 Wednesday, January 6, 2010 10:05 PM

10
EN
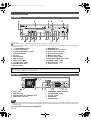
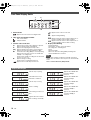
Functional Overview
You can also turn on the unit by pressing these buttons.
You can turn on the unit by pressing these buttons only when a videotape is in this unit.
Press to turn on the unit, or to turn the unit into the standby mode. (To completely shut down the unit, you must unplug the
AC power cord.)
1 B ON\STANDBY button*
3
2 Cassette compartment
3 A OPEN\CLOSE button*
1
(DVD)
4 VCR/DVD indicators
5 Disc tray
6 DV IN jack (AV3)
7 USB input jack
8 I REC button (DVD)
9PLAYB button*
1
(DVD)
10 STOP C button (DVD)
11 SELECT button
12 DUBBING button
13 PROGRAM G\H buttons
14 Display (“Off” in standby)
15 Infrared sensor window
16 I REC button (VCR)
17 PLAY B button*
2
(VCR)
18 STOP/EJECT C / A button (VCR)
19 FWD D button*
2
(VCR)
20 REV E button*
2
(VCR)
21 Power indicator
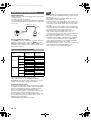
1 Mains cable
2 HDMI OUT jack
3 DIGITAL AUDIO OUT (COAXIAL) jack
4 AUDIO OUT (L\R) jacks
5 COMPONENT VIDEO OUT jacks
6 AV2 (DECODER) socket
7 AV1 (TV) socket
8 ANTENNA IN
9 ANTENNA OUT
Note
• Do not touch the inner pins of the jacks on the rear panel. Electrostatic discharge may cause permanent damage to the unit.
• After turning off the unit, leave the mains cable plugged for about one minute. Otherwise it may cause data loss or the unit may
not work properly.
• This unit does not have an RF modulator.
Front Panel
VCR
DVD
PROGRAM
DUBBING
SELECT
DVD
DVDVCR
VCR
USB
DV IN
1*
3
20
*
2
19
*
2
21
18 16 11 9
*
1
2
3*
1
54
1517
*
2
14 13 12 10 8
7 6
Button names described in the Owner’s Manual
The instructions in this manual are described mainly with the operations using the remote control. Some operations can be
carried out using the buttons on the front panel.
Rear Panel
1 3 456 87 92
E9TK4BD_EN.book Page 10 Wednesday, January 6, 2010 10:05 PM

11
EN
Introduction Connections
Basic Setup /
TV View Operation
Playback Editing OthersFunction SetupRecording VCR Functions
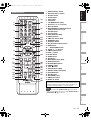
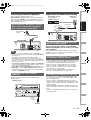
1 OPEN\CLOSE A button
2 INPUT SELECT F button
3 Number buttons
4 SETUP button
5 TEXT button
6 VCR button
7 TOP MENU button (DVD)
8 Direction
K / L / 0 / 1 buttons
9 DISPLAY button
10 RED/GREEN/YELLOW/BLUE button
SEARCH (BLUE) button (VCR)
11 REV E button
12 PLAY B button
13 SKIP H button (DVD)
14 PAUSE F button
15 TIME SLIP button (DVD)
16 DUBBING button
17 SUBTITLE button
18 AD (Audio Description) button
19 HDMI button
20 B ON/STANDBY button
21 PROG. G\H buttons
22 TIMER PROG. button
23 INFO C button
24 CLEAR button
25 GUIDE button
26 DVD button
27 DISC MENU button (DVD)
28 ENTER/OK button
29 RETURN/BACK button
30 FWD D button
31 STOP C button
32 SKIP G button (DVD)
33 INSTANT SKIP button (DVD)
34 SAT.LINK button
35 REC I button
36 REC MODE button
37 TIMER SET button
38 AUDIO D button
Note
• If you turn off this unit, [OPEN\CLOSE A] on the remote
control is not available. Be sure to use [A OPEN\CLOSE] or
[STOP\EJECT C \ A] on the unit.
Remote Control
1
19
20
21
22
23
24
25
26
27
28
29
30
31
32
33
34
35
36
37
38
2
3
4
5
6
7
8
9
10
11
13
14
15
17
12
16
18
Button names described in the Owner’s Manual
The instructions in this manual are described mainly with the
operations using the remote control. Some operations can
be carried out using the buttons on the front panel.
E9TK4BD_EN.book Page 11 Wednesday, January 6, 2010 10:05 PM

12
EN
Installing Batteries in the Remote
Control
Install 2 R6 (1.5 V) batteries (supplied) into the remote
control, carefully match with the polarity indicated inside the
battery compartment.
Caution
• Incorrect use of batteries can result in hazards such as
leakage and bursting.
• Do not mix new and old batteries together.
• Do not use different kinds of batteries together.
• Make sure that the plus (+) and minus (–) ends of each
battery match the indications inside the battery
compartment.
• Remove batteries if the equipment will not be used for a
month or more.
• When disposing used batteries, please comply with
governmental regulations or the public instructions for
environmental protection that apply in your country or area.
• Do not recharge, short-circuit, heat, burn or disassemble
batteries.
• Make sure there is no obstacle between the remote control
and the remote control sensor on the unit.
• Use within the operating range and angle as shown.
• The maximum operable range as follows:
• Remote control operation may become unreliable if the
remote control sensor of the unit is being exposed by the
strong sunlight or fluorescent light.
• Remote controls for different devices can interfere with each
other. Be careful when using remote controls for other
equipment located close to the unit.
• Replace the batteries when the operating range of the
remote control reduces.
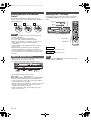
Switching DVD / VCR mode
You must select which component you want to operate first.
Press [DVD] or [VCR] on the remote control or the front
panel.
Press [DVD] on the remote control.
Press [VCR] on the remote control.
Note
• You can also press [SELECT] on the front panel to switch
between DVD and VCR mode.
About the Remote Control
Line of sight: approximately 7 m
Either side of centre: approximately 7 m within 30 degrees
21 3
VCR
DVD
Within
about 7 m
7 m (30°)7 m
7 m (30°)
DVD
VCR
VCR DVD
PROGRAM
DUBBING
SELECT
DVD
DVDVCR
VCR
USB
DV IN
SELECT
DVDVCR
Device select indicators
indicator
DVD button
VCR button
button
E9TK4BD_EN.book Page 12 Wednesday, January 6, 2010 10:05 PM

13
EN
Introduction Connections
Basic Setup /
TV View Operation
Playback Editing OthersFunction SetupRecording VCR Functions
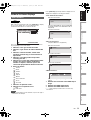
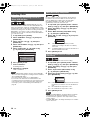
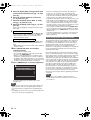
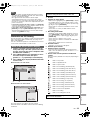
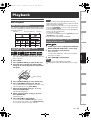
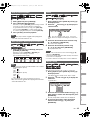
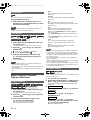
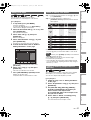
Guide to On-Screen Displays
Press [DVD] first.
With a disc inserted into the unit, press [DISPLAY] to display
the on-screen display. The on-screen display shows
information about what is recorded on the disc.
This is an example screen for explanation. Displayed items
vary depending on the actual mode.
1 Indicates a disc type and format mode.
2 Indicates a type of titles for VR mode DVD-RW
disc.
3 Indicates a channel number, station name
(analogue channel only) or selected external
input mode.
4 Indicates a recording mode and possible
recording time left.
5 Indicates the current title number/total number
of titles, the current chapter number/total
number of chapters, and time lapse of the
current title playback/total duration of the title.
6 Each icon means:
7 Indicates an operation status.
8 Indicates the component in use.
: DVD
: USB device
Note
• For some descriptions on this manual, only one disc type is
indicated as an example.
Press [DISPLAY] repeatedly while the display menu is
displayed to display the following information.
1 Indicates the resolution of the HDMI output
image.
2 Indicates the HDMI video format.
3 Indicates the HDMI audio format.
• “- - -” will be displayed, when it does not have any
information.
DISPLAY Menu
DVD
: Search
: Audio
: Subtitle
: Angle
: Repeat
: Marker
: Noise Reduction
: Zoom
: Surround
1/ 5 1/ 5
-
R W VR ORG
0:01:00 / 1:23:45
2
2
2
8
8
8
5
5
5
6
6
6
1
1
1
3
7
1 BBC1
T C
SP 1:53
4
<Title / File Name Information>
Title name information
(only when DVD+RW/+R, VR mode DVD-RW
or unfinalised video mode DVD-RW/-R disc is
in playback)
File name information
(only when MP3/JPEG/DivX
®
files is in
playback)
<MP3 Tag Information>
(only when MP3 file is in playback)
Title name information
Artist name information
Album name information
<HDMI Information>
(only for the images output through the HDMI
output)
Title Name
My Title
&ILE.AME
-Y&ILE
4ITLE.AME
!RTIST.AME
!LBUM.AME
P
9#B#R
6IDEO)NFO
!UDIO)NFO
"ITSTREAM
E9TK4BD_EN.book Page 13 Wednesday, January 6, 2010 10:05 PM

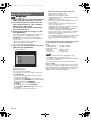
14
EN
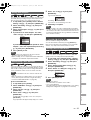
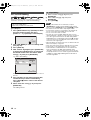
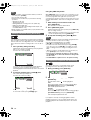
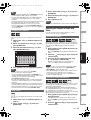
While in the VCR mode, the on screen display of the VCR
mode is displayed.
Press [VCR] first.
Press [DISPLAY] to display the on screen display.
.
1 Current time
2Position number
3 Audio status of the receiving broadcast or
external equipment
4 Audio status of the currently playing back
videotape
5 Tape counter
6 Recording or playing back speed
7 Status of the current tape
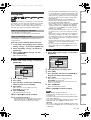
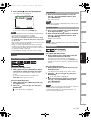
Press [INFO C] while viewing a DVB programme to display
the programme information.
1 Audio language
2 Channel number
3 Channel name
4 Current time and day
5 Next programme information
6 Current programme information
The window will automatically exit after 4 seconds, or press
[RETURN/BACK] to exit.
While the window appears, press [INFO C] again to display
more information. Press [RETURN/BACK] to exit.
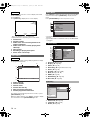
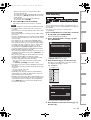
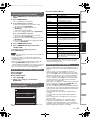
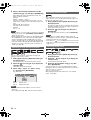
Press [SETUP] to display the main menu. Then use [K \ L] to
select a menu and press [ENTER\OK] to display the sub
menu.
Press [RETURN/BACK] to return to previous screen.
• is displayed when a disc with CD-DA/VCD/MP3/JPEG is
inserted.
• is displayed when a USB flash memory with MP3/JPEG
is plugged.
1 Playback: [E Page 64]
2Display: [E Page 66]
3Video: [E Page 67]
4 Recording: [E Pages 30-32, 38, 41, 42]
5Clock: [E Page 67]
6Channel: [E Pages 20-26]
7DivX: [E Pages 46, 68]
8 HDMI: [E Page 68]
9 DVB Setting: [E Page 69]
10 Reset All: [E Page 69]
1 Adult Lock: [E Page 69]
2Language: [E Page 69]
3 About: [E Page 69]
VCR
INFO Menu
DVB
0:00:00 STEREO
AV2
STEREO
12:00
SP
7
11
22
33
44
55
7
66
This is an example screen for explanation.
Displayed items are depending on the actual mode.
11:23 – 12:20
11:53 Mon
Stereo AD Sub Entertainment 27 min left
12:20 – 12:25
NOW:
13 Channel 4+1
English
NEXT:
Castle
Burning Questions
2
1
6
5
3
4
Main Menu
General Setting
DVB Setting
Setup
Timer Programming
Title List
DVD Menu
General Setting
DISC Playback Mode
USB Playback Mode
1
2
3
4
5
6
7
8
9
10
HDMI
DVB Setting
General Setting
Playback
Display
Video
Recording
Clock
Channel
DivX
Parental Lock
Audio Out
Disc Menu Language
Audio Language
Subtitle Language
Angle Icon
Still Mode
TV System
Reset All
Playback
Display
Video
Recording
Clock
Channel
DivX
HDMI
DVB Setting
Adult Lock
Language
General Setting
About
Reset All
1
2
3
E9TK4BD_EN.book Page 14 Wednesday, January 6, 2010 10:05 PM

15
EN
Introduction Connections
Basic Setup /
TV View Operation
Playback Editing OthersFunction SetupRecording VCR Functions
To programme a timer recording. [E Page 33]
To call up the title list. [E Page 55]
1 Format (DVD-RW, DVD+RW only):
[E Pages 30, 31]
2Finalise: [E Page 42]
3 Disc Protect (VR mode DVD-RW, DVD+RW/+R
disc only):
[E Page 42]
4 Delete All Playlists (VR mode DVD-RW disc
only):
[E Page 60]
Audio CD / video CD
1Random Play: [E Page 52]
2 Programme Play: [E Page 53]
3 PBC (Video CD only): [E Page 48]
CD-RW/-R with MP3 / JPEG files
4 Music (MP3 files): [E Page 52]
5 Photo (JPEG files): [E Pages 52, 53]
6Slide Show: [E Page 53]
1 Music (MP3 files): [E Page 52]
2 Photo (JPEG files): [E Pages 52, 53]
Timer Programming
Title List
DVD Menu
1
2
3
4
Format
Finalise
Disc Protect OFF ON
Delete All Playlists
DVD Menu
DISC Playback Mode
USB Playback Mode
1
2
3
DISC Playback Mode
Random Play
Programme Play
PBC (Video CD only)
DISC Playback Mode
Music
Photo
Random Play
Slide Show
4
5
1
6
USB Playback Mode
Music
Photo
Random Play
Slide Show
2
1
E9TK4BD_EN.book Page 15 Wednesday, January 6, 2010 10:05 PM

16
EN
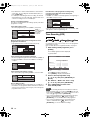
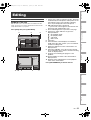
Front Panel Display Guide
1 DTV indicator
2 Title / Track and Chapter number
3 Current status of the unit
4 Displays the following
• Playing back time
• Current title / chapter / track / file number
• Recording time / remaining time
•Clock
• Channel number
• One-touch Timer Recording (OTR) remaining time
• Selected HDMI video resolution
Note
• Except when satellite recording is in standby, front panel
display stays off while the unit is in power off / timer-standby
mode.
This is a new Power Save (ECO) feature.
The disc tray is opening.
The PBC function of the
video CD is activated.
The disc tray is closing.
A disc is loading.
Data is being recorded on a
disc.
Appears when the satellite
link recording is in standby.
Appears when HDMI video
resolution (480p) is
selected.
Appears when HDMI video
resolution (576p) is
selected.
Appears when HDMI video
resolution (720p) is
selected.
Appears when HDMI video
resolution (1080i) is
selected.
Appears when HDMI video
resolution (1080p) is
selected.
DB
DTV
DVD
VCR
4
3
2
1
: Appears when the channel is in digital mode.
: Title / track number
: Chapter number
F: Appears when a tape or disc playback is paused.
Appears during step by step playback.
B: Appears when playing back a tape or disc.
F B: Appears during slow forward / reverse playback.
: Appears when the timer programming or One-
touch Timer Recording (OTR) is set and operating.
Appears when the unit goes into the satellite link
standby or recording mode.
Flashes when satellite recording was not executed
because of some error.
I: Appears during recording.
Flashes when recording being paused.
: Appears when a videotape is in this unit.
: Appears when a disc is in this unit.
: Appears during dubbing.
:Appears when this unit is in DVD output mode, or
the timer-standby mode for DVD recording.
:Appears when this unit is in VCR output mode, or
the timer-standby mode for VCR recording.
DB
DVD
V
CR
Display Messages
DVD
DVD
DVD
DVD
DVD
DVD
DVD
DVD
DVD
DVD
DVD
E9TK4BD_EN.book Page 16 Wednesday, January 6, 2010 10:05 PM

17
EN
Introduction Connections Playback Editing OthersFunction SetupRecording VCR Functions
Basic Setup /
TV View Operation
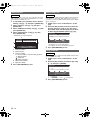
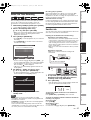
Connecting to a TV
Connect the unit to a TV after considering the capabilities of
your existing equipment.
Connect the antenna or cable to the ANTENNA
IN jack of this unit.
Connect the ANTENNA OUT jack of this unit to
the Aerial jack of your TV.
Connect AV1 (TV) Scart socket of this unit to
the Scart socket of your TV.
Note
• If your TV does not have a Scart socket, use a Scart/RCA
cable to connect.
• Connect this unit directly to the TV. If the AV cables are
connected to a VCR, pictures may be distorted due to the
copy protection system.
• Analogue teletext can only be output in VCR mode through
AV1 (TV) out. Use TV remote control to decode the
analogue teletext.
• When changing the “Video Out” setting (“SCART (RGB)”,
“Component (Interlace)” or “Component (Progressive)”),
connect to the corresponding jack on the TV. If the setting is
changed, for example, to “Component (Interlace)” or
“Component (Progressive)” while the scart cable is
connected to the TV, a distorted video signal may be output.
If your TV has component video input jacks, use a component
video cable (to connect the COMPONENT VIDEO OUT jacks)
and an audio cable (to connect the AUDIO OUT (L\R) jacks).
When using this type of connection, “Video Out” setting
should be set to “Component (Progressive)” or “Component
(Interlace)”. Refer to “Video Out” on page 67.
• Component connection provides the better quality picture.
Connect the COMPONENT VIDEO OUT jacks of
this unit to the component video input jacks of
your TV.
Connect the AUDIO OUT (L\R) jacks of this unit
to the analogue audio input jacks of your TV.
• After you have made the connections, set the “Video Out”
setting. (See page 67.)
Selecting Progressive Scan (576p/480p or
Interlaced 576i/480i) Playback
• If your TV is compatible with progressive scanning (576p/
480p), connect the TV to the COMPONENT VIDEO OUT
jacks of this unit and set “Video Out” setting to “Component
(Progressive)” in “Setup” menu. (See page 67.) Next, set
your TV to the progressive scan mode.
• If your TV is not compatible with progressive scan, set
“Video Out” setting to “Component (Interlace)”.
• Use a commercially available adaptor if the video input jacks
of your TVs or monitors are the BNC type.
• Only component and HDMI connections are compatible with
the Progressive Scan.
Connections
Before installation, unplug your TV and
this unit
Using the Scart socket
1
2
RF cable
(not supplied)
RF cable
(supplied)
Cable
Signal
or
To A e r i a l ja ck
Antenna
1
2
Scart cable
(not supplied)
Scart/RCA cable (not supplied)
Audio/video cable
(not supplied)
Scart adaptor
(not supplied)
Using the COMPONENT VIDEO OUT
Jacks and the AUDIO OUT (L\R) Jacks
YPB/CB PR/CR
1
2
Audio IN
Component
video IN
Audio cable
(not supplied)
Component
video cable
(not supplied)
1
2
E9TK4BD_EN.book Page 17 Wednesday, January 6, 2010 10:05 PM

18
EN
[HDMI CONNECTION]
• HDMI outputs the video / audio signals without converting to
analogue signals.
• No audio connections is required.
• Use the HDMI cable (commercially available) for connection.
• Connect the HDMI output jack of this unit to the HDMI input
jack of TV.
Selecting HDMI video resolution
Press [HDMI] to select the HDMI video resolution. The video
resolution changes as follows every time [HDMI] is pressed.
576p (PAL) / 480p (NTSC) J 720p J 1080i J 1080p
(An HDMI video resolution that is not supported by the display
device will be skipped.)
For audio CD, video CD and MP3 files, 2 channel PCM will be
output regardless of the “Dolby Digital” setting.
If the connected device is not compatible with HDMI
BITSTREAM, audio will be output as PCM even if you select
“Stream” in “Dolby Digital” setting. (See page 65.)
Copyright protection system
To play back the digital video images of a DVD via an HDMI
connection, it is necessary that both the player and the display
device (or an AV amplifier) support a copyright protection
system called HDCP (high-bandwidth digital content
protection system). HDCP is copy protection technology that
comprises data encryption and authentication of the
connected AV device. This unit supports HDCP. Please read
the operating instructions of your display device (or AV
amplifier) for more information.
* HDMI: High Definition Multimedia Interface
Note
• Because HDMI is an evolving technology, it is possible that
some devices with an HDMI input may not operate properly
with this unit.
• When using an HDCP-incompatible display device, the
image will not be viewed properly.
• Among the devices that support HDMI, some devices can
control other devices via the HDMI connector; however, this
unit cannot be controlled by another device via the HDMI
connector.
• The audio signals from the HDMI connector (including the
sampling frequency, the number of channels and bit length)
may be limited by the device that is connected.
• Among the monitors that support HDMI, some do not
support audio output (for example, projectors). In
connections with device such as this unit, audio signals are
not output from the HDMI output connector.
• When this unit’s HDMI connector is connected to a DVI-D
compatible monitor (HDCP compatible) with an HDMI-DVI
conversion cable, the signals are output in digital RGB.
• If the connected equipment is not compatible with HDMI
BITSTREAM, DTS sound will not be output.
• When the power failure occurs, or when you unplug the unit,
some problems in the HDMI setting might occur.
Please check and set the HDMI setting again.
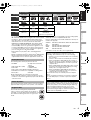
Using an HDMI Compatible Port
Actual Output Modes by Media
Audio recording format of
the disc
Dolby Digital / DTS /
MPEG setting of this
unit
Actual output
DVD-video
Dolby
Digital
PCM 2 channel PCM
Stream Dolby Digital
LPCM
PCM
2 channel PCM
Stream
DTS
®
ON DTS
®
OFF -
MPEG
PCM 2 channel PCM
Stream MPEG
DivX
®
Dolby
Digital
PCM 2 channel PCM
Stream Dolby Digital
MP3
PCM
2 channel PCM
Stream
MP2
PCM 2 channel PCM
Stream MPEG
HDMI IN
TV
To HDMI
input jack
this unit
HDMI cable (not supplied)
E9TK4BD_EN.book Page 18 Wednesday, January 6, 2010 10:05 PM

19
EN
Introduction Connections Playback Editing OthersFunction SetupRecording VCR Functions
Basic Setup /
TV View Operation
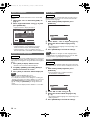
Connecting to External Equipment
This unit has three input terminals. Press
[INPUT SELECT F] repeatedly to select the external input
mode, then press [PROG. G\H] repeatedly to select AV1,
AV2 or DV(AV3). Be sure that all the units are switched off
before making connections.
Note
• When you record a TV programme from a Satellite Box /
decoder, you must connect a Scart cable to AV2 (DECODER).
(See page 37.)
• The signal from the external device will be output
automatically when the TV is connected to AV1 and the
external device is connected to AV2 using a Scart cable with
its power on. (However, it will not be output when this unit’s
power is turned off.)
If you want to monitor this unit’s signal, press [DISPLAY]
or turn the external device off. (The signal from this unit can
only be monitored during playback.)
If you want to monitor the signal from other input, press
[DISPLAY], then press [INPUT SELECT F] to select the
desired external input mode, then select the desired input
channel using [PROG. G\H].
When connecting a DV-camcorder, use DV input jack of
DV(AV3) (Front).
Digital Audio for Better Sound Quality
For clear digital sound quality, use the DIGITAL
AUDIO OUT (COAXIAL) jack to connect your digital
audio equipment.
If the audio format of the digital output does not match the
capabilities of your receiver, the receiver will produce a strong,
distorted sound or no sound at all.
• Connecting multi-channel Dolby Digital decoder allows you
to enjoy the Multi-channel Dolby Digital surround system as
well as DTS decoder, Multi-channel surround system.
• After connecting to a Dolby Digital decoder, set “Dolby
Digital” to “Stream” in “Audio Out” menu. (See page 65.)
• After connecting to a DTS decoder, set “DTS” to “ON” in
“Audio Out” menu. (See page 65.)
• After connecting to a MPEG decoder, set “MPEG” to
“Stream” in “Audio Out” menu. (See page 65.)
• The audio source recorded in Dolby Digital Multi-channel
surround format cannot be recorded using an MD or DAT
deck as a digital sound.
• If not connected to a Dolby Digital decoder, set “Dolby
Digital” to “PCM” in “Audio Out” menu. Playing back a DVD
using incorrect settings may generate noise distortion and
damage speakers.
• Set “Dolby Digital” and “MPEG” to “PCM” and set “DTS” to
“OFF” in “Audio Out” menu for connecting to an MD or DAT
deck.
• You can use AUDIO OUT (L\R) jacks for the connection of
your audio system.
Recording from a DVD player, Satellite
Box or other Audio-Video equipment
with a Scart output socket (AV2)
Recording from a DV-camcorder
(DV(AV3))
AV output jack
(Scart)
Scart cable (not supplied)
AV2 (DECODER)
VCR DVD
PROGRAM
DUBBING
SELECT
DVD
DVDVCR
USB
DV IN
DV(AV3) (Front)
DV cable
(4-pin)
(not supplied)
DV OUT
The connections illustrated above are
optional for better sound
Connecting a Dolby Digital™ decoder,
DTS decoder or MPEG decoder
Connecting to an MD deck or DAT deck
COAXIAL
COAXIAL
Dolby Digital decoder,
DTS decoder or
MPEG decoder, etc.
Digital audio
input jack
Coaxial cable
(not supplied)
E9TK4BD_EN.book Page 19 Wednesday, January 6, 2010 10:05 PM

20
EN
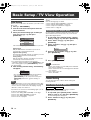
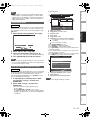
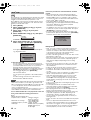
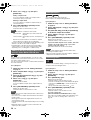
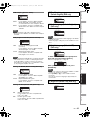
Initial Setting
When you turn on this unit for the first time, you need to follow
these steps.
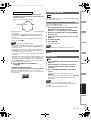
1 Press [B ON\STANDBY].
2 Turn the TV on. Select the input to which the
unit is connected.
3 Select your desired tuning type according to
your area using [K \ L], then press
[ENTER\OK].
The unit will start getting channels available in your area.
Digital tuning:
Only the DVB channels receivable in your area are
automatically scanned and memorised.
Digital & Analog tuning:
Both analogue and DVB channels receivable in your area
are scanned and memorised automatically.
Analog tuning:
Only the analogue channels receivable in your area are
automatically scanned and memorised.
• If no channel has been memorised, the antenna
confirmation display will appear. Press [ENTER\OK] to start
auto scanning again or press [RETURN/BACK] to cancel
the initial settings.
4 After finishing channel setting, “Clock Setting”
will appear.
• The current date and time will appear automatically.
•
If the current date and time are correct, press
[RETURN/BACK]
to exit, if they are incorrect, press
[ENTER\OK]
and follow to “
Clock Setting” on
page 67
.
Note
• After “Initial Setting”, if you need to unplug the mains cable,
make sure to turn off the power first and leave it in standby
mode for at least 1 minute before attempting to unplug.
Otherwise, it may cause data loss.
If you want to set each item of “Initial Setting” again, you can
set them at “General Setting”.
• Refer to “Auto Tuning (DVB & ANALOG)” on this page.
• Refer to “Auto Tuning (ANALOG)” on page 21.
• Refer to “Auto Tuning (DVB)” on page 22.
• Refer to “Clock” on page 67.
Also you can customize the memorised channel at “General
Setting”.
Refer to following pages for details.
• Refer to “Manual Tuning (ANALOG)” on page 21.
• Refer to “Manual Tuning (DVB)” on page 22.
• Refer to “Skip a Preset Channel” on page 22.
• Refer to “Move” on page 22.
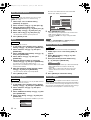
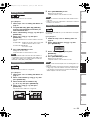
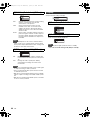
Use this feature to adjust the aspect ratio of the video source
which is different from your TV’s ratio to fit your TV monitor
without distorting the picture.
1 In stop mode, press [SETUP]. Select “General
Setting” using [K \ L], then press [ENTER\OK].
2 Select “Video” using [K \ L], then press
[ENTER\OK].
3 Select “TV Aspect” using [K \ L], then press
[ENTER\OK].
4 Select the desired option using [K \ L], then
press [ENTER\OK].
5 Press [SETUP] to exit.
Note
If you have a standard TV:
• Select “4:3 Letter Box” for a full width picture with black
bars at the top and bottom.
• Select “4:3 Pan & Scan” for a full height picture with both
sides trimmed.
If you have a wide screen TV:
• Select “16:9 Wide”.
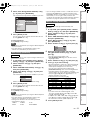
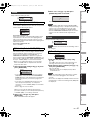
Channel Setting
You can retune this unit or edit the channel setting with
following methods.
Programme the tuner to scan both analogue and DVB
channels you can receive in your area.
1 In stop mode, press [SETUP]. Select “General
Setting” using [K \ L], then press [ENTER\OK].
“General Setting” menu will appear.
2 Select “Channel” using [K \ L], then press
[ENTER\OK].
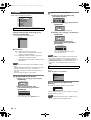
Basic Setup / TV View Operation
Auto Tuning
Make sure the antenna is
connected to “ANTENNA IN” jack.
Digital tuning
Digital & Analog tuning
Analog tuning
&2)
#LOCK3ETTING
Selecting the TV Aspect Ratio
Auto Tuning (DVB & ANALOG)
DVB ANALOG
TV Aspect
Video Out
46!SPECT
,ETTER"OX
0AN3CAN
7IDE
E9TK4BD_EN.book Page 20 Wednesday, January 6, 2010 10:05 PM
Page is loading ...
Page is loading ...
Page is loading ...
Page is loading ...
Page is loading ...
Page is loading ...
Page is loading ...
Page is loading ...
Page is loading ...
Page is loading ...
Page is loading ...
Page is loading ...
Page is loading ...
Page is loading ...
Page is loading ...
Page is loading ...
Page is loading ...
Page is loading ...
Page is loading ...
Page is loading ...
Page is loading ...
Page is loading ...
Page is loading ...
Page is loading ...
Page is loading ...
Page is loading ...
Page is loading ...
Page is loading ...
Page is loading ...
Page is loading ...
Page is loading ...
Page is loading ...
Page is loading ...
Page is loading ...
Page is loading ...
Page is loading ...
Page is loading ...
Page is loading ...
Page is loading ...
Page is loading ...
Page is loading ...
Page is loading ...
Page is loading ...
Page is loading ...
Page is loading ...
Page is loading ...
Page is loading ...
Page is loading ...
Page is loading ...
Page is loading ...
Page is loading ...
Page is loading ...
Page is loading ...
Page is loading ...
Page is loading ...
Page is loading ...
Page is loading ...
Page is loading ...
Page is loading ...
Page is loading ...
-
 1
1
-
 2
2
-
 3
3
-
 4
4
-
 5
5
-
 6
6
-
 7
7
-
 8
8
-
 9
9
-
 10
10
-
 11
11
-
 12
12
-
 13
13
-
 14
14
-
 15
15
-
 16
16
-
 17
17
-
 18
18
-
 19
19
-
 20
20
-
 21
21
-
 22
22
-
 23
23
-
 24
24
-
 25
25
-
 26
26
-
 27
27
-
 28
28
-
 29
29
-
 30
30
-
 31
31
-
 32
32
-
 33
33
-
 34
34
-
 35
35
-
 36
36
-
 37
37
-
 38
38
-
 39
39
-
 40
40
-
 41
41
-
 42
42
-
 43
43
-
 44
44
-
 45
45
-
 46
46
-
 47
47
-
 48
48
-
 49
49
-
 50
50
-
 51
51
-
 52
52
-
 53
53
-
 54
54
-
 55
55
-
 56
56
-
 57
57
-
 58
58
-
 59
59
-
 60
60
-
 61
61
-
 62
62
-
 63
63
-
 64
64
-
 65
65
-
 66
66
-
 67
67
-
 68
68
-
 69
69
-
 70
70
-
 71
71
-
 72
72
-
 73
73
-
 74
74
-
 75
75
-
 76
76
-
 77
77
-
 78
78
-
 79
79
-
 80
80


Toshiba DVR20DTKB Owner's manual
- Category
- DVD players
- Type
- Owner's manual
Ask a question and I''ll find the answer in the document
Finding information in a document is now easier with AI
Related papers
Other documents
-
Pioneer DV-220-K Operating instructions
-
Sanyo HVR-DX625H User manual
-
-
Funai WL6D-M102 Owner's manual
-
Durabrand ADB2737BD Quick Setup Manual
-
Hitachi DV-PF5EUK User manual
-
Technicolor - Thomson DTH614 User manual
-
Orion 21FVD User manual
-
LOEWE 69510T00 Datasheet
-
Panasonic Diga DMR-EZ47V Operating Instructions Manual