Sharp AN-PR1500H Specification

Category
Home cinema systems
Type
Specification

This manual is also suitable for

1 2 3
4 5 6
7 8 9
+100
ITALIANO
Leggere le
pagine i a xii e
I-1 a I-62.
NEDERLANDS
Raadpleeg de
bladzijden i t/m xii
en N-1 t/m
N-62.
PORTUGUÊS
Favor consultar
as páginas i a xii
e P-1 a P-62.
ENGLISH
Please refer to
pages i to xii and
E-1 to E-62.
AN-PR1500H
HOME CINEMA RACK SYSTEM
MEUBLE HOME CINÉMA SURROUND 2.1
SISTEMA HOME CINEMA TIPO RACK
HEMMABIO RACKSYSTEM
CASALINGO CINEMA ATTACCAPANNI SISTEMA
THUISBIOSCOOP RACKSYSTEEM
SISTEMA DE PRATELEIRAS PARA CINEMA EM CASA
HOME CINEMA RACK SYSTEM
DEUTSCH
Siehe Seiten i
bis xii und D-1 bis
D-62.
FRANÇAIS
Se reporter aux
pages i à xii et F-1
à F-62.
ESPAÑOL
Consulte las
páginas i a xii y
S-1 a S-62.
SVENSKA
Hänvisa till
sidorna i till xii
och V-1 till V-62.
MODELL
MODÈLE
MODELO
MODELL
MODELLO
MODEL
MODELO
MODEL
BEDIENUNGSANLEITUNG
MODE D’EMPLOI
MANUAL DE MANEJO
BRUKSANVISNING
MANUALE DI ISTRUZIONI
GEBRUIKSAANWIJZING
MANUAL DE OPERAÇÃO
OPERATION MANUAL
Note: This product is not compatible with MTP and AAC file systems.
AN-PR1500H_EN.indd 1AN-PR1500H_EN.indd 1 4/10/08 2:29:23 PM4/10/08 2:29:23 PM
E-1
AN-PR1500H
ENGLISH
General Information
Introduction
Thank you for purchasing this SHARP product. To obtain the best performance from this product, please read this manual carefully. It will guide you in operating your SHARP
product.
Special Note
Supply of this product does not convey a license nor imply any right to distribute content created with this product in revenue-generating broadcast systems (terrestrial, satellite,
cable and/or other distribution channels), revenue-generating streaming applications (via Internet, intranets and/or other networks), other revenue-generating content distribution
systems (pay-audio or audio-on-demand applications and the like) or on revenue-generating physical media (compact discs, digital versatile discs, semiconductor chips, hard
drives, memory cards and the like). An independent license for such use is required. For details, please visit http://mp3licensing.com
MPEG Layer-3 audio coding technology licensed from Fraunhofer IIS and Thomson.
Contents
Page
General Information
Accessories . . . . . . . . . . . . . . . . . . . . . . . . . . . . . . . . . . . . . . . . . . . . . . . 2
Precautions . . . . . . . . . . . . . . . . . . . . . . . . . . . . . . . . . . . . . . . . . . . . . . . 3
Controls and indicators . . . . . . . . . . . . . . . . . . . . . . . . . . . . . . . . . . 4 - 8
Description of discs . . . . . . . . . . . . . . . . . . . . . . . . . . . . . . . . . . . . 9 - 10
Preparation for Use
System connections . . . . . . . . . . . . . . . . . . . . . . . . . . . . . . . . . . . .11 - 12
Connecting to a conventional TV/monitor . . . . . . . . . . . . . . . . . . . . . 13
Audio connection to other equipment . . . . . . . . . . . . . . . . . . . . . . . . . 14
AC power connection . . . . . . . . . . . . . . . . . . . . . . . . . . . . . . . . . . . . . . 15
Remote control . . . . . . . . . . . . . . . . . . . . . . . . . . . . . . . . . . . . . . . . . . . 16
Changing the set up menu . . . . . . . . . . . . . . . . . . . . . . . . . . . . . . 17 - 23
General control . . . . . . . . . . . . . . . . . . . . . . . . . . . . . . . . . . . . . . . 24 - 25
Setting the clock (Remote Control only) . . . . . . . . . . . . . . . . . . . . . . . 26
Basic Operation
Enjoying surround sound (sound mode) . . . . . . . . . . . . . . . . . . 27 - 30
DVD Operation
Playing a disc . . . . . . . . . . . . . . . . . . . . . . . . . . . . . . . . . . . . . . . . 31 - 33
Basic operation . . . . . . . . . . . . . . . . . . . . . . . . . . . . . . . . . . . . . . . 34 - 35
Useful operation . . . . . . . . . . . . . . . . . . . . . . . . . . . . . . . . . . . . . . 36 - 40
Page
CD, CD-R and CD-RW Operation
Listening to a CD or MP3/WMA disc . . . . . . . . . . . . . . . . . . . . . . . . . . 41
Advanced CD or MP3/WMA disc playback . . . . . . . . . . . . . . . . . . . . . 42
DivX and JPEG disc operation . . . . . . . . . . . . . . . . . . . . . . . . . . 43 - 44
USB Memory Playback
Playback on USB memory device . . . . . . . . . . . . . . . . . . . . . . . . . . . . 45
To remove USB memory device . . . . . . . . . . . . . . . . . . . . . . . . . 45 - 46
Advanced USB playback . . . . . . . . . . . . . . . . . . . . . . . . . . . . . . . 46 - 47
Radio Operation
Listening to the radio . . . . . . . . . . . . . . . . . . . . . . . . . . . . . . . . . . 47 - 48
Advanced Features
Using the Radio Data System (RDS) . . . . . . . . . . . . . . . . . . . . . . 49 - 53
Playing karaoke . . . . . . . . . . . . . . . . . . . . . . . . . . . . . . . . . . . . . . . 53 - 54
Timer and sleep operation (Remote Control only) . . . . . . . . . . . 55 - 57
References
Troubleshooting chart . . . . . . . . . . . . . . . . . . . . . . . . . . . . . . . . . 58 - 60
Maintenance . . . . . . . . . . . . . . . . . . . . . . . . . . . . . . . . . . . . . . . . . . . . . 61
Specifications . . . . . . . . . . . . . . . . . . . . . . . . . . . . . . . . . . . . . . . . 61 - 62
ENGLISH
AN-PR1500H_EN.indd 2AN-PR1500H_EN.indd 2 4/10/08 2:29:25 PM4/10/08 2:29:25 PM
P
,
n
d
e
2
4
5
6
7
8
3
4
7
0
2
E-2
AN-PR1500H
1
ENGLISH
3
6
7
8
9
8
4
3
2
General Information
Accessories
Please confirm that the following accessories are included.
AN-PR1500H_EN.indd 3AN-PR1500H_EN.indd 3 4/10/08 2:29:27 PM4/10/08 2:29:27 PM
E-3
AN-PR1500H
ENGLISH
General Information
Precautions
General
l
Warning:
The voltage used must be the same as that specified by this unit. Using this product
with a higher voltage other than that specified is dangerous and may result in a fire or
other types of accident, causing damage. SHARP will not be held responsible for any
damage resulting from the use of this unit with a voltage other than that specified.
Cooling fan
Caution:
Volume control
The sound level at a given volume setting depends on speaker efficiency, location,
and various other factors. It is advisable to avoid exposure to high volume levels. Do
not turn the volume on to full at switch on and listen to music at moderate levels.
z Use the unit on a firm, level surface free from vibration.
z Keep the unit away from direct sunlight, strong magnetic fields, excessive dust,
humidity and electronic/electrical equipment (home computers, facsimiles, etc.)
which generate electrical noise.
z Do not expose the unit to moisture, to temperatures higher than 60˚C (140˚F) or
to extremely low temperatures.
z If the unit does not work properly, disconnect the AC
power lead from the wall socket. Plug the AC power
lead back in and then turn on your system.
z In case of an electrical storm, unplug the unit for
safety.
z Hold the AC power plug by the head when removing
it from the wall socket, as pulling the lead can
damage internal wires.
z The AC power plug is used as a disconnect device
and shall always remain readily operable.
z Do not remove the outer cover, as this may result in electric shock. Refer
internal service to your local SHARP service facility.
z The ventilation should not be impeded by covering the ventilation openings with
items, such as newspapers, tablecloths, curtains, etc.
z No naked flame sources, such as lighted candles, should be placed on the
apparatus.
z Attention should be drawn to the environmental aspects of battery disposal.
z The apparatus is designed for use in moderate climates.
z This unit should only be used within the range of 5˚C - 35˚C (41˚F - 95˚F).
z Because this unit is extremely heavy, it must always be handled by at least two
persons, to prevent the risk of injury and accidents.
z Never place the unit on an unstable surface or any surface unable to sustain its
weight. Otherwise the unit may fall over or drop, and there is a risk of damage and
injury.
This unit is fitted with a cooling fan at the rear for improved cooling. Do not cover the
opening in this section with any obstacles.
Cooling fan
z The unit will get warm whilst being used. Do not touch the warm areas of the unit
for prolonged periods to avoid injury.
z This unit is equipped with a special function which protects the amplifier circuit from
damages. When it is activated, the sound switch is turned off. In this case, set the
unit to the stand-by mode and turn on again.
AN-PR1500H_EN.indd 4AN-PR1500H_EN.indd 4 4/10/08 2:29:29 PM4/10/08 2:29:29 PM
E-4
AN-PR1500H
1
ENGLISH
3
6
7
8
9
8
4
3
2
General Information
Controls and indicators
Main unit (front panel)
Reference page
1. Left Front Speakers . . . . . . . . . . . . . . . . . . . . . . . . . . . . . . . . . . . . . 12
2. Top glass cover . . . . . . . . . . . . . . . . . . . . . . . . . . . . . . . . . . . . . . . . 11
3. Right Front Speakers . . . . . . . . . . . . . . . . . . . . . . . . . . . . . . . . . . . 12
4. Right Subwoofer. . . . . . . . . . . . . . . . . . . . . . . . . . . . . . . . . . . . . . . . 12
5. Wooden Shelf Board . . . . . . . . . . . . . . . . . . . . . . . . . . . . . . . . . . . . 11
6. Left Subwoofer . . . . . . . . . . . . . . . . . . . . . . . . . . . . . . . . . . . . . . . . . 12
7. Display. . . . . . . . . . . . . . . . . . . . . . . . . . . . . . . . . . . . . . . . . . . . . . . . . 6
8. On/Stand-by Button . . . . . . . . . . . . . . . . . . . . . . . . . . . . . . . . . . 16, 24
9. Timer Indicator . . . . . . . . . . . . . . . . . . . . . . . . . . . . . . . . . . . . . . . . . 56
10.DVD/CD/USB Play/Pause Button. . . . . . . . . . . . . . . . . . . . . . . . 32, 45
11.Disc or USB Stop Button . . . . . . . . . . . . . . . . . . . . . . . . . . . . . 32, 45
12.Function Button . . . . . . . . . . . . . . . . . . . . . . . . . . . . . . . . . . . . . 24, 25
13.USB Terminal . . . . . . . . . . . . . . . . . . . . . . . . . . . . . . . . . . . . . . . . . . 45
14.Remote Sensor . . . . . . . . . . . . . . . . . . . . . . . . . . . . . . . . . . . . . . . . 16
15.Mic 1 socket . . . . . . . . . . . . . . . . . . . . . . . . . . . . . . . . . . . . . . . . . . . 53
16.Mic 2 socket . . . . . . . . . . . . . . . . . . . . . . . . . . . . . . . . . . . . . . . . . . . 53
17.Volume Up and Down Buttons . . . . . . . . . . . . . . . . . . . . . . . . . . . . 24
18.Disc Eject Button . . . . . . . . . . . . . . . . . . . . . . . . . . . . . . . . . . . . . . . .32
Main unit (rear panel)
Reference page
1. Speaker Terminal . . . . . . . . . . . . . . . . . . . . . . . . . . . . . . . . . . . . . . . 12
2. Bass Reflex Duct . . . . . . . . . . . . . . . . . . . . . . . . . . . . . . . . . . . . . . . 12
2
3
4
1
5
6
7
9
10
8
13 14
15
16
17
11 12
18
1
2
AN-PR1500H_EN.indd 5AN-PR1500H_EN.indd 5 4/10/08 2:29:31 PM4/10/08 2:29:31 PM
E-5
AN-PR1500H
ENGLISH
General Information
Controls and indicators (continued)
Main unit (rear panel)
Reference page
1. FM 75 Ohms Aerial Socket . . . . . . . . . . . . . . . . . . . . . . . . . . . . . . . 11
2. HDMI Output Socket . . . . . . . . . . . . . . . . . . . . . . . . . . . . . . . . . . . . . 13
3. Optical Digital Audio Output Socket . . . . . . . . . . . . . . . . . . . . 13, 14
4. Video Output Socket . . . . . . . . . . . . . . . . . . . . . . . . . . . . . . . . . . . . 13
5. S-Video Output Socket . . . . . . . . . . . . . . . . . . . . . . . . . . . . . . . . . . 13
6. Component Video Output Sockets . . . . . . . . . . . . . . . . . . . . . . . . . 13
7. SCART Output Socket (Audio + Video) . . . . . . . . . . . . . . . . . . . . . 13
8. Audio Line Input Sockets . . . . . . . . . . . . . . . . . . . . . . . . . . . . . . . . 14
9. Cooling fan . . . . . . . . . . . . . . . . . . . . . . . . . . . . . . . . . . . . . . . . . . . . . 3
10.Optical Audio Input Sockets . . . . . . . . . . . . . . . . . . . . . . . . . . . . . . 14
11.Coaxial Audio Input Socket . . . . . . . . . . . . . . . . . . . . . . . . . . . . . . . 14
12.AC Power Lead . . . . . . . . . . . . . . . . . . . . . . . . . . . . . . . . . . . . . . . . . 15
321
9 108
6
7
12
11
4
5
AN-PR1500H_EN.indd 6AN-PR1500H_EN.indd 6 4/10/08 2:29:33 PM4/10/08 2:29:33 PM
E-6
AN-PR1500H
1
ENGLISH
3
6
7
8
9
8
4
3
2
General Information
Display
Reference page
1. Chapter Indicator. . . . . . . . . . . . . . . . . . . . . . . . . . . . . . . . . . . . . . . .39
2. Title Indicator. . . . . . . . . . . . . . . . . . . . . . . . . . . . . . . . . . . . . . . . . . .39
3. Folder Indicator . . . . . . . . . . . . . . . . . . . . . . . . . . . . . . . . . . . . . . . . .40
4. MP3 Indicator. . . . . . . . . . . . . . . . . . . . . . . . . . . . . . . . . . . . . . . . . . .40
5. WMA Indicator . . . . . . . . . . . . . . . . . . . . . . . . . . . . . . . . . . . . . . . . . .40
6. RDS Indicator. . . . . . . . . . . . . . . . . . . . . . . . . . . . . . . . . . . . . . . . . . .49
7. Traffic Announcement Indicator . . . . . . . . . . . . . . . . . . . . . . . . . . .49
8. Dynamic PTY Indicator . . . . . . . . . . . . . . . . . . . . . . . . . . . . . . . . . . .49
9. Traffic Programme Indicator . . . . . . . . . . . . . . . . . . . . . . . . . . . . . .49
10. Total Indicator . . . . . . . . . . . . . . . . . . . . . . . . . . . . . . . . . . . . . . . . . .33
11. Sleep Indicator . . . . . . . . . . . . . . . . . . . . . . . . . . . . . . . . . . . . . . . . .57
12. Timer Play Indicator . . . . . . . . . . . . . . . . . . . . . . . . . . . . . . . . . . . . .55
13. Daily Timer Indicator . . . . . . . . . . . . . . . . . . . . . . . . . . . . . . . . . . . .55
14. FM Stereo Mode Indicator . . . . . . . . . . . . . . . . . . . . . . . . . . . . . . . 48
Reference page
15. FM Stereo Receiving Indicator. . . . . . . . . . . . . . . . . . . . . . . . . . . . . 48
16. Dolby Digital Signal Indicator . . . . . . . . . . . . . . . . . . . . . . . . . . . . . 28
17. DTS Indicator . . . . . . . . . . . . . . . . . . . . . . . . . . . . . . . . . . . . . . . . . . 27
18. Dolby Virtual Speaker Indicator . . . . . . . . . . . . . . . . . . . . . . . . . . . 29
19. Dolby Pro Logic II Indicator . . . . . . . . . . . . . . . . . . . . . . . . . . . . . . . 29
20. Mono to Stereo Indicator . . . . . . . . . . . . . . . . . . . . . . . . . . . . . . . . . 30
21. Intelligent Volume Indicator . . . . . . . . . . . . . . . . . . . . . . . . . . . . . . . 30
22. Natural Bass Indicator . . . . . . . . . . . . . . . . . . . . . . . . . . . . . . . . . . . 30
23. Sound Space Indicator . . . . . . . . . . . . . . . . . . . . . . . . . . . . . . . . . . 30
24. Memory Indicator . . . . . . . . . . . . . . . . . . . . . . . . . . . . . . . . . . . . . . . 38
25. Disc or USB Pause Indicator . . . . . . . . . . . . . . . . . . . . . . . . . . . . . . 32
26. Disc or USB Play Indicator . . . . . . . . . . . . . . . . . . . . . . . . . . . . 31, 46
27. Disc or USB Repeat Indicator . . . . . . . . . . . . . . . . . . . . . . . . . . 39, 46
28. Karaoke Indicator . . . . . . . . . . . . . . . . . . . . . . . . . . . . . . . . . . . . . . . 54
MP3
WMA
RDS TA PTYI TP
TOTAL
DAILY
MTS
MEMORY
MHz
A1
B
IVC NB SS
DIGITAL
VS PL
ST
FOLDTITLECHAP
SLEEP
1 2 3 4 5 6 7 8 9 10 11
26
25
27
28
12
DAILY
DIGITAL
VS PL
ST
13
18 19
16 17
14 15
MTS
MEMORY
IVC NB SS
20 21 22 23
24
AN-PR1500H_EN.indd 7AN-PR1500H_EN.indd 7 4/10/08 2:29:34 PM4/10/08 2:29:34 PM
E-7
AN-PR1500H
ENGLISH
General Information
Controls and indicators (continued)
Remote control
Reference page
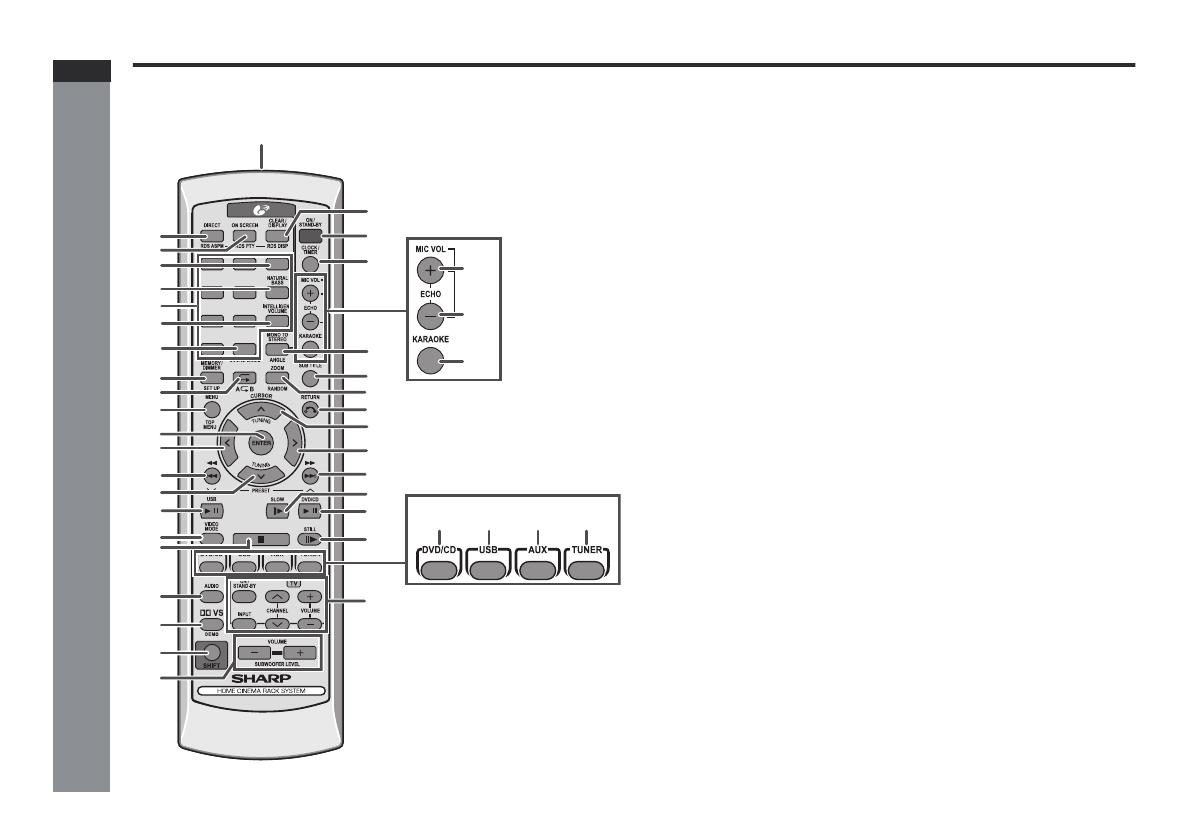
1. Remote Control Transmitter . . . . . . . . . . . . . . . . . . . . . . . . . . . . . . .16
2. DVD Direct Button. . . . . . . . . . . . . . . . . . . . . . . . . . . . . . . . . . . . . . . .35
3. DVD On Screen Button. . . . . . . . . . . . . . . . . . . . . . . . . . . . . . . . . . . .39
6. Direct Search Buttons . . . . . . . . . . . . . . . . . . . . . . . .23, 35, 38, 42, 43
9. Memory or Dimmer Button. . . . . . . . . . . . . . .24, 26, 38, 47, 50, 55, 57
10.DVD/CD/MP3/WMA Repeat Button . . . . . . . . . . . . . . . . . . . . . . .39, 46
11.Menu Button . . . . . . . . . . . . . . . . . . . . . . . . . . . . . . . . . . . . . . . . . . . .37
12.Enter Button . . . . . . . . . . . . . . . . . . . . . . 17, 23, 31, 34, 37, 38, 43, 45
13.Cursor Left Button . . . . . . . . . . . . . . . . . 17, 31, 35, 37, 38, 43, 44, 45
14.DVD Chapter Skip/DVD/MP3/WMA Fast Reverse/CD/MP3/WMA
Track Down/Tuner Preset Down and Time Down Button
. . . . . . . . . . . . . . . . . . . . . . . . . . . . . . . . . 26, 32, 34, 48, 50, 51, 55, 57
15.Tuning Down or Cursor Down Button . . . . . . . .17, 31, 37, 38, 44, 47
16.USB Play or Pause Button . . . . . . . . . . . . . . . . . . . . . . . . . . . . . . . .45
17.Video Mode Button . . . . . . . . . . . . . . . . . . . . . . . . . . . . . . . . . . . . . . .18
18.DVD/CD/MP3/WMA/Stop Button . . . . . . . . . . . . . . . . . . . . . . . . .32, 42
19.Audio Button . . . . . . . . . . . . . . . . . . . . . . . . . . . . . . . . . . . . . . . . . . . .40
20.Dolby Virtual Speaker Button . . . . . . . . . . . . . . . . . . . . . . . . . . . . . .28
21.Shift Button . . . . . . . . . . . . . . 15, 17, 24, 28, 29, 37, 42, 46, 50, 51, 53
22.Volume Up or Down Buttons . . . . . . . . . . . . . . . . . . . . . . . . . . . . . .25
23.Clear or Display Button . . . . . . . . . . . . . . . . . . . . . . . . . . . . .39, 48, 50
24.On/Stand-by Button . . . . 15, 16, 17, 24, 26, 31, 47, 48, 50, 55, 57, 59
25.Clock or Timer Button . . . . . . . . . . . . . . . . . . . . . . . . . . . . . .26, 55, 57
26.MIC Volume Up Button . . . . . . . . . . . . . . . . . . . . . . . . . . . . . . . . . . . .53
27.MIC Volume Down Button . . . . . . . . . . . . . . . . . . . . . . . . . . . . . . . . .53
28.Karaoke Button . . . . . . . . . . . . . . . . . . . . . . . . . . . . . . . . . . . . . . . . . .54
29.DVD Angle Button. . . . . . . . . . . . . . . . . . . . . . . . . . . . . . . . . . . . .10, 37
30.DVD Subtitle Button . . . . . . . . . . . . . . . . . . . . . . . . . . . . . . . . . . .10, 40
31.DVD Zoom Button . . . . . . . . . . . . . . . . . . . . . . . . . . . . . . . . . . . . .37, 44
32.Return Button . . . . . . . . . . . . . . . . . . . . . . . . . . . . . . . . . . . . . . . . . . .31
33.Tuning Up or Cursor Up Button . . . . . . . . . . . . .17, 31, 37, 38, 44, 47
34.Cursor Right Button . . . . . . . . . . . . . . . 17, 31, 35, 37, 38, 43, 44, 45
35.DVD Chapter Skip/DVD/MP3/WMA Fast Forward/CD/MP3/WMA
Track Up/Tuner Preset Up and Time Up Button
. . . . . . . . . . . . . . . . . . . . . . . . . . . . . . . . . 26, 32, 34, 48, 50, 51, 55, 57
36.DVD Slow Button . . . . . . . . . . . . . . . . . . . . . . . . . . . . . . . . . . . . . . . .36
37.DVD/CD/MP3/WMA Play or Pause Button. . . . . . . . . . . . . . . . . .32, 36
38.DVD/CD/MP3/WMA Still Button . . . . . . . . . . . . . . . . . . . . . . . . . . . . .36
39.DVD/CD/MP3/WMA Button . . . . . . . . . . . . . . . . . . . . . . . . . . . . . . . .31
40.USB Button . . . . . . . . . . . . . . . . . . . . . . . . . . . . . . . . . . . . . . . . . . . . .45
41.Auxiliary Button . . . . . . . . . . . . . . . . . . . . . . . . . .13, 14, 24, 25, 45, 54
42.Tuner Button . . . . . . . . . . . . . . . . . . . . . . . . . . . . . . . . . . . . . . . . .47, 49
43.TV Operation Buttons. . . . . . . . . . . . . . . . . . . . . . . . . . . . . . . . . . . . . .8
1 2 3
4 5 6
7 8 9
+100
23
24
25
7
5
4
8
29
30
31
32
33
34
35
37
38
43
36
1
2
3
6
9
10
11
12
13
14
15
16
17
18
19
20
21
22
39
40 41 42
26
27
28
AN-PR1500H_EN.indd 8AN-PR1500H_EN.indd 8 4/10/08 2:29:35 PM4/10/08 2:29:35 PM
E-8
AN-PR1500H
1
ENGLISH
3
6
7
8
9
8
4
3
2
General Information
Remote control with shift button
Reference page
2. RDS ASPM Button . . . . . . . . . . . . . . . . . . . . . . . . . . . . . . . . . . . . . . 49
3. RDS PTY Button . . . . . . . . . . . . . . . . . . . . . . . . . . . . . . . . . . . . . . . .49
4. Sound Space Button . . . . . . . . . . . . . . . . . . . . . . . . . . . . . .28, 29, 30
5.
Natural Bass Button
. . . . . . . . . . . . . . . . . . . . . . . . . . . . . . . .28, 29, 30
7.
Intelligent Volume Button
. . . . . . . . . . . . . . . . . . . . . . . . . . .28, 29, 30
8. Sound Mode Button . . . . . . . . . . . . . . . . . . . . . . . . . . . . . . . . . . . . 28
9. Set Up Button. . . . . . . . . . . . . . . . . . . . . . . . . . . . . . . . . . . . . . . . . . .17
10. A-B Repeat Button . . . . . . . . . . . . . . . . . . . . . . . . . . . . . . . . . . . . . .37
11. Top Menu Button . . . . . . . . . . . . . . . . . . . . . . . . . . . . . . . . . . . . . . . .37
20. Demo Button . . . . . . . . . . . . . . . . . . . . . . . . . . . . . . . . . . . . . . . . . . .15
22. Subwoofer level
-
or + Button . . . . . . . . . . . . . . . . . . . . . . . . . . . . .25
23. RDS DISP Button . . . . . . . . . . . . . . . . . . . . . . . . . . . . . . . . . . . . . . 49
26.
Echo Up Button
. . . . . . . . . . . . . . . . . . . . . . . . . . . . . . . . . . . . . . . . .53
27.
Echo Down Button
. . . . . . . . . . . . . . . . . . . . . . . . . . . . . . . . . . . . . .53
29.
Mono to Stereo Button
. . . . . . . . . . . . . . . . . . . . . . . . . . . . . .28, 29, 30
31.
Random Button
. . . . . . . . . . . . . . . . . . . . . . . . . . . . . . . . . . . . . .42, 46
Note:
Some models of SHARP TV may not be operable.
TV Operation Buttons (Only SHARP TV):
On/Stand-by
Button
Set the TV power
to “ON” or
“STAND-BY”.
Input Select
Button (TV)
Press the button
to switch the
input source.
Volume Up
and Down
Buttons
Turn up/down
the TV volume.
Channel Up
and Down
Buttons
Switch up/down
the TV channels.
AN-PR1500H_EN.indd 9AN-PR1500H_EN.indd 9 4/10/08 2:29:36 PM4/10/08 2:29:36 PM
E-9
AN-PR1500H
ENGLISH
General Information
Description of discs
Types of playable discs
The DVD player can play back discs bearing any of the following marks:
Types of playable DVD discs vary depending on the region. This unit can play back
only DVDs with the same region number written on the back of the unit.
Disc type Disc contents
DVD Video Disc Audio and video
(movies)
DVD-R
Disc recorded in Video Mode (*1)(*2)
Audio and video
(movies)
DVD-RW
Disc recorded in Video Mode (*2)
Audio and video
(movies)
Audio CD Audio
CD-R/CD-RW (*1)(*2)
Or CD-R/CD-RW recorded in JPEG
format (*3) (*4)
Audio and picture
DivX
®
Video disc (Ver 6 and below) Audio and video
(movies)
(*1): Playability depends on recording device or disc condition (special disc,
scratches, dirt or dirt on pick up).
(*2): The DVD-R/DVD-RW/CD-R/CD-RW may not be played back properly
depending on the recording equipment or the disc.
(*3): JPEG or JPG picture discs are also playable on this unit. However, pictures may
not be clear (depends on resolution and recording method).
(*4): If the file size is larger than 10 Mb, it will take some time for the file to be
displayed.
z For unplayable discs, see page 10.
Icons used in this operation manual
Some functions may not be available depending on discs. The following icons indicate
the discs that can be used in the section.
... Indicates DVDs.
... Indicates audio CDs.
... Indicates CD-R/RW with MP3 recording.
... Indicates CD-R/RW with WMA recording.
... Indicates CD-R/RW with JPEG recording.
... Indicates CD-R/RW with DivX
®
recording.
z Some operations may not be performed depending on discs even if they are
described in this manual.
z During operation, “INVALID KEY” may be displayed on the screen. This means that
the operations described in this manual are prohibited by the disc.
22 3 4
or
or
WMA
AN-PR1500H_EN.indd 10AN-PR1500H_EN.indd 10 4/10/08 2:29:37 PM4/10/08 2:29:37 PM
E-10
AN-PR1500H
1
ENGLISH
3
6
7
8
9
8
4
3
2
General Information
Discs that cannot be played
z The discs above cannot be played at all, or no sound is heard although images
appear on the screen or vice versa.
z Incorrect operation may damage the speakers and can have an adverse effect on
your hearing when played at high volume settings.
z You cannot play illegally produced discs.
Notes:
z A disc which has scratches or fingerprints may not play properly. Refer to Care of
compact discs (page 60) and clean the disc.
z Do not play discs of special shapes (heart or octagon shaped) as they can be
ejected whilst rotating and cause injury.
Title, chapter and track
DVDs are divided into titles and chapters”. If the disc has more than one movie on
it, each movie is a separate title”. Chapters are subdivisions of titles.
Note:
Title, chapter, or track numbers may not be recorded on some discs.
DivX
®
z Official DivX Certified
TM
product
z Plays all versions of DivX
®
video
(including DivX
®
6) with standard
playback of DivX
®
media files.
(DivX
®
version cannot be upgraded on this product.)
Icons used on DVD discs
Check the icons on the DVD case before playing your discs.
zDVDs without the region number on
the back of the unit.
zDVDs with SECAM system
zDVD-ROM
zDVD-RAM
zDVD-Audio
zCDG
zCDV
zPhoto CD
zCD-ROM
zSACD
zDiscs recorded in special
formats, etc.
zDVD+R
zDVD+RW
Audio CDs consist of tracks”.
A track is each tune on an audio CD.
Chapter 1
Title 1 Title 2
Chapter 2
Chapter 3 Chapter 1 Chapter 2
Track 1 Track 2 Track 3 Track 4 Track 5
Display Description
Region number (playable area
number)
DVD discs are programmed with region
numbers indicating countries in which they
can be played. This system can play discs
with region number on the back of the unit.
Format recorded on the DVD To adopt the video format to the connected
TVs (wide-screen TV or 4:3 size TV).
Recorded in 4:3.
You can enjoy wide images on a wide-screen TV and letterbox size
images on the 4:3 size TV.
You can enjoy wide images on a wide-screen TV and 4:3 images with
the side edges cut on the 4
:3 size TV.
Type of subtitles recorded Recorded subtitle languages.
Example: Language can be selected with the
SUBTITLE button.
1: English
2: French
Number of camera angles Number of angles recorded on the DVD.
Angles can be selected with the ANGLE
button.
Number of audio tracks and audio
recording systems
The number of audio tracks and audio
recording systems are indicated.
Example:
1: Original <English>
(Dolby Digital 2
Surround)
The audio recorded on the DVD can be
switched by using the AUDIO button.
The number of audio tracks and recording
systems vary depending on the DVD.
Check them in the DVD's manual.2: English (Dolby Digital
5.1 Surround)
2 3 4
2
2
AN-PR1500H_EN.indd 11AN-PR1500H_EN.indd 11 4/10/08 2:29:39 PM4/10/08 2:29:39 PM
E-11
AN-PR1500H
ENGLISH
Preparation for Use
System connections
Installing the main unit and the subwoofer
1. Pull up both speakers outwards.
2. Turn the unit. Place the glass shelf on top of it.
3. Place the wooden shelf on top of the screw.
4. Cover the screws on the speakers with the screw covers provided.
Notes:
z It is advisable for the top glass cover to be carried by 2 persons.
z Top glass with sticker on its surface, must face upwards.
z The maximum load for the top glass cover on the unit is 80 kg.
z
The glass are made of reinforced glass, but dropping pointed objects on them or strongly
hitting the surface may cause them to break.
z
The top glass cover and wooden shelf board are not fastened to the unit. Always take care
the unit level when transporting it. Otherwise these parts may fall off and there is a risk of
damage and injury.
Aerial connection
External FM aerial
Use an external FM aerial if you require better reception. Consult your dealer.
Note:
When an external FM aerial is used, disconnect the supplied FM aerial wire.
Protection
sheet
Top glass cover cushion
Wooden shelf
Top glass cover
Sticker up side
Screw cover
Supplied FM aerial:
Connect the FM aerial wire to the FM 75 OHMS socket
and position the FM aerial wire in the direction where
the strongest signal can be received.
Note:
Placing the aerial on the unit or near the AC power lead
may cause noise pickup.
Place the aerial away from the unit for better reception.
FM
aerial
External
FM aerial
75 ohms
coaxial cable
AN-PR1500H_EN.indd 12AN-PR1500H_EN.indd 12 4/10/08 2:29:40 PM4/10/08 2:29:40 PM
E-12
AN-PR1500H
1
ENGLISH
3
6
7
8
9
8
4
3
2
Preparation for Use
Placing the TV or other equipment
1. Please ensure that the equipment is positioned in a well-ventilated area and ensure
that there is at least 10 cm (4") of free space along the sides and back of the
equipment.
2. Placing the TV, DVD player and etc equipment. Please use anti-slip TV cushion to
prevent fall.
Caution:
z Before moving the TV away, please ensure that the anti-slip cushions underneath
it have been taken out. This is to prevent the top glass cover from falling as it might
stick to the TV during shifting.
z Do not move the unit with a TV or other component on top. Otherwise such a
component may fall over or drop, and there is a risk of damage and injury.
Video deck
DVD player
Stick the anti-slip
cushions (4 pcs)
underneath the TV.
(not included in accessory)
TV
Anti-slip
cushions
AN-PR1500H_EN.indd 13AN-PR1500H_EN.indd 13 4/10/08 2:29:42 PM4/10/08 2:29:42 PM
E-13
AN-PR1500H
ENGLISH
Preparation for Use
Connecting to a conventional TV/monitor
If the TV/monitor has video input, connect
it to the VIDEO OUT socket on the rear of
the unit.
If the TV/monitor has S-video input,
connect it to the S-VIDEO OUT socket on
the rear of the unit.
If the TV/monitor has component video
input, connect it to the COMPONENT
VIDEO OUT socket on the rear of the unit.
Notes:
z Change the TV input in accordance with the connected socket.
z Do not connect other equipment between the TV and this unit. If they are connected
via a VCR, pictures may be distorted.
z If your TV has different indications for the component video inputs (Y, CB and CR
or Y, B-Y and P-Y), connect sockets with its matching colour.
z Do not connect to a component video input socket designed for the high-vision
system, which is not DVD-compatible (the images may be distorted or not appear).
If the TV/monitor has scart input, connect it
to the SCART OUT socket on the rear of the
unit. (Do not connect the SCART cable to
equipment other than the TV/monitor)
To select SCART function:
z On main unit: Press FUNCTION button repeatedly until SCART is
displayed.
z On remote control: Press VIDEO MODE or AUX button repeatedly until SCART is
displayed.
If the TV/monitor has HDMI input, connect it
to the HDMI socket on the rear of the unit.
Caution:
Turn off all other equipment before making connections.
Video signal
TV
(not supplied)
To video
input socket
TV
Video signal
S-video cable
(not supplied)
To S-video
input socket
TV
Component
video cable
(not supplied)
To component
video input socket
TV
To SCART
input socket
SCART cable
(not supplied)
Video/Audio signal
HDMl cable
To HDMI
input socket
TV
AN-PR1500H_EN.indd 14AN-PR1500H_EN.indd 14 4/10/08 2:29:43 PM4/10/08 2:29:43 PM
E-14
AN-PR1500H
1
ENGLISH
3
6
7
8
9
8
4
3
2
Preparation for Use
Audio connection to other equipment
You can hear the sound of other equipment via this product. Connect the DVD player,
VCR or digital tuner to a TV directly to receive the images (refer to the operation
manual of each equipment).
Caution:
Turn off the other equipment before making this connection.
Connection for the analogue sound
(VCR, etc.)
To select AUX function:
z On main unit: Press FUNCTION button repeatedly until LINE 1 or LINE 2 or LINE
3 is displayed.
z On remote control: Press AUX button repeatedly until LINE 1 or LINE 2 or LINE
3 is displayed.
Connection for the digital tuner sound (or
other optical digital equipment such as an
MD player)
If the digital equipment has an optical output socket, you can enjoy better sound by
connecting it to the optical digital input socket of the main unit using the optical digital
cable.
To select OPTICAL 1, OPTICAL 2 or COAXIAL 3 function:
z On main unit: Press FUNCTION button repeatedly until DIGITAL 1, DIGITAL 2 or
DIGITAL 3 is displayed.
z On remote control: Press AUX button repeatedly until DIGITAL 1, DIGITAL 2 or
DIGITAL 3 is displayed.
To audio input sockets (LINE 1/LINE 2/
LINE 3)
Audio cable
(commercially available)
To audio
output sockets
VCR, DVD recorder, etc.
TV
Optical digital cable
(commercially available)
To coaxial digital
audio output socket
Digital equipment such
as a digital music player
Digital tuner, etc.
TV
Coaxial digital
audio cable
(commercially
available)
To optical digital audio input socket To COAXIAL input socket
To optical digital
audio output socket
AN-PR1500H_EN.indd 15AN-PR1500H_EN.indd 15 4/10/08 2:29:45 PM4/10/08 2:29:45 PM
E-15
AN-PR1500H
ENGLISH
Preparation for Use
AC power connection
Connecting the AC power lead
After checking all the connections have been made correctly, connect the AC power
lead to the wall socket.
Note:
Unplug the AC power lead from the wall socket if the unit will not be in use for a
prolonged period of time.
To turn the power on
Press the ON/STAND-BY button.
If the power does not turn on, check whether the power lead is plugged in properly.
To set the unit to stand-by mode:
Press the ON/STAND-BY button again.
Note:
After the unit enters the power stand-by mode, wait a few seconds to turn on again.
Demonstration mode
Wall socket
(AC 220 - 240 V ~ 50 Hz)
The first time the unit is plugged in, the unit will enter the
demonstration mode. You will see words scroll.
To cancel the demonstration mode:
When the unit is in the power stand-by mode
(demonstration mode), press the SHIFT and DEMO
buttons on the remote control. The unit will enter the low
power consumption mode.
To return to the demonstration mode:
When the unit is in the power stand-by mode, press the SHIFT and DEMO buttons
on the remote control again.
AN-PR1500H_EN.indd 16AN-PR1500H_EN.indd 16 4/10/08 2:29:48 PM4/10/08 2:29:48 PM
.
E-16
AN-PR1500H
1
ENGLISH
3
6
7
8
9
8
4
3
2
Preparation for Use
Remote control
Battery installation
Precautions for battery use:
z Replace all old batteries with new ones at the same time.
z Do not mix old and new batteries.
z Remove the batteries if the unit will not be used for long periods of time. This will
prevent potential damage due to battery leakage.
Caution:
z Do not use rechargeable batteries (nickel-cadmium battery, etc.).
z Installing the batteries incorrectly may cause the unit to malfunction.
z Batteries (battery pack or batteries installed) shall not be exposed to excessive
heat such as sunshine, fire or the like.
Battery removal:
Open the battery cover and pull up the battery to take out.
Notes concerning use:
z Replace the batteries if the operating distance is reduced or if the operation
becomes erratic. Purchase 2 “AA” size batteries (UM/SUM-3, R6, HP-7 or similar).
z Periodically clean the transmitter on the remote control and the sensor on the unit
with a soft cloth.
z Exposing the sensor on the unit to strong light may interfere with operation. Change
the lighting or the direction of the unit.
z Keep the remote control away from moisture, heat, shock, and vibrations.
Test of the remote control
Point the remote control directly at the remote sensor on the unit.
The remote control can be used within the range shown below:
Press the ON/STAND-BY button. Does the power turn on? Now, you can use the unit.
1 Open the battery cover.
2 Insert the supplied batteries according to the direction indicated in
the battery compartment.
When inserting or removing the batteries, push them towards the battery
terminals.
3 Close the cover.
1 2 3
4 5 6
7 8 9
+100
0.2 m - 6 m
(8” - 20’)
Remote sensor
AN-PR1500H_EN.indd 17AN-PR1500H_EN.indd 17 4/10/08 2:29:49 PM4/10/08 2:29:49 PM
E-17
AN-PR1500H
ENGLISH
Preparation for Use
Changing the set up menu
Notes:
z The setting are stored even if the unit is set to stand-by mode.
z The backup function protects the stored setting for a few hours should there be a
power failure or AC power lead disconnection.
z System set up can be performed during playback mode.
1 2 3
4 5 6
7 8 9
+100
1 Turn on the TV.
2 Set the TV to the correct input, eg. “AV1”, “VIDEO”, etc.
3 Turn on the unit by pressing the
ON/STAND-BY button.
zThe SHARP startup screen appears.
Note:
Startup screen will be displayed when both S-
Video cable and SCART cable are connected to
the TV. If only the S-Video cable is connected, the
screen may be blank. To set up S-Video mode,
use video out cable or SCART cable.
4 Press the SHIFT and SET UP buttons.
5 Press the or button to select a menu.
z See the list on pages 18 - 23 for set up menu.
6 Press the , , or button to change the setting and press the
ENTER button.
7 After setting is completed, select “EXIT
SET UP”, then press the ENTER button to
return to the main page.
AN-PR1500H_EN.indd 18AN-PR1500H_EN.indd 18 4/10/08 2:29:51 PM4/10/08 2:29:51 PM
E-18
AN-PR1500H
1
ENGLISH
3
6
7
8
9
8
4
3
2
Preparation for Use
Set up menu Selectable parameters (* indicates default setting) Description
SYSTEM
SET UP
TV SYSTEM NTSC
PAL*
AUTO
Select the correct colour system (TV standard).
(for details, see page 22).
VIDEO S-VIDEO
SCART*
COMP. P-SCAN ON
COMP. P-SCAN OFF
Select “S-VIDEO or SCART or COMP. P-SCAN ON or COMP. P-SCAN
OFF” mode if connecting unit to TV (for details, see page 13).
Selection can also be made using remote control VIDEO MODE button.
TV TYPE 4:3 PS*
4:3 LB
16:9
The screen mode should be set according to the connected TV type (for
details, see page 22).
PASSWORD _ _ _ _ Change the password (for details, see page 23).
RATING 1 KID SAFE
2 G
3 PG
4 PG13
5 PG-R
6 R
7 NC-17
8 ADULT*
Set a restriction level for DVD viewing (for details, see page 23).
Enter a 4-digit password.
It is set to 0000 by default.
DEFAULT RESTORE This resets all settings, except for PARENTAL to the factory defaults.
LANGUAGE
SET UP
OSD LANGUAGE ENGLISH*
FRENCH
SPANISH
CHINESE
GERMAN
ITALIAN
PORTUGUESE
DUTCH
You can select the desired OSD (On Screen Display) language for the
set up menu or playback control screen.
Example: To select German language, choose “GERMAN” from the
menu. Press ENTER button and below screen will appear in German.
AUDIO LANG ENGLISH*
FRENCH
SPANISH
CHINESE
GERMAN
ITALIAN
Select the language audible from the speakers.
SPRACHE EINST
OSD-SPRACHE
AUDIO
UNTERTITEL
MENU
DIVX[R] VOD
MENU ENDE
ENGLISCH
FRANZÖSISH
SPANISH
CHINESISCH
DEUTSCH
ITALIENISCH
PORTUGIESISCH
HOLLÄNDISH
AN-PR1500H_EN.indd 19AN-PR1500H_EN.indd 19 4/10/08 2:29:53 PM4/10/08 2:29:53 PM
E-19
AN-PR1500H
ENGLISH
Preparation for Use
Changing the set up menu (continued)
Set up menu Selectable parameters (* indicates default setting) Description
LANGUAGE
SET UP
SUBTITLE LANG ENGLISH*
FRENCH
SPANISH
CHINESE
GERMAN
ITALIAN
OFF
Select the subtitle displayed on the TV screen.
MENU LANG ENGLISH*
FRENCH
SPANISH
CHINESE
GERMAN
ITALIAN
Select the disc menu language.
DivX [R] VOD REGISTRATION
CODE
********
SHARP provide you the DivX registration code that allows you to rent and
purchase videos using the DivX service. Please go to www.divx.com/vod
for more information.
AUDIO
SET UP
AUDIO OUT SP DIF/OFF
SP DIF/RAW
SP DIF/PCM*
Useful whilst using HDMI cable. When playing a disc recorded with Dolby
Digital or DTS, the corresponding digital signals will be output from the
HDMI output socket.
z PCM : Choose this setting if the HDMI TV cannot support Dolby Digital
or DTS to avoid noise or mute from the TV.
z RAW : Choose this setting if the HDMI TV can support Dolby Digital or
DTS.
AN-PR1500H_EN.indd 20AN-PR1500H_EN.indd 20 4/10/08 2:29:54 PM4/10/08 2:29:54 PM
  • Page 1 1
  • Page 2 2
  • Page 3 3
  • Page 4 4
  • Page 5 5
  • Page 6 6
  • Page 7 7
  • Page 8 8
  • Page 9 9
  • Page 10 10
  • Page 11 11
  • Page 12 12
  • Page 13 13
  • Page 14 14
  • Page 15 15
  • Page 16 16
  • Page 17 17
  • Page 18 18
  • Page 19 19
  • Page 20 20
  • Page 21 21
  • Page 22 22
  • Page 23 23
  • Page 24 24
  • Page 25 25
  • Page 26 26
  • Page 27 27
  • Page 28 28
  • Page 29 29
  • Page 30 30
  • Page 31 31
  • Page 32 32
  • Page 33 33
  • Page 34 34
  • Page 35 35
  • Page 36 36
  • Page 37 37
  • Page 38 38
  • Page 39 39
  • Page 40 40
  • Page 41 41
  • Page 42 42
  • Page 43 43
  • Page 44 44
  • Page 45 45
  • Page 46 46
  • Page 47 47
  • Page 48 48
  • Page 49 49
  • Page 50 50
  • Page 51 51
  • Page 52 52
  • Page 53 53
  • Page 54 54
  • Page 55 55
  • Page 56 56
  • Page 57 57
  • Page 58 58
  • Page 59 59
  • Page 60 60
  • Page 61 61
  • Page 62 62
  • Page 63 63
  • Page 64 64

Sharp AN-PR1500H Specification

Category
Home cinema systems
Type
Specification
This manual is also suitable for

Ask a question and I''ll find the answer in the document

Finding information in a document is now easier with AI