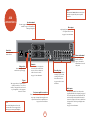
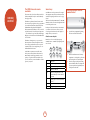
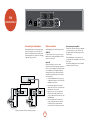
Arcam A38 is a high-performance integrated amplifier that combines innovative technology with exceptional sound quality. With its advanced features, such as new output devices, improved thermal coupling, and a massive toroidal power supply, the A38 delivers dynamic and thrilling audio reproduction. Its comprehensive connectivity options, including various audio inputs, recording loops, and pre/power amplifier connections, make it versatile for integrating into different audio systems.
Arcam A38 is a high-performance integrated amplifier that combines innovative technology with exceptional sound quality. With its advanced features, such as new output devices, improved thermal coupling, and a massive toroidal power supply, the A38 delivers dynamic and thrilling audio reproduction. Its comprehensive connectivity options, including various audio inputs, recording loops, and pre/power amplifier connections, make it versatile for integrating into different audio systems.


-
 1
1
-
 2
2
-
 3
3
-
 4
4
-
 5
5
-
 6
6
-
 7
7
-
 8
8
-
 9
9
-
 10
10
-
 11
11
-
 12
12
-
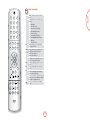 13
13
-
 14
14
-
 15
15
-
 16
16
-
 17
17
-
 18
18


Arcam A38 is a high-performance integrated amplifier that combines innovative technology with exceptional sound quality. With its advanced features, such as new output devices, improved thermal coupling, and a massive toroidal power supply, the A38 delivers dynamic and thrilling audio reproduction. Its comprehensive connectivity options, including various audio inputs, recording loops, and pre/power amplifier connections, make it versatile for integrating into different audio systems.
Ask a question and I''ll find the answer in the document
Finding information in a document is now easier with AI
Related papers
-
Arcam FMJ A22 User manual
-
-
-
Arcam AVR400 User manual
-
Arcam P7 Operating instructions
-
Arcam C31 User manual
-
-
-
-
Arcam A32 User manual
Other documents
-
ZEN P38 Hard reset manual
-
Pro-Ject Control it Product information
-
Tangent AMP-50 User manual
-
Cambridge Audio A1 Integrated Amplifier User manual
-
Creek Audio 4240 User manual
-
Exposure XM HP Quick start guide
-
BENQ-SIEMENS A38 User manual
-
Barco MDSC-2124 Owner's manual
-
-
 A&R A60 Owner's Handbook Manual
