Page is loading ...

E L i T E
®
EZ INSTALLTips For Best Washer Performance
ConsulttheUseandCareGuideformoredetailedinstructions.
NOTE: Be sure lid is taped in place before tipping the washer.
Remove foam shipping base and remove packing ring.
Lid must be taped in place prior
to moving the washer.
Lay washer on its back and
remove foam shipping base.
Set washer upright. Remove
tape and lid label from lid.
Remove foam packing ring from
washer tub.
Remove drain hose from washer.
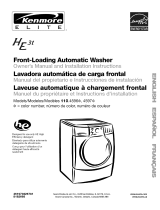
Installed Washer
Connect inlet hoses to washer.
Oasis
Move washer to its final location and level the washer.
IMPORTANT." Make firm contact with the floor and level
washer to maintain balance and minimize noise and vibration.
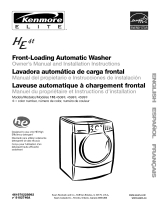
NOTE: Adjust the right front foot only. The other three feet
have been preset at the factory.
Push on the upper front panel to be
sure that the washer is on the rear
feet. Lower right front foot to floor. By
hand, firmly rotate foot up to an
additional 1_ turns. Rock washer
gently front to back, side to side and
diagonally to check that all four feet
are in firm contact with the floor.
Check levelness by placing level
in crease between top of washer
and cabinet.
Check levelness on both the
front and side of the washer.
If level, use _" or 14 mm open-
end wrench to tighten Iocknut to
washer base.
NOTE: Ifthe washer is not level, refer to the Use and Care
Guide for more detailed leveling information.
Locate the pull tie to remove
drain hose from washer. Pull
drain hose straight out of washer
by first grabbing the pull tie.
Pull drain hose straight out of
washer from top of hose.
Continue to pull the hose until
the end emerges.
Retrieve hose form from parts
bag. Feed drain hose into one
end of form.
Connect inlet hoses to water faucets.
Bend hose over top of form
and feed into other end.
Insert washers into hoses.
Hand tighten couplings - hot to Turn another _ rotation.
hot, cold to cold. Do not overtighten.
Secure the drain hose with beaded tie strap, in one of these ways:
Turn on the water faucets.
Check for leaks.
Electrical Shock Hazard
Plug into a grounded 3 prong outlet.
Do not remove ground prong.
Do not use an adapter.
Do not use an extension cord.
Failure to follow these instructions can result in death, fire, or
electrical shock.
lql ql qilqqqqqqq I
Plug into a grounded 3 prong outlet.
Check for leaks around faucets,
inlet hoses and drain hose.
Insert washers into hoses.
Hand tighten couplings to
faucets.
2
Turn another Y_rotation.
Do not overtighten.
Run water into bucket to
determine which hose is hot and
which is cold.
laundry tub, drainpipe (must be at least wall-mounted standpipe.
39"[99 crn] high),
Spanish and French on back.
VersiSn en espafiol en el reverse.
Version en frangais au verso.
8567034A 11/05
TM SM
© 2005 Sears Brands, LLC '_ Registered Trademark / Trademark / Service Mark of Sears Brands, LLC Printed ffl U.S.A.
/