Page is loading ...

WinSystems, Inc. | 715 Stadium Drive, Arlington, Texas 76011 | 817-274-7553 | [email protected] | www.winsystems.com
PPC3-6.5-407
Intel
®
Atom™ E3800 6.5-inch Panel PC
with PC104 Expansion
Product Manual

PPC3-6.5-407/
v1.0 www.winsystems.com Page 2
Revision History
Copyright and Trademarks
Copyright 2020, WINSYSTEMS, Inc.
No part of this document may be copied or reproduced in any form or by
any means without the prior written consent of WINSYSTEMS, Inc. The
information in the document is subject to change without notice. The
information furnished by WINSYSTEMS, Inc. in this publication is believed
to be accurate and reliable. However, WINSYSTEMS, Inc. makes no
warranty, express, statutory, implied or by description, regarding the
information set forth herein or regarding the freedom of the described
devices from patent infringement. WINSYSTEMS, Inc. makes no warranty
of merchantability or fitness for any purpose. WINSYSTEMS, Inc. assumes
no responsibility for any errors that may appear in this document.
Trademark Acknowledgments
WINSYSTEMS is a registered trademark of WINSYSTEMS, Inc.
Intel is a registered trademark and Atom is a trademark of Intel
Corporation or its subsidiaries in the U.S. and/or other countries.
DisplayPort, the DisplayPort logo, and VESA are trademarks owned by the
Video Electronics Standards Association (VESA) in the United States and
other countries.
PC104 is a trademark of the PC104 Consortium.
Duo-Clasp and Pico-Clasp are trademarks of Molex, Inc.
Phoenix SecureCore is a trademark of Phoenix Technologies Ltd.
Document
Version
Last
Updated
Date
Brief Description of Change
v1.0 5/2020 Initial release

PPC3-6.5-407
v1.0 www.winsystems.com Page 3
Table of Contents
1 Before You Begin. . . . . . . . . . . . . . . . . . . . . . . . . . . . . . . . . . . . . . . . . . . . . . . . . . . 5
1.1 Warnings . . . . . . . . . . . . . . . . . . . . . . . . . . . . . . . . . . . . . . . . . . . . . . . . . . . . . . . . . . . . . .5
2 Introduction . . . . . . . . . . . . . . . . . . . . . . . . . . . . . . . . . . . . . . . . . . . . . . . . . . . . . . 5
3 Functionality . . . . . . . . . . . . . . . . . . . . . . . . . . . . . . . . . . . . . . . . . . . . . . . . . . . . . . 5
4 Features . . . . . . . . . . . . . . . . . . . . . . . . . . . . . . . . . . . . . . . . . . . . . . . . . . . . . . . . . 6
5 General Operation . . . . . . . . . . . . . . . . . . . . . . . . . . . . . . . . . . . . . . . . . . . . . . . . . . 8
5.1 System Block Diagram. . . . . . . . . . . . . . . . . . . . . . . . . . . . . . . . . . . . . . . . . . . . . . . . . . . . .8
6 Specifications . . . . . . . . . . . . . . . . . . . . . . . . . . . . . . . . . . . . . . . . . . . . . . . . . . . . . 9
7 Configuration . . . . . . . . . . . . . . . . . . . . . . . . . . . . . . . . . . . . . . . . . . . . . . . . . . . . 11
7.1 Component Layout . . . . . . . . . . . . . . . . . . . . . . . . . . . . . . . . . . . . . . . . . . . . . . . . . . . . . .11
7.1.1 Top and Side Views . . . . . . . . . . . . . . . . . . . . . . . . . . . . . . . . . . . . . . . . . . . . . . . . . . 11
7.1.2 Bottom View . . . . . . . . . . . . . . . . . . . . . . . . . . . . . . . . . . . . . . . . . . . . . . . . . . . . . . . . 13
7.2 I/O Port Map. . . . . . . . . . . . . . . . . . . . . . . . . . . . . . . . . . . . . . . . . . . . . . . . . . . . . . . . . .13
7.3 Interrupt Map. . . . . . . . . . . . . . . . . . . . . . . . . . . . . . . . . . . . . . . . . . . . . . . . . . . . . . . . . .15
7.4 Register Definitions . . . . . . . . . . . . . . . . . . . . . . . . . . . . . . . . . . . . . . . . . . . . . . . . . . . . .16
7.4.1 Port 0 through 5 I/O. . . . . . . . . . . . . . . . . . . . . . . . . . . . . . . . . . . . . . . . . . . . . . . . . . 17
7.4.2 INT_PENDING . . . . . . . . . . . . . . . . . . . . . . . . . . . . . . . . . . . . . . . . . . . . . . . . . . . . . . . 17
7.4.3 PAGE/LOCK . . . . . . . . . . . . . . . . . . . . . . . . . . . . . . . . . . . . . . . . . . . . . . . . . . . . . . . . . 17
7.4.4 POL0 through POL2 . . . . . . . . . . . . . . . . . . . . . . . . . . . . . . . . . . . . . . . . . . . . . . . . . . 18
7.4.5 ENAB0 through ENAB2 . . . . . . . . . . . . . . . . . . . . . . . . . . . . . . . . . . . . . . . . . . . . . . . 18
7.4.6 INT_ID0 through INT_ID2 . . . . . . . . . . . . . . . . . . . . . . . . . . . . . . . . . . . . . . . . . . . . . 18
7.5 Watchdog Timer . . . . . . . . . . . . . . . . . . . . . . . . . . . . . . . . . . . . . . . . . . . . . . . . . . . . . . . .18
7.5.1 Advanced. . . . . . . . . . . . . . . . . . . . . . . . . . . . . . . . . . . . . . . . . . . . . . . . . . . . . . . . . . . 18
7.6 Real-time Clock/Calendar . . . . . . . . . . . . . . . . . . . . . . . . . . . . . . . . . . . . . . . . . . . . . . . . .19
7.7 Power . . . . . . . . . . . . . . . . . . . . . . . . . . . . . . . . . . . . . . . . . . . . . . . . . . . . . . . . . . . . . . .19
7.8 Connectors . . . . . . . . . . . . . . . . . . . . . . . . . . . . . . . . . . . . . . . . . . . . . . . . . . . . . . . . . . . .20
7.8.1 Panel PC Terminal Strip Power Connector. . . . . . . . . . . . . . . . . . . . . . . . . . . . . . . 20
7.8.2 J1 Power Connector (Single Board Computer). . . . . . . . . . . . . . . . . . . . . . . . . . . . 20
7.8.3 J2 PC104 bus (C/D, 16-bit ISA bus also includes J3) Connector
J3 PC104 bus (A/B, 8-bit ISA bus) Connector . . . . . . . . . . . . . . . . . . . . . . . . . . . . . 21

PPC3-6.5-407/
v1.0 www.winsystems.com Page 4
7.8.4 J4 External Battery Connector . . . . . . . . . . . . . . . . . . . . . . . . . . . . . . . . . . . . . . . . . 23
7.8.5 J5 LVDS and Audio Connector . . . . . . . . . . . . . . . . . . . . . . . . . . . . . . . . . . . . . . . . . 24
7.8.6 J6 Mini DisplayPort. . . . . . . . . . . . . . . . . . . . . . . . . . . . . . . . . . . . . . . . . . . . . . . . . . . 26
7.8.7 J7 VGA. . . . . . . . . . . . . . . . . . . . . . . . . . . . . . . . . . . . . . . . . . . . . . . . . . . . . . . . . . . . . . 26
7.8.8 J8 USB. . . . . . . . . . . . . . . . . . . . . . . . . . . . . . . . . . . . . . . . . . . . . . . . . . . . . . . . . . . . . . 27
7.8.9 J9 Serial Ports . . . . . . . . . . . . . . . . . . . . . . . . . . . . . . . . . . . . . . . . . . . . . . . . . . . . . . . 28
7.8.10 J11 Ethernet External LEDs . . . . . . . . . . . . . . . . . . . . . . . . . . . . . . . . . . . . . . . . . . . . 31
7.8.11 J12 PC104-Plus (PCI bus) . . . . . . . . . . . . . . . . . . . . . . . . . . . . . . . . . . . . . . . . . . . . . . 31
7.8.12 J500 Backlight . . . . . . . . . . . . . . . . . . . . . . . . . . . . . . . . . . . . . . . . . . . . . . . . . . . . . . . 33
7.8.13 J501 Mini-PCIe/mSATA Connector . . . . . . . . . . . . . . . . . . . . . . . . . . . . . . . . . . . . . . 33
7.8.14 J503 Serial ATA (SATA) . . . . . . . . . . . . . . . . . . . . . . . . . . . . . . . . . . . . . . . . . . . . . . . . 35
7.8.15 J504 Digital Input/Output . . . . . . . . . . . . . . . . . . . . . . . . . . . . . . . . . . . . . . . . . . . . . 36
7.8.16 J505 Ethernet . . . . . . . . . . . . . . . . . . . . . . . . . . . . . . . . . . . . . . . . . . . . . . . . . . . . . . . 37
7.9 Jumpers . . . . . . . . . . . . . . . . . . . . . . . . . . . . . . . . . . . . . . . . . . . . . . . . . . . . . . . . . . . . . .37
7.9.1 JP1 AT/ATX Power Mode . . . . . . . . . . . . . . . . . . . . . . . . . . . . . . . . . . . . . . . . . . . . . . 37
7.9.2 JP3 Basic Input/Output System (BIOS) Programming Defaults . . . . . . . . . . . . . . 38
7.9.3 JP4 Low-Voltage Differential Signaling (LVDS) . . . . . . . . . . . . . . . . . . . . . . . . . . . . 38
7.10 LED Indicators. . . . . . . . . . . . . . . . . . . . . . . . . . . . . . . . . . . . . . . . . . . . . . . . . . . . . . . . . .39
7.10.1 D504 User LED . . . . . . . . . . . . . . . . . . . . . . . . . . . . . . . . . . . . . . . . . . . . . . . . . . . . . . 39
8 BIOS. . . . . . . . . . . . . . . . . . . . . . . . . . . . . . . . . . . . . . . . . . . . . . . . . . . . . . . . . . . 39
8.1 General Information . . . . . . . . . . . . . . . . . . . . . . . . . . . . . . . . . . . . . . . . . . . . . . . . . . . . .39
8.2 Entering Setup . . . . . . . . . . . . . . . . . . . . . . . . . . . . . . . . . . . . . . . . . . . . . . . . . . . . . . . . .40
8.3 Navigation of the Menus . . . . . . . . . . . . . . . . . . . . . . . . . . . . . . . . . . . . . . . . . . . . . . . . . .40
8.4 BIOS Splash Screen . . . . . . . . . . . . . . . . . . . . . . . . . . . . . . . . . . . . . . . . . . . . . . . . . . . . . .40
8.5 BIOS Screens . . . . . . . . . . . . . . . . . . . . . . . . . . . . . . . . . . . . . . . . . . . . . . . . . . . . . . . . . .40
9 Cables. . . . . . . . . . . . . . . . . . . . . . . . . . . . . . . . . . . . . . . . . . . . . . . . . . . . . . . . . . 54
10 Software Drivers. . . . . . . . . . . . . . . . . . . . . . . . . . . . . . . . . . . . . . . . . . . . . . . . . . 54
A Best Practices . . . . . . . . . . . . . . . . . . . . . . . . . . . . . . . . . . . . . . . . . . . . . . . . . . . . 55
B Mechanical Drawings . . . . . . . . . . . . . . . . . . . . . . . . . . . . . . . . . . . . . . . . . . . . . . 60
C Power-on Self-Test (POST) Codes . . . . . . . . . . . . . . . . . . . . . . . . . . . . . . . . . . . . . 62
D Warranty Information . . . . . . . . . . . . . . . . . . . . . . . . . . . . . . . . . . . . . . . . . . . . . . 68

PPC3-6.5-407/Before You Begin
v1.0 www.winsystems.com Page 5
1. Before You Begin
Review the warnings in this section and the best practice
recommendations (see “Best Practices” on page 55) when using and
handling the WINSYSTEMS PPC3-6.5-407. Following these
recommendations provides an optimal user experience and prevents
damage. Read through this document and become familiar with the PPC3-
6.5-407 before proceeding.
1.1 Warnings
Only qualified personnel should configure and install the PPC3-6.5-407.
While observing the best practices, pay particular attention to the
following:
2. Introduction
This manual provides configuration and usage information for the PPC3-
6.5-407. If you still have questions, contact Technical Support at (817) 274-
7553, Monday through Friday, between 8 AM and 5 PM Central Standard
Time (CST).
Refer to the WINSYSTEMS website for other accessories (including cable
drawings and pinouts) that can be used with your PPC3-6.5-407.
3. Functionality
The PPC3-6.5-407 is a full-featured Panel PC that operates in the Windows
7, Windows 8, Windows 10, Windows CE, Linux and DOS environments. It
features an Intel
®
Atom™ E3800 Processor, up to 4 GB soldered DDR3
RAM, PC104 and PC104-Plus bus connectors, as well as optional fanless
operation. It provides 24 lines of 5 VDC tolerant digital input-output (DIO),
and also video output with audio support. Communication interfaces
include Gigabit Ethernet, four USB 2.0 ports, two serial RS-232/422/485
FAILING TO COMPLY WITH THESE BEST PRACTICES MAY DAMAGE THE PPC3-6.5-
407 AND VOID YOUR WARRANTY.
Avoid Electrostatic Discharge (ESD)
Only handle the circuit board and other bare electronics when electrostatic dis-
charge (ESD) protection is in place. Having a wrist strap and a fully grounded
workstation is the minimum ESD protection required before the ESD seal on
the product bag is broken.

PPC3-6.5-407/Features
v1.0 www.winsystems.com Page 6
channels and two serial RS-232. channels. Refer to “Features” on page 6
and “General Operation” on page 8 for specific information.
NOTE WINSYSTEMS can provide custom configurations for OEM clients. Please
contact an Application Engineer for details.
4. Features
The PPC3-6.5-407 provides the following features.
LCD Panel and Touchscreen
• 6.5-inch TN LCD panel
•700 nits (cd/m
2
)
• 640 x 480 resolution
• 6-bit + FRC (16.2 M colors)
• USB resistive touchscreen
Single Board Computer
• PC104-Plus compatible single board computer
– Optional stack-through PC104-Plus connectors
• Available Multi-Core Intel Atom E3800 processors
– E3815 1 core, 1.46 GHz
– E3825 2 core, 1.33 GHz
– E3845 4 core, 1.91 GHz
Operating Systems (compatibility)
• Windows (32/64-bit)
•Linux
•Other x86-compatible
Memory
• Available 2 GB or 4 GB soldered down DDR3 RAM
BIOS
•Phoenix SecureCore™
Video Interfaces (Intel Gen7 Graphics, one or two simultaneously
active displays)
• Mini DisplayPort (version 1.1)
• Video Graphics Array (VGA up to 2560 x 1536)
• Low-Voltage Differential Signaling (LVDS, 18 or 24 bpp output to 6.5-
inch LCD display)

PPC3-6.5-407/Features
v1.0 www.winsystems.com Page 7
Ethernet
•Intel
®
i210 Gigabit Ethernet port (1 gigabit per second, GbE) with Surge
Suppression
Storage
• MiniPCIe/mSATA Socket (same connection as used for Bus Expansion)
• Bootable SATA Connector
Digital Input/Output (DIO)
• 24 lines (bi-directional) provided within the Lattice Semiconductor
Corp., MachXO2™ FPGA (field-programmable gate array) interfaced to
the processor with the Low Pin Count (LPC) interface.
•5 V tolerant signals
• Each line programmable for input, output, or event sense
• Lines can be paired with external isolation and relay modules
Bus Expansion
• PC104-Plus (PC104 and PCI104)
• MiniPCIe/mSATA socket (same connection as used for Storage)
Serial Interface
• Four USB 2.0 with Surge Suppression
• Serial Ports
– Two RS232/422/485
– Two RS232: speeds to 250 Kbps (0.25 Mbps)
Audio
• Stereo Audio (Line In, Line Out, Mic)
Power
•+5 VDC Power Input
Industrial Operating Temperature
• -10°C to +70°C (-14°F to +158°F)
Additional Features
• Watchdog timer from 1 second to 255 minutes (15,300 seconds)
• Real-Time Clock (RTC) with optional battery back up
• Status LEDs for Ethernet, 3.3 V Stand-By, and one software controlled
•Speaker output

PPC3-6.5-407/General Operation
v1.0 www.winsystems.com Page 8
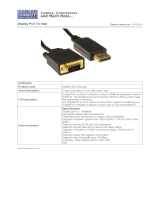
5. General Operation
5.1 System Block Diagram
The PPC3-6.5-407 is a Panel PC utilizing a PC104 single board computer
(SBC). It is a full-featured embedded system with a variety of onboard I/O
options. The following figure is a simplified system block diagram of the
PPC3-6.5-407.
Three display interfaces (MiniDisplayPort, VGA, and LVDS) support up to
two independent displays along with stereo audio. Communication
interfaces include Gigabit Ethernet, four USB 2.0 ports, two serial RS-232/
422/485 channels and two serial RS-232 channels. 24 digital I/O lines with
event sense can be programmed individually for input, output, or
interrupt driven applications. For additional flexibility, the I/O lines can be
paired with external isolation and relay modules.
The Panel PC is designed for harsh environments and reliability, featuring
soldered RAM for added shock and vibration resistance, and provides an
optional fanless solution for operating temperatures between -10°C and
+70°C (-14°F and +158°F).
DDR3L
Memory Down
x64
LPC
E3815
E3827
E3845
VGA
Mini DP
LVDS
USB 1-4
Audio
SATA
mini PCIe/
mSATA
PC104-Plus
Gigabit Enet
MUX
USB
Audio
SATA 1
SATA 2
PCIe 2
PCIe 0
PCIe 1
Legacy
Interface
Display Controller
PC104
DIO24
COM 1-2
COM 3-4
FPGA
SUPER I/O
Level Translators
RS232
RS232/RS422/485
DisplayPort to LVDS
USB Power Switch
HD Audio Codec
PCIe to PCI Bridge
i210 MAC/PHY

PPC3-6.5-407/Specifications
v1.0 www.winsystems.com Page 9
The PPC3-6.5-407 processor options provide single, dual, or quad-core
processing. Each processor option is available with 2 GB or 4 GB of
soldered DDR3 memory and optional stack-through PC104-Plus
connectors.
Linux, Windows and other x86 operating systems can be initialized from
the SATA, mSATA, or USB interfaces. This provides flexible data storage
options.
6. Specifications
The PPC3-6.5-407 adheres to the following specifications and
requirements.
Electrical
V
CC
+5 VDC ±5% required
E3845-4G: 1.7A Typical, 2.5A maximum
E3825-2G: 1.2 A Typical, 2.0 A maximum
E3815-2G: 1.4 A Typical, 2.0 A maximum
Models
1, 2
1
See processor for 38XX
models
2
Add -ST to the end of
each part number for a
stack-through
configuration
PPC3-6.5-407-3825-2
6.5-inch Panel PC with E3825, 2 GB RAM, heat spreader
PPC3-6.5-407-3825-4
6.5-inch Panel PC with E3825, 4 GB RAM, heat spreader
PPC3-6.5-407-3845-2
6.5-inch Panel PC with E3845, 2 GB RAM, heat spreader
PPC3-6.5-407-3845-4
6.5-inch Panel PC with E3845, 4 GB RAM, heat spreader
Processor 3815: E3815 single-core 1.46 GHz, 512 K cache (MOQ
required)
3825: E3825 dual-core 1.33 GHz, 1 MB cache
3845: E3845 quad-core 1.91 GHz, 2 MB cache
Mechanical
Dimensions 7.75 x 5.375 x 2.25 inches
(196.85 x 136.53 x 57.15 mm)
Weight 7.592 oz (215.23 g), without optional heatsink
PCB thickness 0.078 inches (1.98 mm)

PPC3-6.5-407/Specifications
v1.0 www.winsystems.com Page 10
Additional Accessories
Standoff kits are available and recommended for use with the PPC3-6.5-
407.
• KIT-G-PCM-STANDOFF-4: Four piece nylon hex PC104 standoff kit
• KIT-PCM-STANDOFF-B-4: Four piece brass hex PC104 standoff kit
The following table lists the items contained in each kit.
Environmental
Temperature -10°C to +70°C (-14°F to +158°F)
Humidity (RH) 5% to 95% non-condensing
Mechanical Shock
Testing
MIL-STD-202G, Method 213B, Condition A 50 g half-sine,
11 ms duration per axis, 3 axis
Random Vibration
Testing
MIL-STD-202G, Method 214A, Condition D 0.1 g/Hz
(11.95g rms), 20 minutes per axis, 3 axis
RoHS Compliant Yes
Operating Systems
Runs 32/64-bit Windows, Linux, and other x86-compatible operating systems.
Kit
Componen
t
Description Qty
KIT-G-PCM-STANDOFF-
4
4 pc. nylon hex PC104
standoff kit
Standoff Nylon 0.25” hex, 0.600” long
male/female 4-40
4
Hex nut Hex nylon 4-40 4
Screw Phillips-pan head (PPH)
4-40 x 1/4” stainless steel
4
KIT-PCM-STANDOFF-B-
4
4 pc. brass hex PC104
standoff kit
Standoff Brass 5 mm hex, 0.600” long
male/female 4-40
4
Hex nut 4-40 x 0.095 thick, nickel fin-
ish
4
Screw Phillips-pan head (PPH)
4-40 x 1/4” stainless steel
4

PPC3-6.5-407/Configuration
v1.0 www.winsystems.com Page 11
7. Configuration
This section describes the PPC3-6.5-407 attached single board computer
components and configuration.
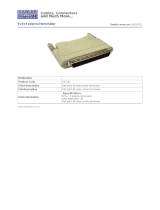
7.1 Component Layout
The attached single board computer provides components on the top and
bottom of the board.
7.1.1 Top and Side Views
JP4
Power
Terminal
Strip
J8
JP3 JP2 JP1
J1
J5
J6
J7
J9
AUDIO
J4
USB
BATT J11
Power Terminal Strip
USB

PPC3-6.5-407/Configuration
v1.0 www.winsystems.com Page 12
Components
Item Description
Referenc
e
J1 Power connector page 20
J2 PC104 Bus (C/D, 16-bit ISA bus also includes J3)
connector
page 21
J3 PC104 Bus (A/B, 8-bit ISA bus) connector page 21
J4 External battery connector page 23
J5 LVDS and audio connector page 24
J6 Mini DisplayPort page 26
J7 VGA page 26
J8 USB page 27
J9 Serial ports page 28
J11 Ethernet external LEDs page 31
J12 PC104-Plus (PCI bus) page 31
JP1 AT/ATX power mode page 37
JP3 Basic input/output system (BIOS) defaults page 38
JP4 Low-voltage differential signaling (LVDS) page 38
D7, D9,
D10
LED indicators page 39

PPC3-6.5-407/Configuration
v1.0 www.winsystems.com Page 13
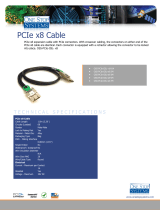
7.1.2 Bottom View
Bottom View Components
7.2 I/O Port Map
The PPC3-6.5-407 uses plug-and-play (PnP) BIOS resource allocation. Care
must be taken to avoid contention with resources allocated by the BIOS.
The PPC3-6.5-407 utilizes a Low Pin Count to Industry Standard
Architecture bridge (LPC to ISA Bridge) to address the PC104 bus. Most
legacy PC104 modules are I/O mapped and function as expected. The LPC
J503
J504
J500
J505
J501
Item Description
Referenc
e
J500 Backlight page 33
J501 Mini PCIe/mSATA connector page 33
J503 Serial ATA (SATA) page 35
J504 Digital input/output page 36
J505 Ethernet page 37
D504 User LED indicator page 39

PPC3-6.5-407/Configuration
v1.0 www.winsystems.com Page 14
controller is the subtractive agent of the Intel Legacy Block. All
transactions not claimed elsewhere are sent to the LPC controller. The LPC
to ISA Bridge does not implement bus mastering cycles or direct memory
access (DMA).
The following table contains the I/O ports used on the PPC3-6.5-407.
PCU I/O addresses
I/O Address Device
0000h-001Fh DMA Controller 82C37
0020h-0021h Interrupt Controller 8259 Master
0024h-0025h Interrupt Controller 8259 Master
0028h-0029h Interrupt Controller 8259 Master
002Ch-002Dh Interrupt Controller 8259 Master
0030h-0031h Interrupt Controller 8259 Master
0034h-0035h Interrupt Controller 8259 Master
0038h-0039h Interrupt Controller 8259 Master
003Ch-003Dh Interrupt Controller 8259 Master
0040h-0043h Timer counter 8254
0050h-0053h Timer counter 8254
0060h PS2 Control (data port)
0061h NMI controller
0062h 8051 download 4K address counter
0064h PS2 Control (status port)
0066h 8051 download 8-bit data port
0070h-0077h RTC Controller
0080h-0083h Port 80
0092h Init Register (Reset Generator)
00A0h-00A1h Interrupt Controller 8259 Slave
00A4h-00A5h Interrupt Controller 8259 Slave
00A8h-00A9h Interrupt Controller 8259 Slave
0ACh-00ADh Interrupt Controller 8259 Slave
00B0h-00B1h Interrupt Controller 8259 Slave
00B2h-00B3h Power Management
00B4h-00B5h Interrupt Controller 8259 Slave
00B8h-00B9h Interrupt Controller 8259 Slave
0120h-012Fh Digital I/O (Default)

PPC3-6.5-407/Configuration
v1.0 www.winsystems.com Page 15
7.3 Interrupt Map
Hardware Interrupts (IRQs) are supported for PC104 (ISA), PCI, and PCIe
devices. The user must reserve IRQs in the BIOS CMOS configuration for
use by legacy devices. The PCIe/PnP BIOS will use unreserved IRQs when
allocating resources during the boot process. The following tables contain
the IRQ resources as used by the PPC3-6.5-407.
IRQ resources
0298h-029Bh Reserved for Super I/O Configuration
029C Interrupt Status Register
029D Status LED Register
029E-029F Watchdog Timer Control
02E8h-02EFh COM4 (Default)
02F8h-02FFh COM2 (Default)
03E8h-03EFh COM3 (Default)
03F8h-03FFh COM1 (Default)
0400h-047Fh Reserved ACPI
0564h-0568h Advanced Watchdog
0800h-08FFh Reserved
0CF9h Reset Generator
2000-201Fh Reserved SMBus
FED1C000h-FED1C3FFh Reserved RCBA
I/O Address Device
IRQ Device
IRQ0 Internal Timer /Counter 0 or HPET #0
IRQ1 Keyboard
IRQ2 Chained to Slave controller (IRQ9)
IRQ3 COM2 *
IRQ4 COM1 *
IRQ5 COM3 *
IRQ6 COM4 *
IRQ7 FREE **
IRQ8 Real Time Clock
IRQ9 FREE **
IRQ10 Digital I/O

PPC3-6.5-407/Configuration
v1.0 www.winsystems.com Page 16
Interrupt status register - 29CH
NOTE A 1 will be read for devices with an interrupt pending.
7.4 Register Definitions
The PPC3-6.5-407 uses the WINSYSTEMS exclusive application-specific
integrated circuit (ASIC), the WS16C48. This device provides 48 lines of
digital I/O. There are 16 unique registers within the WS16C48. The
following table summarizes the registers.
IRQ11 PCI Interrupts
IRQ12 Mouse
IRQ13 Floating point processor
IRQ14 SATA Controller
IRQ15 SATA Controller ***
* These IRQ references are default settings that can be changed by the user in the CMOS Settings
utility. Reference the Super I/O Control section under Intel.
** IRQ9 is commonly used by ACPI when enabled and may be unavailable (depending on operating
system) for other uses.
*** IRQ15 is currently unavailable under the Windows operating systems.
Some IRQs can be freed for other uses if the hardware features they are assigned to are not being
used. To free an
interrupt, use the CMOS setup screens to disable any unused board features or their IRQ
assignments.
Bit Name
Bit 0 COM1
Bit 1 COM2
Bit 2 COM3
Bit 3 COM4
Bit 4 N/A
Bit 5 N/A
Bit 6 N/A
Bit 7 N/A
WINSYSTEMS does not provide software support for implementing the Interrupt Status Register to
share interrupts. Some operating systems, such as Windows XP and Linux, have support for
sharing serial port interrupts (see your specific operating system’s documentation for any available
examples). You will need to implement the appropriate software to share interrupts for the other
devices.
IRQ Device

PPC3-6.5-407/Configuration
v1.0 www.winsystems.com Page 17
Register definitions
The following sections provide details on each of the internal registers.
7.4.1 Port 0 through 5 I/O
Each I/O bit in each of the six ports can be individually programmed for
input or output. Writing a 0 to a bit position causes the corresponding
output pin to go to a high-impedance state (pulled high by external 10 KΩ
resistors). This allows it to be used as an input. When used in the input
mode, a read reflects the inverted state of the I/O pin, such that a high on
the pin will read as a 0 in the register. Writing a 1 to a bit position causes
that output pin to sink current (up to 12 mA), effectively pulling it low.
7.4.2 INT_PENDING
This read-only register reflects the combined state of the INT_ID0 through
INT_ID2 registers. When any of the lower three bits are set, it indicates
that an interrupt is pending on the I/O port corresponding to the bit
position(s) that are set.
Reading this register allows an Interrupt Service Routine to quickly
determine if any interrupts are pending and which I/O port has a pending
interrupt.
7.4.3 PAGE/LOCK
This register serves two purposes. The upper two bits (D6 and D7) select
the register page in use. Bits 0-5 allow for locking the I/O ports. Write a 1
to the I/O port position to prohibit further writes to the corresponding I/O
port.
I/O Address
Offset
Page 0 Page 1 Page 2 Page 3
00h Port 0 I/O Port 0 I/O Port 0 I/O Port 0 I/O
01h Port 1 I/O Port 1 I/O Port 1 I/O Port 1 I/O
02h Port 2 I/O Port 2 I/O Port 2 I/O Port 2 I/O
03h Port 3 I/O Port 3 I/O Port 3 I/O Port 3 I/O
04h Port 4 I/O Port 4 I/O Port 4 I/O Port 4 I/O
05h Port 5 I/O Port 5 I/O Port 5 I/O Port 5 I/O
06h Int_Pending Int_Pending Int_Pending Int_Pending
07h Page/Lock Page/Lock Page/Lock Page/Lock
08h Reserved Pol_0 Enab_0 Int_ID0
09h Reserved Pol_1 Enab_1 Int_ID1
0Ah Reserved Pol_2 Enab_2 Int_ID2

PPC3-6.5-407/Configuration
v1.0 www.winsystems.com Page 18
7.4.4 POL0 through POL2
These registers are accessible when Page 1 is selected. They allow
interrupt polarity selection on a port-by-port and bit-by-bit basis. Writing a
1 to a bit position selects the rising edge detection interrupts while writing
a 0 to a bit position selects falling edge detection interrupts.
7.4.5 ENAB0 through ENAB2
These registers are accessible when Page 2 is selected. They allow for
port-by-port and bit-by-bit enabling of the edge detection interrupts.
When set to a 1, the edge detection interrupt is enabled for the
corresponding port and bit. When cleared to 0, the bit’s edge detection
interrupt is disabled. Note that this register can be used to individually
clear a pending interrupt by disabling and re-enabling the pending
interrupt.
7.4.6 INT_ID0 through INT_ID2
These registers are accessible when Page 3 is selected. They are used to
identify currently pending edge interrupts. A bit when read as a 1 indicates
that an edge of the polarity programmed into the corresponding polarity
register has been recognized. Note that a write to this register (value
ignored) clears ALL of the pending interrupts in this register.
7.5 Watchdog Timer
The PPC3-6.5-407 features an advanced watchdog timer which can be
used to guard against software lockups. Two interfaces are provided to
the watchdog timer. The Advanced interface is the most flexible and
recommended for new designs. The other interface option is provided for
software compatibility with older WINSYSTEMS single board computers.
7.5.1 Advanced
The watchdog timer can be enabled in the BIOS Settings by entering a
value for Watchdog Timeout on the Intel > Super I/O Control screen.
Any non-zero value represents the number of minutes prior to reset
during system boot. Once the operating system is loaded, the watchdog
can be disabled or reconfigured in the application software.
Page D7 D6 D5-D0
Page 0 0 0 1/0
Page 1 0 1 1/0
Page 2 1 0 1/0
Page 3 1 1 1/0

PPC3-6.5-407/Configuration
v1.0 www.winsystems.com Page 19
NOTE Use a long timeout if the watchdog is enabled when trying to boot any
operating system.
The watchdog can be enabled, disabled, or reset by writing the
appropriate values to the configuration registers located at I/O addresses
565h and 566h. The watchdog is enabled by writing a timeout value other
than zero to the I/O address 566h and disabled by writing 00h to this I/O
address. The watchdog timer is serviced by writing the desired timeout
value to I/O port 566h. If the watchdog has not been serviced within the
allotted time, the circuit resets the CPU.
The timeout value can be set from 1 second to 255 minutes. If port 565h
bit 7 equals 0, the timeout value written into I/O address 566h is in
minutes. The timeout value written to address 566h is in seconds if port
565 bit 7 equals 1.
Watchdog timer examples
7.6 Real-time Clock/Calendar
A real-time clock is used as the AT-compatible clock/calendar. It supports a
number of features including periodic and alarm interrupt capabilities. In
addition to the time and date keeping functions, the system configuration
is kept in CMOS RAM contained within the clock section. A battery must be
enabled for the real-time clock to retain time and date during a power
down.
7.7 Power
The PPC3-6.5-407 Panel PC draws power through a power terminal strip
on the backside of the system. This terminal strip is comprised of two
parts: a plug (Part# WECO 302-NSLW-HDS/08) and a socket (Part# WECO
302-NFLW-DS/08). This terminal strip passes power to the attached single
board computer via J1 (see “J1 Power Connector (Single Board Computer)”
on page 20). The attached SBC requires 5 VDC. The +12 V and -12 VDC
power inputs supply pass-through power to the PC104 and PC104-Plus
connectors. The +12 VDC also supplies power to the Panel PC backlight.
Port
Address
Port Bit
7 Value
Port Address Value Reset Interval
565h x 566h 00h DISABLED
565h 1 566h 03h 3 seconds
565h 1 566h 1Eh 30 seconds
565h 0 566h 04h 4 Minutes
565h 0 566h 05h 5 Minutes
Software watchdog timer PET = PORT 566h, write the timeout value.

PPC3-6.5-407/Configuration
v1.0 www.winsystems.com Page 20
5 VDC stand-by is only required to supply the power connector for ATX
mode operation.
The PPC3-6.5-407 supports AT or ATX type power supplies. Jumper JP1 (see
“JP1 AT/ATX Power Mode” on page 37) specifies the type of supply
connected to the single board computer. AT Power is a simple on/off
power supply with no interaction with the single board computer. Most
embedded systems use this type of power supply (default setting).
7.8 Connectors
7.8.1 Panel PC Terminal Strip Power Connector
Layout and Pin Reference
7.8.2 J1 Power Connector (Single Board Computer)
Use this connection to supply power to the PPC3-6.5-407. Set Jumper JP1
(see “JP1 AT/ATX Power Mode” on page 37) to select the type of power
supply operation (AT or ATX).
Layout and Pin Reference
Pin Name Pin Name
1+5 V 5 GND
2+5 V 6 GND
3+12 V 7 GND
4 -12 V 8 RESET
81
Pin Name Pin Name
1 ATX_PWRGOOD 7 +5V_SB
2GND 8 +5 V
3GND 9 +5 V
4 +12VDC 10 -12 V
5 PSON_N 11 GND
6 PMC_RSTBTN_N 12 PWRBTN_N
61
712
/