Page is loading ...

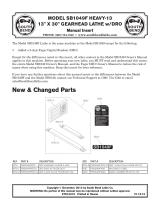
MODEL T10045
FENCE STRETCHER
INSTRUCTION SHEET
COPYRIGHT © NOVEMBER, 2007 BY GRIZZLY INDUSTRIAL, INC.
WARNING: NO PORTION OF THIS MANUAL MAY BE REPRODUCED IN ANY SHAPE
OR FORM WITHOUT THE WRITTEN APPROVAL OF GRIZZLY INDUSTRIAL, INC.
#JB10164 PRINTED IN CHINA
Figure 1. Model T10045 Fence Stretcher.
Tensioning wire is dangerous. Always wear
eye protection and leather gloves when
using this device. If the wire should break
during tensioning, it could recoil, resulting
in bodily injury.
Introduction
The Model T10045 allows for the easy tension-
ing of wire fences. By pulling the length of wire
while still leaving the wire end free, it allows the
user to safely achieve the desired tension when
installing new fencing or splicing existing fence
wires. Locking cam jaws at each end hold the
wire securely while the ratchet lever pulls the wire
taut.
Operations
The fence-stretching functions of the Model
T10045 require that the fence wire be clamped
into the cam jaws. The cam jaws allow the wire to
pass in one direction while tensioning, but clamp
down with increasing pressure when the wire is
pulled in the opposite direction. Familiarize your-
self with the clamping procedures before attempt
-
ing the fence-stretching functions of the Model
T10045 Fence Stretcher.
To clamp fence wire into the cam jaws:
1. Open the jaws using the cam jaw lever, then
insert the wire, as shown in Figure 2
.
Figure 2. Clamping fence wire.
Cam Jaws
Cam Jaw
Lever
Wire
2. Close the jaw, securing the fence wire in
place (Figure 2 Inset). Be sure the wire
is securely clamped by pulling away from
the fence stretcher body. If the wire slides
through the cam jaw, use the cam jaw lever
to apply additional clamping force.

-2-
T10045 Fence Stretcher
To stretch fence wire when attaching to fence
post:
1. Manually pull the wire fencing so that there is
not excessive slack.
2. Clamp the wire into the lock hook cam jaw,
then hook the stationary hook to the fence
post, as shown in Figure 3
.
Note: If the stationary hook cannot be securely
hooked directly to the fence post due to the size
or shape of the fence post, wrap a chain around
the fence post and hook the stationary hook to
the chain.
5. Use the ratchet lever to tension the wire. The
excess wire will be left untensioned and can
easily be secured to the fence post. If the
traveling hook reaches the end of its travel
and the wire requires additional tension, see
"To reposition the traveling hook" on Page
3.
Figure 3. Attaching to fence post
.
Wire
3. Take up excess slack by hand until the wire is
taut enough that the fence stretcher will hold
itself in position on the fence post.
4. Clamp the wire into the traveling hook cam
jaw, as shown in
Figure 4.
Figure 4. Tensioning.
Lock Hook Cam Jaw
Stationary Hook
Fence
post
Untensioned
Wire
Traveling Hook
Cam Jaw
Ratchet Lever
To splice existing fence wires:
1. Clamp one of the wires into the stationary
hook cam jaw. Clamp the other wire into the
lock hook cam jaw, as shown in Figure 5
.
Figure 5. Splicing
.
Figure 6. Tensioning.
2. Take up any excess slack by hand, then
clamp the wire into the traveling hook cam
jaw, as shown in Figure 6
.
Wire
Stationary Hook
Cam Jaw
Lock Hook Cam Jaw
Ratchet Lever
Untensioned
Wire
Traveling Hook
Cam Jaw

T10045 Fence Stretcher
-3-
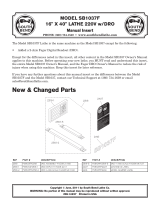
Operations Overview
A. Stationary Hook: Can be used to hook fence
stretcher to existing fence posts when attach
-
ing new wire to the post. Also used to clamp
onto existing wire when splicing.
B. Ratchet Lever: Moves the traveling hook
along the shaft of the fence stretcher in lock
-
ing increments.
C. Cam Jaw Lever: Easily and safely opens
cam jaws.
D. Cam Jaws: Lock and hold fence wires.
E. Traveling Hook: Clamps the fence wire and
ratchets along the shaft of the fence stretch
-
er, tensioning the fence wire.
F. Lock Hook: Temporarily secures wire dur-
ing stretching so the traveling hook can be
repositioned when it reaches the end of the
stretcher shaft.
A
B
C
E
F
D
If the traveling hook reaches the end of its travel
and the wire still requires additional tension, it is
necessary to reposition the traveling hook adja
-
cent to the lock hook. The lock hook cam jaw will
hold the tension in the wire, allowing the traveling
hook cam jaw to be opened and repositioned.
To reposition the traveling hook:
1. Make sure the wire is clamped securely in the
lock hook cam jaw.
2. Release the wire from the traveling hook
cam jaw, then slide the traveling hook back
towards the lock hook, as shown in
Figure
7.
Figure 7. Repositioning traveling hook.
3. Clamp the wire back into the traveling hook
cam jaws and continue the tensioning pro
-
cess. Repeat as necessary.
3. Use the ratchet lever to tension the wire. The
excess wire will be left untensioned and can
easily be spliced. If the traveling hook reach
-
es the end of its travel and the wire requires
additional tension, see "To reposition the
traveling hook
".
Lock Hook Cam Jaw
Traveling Hook
Cam Jaw
Traveling Hook

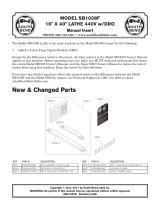
REF PART # DESCRIPTION REF PART # DESCRIPTION
1 PT10045001 FENCE STRETCHER ASSEMBLY 4 PT10045004 READ MANUAL LABEL
2 PT10045002 CAM TENSION SPRING 5 PT10045005 EYE INJURY HAZARD
3 PT10045003 LATCH TENSION SPRING
T10045 Parts Breakdown & List
1
2
3
4
5
2
2
/