SZ 12 A1 D/HA

Hotpoint SZ 12 A1 D/HA Owner's manual

  • Hello! I am an AI chatbot trained to assist you with the Hotpoint SZ 12 A1 D/HA Owner's manual. I’ve already reviewed the document and can help you find the information you need or explain it in simple terms. Just ask your questions, and providing more details will help me assist you more effectively!
Gebrauchsanweisung
Instructions for use
Mode d’emploi
Gebruiksaanwijzing
Istruzioni per l’uso
Brugsanvisning
Bruksanvisning
Käyttöohje
Manual de utilização
Instrucciones para el uso
Instrukcje użytkowania
Használati utasítás
ИнструкциЯ за употреба
Návod k použití
Návod na použitie
Instrucţiuni de utilizare
Инструкции по эксплуатации
9


Вновь включите прибор, чтобы проверить,
устранена ли неполадка. Если нет, снова
отключите прибор и повторите процедуру
через час.
Если после проверки в соответствии с
таблицей устранения неисправностей
и включения прибора он все равно
функционирует неправильно, обратитесь
в сервисный центр и четко опишите суть
проблемы, указав:
вид неполадки;
модель;
тип и серийный номер прибора (указаны
на паспортной табличке внутри прибора);
сервисный номер (если имеется)
(номер после слова SERVICE на
паспортной табличке внутри прибора).







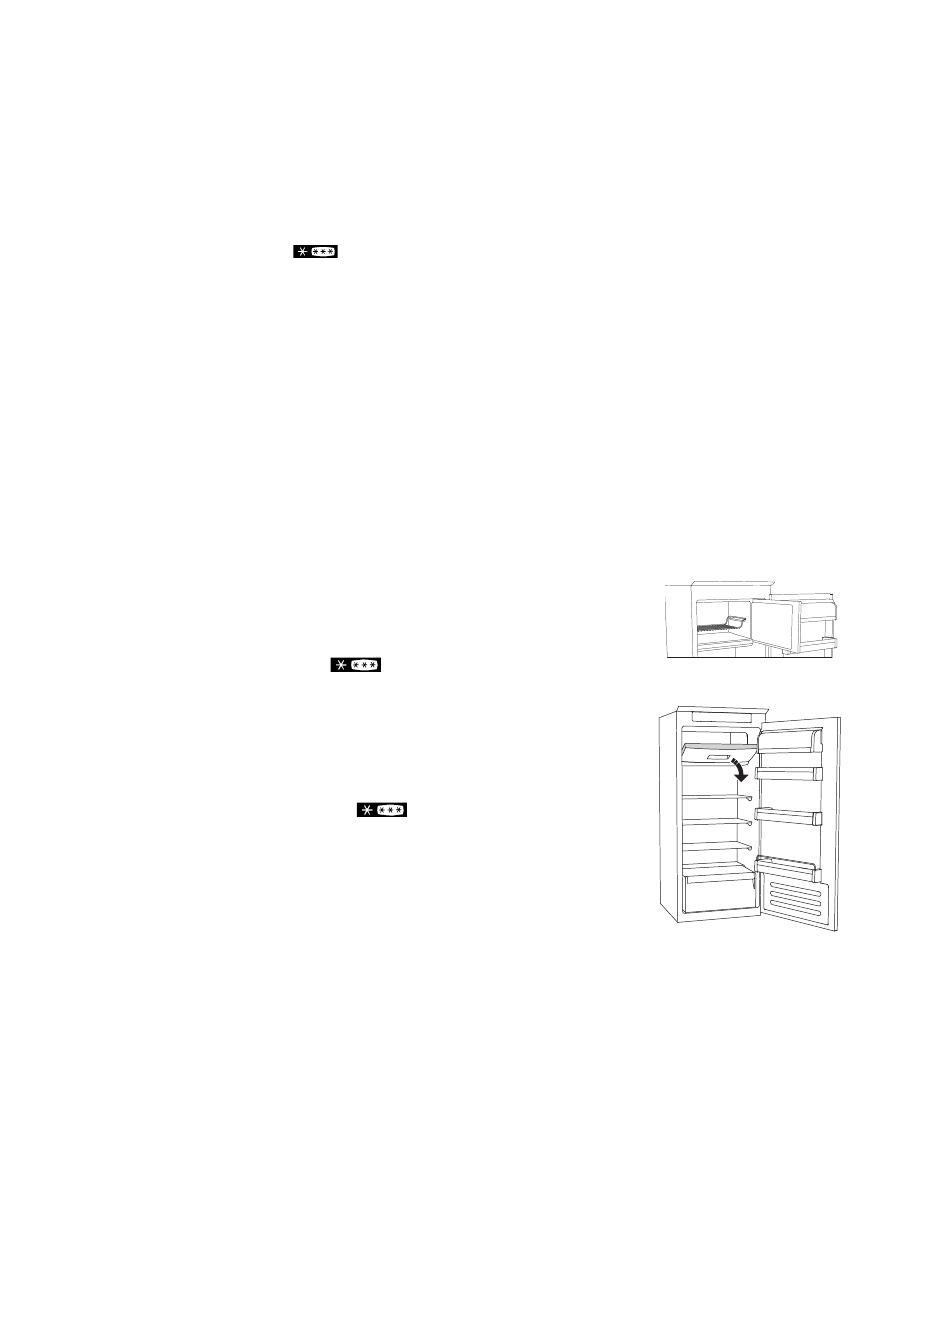
выполните следующие шаги:
- для облегчения процедуры мы рекомендуем опустошить (и по возможности снять)
нижнюю полку в дверце;
- выключите отделение;
- выньте отделение, повернув его кверху;
- выньте белую пластиковую полку под отделением;
 верхняя полка и боковые держатели не снимаются.
Чтобы снова воспользоваться , осторожно вставьте
белую пластиковую полку над отделением, затем вставьте ящик и включите функцию.
Чтобы увеличить объем холодильной камеры и снизить потребление электроэнергии,
рекомендуется выключить  и вынуть его.
Время от времени следует чистить отделение и его части тканью, смоченной теплой
водой (не погружайте в воду белую полку под ящиком) с нейтральным моющим средством,
предназначенным для чистки холодильников. Не пользуйтесь абразивными очистителями.




Шам лампасын ауыстырудың алдында құрылғыны әрқашан қуат көзінен ажыратыңыз. Бұдан
кейін өніміңізге арналған шам лампасының түріне негізделген нұсқауларды орындаңыз.
Шам лампасын Техникалық қолдау қызметі және өкілетті сатушыларда сатылатын бірдей
сипаттағы лампамен ауыстырыңыз.

Шам лампасын алу үшін оны суретте көрсетілгендей,
сағат тіліне қарсы бағытта бұрап алыңыз. Құрылғыны
қайта қосудан бұрын 5 минуттай күте тұрыңыз.
- әдеттегі шам лампасы (макс. 25 Вт)
немесе
- жарық диод шам лампасы (сипаттары бірдей)
тек Техникалық қолдау қызметінде сатылады

Өнімнің төменде көрсетілген суреттердегідей жарық диод шамдары болған жағдайда
оларды ауыстыру қажет болса Техникалық қолдау қызметіне хабарласыңыз.
Жарық диод шамдары әдеттегі шам лампаларына қарағанда ұзақ жұмыс істейді, ішкі
көрінерлікті жақсартады және қоршаған ортаға зиянды емес.
10
Құрылғыны жүйелі түрде сүлгі және суға араластырылған
бейтарап тазалау, әсіресе тоңазытқыштың ішін тазалауға
арналған заттармен тазалаңыз. Ысқыш тазалау заттарды
пайдаланбаңыз. Еріген судың тұрақты және тиісті ағынын
қамтамасыз ету үшін тоңазытқыштың жеміс және көкөніс
жәшігінің артқы жағында орналасқан науаның ішін ұсынылған
жабдықты пайдаланып жүйелі түрде тазалап отырыңыз (суретті қараңыз).
Қызмет көрсету немесе тазалаудың алдында ток айырын розеткадан шығарыңыз немесе
құрылғыны қуат көзінен өшіріңіз.
Құрылғыны қуат көзіне жалғау.
Электрондық үлгілерде дыбыс сигналы шығарылуы мүмкін, бұл температура сигналының
белсендірілуін білдіреді: дыбыс сигналын өшіру түймешігін басыңыз. Ұсынылған болса,
бактерияға қарсы иісті болдырмайтын сүзгіні оның орамында көрсетілгендей желдеткішке
орнатыңыз.
 Құрылғыны іске қосқаннан кейін қалыпты толтырылған құрылғының сәйкес
сақтау температурасы орныққанша 4-5 сағат күту қажет.






LED- strip
Dragon
et2
11
Құрылғыны қуат көзінен ажыратыңыз, босатыңыз, мұзды ерітіңіз (қажет болғанда) және
тазалаңыз. Бөлімдер ішінде ауаның циркуляциясына мүмкіндік беру үшін есіктерді сәл
ашық ұстаңыз. Осының нәтижесінше зең және жағымсыз иістің таралуын болдырмауға
болады.


Есіктерді жабық ұстаңыз, осылайша тағамдар мүмкіндігінше ұзақ уақыт бойы сұық күйінде
сақталады. Ішінара ерітілген тағамдарды қайта мұздатпаңыз. Егер қуат үзілісі ұзаққа
созылса, шамды өшіру сигналы белсендірілуі мүмкін (электроникалық өнімдерде).

Тоңазытқыш бөлімі балғын тағамдар және сусындарды сақтауға мүмкіндік береді.

Бөлімнің ішіндегі артқы бетінде су тамшыларының болуы автоматты еріту кезеңінің белгісі
болып табылады. Еріген су төгу құбырына бағытталады және кейін буланатын контейнерде
жиналады.
Үлгісіне байланысты өнім арнайы «Нөлдік градус» бөлімімен жабдықталуы мүмкін, ол
балғын ет және балықты сақтау үшін аса оңтайлы.
 тоңазытқыштың керек-жарақтарын ыдыс жуғыш машинасында тазаламаңыз.
 ортаның температурасы, есіктердің ашылу жиілігі және құрылғының орналасуы
екі бөлімдердегі ішкі температурасына әсер етуі мүмкін. Температураларды осы
жағдайларға сәйкес орнатыңыз.
 өте ылғалды жағдайларда тоңазытқыш бөлімінде, әсіресе әйнек сөрелерде
конденсат түзілуі мүмкін. Мұндай жағдайда сұйықтық бар контейнерлерді (мысалы,
сорпа құйылған ыдыс) жабу, сұйықтығы көп тағамдарды (мысалы, көкөністер) орау және
жабдықталған жағдайда желдеткішті қосу ұсынылады.

Жәшікті сыртқа қарай мүмкіндігінше алыс етіп тартыңыз да, жоғары көтеріп шығарыңыз.
Жеміс және көкөніс жәшігінің шығарылуын оңайлату үшін екі төменгі есік сөрелерін
босатып, (және мүмкіндігінше шығарып алу) кейін жәшікті шығару қажет болуы мүмкін.


Желдеткіш бөлімдер ішіндегі температураның таралуын және сәйкесінше тағамдардың
сақталуын жақсартып, шамадан тыс ылғалдылықты азайтады. Желдету аймағын бөгемеңіз.
Желдеткіш қолмен қосыла/өшіріле алады (Қысқа нұсқаулықты қараңыз); егер желдеткіш
қосулы болса, қажет болғанда ол автоматты түрде жұмыс істейді.

12
Бөлек мұздатқыш бөлімі бар үлгі
Мұздатқыш бөлімі мұздатылған тағамдарды (орамда көрсетілген мерзім бойы) сақтауға
және балғын тағамдарды мұздатуға мүмкіндік береді. 24 сағат ішінде мұздатыла алатын
балғын тағамдардың көлемі мөлшерлер кестесінде көрсетілген. Балғын тағамдарды мұздату
бөлімінің (Қысқа нұсқаулықты қараңыз) мұздату аймағында ауаның еркін циркуляциясына
мүмкіндік бері үшін тағамдар орамының айналасында жеткілікті орын қалдыра отырып
орналастырыңыз. Ішінара ерітілген тағамдарды мұздатпау ұсынылады. Су, ылғал және
конденсаттың енуін болдырмау үшін тағамдарды орау қажет.

Мұз науасының (қолжетімді болса) 2/3 бөлігін сумен толтырып, мұздату бөліміне қайта
салыңыз. Мұзды шығару үшін ешбір жағдайда үшкір немесе өткір заттарды пайдаланбаңыз.

Жәшіктерді мүмкіндігінше алыс етіп сыртқа тартыңыз, жоғары көтеріп алыңыз. Қосымша
көлемге қол жеткізу үшін мұздатқыш бөлімі жәшіктерсіз пайдаланыла алады.
Тамақты қайта торға/сөрелерге қайта орнатқаннан кейін есіктің тиісінше жабылғанына көз
жеткізіңіз.
Қырауға төзімді үлгілер үшін еріту рәсімдерін орындаудың қажеті жоқ.

Қыраудың мөлшері және жиналуы орта жағдайларына және есіктің ашылу жиілігіне
байланысты өзгереді. Суығырақ температураны орнату немесе, қолжетімді болса, еріту
барысында тағамдардың сақталуын ұзарту үшін жылдам мұздату функциясын (Қысқа
нұсқаулықты қараңыз) тағамдарды мұздату бөлімінен алудан бұрын 4 сағатқа қосыңыз.
Еріту үшін құрылғыны өшіріңіз және жәшіктерді алыңыз. Мұздатылған тағамды суық жерге
салыңыз. Қыраудың еруіне мүмкіндіку беру үшін есікті ашық қалдырыңыз. Еріту барысында
судың ағуын болыдрмау үшін мұздату бөлімінің астына сіңіргіш матаны төсеп, оны жүйелі
түрде сығып отыру ұсынылады.
Мұздату бөлімінің ішкі жағын тазалаңыз және жақсылап кептіріңіз.
Құрылғыны қосыңыз және тағамдарды қайта орнына салыңыз.



 




тағамды бар болса, торда (1-сурет) немесе бөлімнің (2-сурет)
астында орналастырыңыз
тағамды бұрыннан мұздатылған тағамдармен жанаспайтындай,
20 мм аралықты сақтай отырып,
бөлімінің ортасына
салыңыз (1 және 2 сурет).
Ішкі өнім бөлімі бар үлгілер
14m_4s
12m_4s
1-сурет
2-сурет
13

ҚЫРАУДЫ ТОҚТАТУ ЖҮЙЕСІ (үлгіге байланысты қолжетімді) мұздату бөлімі үшін ерітуді
оңайлатады. ҚЫРАУДЫ ТОҚТАТУ құралы (1-сурет) мұздату бөлімінде түзілетін қырауды
жинау үшін жасалған және оны алып, тазалау оңай, сондықтан ол мұздату бөлімінің ішкі
жағын еріту уақытын қысқартады.
ҚЫРАУДЫ ТОҚТАТУ құралындағы қырауды алып тастау үшін төменде көрсетілген тазалау
рәсімін орындаңыз.


- Мұздатқыш бөлімінің есігін ашыңыз және
жоғарғы жәшікті алыңыз (2-сурет).
- ҚЫРАУДЫ ТОҚТАТУ құралын (3-сурет)
ажыратыңыз да, төмендегі әйнек
сөреге құлап қалмауын қадағалап,
алыңыз (4-сурет). Ескертпе: Егер құрал
қыстырылып қалса немесе алынуы
қиын болса, оны алуға тырыспаңыз,
бірақ мұздату бөлімінің толық ерітілуін
жалғастырыңыз.
- Мұздату бөлімінің есігін жабыңыз.
- Құралдағы қырауды ағын (ыстық емес)
судың астында шаю арқылы тазалаңыз
(5-сурет).
- Құралды кептіріңіз және пластик бөліктерін
жұмсақ матамен сүртіңіз.
- 7-А суретінде көрсетілген шығыңқы
жерлерге құралды орнату арқылы қайта
енгізіңіз және құралдың тетігін жоғарыдағы
ұстағыштармен бекітіңіз (7-В суреті).
- Жоғарғы жәшікті қайта енгізіңіз де,
мұздатқыш бөлімінің есігін жабыңыз.
ҚЫРАУДЫ ТОҚТАТУ құралын өздігінен,
мұздатқыш бөлімін ерітусіз тазалау мүмкін
болады. ҚЫРАУДЫ ТОҚТАТУ құралын
жүйелі түрде тазалау мұздату бөлімін толық
еріту қажеттілігін азайтуға мүмкіндік береді.

өнім сипаттамалары, соның
ішінде көлемі және қуаты ҚЫРАУДЫ
ТОҚТАТУ құралынсыз есептеледі.
Click!!
Click!!
A
B
1
2
5
7
6
3 4
15


Ақаулықтың шешілуін тексеру үшін
құрылғыны қайта іске қосыңыз. Олай
болмаса құрылғыны қайта ажыратыңыз
және рәсімді бір сағаттан кейін қайталаңыз.
Нұсқаулықта көрсетілген ақаулықтар
тексерулерін орындағаннан және
құрылғыны қайта іске қосқаннан кейін
құрылғыңыз қате жұмыс істесе, Техникалық
қолдау қызметімен хабарласып, ақаулықты
және жағдайды толық түсіндіріп беріңіз:
ақаулық түрі
үлгісі
құрылғының түрі және сериялық нөмірі
(мөлшерлер кестесінде көрсетілген)
Қызметтік нөмірі (қолжетімді болса)
(құрылғының ішінде орналасқан
техникалық төлқұжаттағы SERVICE
сөзінен кейінгі нөмір)







Келесі қадамдарды орындаңыз:
- бөлімнің алынуын жеңілдету үшін төменгі есік сөрелерін босату (және мүмкіндігінше алу)
ұсынылады.
- бөлімді өшіріңіз
- бөлімді жоғары айналдыру арқылы алыңыз
- ақ пластик сөрені бөлімнің астынан алыңыз
 жоғарғы сөрені және бүйірлік тіректерді алу мүмкін емес.
«» бөлімін қайта пайдалану үшін жәшікті енгізу және функцияны қайта
қосудан бұрын ақ пластик сөрені бөлімнің астына қайта орнатыңыз.
Тоңазытқыштың көлемін үлкейту және қуаттың тұтынылуын азайту үшін «»
бөлімін өшіру және бөлімді шығару ұсынылады.
Бөлімді және оның құрамдастарын жүйелі түрде және жылы су (ақ пластик сөресінің жәшік
астына түспеуіне көз жеткізіп) мен тоңазытқыштың ішін тазалауға арналған бейтарап
тазалау заттарының көмегімен тазалаңыз. Ысқыш тазалау заттарды пайдаланбаңыз.


400010807085
RU KZ UA
05/15
001
3
DEUTSCH Gebrauchsanweisung Seite 4
FRANÇAIS Mode d’emploi Page 10
ITALIANO Istruzioni per l’uso Pagina 16
NEDERLANDS Gebruiksaanwijzing Pagina 22
Scollegare sempre l’apparecchio dall’alimentazione elettrica prima di sostituire la lampadina quindi
seguire le istruzioni in base alla tipologia di illuminazione del vostro prodotto.
Sostituire la lampadina con un tipo delle stesse caratteristiche disponibile presso il Servizio
Assistenza Tecnica ed i rivenditori autorizzati.
Illuminazione tipo 1)
Per rimuovere la lampadina svitare in senso antiorario come
indicato in figura. Aspettare 5 minuti prima di ricollegare
l’apparecchio.
- lampadina di tipo tradizionale (max 25W)
oppure
- lampadina LED (con le stesse caratteristiche)
disponibile solo presso il Servizio Assistenza Tecnica
Illuminazione tipo 2)
Se il prodotto è dotato di luci a LED, come rappresentato nelle figure seguenti, rivolgersi al
Servizio Assistenza tecnica in caso di sostituzione.
Rispetto alla lampadina tradizionale i LED durano più a lungo, migliorano la visibilità interna e
rispettano l’ambiente.
16
Pulire periodicamente l’apparecchio utilizzando un panno ed una
soluzione di acqua tiepida e detergenti neutri specifici per la pulizia
interna del frigorifero. Non usare mai detergenti abrasivi. Per
garantire il deflusso costante e corretto dell’acqua di sbrinamento,
pulire regolarmente l’interno del foro di scarico situato sulla parete
posteriore del comparto frigorifero in prossimità del cassetto frutta e
verdura, usando l’utensile in dotazione (vedi figura).
Prima di eseguire qualsiasi operazione di manutenzione o pulizia,
disinserire la spina dalla presa di corrente o scollegare l’apparecchio dall’alimentazione elettrica.
Collegare l’apparecchio alla rete elettrica.
Nei modelli con elettronica potrebbe attivarsi un segnale acustico, significa che è intervenuto
l’allarme di temperatura: premere il pulsante di spegnimento allarmi acustici. Ove previsto
posizionare il filtro antibatterico-antiodore nella ventola come indicato nella confezione del filtro.
Nota: Dopo la messa in funzione è necessario attendere 4/5 ore prima che venga raggiunta la
temperatura di conservazione adeguata ad un normale carico dell’apparecchio.
PRIMO UTILIZZO
MANUTENZIONE E PULIZIA
DELL’APPARECCHIO
SOSTITUZIONE LAMPADINA O LED
(a seconda del modello)
Lampadina
Lampadina LED
LED- strip
Dragon
et2
Gebruiksaanwijzing
Koelkast met vriesvak
Mode d’emploi
Réfrigérateur avec compartiment
Bedienungsanleitung
Kühlschrank mit Gefrierfach
Instructions for use
Fridge with freezer compartment
178 cm
cop_5019_608_33027 3-10-2006 17:51 Pagina 1
3
DEUTSCH Gebrauchsanweisung Seite 4
FRANÇAIS Mode d’emploi Page 10
ENGLISH Instructions Page 16
NEDERLANDS Gebruiksaanwijzing Pagina 22
Always disconnect the appliance from the power supply before replacing the light bulb. Then
follow the instructions based on the type of light bulb for your product.
Replace the light bulb with one with the same features, available from the Technical Assistance
Service and authorised sellers.
Light type 1)
To remove the light bulb, unscrew it in an anti-clockwise direction, as
shown in the figure. Wait 5 minutes before reconnecting the appliance.
- traditional light bulb (max 25W)
or
- LED light bulb (with the same features)
only available from the Technical Assistance Service
Light type 2)
If the product has LED lights, as demonstrated in the figures below, contact the Technical
Assistance Service if you need a replacement.
LEDs last longer than traditional light bulbs, improve internal visibility and are environmentally-
friendly.
16
Clean the appliance occasionally with a cloth and a solution of warm
water and neutral cleaning agents specifically for cleaning the inside
of the refrigerator. Do not use abrasive cleaning agents. To ensure
the constant and correct flow of the defrosting water, regularly clean
the inside of the drain situated in the back wall of the refrigerator
compartment near the fruit and vegetable drawer using the utensil
provided (see figure).
Before carrying out any maintenance or cleaning, take the plug out of the socket or disconnect the
appliance from the power supply.
Connect the appliance to the power supply.
In models with electronics, a sound signal may be emitted, which means that the temperature
alarm has been activated: press the sound alarm off button. Where provided, position the
antibacterial anti-odour filter in the fan as demonstrated in the filter packaging.
Note: After turning the appliance on, you must wait for 4-5 hours for the correct storage
temperature to be reached for a normally filled appliance.
USING FOR THE FIRST TIME
MAINTENANCE AND CLEANING
OF THE APPLICANCE
REPLACING THE LIGHT BULB OR LED
(depending on the model)
Light bulb
LED light bulb
LED- strip
Dragon
et2
17
Disconnect the appliance from the power supply, empty it, defrost it (if necessary) and clean it.
Keep the doors slightly ajar to let air circulate inside the compartments. By doing this, you avoid
the development of mould and bad odours.
IN THE EVENT OF NON-USE
OF THE APPLICANCE
Keep the doors closed so the food stays cold for as long as possible. Do not re-freeze food that
has partially defrosted. If there is a prolonged power cut, the black out alarm may also activate (in
products with electronics).
IN THE EVENT OF AN INTERRUPTION TO
THE POWER SUPPLY
The refrigerator compartment allows for the storage of fresh food and drink.
The refrigerator compartment defrosts completely automatically.
The occasional presence of drops of water on the internal back wall of the compartment is a
sign of the automatic defrosting phase. The defrosting water is channelled into a drain and then
collected in a container, where it evaporates.
Depending on the model, the product may be equipped with a special “Zero Degrees”
compartment, which is ideal for storing fresh meat and fish.
Warning: do not clean refrigerator accessories in a dishwasher.
Note: the ambient temperature, how often the doors are opened and the position of the appliance
may affect the internal temperatures in the two compartments. Set the temperatures depending on
these factors.
Note: in very humid conditions, condensation may form in the refrigerator compartment, especially
on the glass shelves. In this case, it is recommended that you close containers with liquids in (e.g.
a pot of stock), wrap up food with a high water content (e.g. vegetables) and turn on the fan, if
there is one.
Removing the fruit and vegetable drawer (depending on the model)
Pull the drawer outwards as far as it will go, lift it up and take it out.
To make it easier to remove the fruit and vegetable drawer, it may be necessary to empty (and
possibly remove) the two lower door shelves and then continue to remove the drawer.
Fan and antibacterial anti-odour filter (depending on the model)
The fan allows for the even distribution of the temperatures inside the compartments and,
consequently, better preservation of the food and reduction of excess humidity. Do not obstruct
the ventilation area. The fan can be turned on/off manually (see the Quick Guide); if it is turned on,
it operates automatically when necessary.
REFRIGERATOR COMPARTMENT
18
Model with separate freezer compartment
The freezer compartment allows for the storage of frozen food (for the period indicated on the
packaging) and the freezing of fresh food. The quantity of fresh food that can be frozen in 24 hours is
written on the rating plate. Arrange the fresh food in the freezing area inside the freezer compartment
(see Quick Guide), leaving enough space around the food packages to allow air to circulate freely. It
is advisable that you do not re-freeze food that has partially defrosted. It is important to wrap the food
in a way that prevents the ingress of water, humidity or condensation.
Making ice cubes
Fill 2/3 of the ice tray (if available) with water and put it back in the freezer compartment. Do not
use sharp or pointed objects to remove the ice under any circumstances.
Removing the drawers (depending on the model)
Pull the drawers outwards as far as they will go, lift them up and remove them. To get more
volume, the freezer compartment can be used without the drawers.
Make sure that the door is closed properly after putting the food back on the grilles/shelves.
For frost free models it is not necessary to carry out any defrosting procedures.
For other models, the build up of frost is a normal occurrence.
The quantity and speed of frost accumulation varies depending on the ambient conditions and
how often the door is opened. It is advisable to set the temperature colder or, if available, turn on
the quick freeze function (see Quick Guide) four hours before removing the food from the freezer
compartment, to prolong the preservation of the food during the defrosting phase. To defrost, turn
the appliance off and remove the drawers. Put the frozen food in a cool place. Leave the door
open to allow the frost to melt. To prevent the water from escaping during the defrost, it is advised
that you place an absorbent cloth on the bottom of the freezer compartment and wring it out
regularly.
Clean the inside of the freezer compartment and dry it carefully.
Turn the appliance back on and put the food back inside.
HOW TO DEFROST
THE FREEZER COMPARTMENT
(depending on the model)
FREEZER COMPARTMENT
In the freezer compartment you can also freeze fresh
food. The quantity of fresh food that can be frozen in 24 hours
is written on the rating plate.
How to freeze fresh food:
arrange the food on the grille, if present (figure 1), or directly on the
bottom of the compartment (figure 2)
put the food in the middle of the
compartment without it
coming into contact with food that is already frozen, keeping a
distance of about 20 mm (figure 1 and 2).
Models with an internal product compartment
14m_4s
12m_4s
Figure 1
Figure 2
19
STOP FROST SYSTEM (depending on the model)
The STOP FROST SYSTEM (available depending on the model) facilitates the defrost procedure
for the freezer compartment. The STOP FROST accessory (figure 1) is designed to collect some
of the frost that forms in the freezer compartment and it is easy to remove and clean, therefore
reducing the time needed to defrost the inside of the freezer compartment.
To remove the frost on the STOP FROST accessory follow the cleaning procedure demonstrated
below.
PROCEDURE TO CLEAN THE STOP FROST
ACCESSORY
- Open the freezer compartment door and
remove the upper drawer (figure 2).
- Unfasten the STOP FROST accessory
(figure 3) and remove it (figure 4), taking
care not to drop it on the glass shelf below.
Note: if the accessory is jammed or difficult
to remove, do not keep trying to remove it,
but proceed with the complete defrost of the
freezer compartment.
- Close the door to the freezer compartment.
- Remove the frost on the accessory by rinsing
it under running (not hot) water (figure 5).
- Let the accessory drip dry and dry the plastic
parts with a soft cloth.
- Reinsert the accessory by placing the back
part on the projections shown in figure 7-A,
then refasten the handle of the accessory to
the clasps above (figure 7-B).
- Reinsert the upper drawer and close the door
to the freezer compartment.
It is possible to clean the STOP FROST
accessory on its own without completely
defrosting the freezer compartment. Cleaning
the STOP FROST accessory regularly helps
to reduce the need to completely defrost the
freezer compartment.
Note: the product specifications, including
volume and energy, are calculated without the
STOP FROST accessory.
Click!!
Click!!
A
B
1
2
5
7
6
3 4
/