Abbott FreeStyle Flash Owner's Booklet

Category
Measuring, testing & control
Type
Owner's Booklet

Abbott FreeStyle Flash is a blood glucose monitoring system that provides virtually pain-free testing with a variety of features to help you manage your diabetes. It uses the world's smallest sample size, allowing you to test from various locations on your body.

Abbott FreeStyle Flash is a blood glucose monitoring system that provides virtually pain-free testing with a variety of features to help you manage your diabetes. It uses the world's smallest sample size, allowing you to test from various locations on your body.

Owners
Booklet
Manual del
propietario
Virtually
Pain-Free
Testing
Pruebas
prácticamente
indoloras
Blood Glucose Monitoring System
Sistema de prueba para glucosa en sangre
Table of Contents
Important Information About Your
FreeStyle Flash® Blood Monitoring System .....................................................3
Important Health Related Information ........................................................ 4-5
The FreeStyle Flash Meter and FreeStyle® Test Strip
The FreeStyle Flash Meter and How It Works ............................................ 6-7
The FreeStyle Flash Meter Display .............................................................. 8-9
The FreeStyle Test Strip ....................................................................................10
The FreeStyle Control Solution
The FreeStyle Control Solution ................................................................. 11-12
Performing a Control Solution Test..........................................................13-14
The FreeStyle Lancing Device
Using the Lancing Device .......................................................................... 15-16
Testing Your Blood Glucose
Testing Your Blood Glucose .... .......................................................................17
Performing a Blood Glucose Test ............................................................. 18-23
LO and HI Readings .........................................................................................24
Meter Set-Up
Setting Up Your Meter ......................................................................................26
Setting the Alarms ....................................................................................... 26-27
Setting the Sound, Time, Time Format ................................................... 28-29
Setting the Date, Date Format ........................................................................29
Unit of Measurement, Software Version Display ..........................................30
Meter Results
Meter Memory, 14 Day Average................................................................ 30-31
Test Results (Blood Glucose, Control Solution), Transferring Data .... 31-32
Meter Maintenance
Battery ................................................................................................................
33
Replacing the Battery .................................................................................. 33-34
Caring for Your Meter ......................................................................................34
System Troubleshooting
Error Messages ............................................................................................. 35-37
Troubleshooting .................................................................................................38
FreeStyle Flash System Specifications ............................................................39
2
Call Customer Care Toll Free at 1-888-522-5226 www.AbbottDiabetesCare.com
ENGLISH
3
ENGLISH
The FreeStyle Flash® System Uses the World’s
Smallest Sample So You Can Test on a Variety of
Locations
The human figure above shows the areas where you can test with the
FreeStyle Flash System. Avoid moles, veins, bones, and tendons.
WARNING:
We recommend that you test on your fingers or palm, at the
base of the thumb if you are testing for hypoglycemia (low blood
glucose) or if you suffer from hypoglycemia unawareness.
Important Information About Your FreeStyle
Flash® Blood Glucose Monitoring System
How the FreeStyle Flash System Should Be Used
The FreeStyle Flash System is intended for use outside the body (in
other words, in vitro diagnostic use only).
The FreeStyle Flash System is used for measuring blood glucose
(also known as blood sugar) from samples taken from the forearm,
upper arm, hand, thigh, calf, or fingers.
The FreeStyle Flash Meter should only be used with FreeStyle® Test
Strips and FreeStyle Control Solution. Using other brands of test
strips and control solution with this meter can produce inaccurate
results.
Do use the FreeStyle Flash Meter for:
Testing blood glucose.
Testing only with fresh capillary whole blood samples.
Do not use the FreeStyle Flash Meter for:
The diagnosis of diabetes.
Testing on newborns.
Testing of arterial blood.
WARNING:
The FreeStyle Flash System contains small parts that may be
dangerous if swallowed.
Patients receiving peritoneal dialysis using a solution containing
Icodextrin should not use the FreeStyle Flash System.
Caution: Please read all the instructions provided in this Owner’s
Booklet and practice the testing procedures before using the
FreeStyle Flash System. Blood glucose monitoring should be done
with the guidance of a healthcare professional.
Upper arm
Forearm
Hand
Fingertips
Thigh
Calf
Suggested Test
Areas for the Hand
Most Test Sites Available
4
Call Customer Care Toll Free at 1-888-522-5226 www.AbbottDiabetesCare.com
ENGLISH
5
ENGLISH
Important Health-Related Information
• Severe dehydration and excessive water loss may cause false low
results. If you believe you are suffering from severe dehydration,
consult your physician immediately.
• Peritoneal dialysis solution containing Icodextrin or compounds of
Galactose ≥13 mg/dL, Maltose ≥20 mg/dL or Lactose ≥10 mg/dL
causes the FreeStyle Flash Blood Glucose Monitoring System to
overestimate blood glucose test results.
• Test results below 60 mg/dL mean low blood glucose
(hypoglycemia).
• Test results greater than 240 mg/dL mean high blood glucose
(hyperglycemia).
Important Health-Related Information (cont)
• If you get results below 60 mg/dL or above 240 mg/dL and do not
have symptoms of hypoglycemia or hyperglycemia, repeat the test.
If you have symptoms or continue to get results that fall below 60
mg/dL or above 240 mg/dL, follow the treatment advice of your
healthcare professional.
• If you are experiencing symptoms that are not consistent with your
blood glucose test and you have followed all instructions described
in the FreeStyle Flash® Owner’s Booklet, call your healthcare
professional.
6
Call Customer Care Toll Free at 1-888-522-5226 www.AbbottDiabetesCare.com
ENGLISH
7
ENGLISH
The FreeStyle Flash® Meter and How It Works
c (Configure) Button
Marks a control solution test.
Changes the test strip code
(scrolls forward), date, time,
alarm settings, sound options,
and reviews stored readings.
Test Strip Port
Insert the Top end of a new FreeStyl
Test Strip here. The meter powers on
when you insert the test strip.
Bottom
FreeStyle Test Strip
Sample Area/Test Strip Edge
Data Port
Download test results. Requires a compatible data
management system.
Display Screen
Displays your test results and other important information.
m (Mode) Button
Move to different mode settings.
Changes the test strip code (scrolls backward).
Silences an alarm.
Sample Areas (dark-colored half-circles on Test Strip Edge)
Apply blood or control solution to one Test Strip Edge only.
Insert printed side up (with the dark-colored rectangle
going into the meter.
Top
Light Button
Controls the display backlight and test light.
System Check Screen
This screen always appears when meter leaves clock mode
so that you can make sure the display is working properly.
Do not use the meter if the system check screen does not
match the example here. Please call Customer Care.
8
Call Customer Care Toll Free at 1-888-522-5226 www.AbbottDiabetesCare.com
ENGLISH
9
ENGLISH
Blood Drop and Test Strip Symbols
These symbols work together in an
animation to tell you when the meter
is ready for you to apply blood or
control solution.
Date Setup Symbol
Appears in Set
mode when setting
the date format.
Check and Set Test
Strip Code Symbol
Appears when you
should check and set
the test strip code.
Thermometer Symbol
Appears if your meter
is out of operating
temperature range.
Sound Level Symbols
Indicates high, low, or off sound volume.
mg/dl (U.S. Standard)
Indicates unit of
measurement.
Clock Symbol
Appears in Clock
mode and in Set
mode when setting
the time.
14-Day Average
Symbol
Shows the average
value of glucose
readings from the
last 14 days.
P Symbol
Indicates PM in 12-hour
format.
The FreeStyle® Flash Meter Display
Control Solution Test Result Symbol
Shows that you have marked a test result as
a control solution test.
Test Result Area
Displays test results.
Check Owner’s Booklet Symbol
Appears with another symbol to indicate the relevant reference in the
FreeStyle Flash Owner’s Booklet.
Message Area
Displays date, time, number of tests, and software version.
Battery Symbol
Appears when you should replace your
meter batteries.
Memory Mode Symbol
Shows you test results stored in the
meter memory.
10
Call Customer Care Toll Free at 1-888-522-5226 www.AbbottDiabetesCare.com
ENGLISH
11
ENGLISH
Test Strip Edge
WARNING:
The cap or vial contains drying agents that may be harmful if
inhaled or swallowed and may cause skin or eye irritation.
The FreeStyle® Control Solution
FreeStyle Control Solution is a red liquid that contains a
fixed amount of glucose that is used to:
• Practice testing without having to use your own
blood.
• Ensure that your meter and test strips are working
together properly.
A control solution test should be performed
• When you question your results and want to confirm that your
monitor and test strips are working properly.
For information on how to obtain Control Solution, call Customer
Care at 1-888-522-5226.
Important Test Strip Information
• The FreeStyle Flash System has an operating range of 40° to 104° F.
• Store the test strip package in a cool, dry place between 37° and 86° F.
• Use test strips only within the system operating temperature range.
• Keep away from direct sunlight and heat.
• Store your test strips in their original vial only; never transfer them
to another vial or any other container.
• Never store individual test strips outside the vial.
• After removing a FreeStyle Test Strip from the vial, immediately
close the vial cap tightly.
• With clean, dry hands, you may gently touch the test strip anywhere
when removing it from the vial or inserting it into the meter.
• Do not use test strips beyond the expiration date. This may cause
inaccurate results.
• Do not bend, cut, or alter FreeStyle Test Strips.
Note: For further information, refer to the FreeStyle Test Strip package
insert.
The FreeStyle® Test Strip
Apply blood or control solution to only
one Test Strip Edge per test.
Important: Use only one sample area of the test strip per
test. Do not apply blood to both sample areas. Test strips
may be used only once. Discard used test strips. You can
continue to fill the test strip for up to 60 seconds. Be sure
to reapply the sample to the same sample area.
12
Call Customer Care Toll Free at 1-888-522-5226 www.AbbottDiabetesCare.com
ENGLISH
13
ENGLISH
Insert the top of the test strip into your meter
until it stops. This will power on the meter.
The code number on the display must match the
code number on the side of your test strip vial.
Refer to Setting the Test Strip Code.
Wait for the meter to display the Blood Drop
and Test Strip symbols.
Note: Be ready to adjust the code on the meter to match the code
number on the test strip vial.
Gently touch only the Sample Area of the Test
Strip Edge to the control solution.
Important: Do not apply control solution to both
Test Strip Edges.
If the sound prompt is on, your meter will beep when the test strip
is full. A short line then moves clockwise around the display screen
while the sample is processing.
Important Control Solution Information
FreeStyle® Control Solution is good for three months after opening
the bottle or until the expiration date printed on the label, whichever
comes first.
Important: Count forward three months from the date you open a new
bottle of control solution. This is your discard date. Write this date on
the side of the control solution bottle.
Example: You open the control solution on January 15th. Count
forward three months to April 15th. This is the discard date that you
record on the bottle.
• Use only FreeStyle Control Solution with your FreeStyle Flash Meter.
• Replace the cap on the control solution bottle immediately after
using.
• Do not use control solution past the expiration date.
• Do not add water or any liquid to control solution.
• Control solution tests are specified to be accurate only when used
between 59° to 104° F.
• The control solution test results should fall within the range printed
on the test strip vial label.
Important: The control solution range is a target range for control
solution only. It is not a target range for your blood glucose level.
• If control solution results are out of this range, repeat the test.
• If your control solution test results continue to fall outside the range
printed on the test strip vial, do not use the FreeStyle Flash System
to test your blood glucose. Contact Customer Care.
Caution: Results from FreeStyle Control Solution tests do not
reflect your blood glucose level.
2
1
3
Performing a Control Solution Test
14
Call Customer Care Toll Free at 1-888-522-5226 www.AbbottDiabetesCare.com
ENGLISH
15
ENGLISH
The result will appear on the display screen and if the sound is on,
your meter will beep twice. To mark the result as a control solution
result, press and hold the “cbutton for two seconds until the control
solution symbol ( ) appears at the top of the display screen.
If you have marked a blood glucose test as a control solution test by
mistake, you can unmark it by pressing and holding the c” button
again for two seconds.
Compare your control solution test result to the
range printed on your test strip vial label. Your
control solution results should fall within the
range printed on the side of your test strip vial.
Out of range test results may be caused by:
Expired or bad control solution.
Expired or bad test strip.
Error in performing test.
Watered-down control solution.
Code on test strip vial does not match code set in meter.
Meter malfunction.
Control solution test done outside 59° to 104° F.
To return the meter to clock mode, remove the test strip.
4
The FreeStyle® Lancing Device
Dark Cap
(for finger testing)
Cocking Handle
Depth Settings Dial
Depth Indicator Window
Release Button
Clear Cap (for testing sites
other than the fingers)
Using the Lancing Device
1
2
Remove Cap
Snap off the cap on the lancing device at
an angle.
Insert Lancet
Insert a new FreeStyle Lancet firmly into
the white lancet holder cup. (Pushing the
lancet into the cup may cock the device;
this is okay.)
Twist Off the Rounded Top
Hold the lancet firmly in place with one
hand; use your other hand to twist off the
rounded top.
3
16
Call Customer Care Toll Free at 1-888-522-5226 www.AbbottDiabetesCare.com
ENGLISH
17
ENGLISH
4
5
6
Testing Your Blood Glucose
WARNING:
We recommend that you test on your fingers or palm if you are
testing for hypoglycemia (low blood glucose) or if you suffer from
hypoglycemia unawareness.
Important: To ensure accurate results, wash your
hands and test site (for example, your forearm) with
soap and water. Make sure there is no cream or lotion
on the test site. Thoroughly dry your hands and test
site.
With the FreeStyle Flash® Meter, you can test your blood glucose on
your forearm, fingers, upper arm, hand, thigh, or calf.
Testing with the FreeStyle Flash Meter requires a very small sample
size, 0.3 microliters of blood; about the size of pinhead
(example: • ).
Most healthcare professionals recommend testing when blood
glucose values are stable: before meals and before bedtime. However,
when blood glucose is changing, blood from the fingertips or palm
(at the base of the thumb) may show these changes sooner than
blood from other sites.
Times when you may be checking for low blood glucose include:
When you are feeling symptoms such as weakness, sweating,
nervousness, headache, or confusion.
When you have delayed a meal after taking insulin.
When your healthcare professional advises you to do so.
Replace Cap
Replace the cap until it snaps or clicks into place.
Be careful not to touch the exposed needle on
the lancet.
Important: Use the clear cap on the lancing device for the following test
sites: forearm, upper arm, hand, thigh, and calf.
Use the dark cap for finger tests.
Set the Lancing Level
The FreeStyle Lancing Device offers four
different settings. Move the dial to the desired
setting as shown in the depth indicator window.
To lance your arm we recommend that you start
at Level 2.
Level 1 is the shallowest depth; Level 4 is the deepest.
To lance your finger, we recommend that you start at Level 1.
Cock the Handle
Pull the dark cocking handle out until it clicks.
(You may have already cocked the handle in
step 2; this is okay.)
You are now ready to perform a blood glucose test.
18
Call Customer Care Toll Free at 1-888-522-5226 www.AbbottDiabetesCare.com
ENGLISH
19
ENGLISH
Prepare Your Meter
Insert a new test strip into the meter until it
stops. e meter will power on.
Note: If you do not start the test within two minutes, the meter returns
to clock mode. To restart your meter, take out the unused test strip and
reinsert it into the meter.
Setting the Test Strip Code
When the meter powers on, three display screens
will appear in the following order:
When you see the word COdE” and a code
number on the display screen, use the “cbutton
to scroll forward or the “mbutton to scroll
backward until the number matches the number
on your test strip vial. The FreeStyle Flash® Meter
has a total of 50 codes.
Performing a Blood Glucose Test
Caution: Take care to not press the “c” or “m” buttons when you
are holding the meter while performing the blood test. If you do,
you might change the code and get an incorrect reading or an
Error 6.
After you set your code number, the Blood
Drop and Test Strip symbols will appear on the
display screen.
If you want to return to the code number
display screen after the Blood Drop and Test
Strip symbols appear, press the c” button.
Note: To ensure accurate test results, make sure the code number on
your meter always matches the number in the box outlined in blue,
located on the side of the test strip vial.
Code Number
Blood Drop and
Test Strip Symbols
2
Lance Your Forearm, Upper Arm, Hand,
Thigh, or Calf
To bring fresh blood to the surface of the test
site, rub the test site vigorously for a few seconds
until you feel it getting warm.
1
System Check
Setting the Test Strip Code (cont)
20
Call Customer Care Toll Free at 1-888-522-5226 www.AbbottDiabetesCare.com
ENGLISH
21
ENGLISH
Lancing Your Finger
a. Set the depth setting on the lancing device to
Level 1.
b. Lightly touch the lancing device (with the
gray cap) against the side of your fingertip.
c. Press the release button.
d. Gently squeeze your finger, if needed, until
a blood drop the size of a pinhead forms
(example: • ).
Filling the Test Strip with Blood
a. Make sure that the test strip is in the meter
and the meter is powered on. (If the meter
is in clock mode, take out the test strip and
reinsert it into the meter.) You are now ready
to apply the blood sample.
b. Bring the test strip to the blood sample at a
slight angle.
c. The test strip acts like a sponge and pulls the
blood into the strip through the sample area.
3
Test Strip Edge
a. Hold the clear cap down against the top of
your test site. Press the release button. Do not
lift up.
b. Continue to hold the lancing device and
gradually increase pressure for several
seconds.
c. While holding the lancing device on your test
site, look through the clear cap; the blood
sample should be about the size of a pinhead
(example: • ).
d. Lift the lancing device straight up; be careful not to smear the blood
sample on your test site.
Important: Avoid lancing areas with obvious veins or moles to avoid
excess bleeding.
Important: Avoid lancing areas where tendons or bones stick out
(for example, hand bones and ankle bones.)
Lancing Your Palm
When lancing on the palm (at the base of the thumb) use the clear cap
as you would for any alternative site, but there is no need for vigorous
rubbing.
Physiologic differences in the circulation between the finger or
palm (at the base of the thumb) and other test sites like the forearm,
upper arm, top of hand, thigh, and calf may result in differences in
blood glucose measurements from these test sites and your finger
or palm (at the base of the thumb). Differences in blood glucose
measurement between the other test sites and your finger or palm
(at the base of the thumb) may be observed after eating, insulin
medication, or exercise.
Lance Your Forearm, Upper Arm, Hand, Thigh, or Calf (cont)
22
Call Customer Care Toll Free at 1-888-522-5226 www.AbbottDiabetesCare.com
ENGLISH
23
ENGLISH
4
Removing the Lancet
When you have finished testing, snap off the cap
from the lancing device.
Pinch the white clip that holds the lancet until
the lancet falls out.
Potential Bruising
It is possible you may experience bruising at the test site. If bruising
does occur, you may choose to lance another test site.
Maintenance
Use isopropyl alcohol or soap and water to wipe the outside of the
lancing device. If you wish, remove the cap, wash it in warm water and
rinse well.
Important: Do not immerse the body of the lancing device in water or
any other liquid.
Do not press the test strip against the test site.
Do not scrape the blood onto the test strip.
Do not apply blood to the flat side of the test strip.
Do not apply blood to the test strip when the test strip is out
of the meter.
Do not put blood or foreign objects into the test strip port.
Waiting for Result
Do not pull the test strip away until you
hear one beep or see the short line moving
clockwise on your meter screen. This means
you have enough blood and the meter is
reading your glucose.
If after five seconds your meter does not show a short line moving
around the display screen, the sample may be too small. You may
add blood to the same sample area of the test strip from which you
started for up to 60 seconds from the time of the first application.
The test result is complete when your blood
glucose test result is shown on the display
screen. If the sound prompt is on you will hear
two beeps.
The time that the meter takes depends on your
blood glucose level. The higher your glucose
level, the longer it takes to get a result.
5
24
Call Customer Care Toll Free at 1-888-522-5226 www.AbbottDiabetesCare.com
ENGLISH
25
ENGLISH
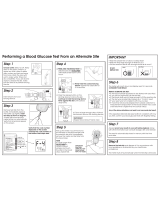
Using Your Meter’s Lights
Depending on what mode your meter is in, pressing the light button
(
) lights either the display backlight or the test light.
Using the Display Backlight
Pressing the light button powers on the display
backlight in all modes except when applying a
sample (for example, clock, memory, and set).
e display backlight goes out when you press
the light button (
) again or when the meter is
inactive for 10 seconds.
Using the Test Light
Pressing the light button while the Blood Drop and
Test Strip symbols appear on the display screen
powers on the test light. e test light goes out:
When you press the light button again.
When the meter receives the correct amount of blood for a test (the
test strip is lled).
Aer 60 seconds of no activity.
When a test strip is removed from the meter.
If you use either the backlight or the test light during the test mode,
the backlight lights again to show you the test results aer the
measurement is complete.
LO and HI Readings
Important: Low or high blood glucose readings can indicate a potentially
serious medical condition. The FreeStyle Flash® Meter displays results
from 20 to 500 mg/dL.
If your test result is lower than 20 mg/dL, LO will appear on the meter
display screen. This reading indicates severe hypoglycemia (low blood
glucose).
LO Reading with Symptoms
If you have a LO reading and have symptoms
such as weakness, sweating, nervousness,
headache or confusion, then follow your doctors
recommendation to treat hypoglycemia.
LO Reading without Symptoms
If you get a LO reading, but have no symptoms of low blood glucose,
then retest with a new test strip on your fingers or palm. If you still
get a LO reading, follow your doctors recommendation to treat
hypoglycemia.
If your test is above 500 mg/dL, HI will appear on the display screen.
This indicates severe hyperglycemia (high blood glucose).
HI Reading with Symptoms
If you feel symptoms such as fatigue, thirst, excess
urination, or blurry vision, then follow your
doctor’s recommendation to treat hyperglycemia.
HI Reading without Symptoms
If you get a HI reading, but have no symptoms of high blood glucose,
then retest with a new test strip. If you still get a HI reading, follow
your doctor’s recommendation to treat hyperglycemia.
LO Reading
HI Reading
26
Call Customer Care Toll Free at 1-888-522-5226 www.AbbottDiabetesCare.com
ENGLISH
27
ENGLISH
Meter Set-Up
To Enter Setup Mode
Start with the meter in clock mode (no test
strip inserted). Press and firmly hold the “m
button until the display screen appears.
To Exit at Any Time
Press and hold the
m” button until the meter returns to clock
mode.
• To Move Through the Screens
Press the “
m” button to move through all the setup screens such
as alarms, sound level, time, date, and so on.
To Change Settings Within the Screen
Press the “
c” (configure) button.
Setting the Alarm
You may set up any or all of the alarms (1-4). Note:
An alarm will never sound during a test.
To set an alarm or multiple alarms please follow
these steps.
1. Start with the meter in clock mode. Press the
m” button and hold until the display
appears with 01234. You are now in the Alarm
setting mode and the “0” is blinking.
2. To move to the first alarm press the “
c” button once. You are now
ready to set alarm 1 (“1” is blinking).
3. To set the hour for alarm “1” press the
m
button once, the hour should now be blinking.
To change the hour press the “c” button until the
correct alarm hour is displayed. Press the “m
button to move to minutes, the minutes should
now be blinking. To change the minutes press
the “cbutton until the correct time is displayed.
4. Press the
m” button to select the volume setting
of the alarm. The default symbol indicates
the alarm is off, to turn alarm 1 on press the c
button once to set alarm 1 at the low volume
setting , press the c” button again to set at the
high volume level .
5. Press the
m” button to finalize your alarm
setting. This will bring you back to the alarm
setting mode. If you wish to set multiple
alarms Press “cto move to alarm 2. Follow steps
3-5 to set each of the 4 alarms.
6. To exit the setting the alarm mode press and
hold the m” button until the clock mode
appears.
Note: Pressing the “mbutton when “0” is blinking in the alarm
setting mode moves you out of the alarm setting mode and on to the
next meter setup mode “Setting the Sound” of your meter.
Select alarm
Select alarm
Select alarm
volume
Select minute
Select hour
28
Call Customer Care Toll Free at 1-888-522-5226 www.AbbottDiabetesCare.com
ENGLISH
29
ENGLISH
Setting the Time
1. With the hour blinking, press the c” button
until the correct hour appears. If using the
12-hour time format, the P displays for “PM”
times.
2. Press the
m” button to move to minute
setting.
3. With the minute blinking, press the
c” button
until the correct minute appears.
4. Press the “
mbutton to move to the time
format setting (12- or 24-hour format).
5. With the 12 (for 12-hour format) or 24 (for
24-hour format) blinking, press the “c” button
to toggle to your format choice. e time
automatically updates to the format selected.
6. Press the
mbutton to move to “Setting the
Date.
Setting the Date
1. With the month blinking, press thec button
until the correct month appears.
2. Press the
m” button to move to the day setting.
3. With the day blinking, press the
cbutton
until the correct day appears.
4. Press the
mbutton to move to the year
setting.
5. With the year blinking, press the “
cbutton
until the correct year appears.
6. Press the
mbutton to move to the date
format setting (month-day (m-d) or day-month
(d-m) format).
7. With the m-d or d-m icon blinking, press the
c button to toggle to your format choice.
e date automatically updates to the format
selected.
8. Press the
mbutton to move to “Unit of
Measurement.
1. Start with the meter in clock mode. Press the
m” button and hold
until the display appears with 01234. You are now in the Alarm
setting mode and the “0” is blinking.
2. Press the
m” button to move to Setting the Soundof your meter
mode.
3. Press the
c” button until the desired sound level appears.
4. Press the
m” button to move to the next setup mode, “Setting the
Time.
Setting the Sound
There are three (3) sound volume options:
Off Low High
Minute
Hour
Time Format
Day
Year
Month
30
Call Customer Care Toll Free at 1-888-522-5226 www.AbbottDiabetesCare.com
ENGLISH
31
ENGLISH
Unit of Measurement
The Unit of Measure for your Freestyle Flash
Meter is milligrams per deciliter (mg/dL).
Software Version Display
This is the software version in your FreeStyle Flash
Meter. It is for display only and cannot be changed.
The picture to the left is an example. Your meter
may have a different number.
You have completed Meter Set-Up.
To move to Setting the User Alarms” press the
m” button.
To exit press and hold the
m” button.
Meter Results
Meter Memory
To Enter
Start with the meter in clock mode (no test strip inserted). Press the
m” button and release; the rst memory screen to appear will be
your 14-day average.
• To Exit
Press the “mbutton until the meter returns to clock mode, then
release.
14-Day Average
The first memory display screen you see is your 14-day average. This
includes all the readings from the last 14 days starting from the cur-
rent date and time shown on the meter. (Control solution, LO, and HI
readings are not included in the average.)
Test Results
The meter stores the last 250 test readings with time and date. You
may scroll through all of the readings by pressing and holding the “c
button. The first reading you see is the most recent result.
Temperature: A result with a thermometer symbol indicates that
the reading was taken outside of the meter’s specified operating
temperature range and may not be accurate. This value is included in
your 14-day average.
LO Reading: A LO reading (under 20 mg/dL) is included in the
memory as LO.
HI Reading: A HI reading (over 500 mg/dL) is included in the
memory as HI.
Blood Glucose Test
A result without a control solution symbol ( )
indicates that it is a blood glucose reading. The
date and time of the test will appear on the bottom
of the screen.
14d avg = your 14-day average
n = indicates the number of results
included in your 14-day average
32
Call Customer Care Toll Free at 1-888-522-5226 www.AbbottDiabetesCare.com
ENGLISH
33
ENGLISH
Test Results (cont)
Control Solution Test
A value with ( ) indicates that you have marked this reading as a
control solution test. The date and time of the control solution reading
will appear on the bottom of the screen.
Transferring Data
The “PC” symbol displays when a data cable
is inserted in the meter data port. You cannot
perform a test while the data cable is in the meter
data port.
The meter will display “PC” until the data cable is
removed from the data port.
(Requires FreeStyle Data Cable and FreeStyle data management soware
or other soware programs that accept FreeStyle Flash data.)
For more information, please go to our website or call Customer Care.
Meter Maintenance
Batteries
Your FreeStyle Flash® Meter comes with two preinstalled, #2032,
3 volt, lithium batteries and two replacement batteries. The batteries
provide enough power for the meter to perform about 500 tests and
to power the display backlight and test light. If your batteries run low,
the battery symbol ( ) appears on every display screen until you
change the batteries. You have enough power for approximately 25
more tests.
Important: When this symbol appears, or when the backlight and test
light begin to dim, you should replace the batteries immediately.
To avoid losing the time and date settings, replace the batteries
within one minute of removing the old batteries.
If you take more than one minute to replace the batteries, you may
need to reset the time and date to get the correct 14-day average. If
the time and date settings are lost, the time and date displays flash
12:00 and 00-00 until they are reset.
Removing the batteries does not affect the meter’s memory log or
previously-stored user settings (such as calibration code, and date
format).
Even if you lose your time and date settings – you can perform a
blood glucose test, and results will not be affected.
Replacing the Batteries
Turn the meter over. Press in the battery
door clip to open. Swing the battery door up
to open and then off the meter.
1
34
Call Customer Care Toll Free at 1-888-522-5226 www.AbbottDiabetesCare.com
ENGLISH
35
ENGLISH
System Troubleshooting
Error Messages
Error 1
Possible Causes
Sample is too small.
Problem with the test strip.
Problem with the meter.
Very low blood glucose (less than 20 mg/dL).
What You Should Do
1. If you have symptoms such as weakness, sweating, nervousness,
headache, or confusion, follow your doctors recommendation for
treating hypoglycemia.
2. Conduct a control solution using a new test strip. If the results of the
control solution test are within the range printed on the side of your
test strip vial, retest using blood and a new test strip.
3. If the retest using control solution does not work or the error
persists, call Customer Care.
Error 2
Possible Causes
Problem with the test strip.
Problem with the meter.
Very high glucose (above 500 mg/dL).
HIGH control solution applied when
temperature is too cold. (This applies only to
control solution that is labeled as HIGH.)
To remove the batteries, use a finger nail to pull
outward from the center to release each battery.
Install the batteries with the positive (+) sign up
toward you.
To close, angle the battery door back onto the
meter and swing down until it snaps into place.
Caring for Your Meter
Avoid getting dirt, dust, blood, control solution, water, or any other
liquid in the meter’s test strip and data ports.
Clean the outside of the meter using a cloth dampened with one of the
following:
Mild detergent/mild soap and water.
70% isopropyl alcohol.
A mix of one part household bleach, nine parts water.
Important: Never immerse the meter in water or any other liquid.
2
3
Replacing the Batteries (cont)
36
Call Customer Care Toll Free at 1-888-522-5226 www.AbbottDiabetesCare.com
ENGLISH
37
ENGLISH
Error 4
Possible Causes
Problem with test strip.
Problem with the meter.
What You Should Do
1. Conduct a control solution test using a new test strip. If the results
of the control solution test are within the range printed on the side
of your test strip vial, retest using blood and a new test strip.
2. If the retest using control solution does not work or the error per
-
sists, call Customer Care.
Note: Error 5 is not used.
Error 6
Possible Cause
A button on the meter was pushed when applying
blood sample or control solution.
What You Should Do
1. Retest using a new test strip. Do not touch the “
m” or the “cbutton
while applying blood or control solution to the test strip.
2. If the error persists, call Customer Care.
What You Should Do
1. If you have symptoms such as thirst, fatigue, excess urination, or
blurry vision, follow your doctor’s recommendation for treating
hyperglycemia.
2. Conduct a control solution using a new test strip. If the results of
the control solution test are within the range printed on the side of
your test strip vial, retest using blood and a new test strip.
3. If the retest using control solution does not work or the error
persists, call Customer Care.
Error 3
Possible Causes
Incorrect test procedure. For example, putting
blood on the test strip before inserting the test
strip into the meter or applying blood before the
Blood Drop and Test Strip symbols display.
Problem with the test strip.
Problem with the meter.
What You Should Do
1. Be sure you see the Blood Drop and Test Strip symbols on the
display screen before you apply blood or control solution.
2. Conduct a control solution using a new test strip. If the results of
the control solution test are within the range printed on the side of
your test strip vial, retest using blood and a new test strip.
3. If the retest using control solution does not work or the error
persists, call Customer Care.
  • Page 1 1
  • Page 2 2
  • Page 3 3
  • Page 4 4
  • Page 5 5
  • Page 6 6
  • Page 7 7
  • Page 8 8
  • Page 9 9
  • Page 10 10
  • Page 11 11
  • Page 12 12
  • Page 13 13
  • Page 14 14
  • Page 15 15
  • Page 16 16
  • Page 17 17
  • Page 18 18
  • Page 19 19
  • Page 20 20
  • Page 21 21
  • Page 22 22

Abbott FreeStyle Flash Owner's Booklet

Category
Measuring, testing & control
Type
Owner's Booklet

Abbott FreeStyle Flash is a blood glucose monitoring system that provides virtually pain-free testing with a variety of features to help you manage your diabetes. It uses the world's smallest sample size, allowing you to test from various locations on your body.

Ask a question and I''ll find the answer in the document

Finding information in a document is now easier with AI