INSTALLATION MANUAL
INSTALLATION
12
Prepare the Hood Location
NOTE: Before starting installation, read all the steps of these instructions.
Use the illustration below to identify your kitchen cabinet type.
EZ1 one-person installation system (VBNDE1 Only)
EZ1 installation is designed for use with kitchen cabinets that have the same width designation as
the range hood width. If the cabinet is greater than 1/2” wider than the range hood width, please
use the standard installation method.
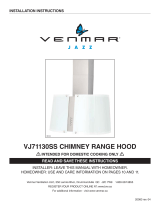
1 ] Use the proper template for vertical OR horizontal disharge (included) for placement of
ductwork and electrical cutout in cabinet or wall. For a non-ducted installation, DO NOT cut a
duct access hole, only cut the hole for electrical wiring. If replacing a hood and plan to use
the existing duct and electrical, steps 2 to 5 may not be necessary. If so, skip to step 6.
2 ] Measure and mark the hood center line on cabinet bottom.
3 ] Align the center line on template with the hood center line marked on the bottom of the
cabinet, placing the edge (where indicated) of the template against back wall. When using
with framed cabinet for vertical exhaust installation, fold over rear edge of template equal
to the depth of the cabinet frame at the wall (use graduations on template, C locations on
template). Tape the template in place.
NOTE: When facing the installation, A and B (on template) must be at right.
This manual covers 2 kinds of installation: the standard (without EZ1 brackets) and the EZ1
one-person installation system (using included template and brackets). Please note that the
EZ1 one-person installation system is not available for the VBNSA1 Series. For the standard
installation, go to page 17.
FRAMED CABINET FRAMELESS CABINET
CABINET FRONT
C
L
AB
Apoyar este borde contra la pared de atrásPlace this edge against back wall
= 3¼” x 10”
= 3¼” x 14”
RECTANGULAR DUCTING7” ROUND DUCTING
OR
Use this template for marking; do not attempt to cut out the ducting hole through it.
NOTE: These cutouts are clearance holes; they do not need to be the exact size of ducting.
= 3¼ po x 10 po
= 3¼ po x 14 po
CONDUIT RECTANGULAIRECONDUIT ROND DE 7 PO
OU
= 3¼ pulg. x 10 pulg.
= 3¼ pulg. x 14 pulg.
CONDUCTO RECTANGULARCONDUCTO REDONDO
DE
7 PULG.
O
Appuyer ce bord au mur arrière
Utiliser ce gabarit pour marquer vos repères;ne pas tenter de découper
le trou pour le conduit à travers le gabarit.
NOTE : Les découpes incluent le jeu nécessaire à l’installation; elles ne doivent pas
être du format exact des conduits.
Use esta plantilla para crear marcados; no trate de cortar el
agujero del conducto a través de la plantilla.
NOTA: To be translated in Spanish.
MARK WHERE INDICATED
FOR THE APPROPRIATE SIZE DUCT OPENING
MARQUER LES REPÈRES AUX ENDROITS INDIQUÉS SELON
LE FORMAT DE CONDUIT UTILISÉ
TITLE TO BE TRANSLATED IN SPANISH
Electrical access hole center
A = single blower hood
B = double blower hood
Centre du trou pour fil
d’alimentation électrique
A = hotte ventilateur simple
B = hotte ventilateur double
To be translated in Spanish
Electrical access hole center
A = single blower hood
B = double blower hood
4¼”
10½”
14½”
8”
7½”
C
C
C
Bend template along graduated
scale when installing to framed
cabinet.
Pour une installation sous une
armoire à fond en retrait, utiliser les
lignes pour mesurer l’épaisseur du
décalage causé par le mur de
l’armoire et plier le gabarit en
conséquence.
To be translated in Spanish.
P
C
CABINET FRONT
C
L
AB
= 3¼” x 10”
= 3¼” x 14”
RECTANGULAR DUCTING7” ROUND DUCTING
OR
Use this template for marking; do not attempt to cut out the ducting hole through it.
NOTE: These cutouts are clearance holes; they do not need to be the exact size of ducting.
= 3¼ po x 10 po
= 3¼ po x 14 po
CONDUIT RECTANGULAIRECONDUIT ROND DE 7 PO
OU
= 3¼ pulg. x 10 pulg.
= 3¼ pulg. x 14 pulg.
CONDUCTO RECTANGULARCONDUCTO REDONDO
DE
7 PULG.
O
Utiliser ce gabarit pour marquer vos repères;ne pas tenter de découper
le trou pour le conduit à travers le gabarit.
NOTE : Les découpes incluent le jeu nécessaire à l’installation; elles ne doivent pas
être du format exact des conduits.
Use esta plantilla para crear marcados; no trate de cortar el
agujero del conducto a través de la plantilla.
NOTA: To be translated in Spanish.
MARK WHERE INDICATED
FOR THE APPROPRIATE SIZE DUCT OPENING
MARQUER LES REPÈRES AUX ENDROITS INDIQUÉS SELON
LE FORMAT DE CONDUIT UTILISÉ
TITLE TO BE TRANSLATED IN SPANISH
Electrical access hole center
A = single blower hood
B = double blower hood
Centre du trou pour fil
d’alimentation électrique
A = hotte ventilateur simple
B = hotte ventilateur double
To be translated in Spanish
Electrical access hole center
A = single blower hood
B = double blower hood
4¼”
10½”
14½”
8”
7½”
C
C
C
Bend template along graduated
scale when installing to framed
cabinet.
Pour une installation sous une
armoire à fond en retrait, utiliser les
lignes pour mesurer l’épaisseur du
décalage causé par le mur de
l’armoire et plier le gabarit en
conséquence.
To be translated in Spanish.
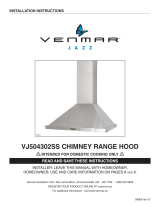
A
C
ELECTRICAL
ACCESS HOLE
LOCATION (A)
(
IN CABINET BOTTOM)
CENTER LINE
FOLD TEMPLATE ALONG GRADUATED
SCALE
WHEN INSTALLING TO FRAMED
CABINET
.
VERTICAL EXHAUST
DUCTING
Electrical access hol
A = single blower ho
B = double blower
Centre du tr
d’alim
ELECTRICAL
ACCESS HOLE
LOCATION (A)
(
IN WALL)
CENTER LINE
A
C
L
AB
Place this edge against
cabinet bottom.
Appuyer ce bord contre le bas
de l’armoire.
Apoyar este borde contra
la base del armario.
= 3¼ pulg. x 10 pulg.
= 3¼ pulg. x 14 pulg.
CONDUCTO RECTANGULAR
= 3¼” x 10”
= 3¼” x 14”
RECTANGULAR DUCTING
= 3¼ po x 10 po
= 3¼ po x 14 po
CONDUIT RECTANGULAIRE
MARK WHERE INDICATED
FOR THE APPROPRIATE SIZE DUCT OPENING
MARQUER LES REPÈRES AUX ENDROITS INDIQUÉS SELON
LE FORMAT DE CONDUIT UTILISÉ
TITLE TO BE TRANSLATED IN SPANISH
Use this template for marking;do not attempt to cut out the ducting hole through it.
NOTE: These cutouts are clearance holes; they do not need to be the exact size of ducting.
Utiliser ce gabarit pour marquer vos repères;ne pas tenter de découper
le trou pour le conduit à travers le gabarit.
NOTE : Les découpes incluent le jeu nécessaire à l’installation; elles ne doivent pas
être du format exact des conduits.
Use esta plantilla para crear marcados;no trate de cortar el
agujero del conducto a través de la plantilla.
NOTA: To be translated in Spanish.
Electrical access hole center
A = single blower hood
B = double blower hood
Centre du trou pour fil
d’alimentation électrique
A = hotte ventilateur simple
B = hotte ventilateur double
To be translated in Spanish
Electrical access hole center
A = single blower hood
B = double blower hood