

English Page 4
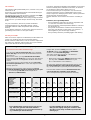
• Keep page 3 open when reading these operating
instructions.
Français Page 10
• Pour le mode d’emploi: dépliez la page 3.
Deutsch Seite 16
• Schlagen Sie beim Lesen der Gebrauchsanweisung
Seite 3 auf.
Nederlands Pagina 22
• Sla bij het lezen van de gebruiksaanwijzing pagina 3 op.
Italiano Pagina 28
• Prima di usare l’apparecchio, aprite la pagina 3 e leggete
attentamente le istruzioni per l’uso.
Español Página 34
• Desplegar la página 3 al leer las instrucciones de manejo.
Dansk Side 40
• Hold side 3 opslået mens De laeser brugsanvisningen.
Norsk Side 46
• Slå opp på side 3 før De leser videre.
Svenska Sid 52
• Ha sidan 3 utvikt när ni läser bruksanvisningen.
2

1
D
B
A
E
F
G
J
N
E
K
I
L
M
H
C
N
P O
HB 544
3

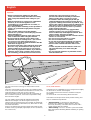
Important
• Before connecting the appliance to the mains
socket, check if the voltage indicated on the rating
plate corresponds with the mains voltage in your
home.
• Water and electricity are a dangerous combination!
Therefore, do not use the appliance in wet
surroundings (e.g. in the bathroom or shower, or
near a swimming pool).
• If you have just been swimming or have just taken a
shower, dry yourself thoroughly before using the
appliance.
• Take care that children cannot play with the
solarium. As a precaution remove the plug from the
wall socket after use.
• Keep the ventilation openings in the upper casing
clear of obstruction when using the solarium.
• Do not exceed the advised session times or the
maximum amount of "tanning hours". (See section
"UV sessions: How often? And how long?")
• Do not select a shorter operational distance than the
advised 20 cm (approx. 8").
• Do not treat each part or side of the body more often
than once a day. Avoid intensive skin exposure to
natural sunlight on the same day as a UV session.
• If you have any symptoms of illness, if you take any
medicines and/or apply cosmetics which increase
skin sensitivity, you should not have a UV-session.
Special care is also necessary in cases of
pronounced individual sensitivity to ultraviolet.
When in doubt, please consult your doctor.
• A solarium is not to be used by people who get
sunburnt without tanning when exposed to the sun,
by persons suffering from sunburn, by children, or by
persons who suffer (or have previously suffered) from
skin cancer or who are predisposed to skin cancer.
• Consult your doctor if ulcers, moles or persistent
lumps develop on the skin.
• Always wear the protective eye goggles while
tanning to protect your eyes against excessive
doses of ultraviolet, visible light and infrared. (Also
refer to section "UV and your health".)
• Remove creams, lipstick and other cosmetics well in
advance of a UV session.
• Do not use sunscreen lotions or creams.
• Do not use suntan lotions or creams.
• If your skin should feel taut after the sun tanning
session, you may apply a moisturizing cream.
• Never use the solarium if the timer has become
faulty.
• Colours may fade under the influence of the sun.
The same effect may occur when using the
appliance.
• Do not expect the appliance to yield better results
than the natural sun.
4
English
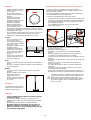
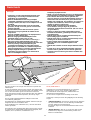
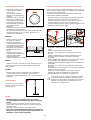
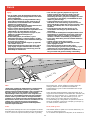
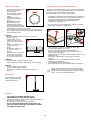
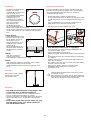
The Sun
UV B
UV C
UV A
VISIBLE LIGHT
INFRARED
The sun is the source of energy on which all life on earth
depends.
There are various kinds of solar energy: the sunlight enables
us to see, we feel the warmth of the sunshine on our skin, and
under the influence of the sun our skin is tanned.
These three effects are due to three specific components of
the sun radiance spectrum, each of the components having
their own wave lengths.
The sun radiates electro-magnetic vibrations with widely
different wave lengths. The wave lengths of heat rays or
"infrared" (IR) are longer than the wave lengths of visible light.
And the wave lengths of "ultraviolet" (UV), which tans our skin,
are shorter than these.
Science has managed to reproduce these three kinds of solar
radiation: heat (e.g. Infraphil), light (lamps) and UV (solariums,
sun couches etc.)
UV-A, UV-B and UV-C
Ultraviolet (UV) is subdivided into UV-A (longer wave lengths),
UV-B and UV-C (shorter wave lengths).
UV-C seldom reaches the earth as it is filtered out by the
atmosphere.
UV-A and UV-B cause the tanning effect of the skin.
In fact there are two processes which produce tanning, and
they are simultaneously effective:
• "Indirect tanning". Primarily UV-B stimulates the
production of a substance called "melanin", which is
necessary for tanning. The effect does not show until a
couple of days after the sunbath.
• "Direct tanning". The UV-A and also a part of the visible
light cause quicker browning without reddening or "getting
sunburnt".

5
The solarium
This solarium emits predominantly UV-A, and also a very small
amount of UV-B.
It possesses some important features which make tanning at
home comfortable and convenient.
The unique type of sun lamp used in this solarium emits light,
warmth and ultraviolet, just like the natural sun.
You can position this solarium so that using it really resembles
lying in the sun: your whole body is tanned evenly, from head
to toe.
For your convenience, but also to prevent unintended
prolonged exposure (e.g. after falling asleep), a timer-
controlled automatic switch-off operates after 60 minutes
tanning.
As it is with the natural sun, it's wise not to have too much of a
good thing! (See section "UV and your health".)
UV and your health
After an excessive exposure to ultraviolet (from the natural sun
or from your solarium), the skin may develop sunburn.
Beside numerous other factors, such as excessive exposure to
the natural sun, improper and excessive use of your solarium
will increase the risk of skin and eye disease.
The nature, intensity and duration of the radiation on one hand,
and the sensitivity of the individual on the other, are decisive
on the degree in which these affects can occur.
The more skin and eyes are exposed to UV, the more risk
increases of diseases such as inflammation of the cornea
and/or conjunctiva, damaging of the retina, cataract, premature
aging of the skin and skin tumours.
Certain medicines and cosmetics increase the sensitivity to
UV.
Therefore, it is of great importance
- that you follow the instructions in sections "Important" and
"UV sessions: how often? And how long?";
- that you select the advised operational distance of at least
20 cm (approx. 8");
- that you do not exceed the maximum amount of tanning
hours per year (Please see the section “UV sessions (...)”
which applies to your solarium type number!);
- that you always wear the provided goggles while tanning.
• If you think that the sessions are too long for you
(e.g. if the skin gets taut and tender after the
session), we advise you to reduce the sessions by
e.g. 5 minutes per side of the body.
• To get a beautiful all-over tan it is suggested
that you turn slightly during the session so that
the sides of your body are better exposed to the
tanning rays.
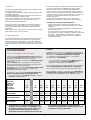
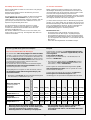
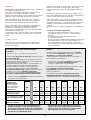
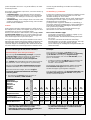
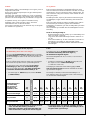
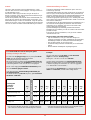
For solarium type HB 541 (8 tube lamps) only:
UV sessions: how often? And how long?
You may have one UV session per day, over a period of
five to ten days. Allow at least 48 hours between the first
two sessions.
After such a course, you may rest the skin for a while.
Approximately one month after a course your skin will have
lost much of the tan. You might then decide to start a new
course.
On the other hand, it is also possible to have one or two
UV sessions per week after a course has elapsed in order
to keep up the tan.
Whatever you may prefer, make sure that you do not
exceed the maximum amount of tanning hours per year.
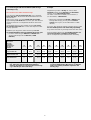
• For solarium type HB 541 (8 tube lamps) this is
33 hours (= 1980 minutes).
Example:
Imagine that you take a 10 day UV course, with a
12 minute session on the first day and 30 minutes'
sessions on the nine following days.
The entire course then includes (1 x 12 minutes) +
(9 x 30 minutes) = 282 minutes.
• When using solarium type HB 541 (with 8 tube lamps),
you may have 7 of these courses over a year.
(As 7 x 282 minutes = 1974 minutes.)
Of course, this maximum amount of tanning hours is valid
for each treated part or side of the body separately.
(E.g. for the front side of your body and for the other side.)
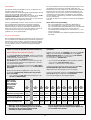
From the table it will be seen that the first session of a
course should have a duration of 12 minutes.
This is not dependent upon individual skin sensitivity.
Duration of the
UV session
(for each
separately
treated part of 1st 2nd 3rd 4th 5th 6th 7th 8th 9th 10th
the body) in session session session session session session session session session session
minutes
- for persons with
very sensitive skin: 12 10-15 10-15 10-15 10-15 10-15 10-15 10-15 10-15 10-15
- for persons with
normal sensitive skin: 12 30-35 30-35 30-35 30-35 30-35 30-35 30-35 30-35 30-35
- for persons with
less sensitive skin: 12 35-40 35-40 35-40 35-40 35-40 35-40 35-40 35-40 35-40
rest of min. 48 hours

6
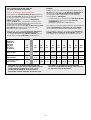
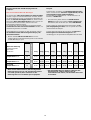
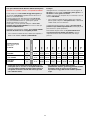
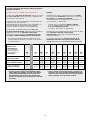
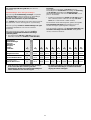
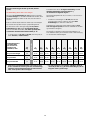
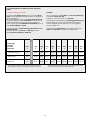
For solarium types HB 542 and HB 544 (with 10 large
tube lamps) only:
UV sessions: how often? And how long?
You may have one UV session per day, over a period of
five to ten days. Allow at least 48 hours between the first
two sessions.
After such a course, you may rest the skin for a while.
Approximately one month after a course your skin will have
lost much of the tan. You might then decide to start a new
course.
On the other hand, it is also possible to have one or two
UV sessions per week after a course has elapsed in order
to keep up the tan.
Whatever you may prefer, make sure that you do not
exceed the maximum amount of tanning hours per year.
• For these solarium types HB 542 and HB 544 (with
10 large tube lamps) this is 28 hours (= 1680
minutes).
Example:
Imagine that you take a 10 day UV course, with a
10 minute session on the first day and 30 minutes'
sessions on the nine following days.
The entire course then includes (1 x 10 minutes) +
(9 x 30 minutes) = 280 minutes.
• When using solarium type HB 542 or HB 544 (with
10 large tube lamps), you may have 6 of these
courses over a year. (As 6 x 280 minutes = 1680
minutes.)
Of course, this maximum amount of tanning hours is valid
for each treated part or side of the body separately.
(E.g. for the front side of your body and for the other side.)
From the table it will be seen that the first session of a
course should have a duration of 10 minutes.
This is not dependent upon individual skin sensitivity.
• If you think that the sessions are too long for you
(e.g. if the skin gets taut and tender after the
session), we advise you to reduce the sessions by
e.g. 5 minutes per side of the body.
• To get a beautiful all-over tan it is suggested that
you turn slightly during the session so that the
sides of your body are better exposed to the
tanning rays.
Duration of the
UV session
(for each
separately
treated part of 1st 2nd 3rd 4th 5th 6th 7th 8th 9th 10th
the body) in session session session session session session session session session session
minutes
- for persons with
very sensitive skin: 10 10-15 10-15 10-15 10-15 10-15 10-15 10-15 10-15 10-15
- for persons with
normal sensitive skin: 10 20-25 20-25 20-25 20-25 20-25 20-25 20-25 20-25 20-25
- for persons with
less sensitive skin: 10 30-35 30-35 30-35 30-35 30-35 30-35 30-35 30-35 30-35
rest of min. 48 hours

7
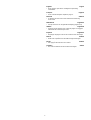
General description (fig. 1, page 3)
A Tube lamps and starters
HB 541 - 8 large tube lamps (type Philips UVA 100W
“Cleo Performance”) with
8 starters (type Philips S12)
HB 542 - 10 large tube lamps (type Philips UVA 100W
“Cleo Performance”) with
10 starters (type Philips S12)
HB 544 - 10 large tube lamps (type Philips UVA 100W
“Cleo Performance”) with
10 starters (type Philips S12) and
4 small tube lamps (type Philips UVA 15W
“Cleo Performance”) for extra face tanning
performance, with
4 starters (type Philips S2)
B Timer
C Stand
D Protective eye goggles (2x)
(Type HB 071 / service n
o
. 4822 690 80123)
E End caps
F Rod
G Bolts and nuts
H Height adjustment knob
I Spanner
J Mains cord
K Castor wheels
L Handle
M Cooling fan
N Vents
O Protective shield
P Protective plastic foil
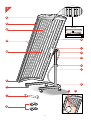
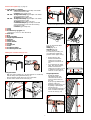
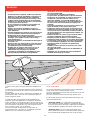
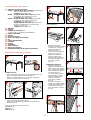
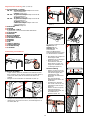
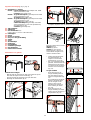
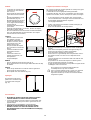
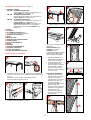
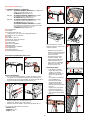
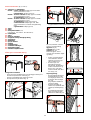
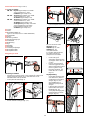
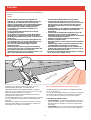
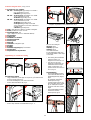
Making the solarium ready for use
Fixing the stand
- With one person helping you, lay the solarium on a table top
with the lamps facing downwards (fig. 2).
Ensure that the handle does not rest on the table.
- Fix the castor wheels to the stand (fig. 3).
- Mount the stand to the rod (fig. 4, 5).
- Lift the solarium from the table top (fig. 6).
- Remove the plastic foil from the protective shield (fig. 7).
You can be tanned either
lying (fig. 8),
sitting (fig. 9), or
standing (fig. 10)
with this solarium.
To make this possible, you
can adjust the height and
position of the upper casing.
• During tanning, the
distance between the
lamps and your body
should be at least 20 cm
(8").
• If you intend to tan while
lying, this means that the
distance between the
lamps and your bed, couch
or mattress should be at
least 40 cm (16") (fig. 11).
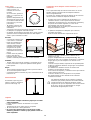
Height adjustment
- Rotate the height
adjustment knob anti-
clockwise two or three
turns to release the rod
(fig. 12).
A gas spring stabilizes the
position of the rod.
- Adjust the height of the rod
by pulling or pushing the
handle (fig. 13).
- Turn the height adjustment
knob clockwise until tight
to lock the rod (fig. 14).
2
3
4
5
6
1
1
2
8
9
10
11
20
40
12
13
7
14

8
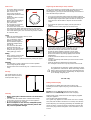
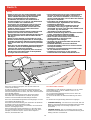
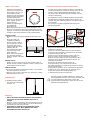
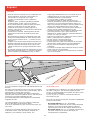
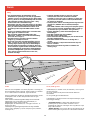
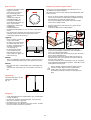
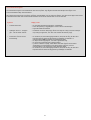
How to use
- Check the distance between
your body and the solarium
(min. 20 cm or 8").
If necessary adjust the
height and/or position of the
solarium.
- Set the timer to the session
time (fig. 15).
(Please refer to the table in
these instructions and to
your own notes.)
- Do not forget to put on the
eye goggles provided.
- As soon as the session time
has elapsed the lamps will automatically be switched off.
- If you wish to treat the other side of your body as well, you
can set the timer again. (It is not necessary for the solarium
to cool down first.)
Lying
- Place the solarium beside a bed or couch.
- As the stand is on wheels
you can draw the solarium
towards you while lying.
Ensure that the lamps are
positioned straight above
you (fig. 8).
- You can move the stand
under the bed (fig. 16).
- After use, you can push the
solarium away from you to
make getting up easier.
Sitting
- Place a (deck) chair and the
solarium together (fig. 9).
- Bring the solarium in optimum position by turning the upper
casing.
Standing
- Turn the upper casing to bring it into a vertical position.
If necessary adjust the height.
- Stand in front of the solarium (fig. 10) - at least 20 cm (8”)
away.
Storage
The solarium takes up very
little space when stored in a
vertical position (fig. 17).
Cleaning
• Always unplug the solarium and let it cool down before
cleaning.
• You can clean the outside of the solarium with a damp
cloth. Make sure that no water runs into the appliance.
• Do not use abrasives or scourers.
• Never use liquids such as alcohol, methylated spirits,
petrol or acetone to clean the protective plate as this
may cause irreparable damage.
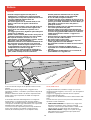
Replacing the tube lamps and/or starters
In the course of time (in normal family use after some years)
the efficiency of the tube lamps will gradually decrease.
If this happens, you may increase the tanning session time or
have the tube lamps replaced.
• You can have the tube lamps and/or the starters replaced
by authorized service personnel: they have the required skill
and the original replacement parts and tools to do the job.
They also have the facilities to dispose of the used tube
lamps.
• If you prefer to replace the lamps yourself, proceed as
follows:
- First remove the mains plug from the wall socket.
- Loosen the screws and remove the two end caps (fig. 18).
- Pull out the protective shield completely (fig. 19).
After this, the lamps and starters are accessible.
- Rotate the lamps slightly to the left or to the right.
When unlocked remove them from the lamp holders .
- Remove the starters by turning slightly to the left and
withdrawing .
(Half the amount of starters are at each end of the
solarium.)
- To place new lamps and starters proceed in reverse order
and direction.
- Slide the protective shield back into the profile.
Do not forget to fix the end caps by means of the screws.
The tube lamps of solariums contain substances which
may pollute the environment. When discarding old tube
lamps, please ensure that they are separated from the
normal household refuse and that they are disposed of
at an officially assigned place.
For U.K. only:
Fitting a different plug
This appliance is fitted with a BS 1363 13 Amp. plug.
Should you need to replace the plug, connect the wires as
follows:
Brown wire to the Live (L) terminal of the new plug.
Blue wire to the Neutral (N) terminal of the new plug.
Always fit the same value of fuse as that originally supplied
with your appliance.
Only use BS 1362 approved fuses.
As a guide only: Appliances under 700 W can have a 3 Amp.
fuse (red) and all others should have a 13 Amp. fuse (brown).
When disposing of an old plug (particularly the moulded type
which has been cut from the mains cord) always remove the
fuse as the plug could be dangerous if ever inserted in a live
socket.
15
6
0
5
5
5
0
4
5
4
0
3
5
3
0
2
5
2
0
1
5
1
0
5
0
M
I
N
16
17
19
18
f

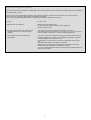
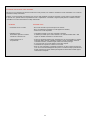
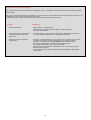
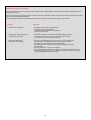
Problem
• Solarium does not switch on.
• The power fuse switches the mains power
off when switching on or while using the
solarium.
• The browning is not according to your
expectations.
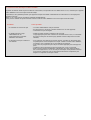
Solarium does not operate as required?
If the solarium should not operate as required, this may be due to a defect. In this case do not hesitate to apply to your dealer or
to a Philips Service Centre.
However, it is also possible that the appliance has not been installed according to the instructions or is used incorrectly.
If this is the case, you will be able to solve the problem immediately.
You may check the following section before contacting your dealer or Philips Service Centre.
Possible cause
- Mains plug is not in wall socket.
- No mains power. (Please check with other appliance.)
- Timer has not been set.
- Check the fuse to which the solarium has been connected.
The proper type for your solarium is a 13 A (for U.K.) or a 10 or 16 A (for
other countries) normal fuse or a slow reacting automatic fuse.
- You use an extension cord which is too long, wound-up and/or does not
allow the required power levels. Please apply to your dealer. In general,
we advise not to use an extension cord.
- You followed a course which is not the most appropriate for your skin
type.
- The operational distance is larger than indicated.
- After using for a long time the UV production of the lamps decreases.
(With normal use this will not be noticeable for years.)
You may compensate for this effect by selecting longer treatment times or
replace the sun lamps
9

Important
• Avant de brancher l'appareil, vérifier que la tension
indiquée sur la plaque signalétique correspond à la
tension du réseau électrique du lieu d'utilisation.
• L'eau et l'électricité ne font pas bon ménage ! Donc,
n'utilisez jamais l'appareil dans un environnement
humide (p. ex. dans la salle de bains ou de douches,
ou encore près d'une piscine).
• Si vous venez de vous baigner ou de prendre une
douche, séchez-vous à fond avant d'utiliser
l'appareil.
• Veillez à ne pas laisser d'enfants jouer avec le
solarium. Pour plus de précautions, débranchez-le
après utilisation.
• Pendant l'utilisation du solarium, ne bouchez pas les
ouïes de ventilation situées à la partie supérieure.
• Ne dépassez pas les durées de bronzage
recommandées ni le nombre maximum d'"heures de
bronzage" (voir chapitre "Séances de bronzage :
durée et fréquence").
• Respectez la distance recommandée de bronzage de
20 cm (env. 8").
• N'exposez pas une même partie du corps plus d'une
fois par jour. Evitez l'exposition intense au soleil le
jour même d'une séance de bronzage.
• Ne faites pas de séances de bronzage en cas de
symptômes de maladie ou si vous prenez des
médicaments et/ou employez des produits
cosmétiques augmentant la sensibilité de la peau.
Des précautions particulières sont également
nécessaires en cas de sensibilité individuelle marquée
aux rayons ultraviolets.
En cas de doute, consultez votre médecin.
• Les personnes qui attrapent des coups de soleil sans
bronzer lors de l'exposition au soleil, les personnes
souffrant de coups de soleil, les enfants ou les
personnes atteintes (ou ayant été atteintes dans le
passé) de cancer de la peau ou qui sont prédisposées
au cancer de la peau ne devraient pas employer de
solarium.
• Consultez votre médecin si vous avez des ulcères, des
grains de beauté ou des tumeurs de la peau.
• Pendant les séances de bronzage, portez toujours les
lunettes fournies afin de protéger vos yeux des doses
excessives de rayons ultraviolets, de lumière visible et
de rayons infrarouges. (Voir également le chapitre "Les
UV et votre santé").
• Retirez toute trace de crème, rouge à lèvres et autres
produits cosmétiques bien avant le bronzage.
• N'employez jamais de lotions ou de crèmes solaires.
• N'employez jamais de lotions ou de crèmes bronzantes.
• Si votre peau est sèche après une séance de bronzage,
il est recommandé d'appliquer une crème hydratante.
• N'employez jamais le solarium si la minuterie est
défectueuse.
• Certaines couleurs peuvent se décolorer sous l'effet
des rayons du soleil.
Le même effet peut se produire lors de l'utilisation du
solarium.
• N'attendez pas du solarium qu'il donne de meilleurs
résultats de bronzage qu'au soleil.
10
Français
Le soleil
UV B
UV C
UV A
LUMIÈRE VISIBLE
INFRAROUGE
Le soleil est une source d'énergie dont toute vie dépend sur
terre.
Le soleil émet un rayonnement complexe qui nous permet de
voir, de sentir la chaleur de ses rayons sur notre peau et de la
faire bronzer.
Ces trois effets sont dus à trois composantes spécifiques du
rayonnement solaire, chacun de ces composants ayant ses
propres longueurs d'onde.
Le soleil émet des rayonnements électromagnétiques de
longueurs d'onde très différentes. Les longueurs d'onde des
rayons calorifiques ou "infrarouges" (IR) sont plus longues que
celles des rayons de la lumière visible. Et les longueurs d'onde
des rayonnements "ultraviolets" (UV), qui font bronzer notre
peau, sont plus courtes que ces dernières.
La science a permis de reproduire ces trois sortes de
rayonnement solaire : la chaleur (p. ex. Infraphil), la lumière
(lampes) et les UV (solariums, lits solaires)
UV-A, UV-B et UV-C
Les rayons ultraviolets (UV) se divisent en UV-A (ultraviolets
longs), UV-B et UV-C (ultraviolets plus courts).
Les UV-C atteignent rarement la surface de la terre car ils sont
filtrés par l'atmosphère.
Les UV-A et UV-B provoquent le bronzage de notre peau.
En fait, il existe deux processus permettant le bronzage, et ils
agissent simultanément :
• "Bronzage retardé". Les UV-B stimulent la production
d'une substance appelée "mélanine", qui pigmente la peau
et qui est nécessaire au bronzage. L'effet n'est pas immédiat
et n'est visible que quelques jours après le bain de soleil.
• "Bronzage direct". Les UV-A ainsi qu'une partie de la
lumière visible provoquent un brunissement plus rapide sans
les inconvénients du rougissement ni du "coup de soleil".
Page is loading ...
Page is loading ...
Page is loading ...
Page is loading ...
Page is loading ...
Page is loading ...
Page is loading ...
Page is loading ...

19
Allgemeine Beschreibung (Abb. 1, Seite 3)
A Sonnenlampen und Starter
HB 541 - 8 große UV-Lampen Philips UVA 100 W
"Cleo Performance"
8 Starter Philips S12
HB 542 - 10 große UV-Lampen Philips UVA 100 W
"Cleo Performance"
10 Starter Philips S12
HB 544 - 10 große UV-Lampen Philips UVA 100 W
"Cleo Performance"
10 Starter Philips S12
4 kleine UV-Lampen Philips UVA 15 W
"Cleo Performance"
4 Starter Philips S2
B Zeitschalter
C Stativfuß
D Schutzbrille, 2 Stück
Type HB 071 / Servicenummer 4822 690 80123
E Schutzscheibe
F Stativsäule
G Bolzen und Muttern
H Höhenverstellung
I Schraubenschlüssel
J Netzkabel
K Laufrollen
L Griff
M Lüfter zur Kühlung
N Lüftungsöffnungen
O Schutzabdeckung
P Schutzfolie
Vorbereitung zum Gebrauch
Anbringen des Stativs
- Legen Sie das Solarium, mit Hilfe einer weiteren Person,
flach auf einen Tisch, mit den Lampen nach unten (Abb. 2).
Achten Sie darauf, daß der Griff nicht auf dem Tisch
aufliegt.
- Bringen Sie die Laufrollen am Stativfuß an (Abb. 3).
- Bringen Sie die Stativsäule am Stativfuß an (Abb. 4 und 5).
- Nehmen Sie das Gerät vom Tisch, und befestigen Sie es
am Stativ (Abb. 6).
- Ziehen Sie die Schutzfolie von der Schutzabdeckung ab
(Abb. 7).
Sie können mit diesem Gerät
liegend (Abb. 8)
sitzend (Abb. 9)
stehend (Abb. 10)
sonnenbaden.
Höhe und Neigung des
Lampengehäuses lassen sich
zu diesem Zweck verstellen.
• Der Abstand der Lampen zu
Ihrem Körper sollte
mindestens 20 cm betragen.
• Wenn Sie liegend
sonnenbaden, muß der
Abstand der Lampen zur
Liege also mindestens 40
cm betragen (Abb. 11).
Höhenverstellung
- Drehen Sie den Knopf zur
Höhenverstellung (H) zwei-
oder dreimal gegen den
Uhrzeigersinn zum
Entriegeln der Stativsäule
(Abb. 12).
Eine Gasdruckfeder
stabilisiert die Position der
Stativsäule.
- Verstellen Sie die Höhe
des Geräts, indem Sie am
Griff drücken oder ziehen
(Abb. 13).
- Drehen Sie den Knopf zur
Höhenverstellung in
Uhrzeigerrichtung fest, um
die Stativsäule zu
arretieren (Abb. 14).
2
3
4
5
6
1
1
2
8
9
10
11
20
40
12
13
7
14
Page is loading ...
Page is loading ...
Page is loading ...
Page is loading ...
Page is loading ...
Page is loading ...

26
Gebruik
- Controleer de afstand tussen
uw lichaam en het solarium
(min. 20 cm).
Stel zonodig de juiste hoogte
en/of stand van het solarium
in.
- Stel de behandeltijd in op de
tijdschakelaar (fig. 15).
(Raadpleeg hiervoor de tabel
in deze gebruiksaanwijzing
en uw eigen aantekeningen.)
- Vergeet niet de
meegeleverde beschermbril
op te zetten.
- Zodra de ingestelde tijd is verstreken, worden de lampen
automatisch uitgeschakeld.
- Als u de andere kant van uw lichaam ook wilt behandelen,
kunt u de tijdschakelaar opnieuw instellen. (De lampen
hoeven niet eerst af te koelen.)
Liggend
- Zet het solarium naast een
bed, ligbank of matras.
- Doordat de statiefvoet van
wieltjes is voorzien, kunt u
het solarium naar u toe
trekken terwijl u ligt.
Zorg ervoor dat de lampen
zich recht boven u bevinden
(fig. 8).
- U kunt de statiefvoet onder
het bed laten steken
(fig. 16).
- U kunt het solarium na
gebruik wegschuiven, om
het opstaan te
vergemakkelijken.
Zittend
- Zet een (lig)stoel bij het solarium (zie fig. 9).
- Breng het solarium in de meest geschikte stand door de kap
te draaien.
Staand
- Draai de kap totdat deze in verticale stand is gekomen.
Stel zonodig de juiste hoogte in.
- Neem plaats voor het solarium (fig. 10).
Opbergen
Het solarium vergt weinig
plaats als u het met de kap
in verticale stand wegzet
(fig. 17).
Schoonmaken
• Haal altijd de stekker uit het stopcontact en laat het
solarium afkoelen voordat u het schoonmaakt.
• U kunt de buitenkant van het solarium schoonmaken met
een vochtige doek. Zorg ervoor dat er geen water in het
apparaat loopt.
• Gebruik geen schuurmiddelen of schuurdoekjes.
• Gebruik nooit vloeistoffen zoals alcohol, spiritus,
benzine of aceton voor het schoonmaken van de
beschermplaat: dit zou tot onherstelbare beschadiging
kunnen leiden.
Lampen en/of starters vervangen
Na verloop van tijd (bij normaal gebruik na enkele jaren) gaan
de lampen minder fel stralen.
U merkt dit aan een teruglopend bruiningsresultaat.
Ondervang dit door voor de UV zonnebaden een iets langere
tijdsduur in te stellen, of door de lampen te (laten) vervangen.
• U kunt de lampen en/of de starters door een bevoegde
service-instantie laten vervangen: daar beschikt men over
de benodigde deskundigheid en originele
vervangingsonderdelen.
• Indien u de lampen en/of starters zelf wilt vervangen, ga
dan als volgt te werk:
- Haal eerst de stekker uit het stopcontact.
- Draai de schroeven los en verwijder de beide eindkappen
(fig 18).
- Trek de beschermplaat geheel uit het apparaat (fig. 19).
Daarna zijn de lampen en starters toegankelijk.
- Draai de lampen wat linksom of rechtsom .
- Daarna kunt u ze gemakkelijk uit de lamphouders nemen .
- De starters maakt u los door ze een stukje linksom te
draaien .
(Aan elk uiteinde van het solarium vindt u de helft van het
aantal starters.)
- Het plaatsen van de nieuwe lampen en starters gaat in
precies omgekeerde volgorde en richting.
- Schuif de beschermplaat terug in het profiel. Vergeet niet de
eindkappen vast te schroeven.
De TL-buizen van solaria bevatten stoffen die
schadelijk kunnen zijn voor het milieu.
Als u TL-buizen afdankt, zorgt u er dan voor dat deze
niet in het normale huisvuil terechtkomen, maar
ingeleverd worden op een door de overheid daartoe
aangewezen plaats.
15
6
0
5
5
5
0
4
5
4
0
3
5
3
0
2
5
2
0
1
5
1
0
5
0
M
I
N
16
17
19
18
f
Page is loading ...
Page is loading ...
Page is loading ...
Page is loading ...

31
DESCRIZIONE GENERALE (fig. 1, pagina 3)
A Lampade e starter
HB 541 - 8 lampade grandi a tubi
(mod. Philips UVA 100W "Cleo Performance")
con 8 starter (mod. Philips S 12).
HB 542 - 10 lampade grandi a tubi
(mod. Philips UVA 100W "Cleo Performance")
con 10 starter (mod. Philips S 12)
HB 544 - 10 lampade grandi a tubi
(mod. Philips UVA 100W "Cleo Performance")
con 10 starter (mod. Philips S 12) e
4 lampade piccole a tubi (mod. Philips UVA
15W "Cleo Performance") per intensificare
l'abbronzatura del viso, con 4 starter (mod.
Philips S 2)
B Timer
C Supporto
D Occhialini di protezione (2x)
(mod. HB 071/n∞ 4822 690 80123)
E Coperture di protezione
F Asta
G Bulloni e dadi
H Manopola per regolare l'altezza
I Chiave inglese
J Cavo di alimentazione
K Ruote
L Maniglia
M Ventola di raffreddamento
N Aperture di aerazione
O Scudo di protezione
P Foglio di protezione in plastica
COME FISSARE IL SUPPORTO
- Facendovi aiutare da una seconda persona, appoggiate il
solarium su un tavolo, con le lampade rivolte verso il basso
(fig. 2).
Controllate che la maniglia non poggi sul tavolo.
- Fissate le ruote al supporto (fig. 3).
- Montate il supporto sull'asta (fig. 4-5).
- Sollevate il solarium dal tavolo (fig. 6).
- Togliete il foglio di protezione in plastica (fig. 7).
Con questo solarium potrete
abbronzarvi
stando sdraiati (fig. 8),
seduti (fig. 9) oppure
in piedi (fig. 10).
A tale proposito, potete regolare
l'altezza e la posizione della
parte superiore del solarium.
• Quando vi abbronzate, la
distanza fra le lampade e il
vostro corpo dovrebbe
essere di almeno 20 cm.
• Se volete abbronzarvi
stando sdraiati, la distanza
fra le lampade e il letto, il
divano o il materassino
dovrebbe essere di almeno
40 cm. (fig. 11).
Regolazione dell'altezza
- Ruotate la manopola per
regolare l'altezza in senso
anti-orario, facendole
compiere due o tre giri per
allentare l'asta (fig. 12).
Una speciale molla
permette di stabilizzare la
posizione dell'asta.
- Regolate l'altezza dell'asta
premendo o spingendo la
manopola (fig. 13).
- Ruotate la manopola in
senso orario per fissare
l'asta (fig. 14).
2
3
4
5
6
1
1
2
8
9
10
11
20
40
12
13
7
14
Page is loading ...
Page is loading ...
Page is loading ...
Page is loading ...
Page is loading ...

37
Descripción general (fig. 1)
A Lámparas tubulares y cebadores
HB 541: 8 grandes lámparas tubulares tipo Philips UVA
100W "Cleo Performance") con
8 cebadores (tipo Philips S12).
HB 542: 10 grandes lámparas tubulares tipo Philips
UVA 100W "Cleo Performance") con
10 cebadores (tipo Philips S12).
HB 544: 10 grandes lámparas tubulares tipo Philips
UVA 100W "Cleo Performance") con
10 cebadores (tipo Philips S12).
4 pequeñas lámparas tubulares tipo Philips
UVA 15W "Cleo Performance") para la función
extra de bronceado de la cara con
4 cebadores (tipo Philips S2).
B Temporizador
C Pedestal
D Gafas protectoras (2x)
(Tipo HB 071 ; Nº. de Servicio 4822 690 80123)
E Cubiertas de los extremos
F Varilla
G Tornillos y tuercas
H Mando de ajuste de la altura
I Llave para tuercas
J Cable de red
K Ruedas orientables
L Empuñadura
M Ventilador para refrigerar
N Respiraderos
O Escudo protector
P Lámina plástica protectora
Para dejar el solarium listo para su uso
Fijación del pedestal
- Con la ayuda de otra persona, pongan el solarium sobre
una mesa, con las lámparas de cara hacia abajo (fig. 2).
Asegúrense de que la empuñadura no quede sobre la mesa.
- Fijen las ruedas orientables al pedestal (fig. 3).
- Monten el pedestal a la varilla (figs. 4, 5).
- Levanten el solarium de la mesa (fig. 6).
- Quiten la lámina de plástico del escudo protector (fig. 7).
Con este solarium pueden broncearse :
- echados (fig. 8),
- sentados (fig. 9) o
- de pie (fig. 10).
Para ello bastará con que
ajusten la altura y posición de
la parte superior.
• Durante el bronceado, la
distancia entre las lámparas
y su cuerpo deberá ser al
menos de 20 cm.
• Si tratan de broncearse
estando echados, esto
significa que la distancia
entre las lámparas y su
cama, lecho o colchoneta
deberá ser al menos de
unos 40 cm (fig. 11).
Ajuste de la altura
- Para liberar la varilla,
hagan girar (dos o tres
vueltas y en sentido
antihorario) el mando de
ajuste de la altura (fig.
12).
Un muelle accionado por
gas estabilizará la
posición de la varilla.
- Ajusten la altura de la
varilla presionando o
tirando de la empuñadura
(fig. 13).
- Hagan girar (en sentido
horario) el mando de
ajuste de la altura hasta
que la varilla quede fijada
(fig. 14).
2
3
4
5
6
1
1
2
8
9
10
11
20
40
12
13
7
14
Page is loading ...
Page is loading ...
Page is loading ...
Page is loading ...
Page is loading ...

43
Generel beskrivelse (fig. 1, side 3).
A Solarierør og glimtændere
HB 541 - 8 store solarierør (Philips type UVA 100W
"Cleo Performance") med
8 glimtændere (Philips type S12)
HB 542 - 10 store solarierør (Philips type UVA 100W
"Cleo Performance") med
10 glimtændere (Philips type S12)
HB 544 - 10 store solarierør (Philips type UVA 100W
"Cleo Performance") med
10 glimtændere (Philips type S12) og
4 små solarierør (Philips type UVA 15W
"Cleo Performance") til ekstra ansigtsbruning,
med
4 glimtændere Philips type S2)
B Timer
C Stativ
D Beskyttelsesbriller (2 x)
(Type HB 071, reservedelsnr. 4822 690 80123)
E Endestykker
F Stang
G Bolte og møtrikker
H Fastgørelsesknap til højdejustering
I Skruenøgle
J Netledning
K Hjul på stativet
L Håndtag
M Ventilatorvinge
N Ventilationsåbninger
O Beskyttelsesplade
P Plastik-beskyttelsesfolie
Sådan gøres solariet klar til brug.
Fastgørelse af stativet:
- Få en person til at hjælpe Dem med at lægge solariet på et
bord med solarierørene nedad (fig. 2)..
Sørg for at håndtaget ikke hviler på bordet.
- Skru hjulene fast på stativet (fig. 3)..
- Monter stangen på stativet (fig. 4, 5).
-Løft solariet op fra bordet (fig. 6).
- Tag plastikfolien af beskyttelsespladen (fig. 7).
De kan med dette solarium
enten få UV-behandling
liggende (fig. 8),
siddende (fig. 9) eller
stående (fig. 10).
Dette kan gøres ved at
regulere på overdelens højde
og stilling.
• Under UV-behandlingen
skal afstanden mellem
solarium og Deres krop
være mindst 20 cm.
• Hvis De tager UV-
behandling liggende,
betyder det, at afstanden
mellem solarierørene og
Deres seng, sofa eller
madras mindst skal være
40 cm (fig. 11).
Højderegulering.
- Drej fastgørelsesknappen
til højdejustering to eller
tre omgange venstre om,
til stangen kan bevæges
(fig. 12).
En gasfjeder stabiliserer
stangens stilling.
- Reguler på højden af
solariet ved at trække eller
skubbe på håndtaget (fig.
13).
- Drej fastgørelsesknappen
højre om til stangen igen
sidder fast i stativet (fig. 14).
2
3
4
5
6
1
1
2
8
9
10
11
20
40
12
13
7
14
Page is loading ...
Page is loading ...
Page is loading ...
Page is loading ...

48
Bare for solarium type HB 542 og HB 544 (med 10
lysrør):
UV-behandling: Hvor ofte? Hvor lenge?
De kan ta en UV behandling pr. dag gjennom en periode
på fem til ti dager. La det være minst 48 timer mellom de to
første behandlingene. Etter en slik serie, bør det være et
opphold.
Etter en måneds tid vil huden ha mistet mye av brunfargen.
Da kan det være på tide med en ny behandlingsrunde.
På den annen side er det også mulig å ta en, eller to
behandlinger pr. uke etterpå for å beholde fargen.
Hva De enn måtte foretrekke, vær sikker på at De ikke
overskrider det maksimale antall soltimer pr. år.
• or solariet type nr. HB 542 og HB 544 (med 10 lysrør) er
dette 28 timer (= 1680 minutter).
F.eks.:
Tenk Dem at De tar en 10 dagers behandling med 10
minutters behandling den første dagen og
30 minutter de 9 følgende dagene.
Hele behandlingstiden blir da (1 x 10 min.) + (9 x 30 min.)=
280 minutter.
• Ved bruk av solariet type nr. HB 542 eller HB 544
(med 10 lysrør), kan De i løpet av et år ta 6 slike
behandlinger (6 x 280 min.= 1680 min.)
Selvfølgelig er maksimum antall soltimer gyldig for hver
side av kroppen separat (med andre ord både for forsiden
og baksiden av kroppen).
Det fremgår av tabellen at den første behandlingen i en
serie alltid skal være på 10 minutter. Dette er ikke avhengig
av den enkeltes hudømfintlighet.
• Hvis De tror at behandlingstiden er for lang for Dem
(f.eks. at huden blir stram og øm etter en behandling)
anbefales det at behandlingstiden blir redusert med
f.eks. 5 min på hver side av kroppen.
• For å få jevn farge over det hele, anbefales det at De
dreier litt på Dem av og til under behandlingen, slik at
kroppens sider også får farge.
Behandlingstid for
UV behandling
(for hver del av
kroppen som 1st 2. 3. 4. 5. 6. 7. 8. 9. 10.
bestråles) i min. dag dag dag dag dag dag dag dag dag dag
for pers.med meget 10 10-15 10-15 10-15 10-15 10-15 10-15 10-15 10-15 10-15
for pers.med 10 20-25 20-25 20-25 20-25 20-25 20-25 20-25 20-25 20-25
for pers.med lite 10 30-35 30-35 30-35 30-35 30-35 30-35 30-35 30-35 30-35
opphold på minst 48 timer

49
Generell beskrivelse (fig. 1 side 3)
A Lysrør og starter
HB 541 - 8 lysrør (type Philips UVA 100W
"Cleo Performance"), med
8 startere (type Philips S 12)
HB 542 - 10 lysrør (type Philips UVA 100W
"Cleo Performance"), med
10 startere (type Philips S 12)
HB 544 - 10 lysrør (type Philips UVA 100W
"Cleo Performance"), med
10 startere (type Philips S 12)
4 små lysrør (type Philips UVA 15W
"Cleo Performanse") for ekstra
bruningseffekt i ansiktet, med
4 startere (type Philips S 2).
B Tidsur
C Stativ
D Beskyttelsesbriller (2)
(type nr. HB 071/service nr. 4822 690 80123)
E Endestykker
F Stang
G Bolter og muttere
H Høydejusterings-hjul
I Skrunøkkel
J Nettledning
K Hjul
L Håndtak
M Kjølevifte
N Ventilasjonsåpninger
O Beskyttelsesfilter
P Beskyttelsesfolie
Klargjøring for bruk
Montering av stativet
-Få hjelp av en annen person. Legg solariet på et bord, med
rørene pekende nedover (fig. 2). Forsikre Dem om at
håndtaket ikke hviler på bordet.
- Fest hjulene til stativet (fig. 3).
- Monter stativet til stangen (fig. 4, 5).
-Løft solariet fra bordet (fig. 6).
- Fjern beskyttelsesfolien fra beskyttelsesfilteret (fig. 7).
De kan sole Dem enten:
liggende (fig. 8),
sittende (fig. 9), eller
stående (fig. 10)
med dette solariet.
For å gjøre dette mulig kan
De justere høyden og
posisjonen til overdelen.
• Under soling må
avstanden mellom rørene
og kroppen være minst 20
cm (8").
• Hvis De har til hensikt å
sole Dem liggende, betyr
dette at avstanden mellom
rørene og Deres seng,
benk eller madrass, må
minst være 40 cm (16")
(fig. 11).
Høydejustering
- Vri høydejusterings-hjulet
mot urviseren to eller tre
omdreiinger for å frigjøre
stangen (fig. 12). En
gass-støtdemper vil
stabilisere posisjonen til
stangen.
- Juster høyden til stangen
ved å trekke eller skyve i
håndtaket (fig. 13).
- Vri høydejusterings-hjulet
med urviseren for å låse
stangen (fig. 14).
2
3
4
5
6
1
1
2
8
9
10
11
20
40
12
13
7
14

50
Bruk av solariet
- Undersøk avstanden mellom
kroppen og solariet
(minimum 20 cm eller 8").
Hvis nødvendig juster
høyden og/eller stillingen til
solariet.
- Sett timeren til ønsket
behandlingstid (fig. 15).
(Vennligst se tabellen i
denne bruksanvisningen og
Deres egne notater).
- Glem ikke å ta på Dem de
medfølgende
beskyttelsesbrillene.
- Så snart behandlingstiden er over vil rørene automatisk bli
slått av.
- Hvis De ønsker å behandle den andre siden av kroppen
samtidig, kan De sette på timeren igjen (det er ikke
nødvendig å avkjøle solariet først).
Liggende
- Plasser solariet ved siden av
sengen eller benken.
- Da stativet er på hjul kan De
dra solariet mot Dem mens
De ligger. Forsikre Dem om
at rørene er plassert rett
over Dem (fig. 8).
- De kan bevege stativet
under sengen (fig. 16).
- Etter bruk kan De skyve
solariet vekk for å gjøre det
lettere å stå opp.
Sittende
- Plasser en (flukt)stol og solariet sammen som illustrert i fig. 9.
- Juster solariet i riktig stilling ved å dreie på den øvre delen.
Stående
- Drei den øvre delen i vertikal stilling. Hvis nødvendig juster
høyden.
- Ta plass foran solariet (fig. 10) i en avstand av minst 20 cm
(8").
Oppbevaring
Solariet tar liten plass når det
oppbevares vertikalt
(fig. 17).
Rengjøring
• Trekk alltid støpselet ut av stikkontakten og la solariet kjøles
ned før rengjøring.
• Utsiden kan rengjøres med en fuktig klut. Pass på at det
ikke renner vann inn i apparatet.
• Bruk ikke pusse- eller slipemidler.
• Bruk ikke væsker som alkohol, bensin eller aceton, da dette
kan lage skader som ikke kan repareres.
Skifting av lysstoffrør og/eller startere
I tidens løp (ved vanlig familiebruk først etter flere år), vil
lysstoffrørene bli mindre effektive.
Når dette skjer må man enten forlenge behandlingstiden eller
skifte ut rørene.
• De kan la rørene og/eller starterne bli skiftet av autorisert
service personell: De har nødvendig produktkjennskap og
originale deler og verktøy for å gjøre jobben.
De har også mulighet til å avhende seg med de brukte
rørene på en godkjent måte.
• Hvis De foretrekker å skifte rørene selv, gjøres det på
følgende måte:
- Trekk først støpselet ut av stikkontakten.
-Løsne skruene og fjern de to endedekslene (fig. 18).
- Trekk helt ut beskyttelsesdekslet (fig. 19). Etter dette er
rørene og starterne tilgjengelige.
- Drei rørene forsiktig mot venstre eller høyre. Når de løsner,
fjernes de fra lampeholderne.
- Fjern starterne ved å dreie dem forsiktig mot venstre og
deretter trekke dem ut. (Halvparten av starterne sitter på
hver sin side av solariet).
-Gå frem på motsatt vis ved innsetting av nye rør og startere.
- Skyv beskyttelsesdekslet tilbake på plass. Glem ikke å feste
endestykkene med skruene.
Rørene til dette solariet inneholder stoffer som kan
forurense miljøet. Når De kaster et gammelt rør,
forsikre Dem om at det er separert fra vanlig
husholdningsavfall og kastes på en offentlig anvist
plass.
15
6
0
5
5
5
0
4
5
4
0
3
5
3
0
2
5
2
0
1
5
1
0
5
0
M
I
N
16
17
19
18
f
Page is loading ...
Page is loading ...
Page is loading ...
Page is loading ...

55
Solariets viktigaste delar, se fig 1 sid 3.
A Solarielysrör och tändare.
HB 541 - 8 stora lysrör (typ Philips UVA 100W "
Cleo performance") med
8 tändare (typ Philips S12)
HB 542 - 10 stora lysrör (typ Philips UVA 100W
"Cleo performance") med
10 tändare (typ Philips S12)
HB 544 - 10 stora lysrör (typ Philips UVA 100W
"Cleo performance") med
10 tändare (typ Philips S12)
4 små lysrör (typ Philips UVA 15W
"Cleo performance") för extra solbränna i
ansiktet, med
4 tändare (typ Philips S2)
B Tidur, med vilken du ställer in önskad solningstid.
C Stativ, bestående av ben och fot.
D Skyddsglasögon, 2st.
(Typ nr HB 071 / service nr 4822 690 80123)
E Skyddskåpor.
F Teleskoprör.
G Fästbultar och muttrar.
H Höjdjusteringsratt.
I Skruvnyckel.
J Nätsladd.
K Länkrullar (svängbara hjul).
L Handtag.
M Kylfläkt.
N Ventilationsöppningar på ovansidan.
O Skyddsskiva.
P Skyddsfolie för skyddsskiva.
Uppställning av solariet för solning
Att sätta ihop stativet
-Lägg solhimmeln, med hjälp av en person, på ett bord med
lysrören vända neråt, fig 2.
Se till att handtaget (L) inte vilar mot bordet.
- Skruva fast länkrullarna (K), fig 3.
- Skruva ihop stativet med fästbultarna, fig 4 - 5.
- Res upp solariet från bordet, fig 6.
- Avlägsna skyddsfolien från skyddsskivan, fig 7.
Du kan sola antingen:
liggande, fig 8,
sittande, fig 9 eller
stående, fig 10
med detta solarium.
För att möjliggöra detta kan
solhimmeln ställas i olika höjd
och vinklar.
• Vid solning skall avståndet
mellan lysrören och
kroppen vara minst 20 cm.
• Om du avser att sola
liggande innebär detta att
avståndet mellan sängen,
soffan, madrassen och
lysrören skall vara minst ca
40 cm, fig 11.
Höjdinställning
- Vrid höjdinställningsratten
(H) moturs två till tre varv så
att teleskoppröret (F) frigörs,
fig 12.
En gasfjäder inuti håller
teleskopröret i läge.
- Justera höjden genom att
dra neråt eller trycka uppåt,
fig 13. OBS! När solariet
levereras står det i översta
läget.
- Vrid höjdinställningsratten
medurs för att låsa
teleskopröret, fig 14.
2
3
4
5
6
1
1
2
8
9
10
11
20
40
12
13
7
14
Page is loading ...
Page is loading ...

4222 000 69431
;
-
 1
1
-
 2
2
-
 3
3
-
 4
4
-
 5
5
-
 6
6
-
 7
7
-
 8
8
-
 9
9
-
 10
10
-
 11
11
-
 12
12
-
 13
13
-
 14
14
-
 15
15
-
 16
16
-
 17
17
-
 18
18
-
 19
19
-
 20
20
-
 21
21
-
 22
22
-
 23
23
-
 24
24
-
 25
25
-
 26
26
-
 27
27
-
 28
28
-
 29
29
-
 30
30
-
 31
31
-
 32
32
-
 33
33
-
 34
34
-
 35
35
-
 36
36
-
 37
37
-
 38
38
-
 39
39
-
 40
40
-
 41
41
-
 42
42
-
 43
43
-
 44
44
-
 45
45
-
 46
46
-
 47
47
-
 48
48
-
 49
49
-
 50
50
-
 51
51
-
 52
52
-
 53
53
-
 54
54
-
 55
55
-
 56
56
-
 57
57
-
 58
58


Ask a question and I''ll find the answer in the document
Finding information in a document is now easier with AI
in other languages
- italiano: Philips HB544/01 Manuale utente
- français: Philips HB544/01 Manuel utilisateur
- español: Philips HB544/01 Manual de usuario
- Deutsch: Philips HB544/01 Benutzerhandbuch
- Nederlands: Philips HB544/01 Handleiding
- dansk: Philips HB544/01 Brugermanual
- svenska: Philips HB544/01 Användarmanual
Related papers
Other documents
-
 Dr. Kern Tancan 8000 Owner's manual
-
Signature F73 User manual
-
 SunShower DELUXE WHITE User manual
-
Hapro TOPAZ8 Datasheet
-
-
 Sonnen eco 8.2 Setup Instructions
-
KBL mon amie Operating instructions
-
-
-


