Page is loading ...

EID11002RV
GB
IMPACT DRILL USER’S MANUAL
1
FR
PERCEUSE À PERCUSSION MANUEL D’UTILISATION 4
DE
SCHLAGBOHRMASCHINE BEDIENUNGSANLEITUNG 7
ES
TALADRO DE PERCUSION MANUAL DE UTILIZACIÓN 10
IT
TRAPANO A PERCUSSIONE MANUALE D’USO 13
NL
KLOPBOOR GEBRUIKERSHANDLEIDING 16
PT
BERBEQUIM DE PERCUSSÃO MANUAL DE UTILIZAÇÃO 19
DK
SLAGBOREMASKINE BRUGERVEJLEDNING 22
SE
SLAGBORRMASKIN INSTRUKTIONSBOK 25
FI
ISKUPORAKONE KÄYTTÄJÄN KÄSIKIRJA 28
NO
SLAGBOREMASKIN BRUKSANVISNING 31
RU
êìäéÇéÑëíÇé èé ùäëèãìÄíÄñàà 34
PL
WIERTARKA UDAROWA INSTRUKCJA OBSŁUGI 37
CZ
PŘÍKLEPOVÁ VRTAČKA NÁVOD K OBSLUZE 40
HU
ÜTVEFÚRÓ HASZNÁLATI ÚTMUTATÓ 43
RO
MASINA DE GAURIT ROTOPERCUTOARE MANUAL DE UTILIZARE 46
LV
TRIECIENURBIS LIETOTĀJA ROKASGRĀMATA 49
LT
SMŪGINIS GRĄŽTAS NAUDOJIMO VADOVAS 52
EE
LÖÖKTRELL KASUTAJAJUHEND 55
HR
BEÆI»NA BU©ILICA-ZAVRTA» KORISNI»KI PRIRU»NIK 58
SI
UDARNI VRTALNIK UPORABNIŠKI PRIROČNIK 61
SK
PRÍKLEPOVÉ VŔTANIE NÁVOD NA POUŽITIE 64
GR
O X 67
TR
DARBEL MATKAP KULLANiM KILAVUZU 70
GB ORIGINAL INSTRUCTIONS FR TRADUCTION DES INSTRUCTIONS ORIGINALES DE ÜBERSETZUNG DER ORIGINALANLEITUNG ES TRADUCCIÓN DE
LAS INSTRUCCIONES ORIGINALES IT TRADUZIONE DELLE ISTRUZIONI ORIGINALI NL VERTALING VAN DE ORIGINELE INSTRUCTIES PT TRADUÇÃO DAS
INSTRUÇÕES ORIGINAIS DK OVERSÆTTELSE AF DE ORIGINALE INSTRUKTIONER SE ÖVERSÄTTNING AV DE URSPRUNGLIGA INSTRUKTIONERNA FI
ALKUPERÄISTEN OHJEIDEN SUOMENNOS NO OVERSETTELSE AV DE ORIGINALE INSTRUKSJONENE RU
PL TUMACZENIE INSTRUKCJI ORYGINALNEJ CZ PŘEKLAD ORIGINÁLNÍCH POKYNŮ HU AZ EREDETI ÚTMUTATÓ FORDÍTÁSA RO TRADUCEREA
INSTRUCIUNILOR ORIGINALE LV TULKOTS NO ORIĢINĀLĀS INSTRUKCIJAS LT ORIGINALIŲ INSTRUKCIJŲ VERTIMAS EE ORIGINAALJUHENDI TÕLGE
HR
PRIJEVOD ORIGINALNIH UPUTA SI PREVOD ORIGINALNIH NAVODIL SK PREKLAD POKYNOV V ORIGINÁLI GR
TR ORIJINAL TALIMATLARIN TERCÜMESI
EID11002RV_24lgs manual_v2B.indd A1EID11002RV_24lgs manual_v2B.indd A1 1/16/10 9:41:11 AM1/16/10 9:41:11 AM

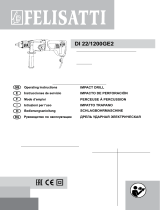
7
8
11
1
5
2
10
6
3
16
17
18
5
18
1
4
2
19
Fig. 2Fig. 1
EID11002RV_24lgs manual_v2B.indd A2EID11002RV_24lgs manual_v2B.indd A2 1/16/10 9:41:13 AM1/16/10 9:41:13 AM

4
6
15 14
16
6
7
19
17
9
3
12
13
Fig. 5
Fig. 4Fig. 3
Fig. 6
Fig. 7
Fig. 8
EID11002RV_24lgs manual_v2B.indd A3EID11002RV_24lgs manual_v2B.indd A3 1/16/10 9:41:16 AM1/16/10 9:41:16 AM

Important!
It is essential that you read the instructions in this manual before operating this machine.
Attention !
Il est indispensable que vous lisiez les instructions contenues dans ce manuel avant la mise en service
de l’appareil.
Achtung!
Bitte lesen Sie unbedingt vor Inbetriebnahme die Hinweise dieser Bedienungsanleitung.
¡Atención!
Es imprescindible que lea las instrucciones de este manual antes de la puesta en servicio.
Attenzione!
Prima di procedere alla messa in funzione, è indispensabile leggere attentamente le istruzioni contenute
nel manuale.
Let op !
Het is van essentieel belang dat u de instructies in deze gebruiksaanwijzing leest vooraleer u dit toestel
in gebruik neemt.
Atenção!
É indispensável que leia as instruções deste manual antes de utilizar a máquina.
OBS!
Denne brugsanvisning skal læses igennem inden ibrugtagning.
Observera!
Det är nödvändigt att läsa instruktionerna i denna bruksanvisning innan användning.
Huomio!
On ehdottoman välttämätöntä lukea tässä käyttöohjeessa annetut ohjeet ennen käyttöönottoa.
Advarsel!
Det er meget viktig at du leser denne brukerveiledningen før du tar maskinen i bruk.
ÇÌËχÌËe!
.
Uwaga!
Przed przystpieniem do uytkowania tego urzdzenia, naley koniecznie zapozna si z zaleceniami
zawartymi w niniejszym podrczniku.
Dležité upozornní!
Nepoužívejte tento pístroj díve, než si petete pokyny uvedené v tomto návodu.
Figyelem!
Feltétlenül fontos, hogy a jelen használati útmutatóban foglalt elírásokat az üzembe helyezés eltt
elolvassa!
Atenie!
Este esenial s citii instruciunile din acest manual înainte de operarea acestui aparat.
Uzmanību! Svarīgi, lai jūs pirms mašīnas darbināšanas izlasītu instrukcijas šajā rokasgrāmatā.
Dėmesio! Prieš praddami eksploatuoti š prietais, svarbu, kad perskaitytumte šiose instrukcijose pateiktus
nurodymus.
Tähtis! Enne trelli kasutama hakkamist tuleb käesolevas juhendis esitatud juhised kindlasti läbi lugeda.
Upozorenje! Neophodno je da proitate ove upute prije uporabe ovog ureaja.
Pomembno!
Pred uporabo tega stroja, obvezno preberite navodila iz tega prironika.
Dôležité! Pre prácou s týmto zariadením je dôležité, by ste si prečítali pokyny v tomto návode.
!
.
Dikkat!
Cihazn çaltrlmasndan önce bu klavuzda bulunan talimatlar okumanz zorunludur.
Subject to technical modifications / Sous réserve de modifications techniques /Technische Änderungen vorbehalten /
Sujeto a modificaciones técnicas / Con riserva di eventuali modifiche tecniche /Technische wijzigingen voorbehouden /
Com reserva de modificações técnicas / Med forbehold for tekniske ændringer / Med förbehåll för tekniska ändringar /
Tekniset muutokset varataan / Med forbehold om tekniske endringer /
åÓ„ÛÚ ·˚Ú¸ ‚ÌeÒeÌ˚ ÚeıÌ˘eÒÍËe ËÁÏeÌeÌËfl /
Z zastrzeeniem modyfikacji technicznych / Zmny technických údaj vyhrazeny / A mszaki módosítás jogát fenntartjuk /
Sub rezerva modificarilor tehnice /
Paturam tiesības mainīt tehniskos raksturlielumus / Pasiliekant teisę daryti techninius pakeitimus /
Tehnilised muudatused võimalikud /
Podloæno tehniËkim promjenama /Tehnine spremembe dopušene/
Technické zmeny vyhradené / / Teknik deiiklik hakk sakldr
EID11002RV_24lgs manual_v2B.indd A4EID11002RV_24lgs manual_v2B.indd A4 1/16/10 9:41:18 AM1/16/10 9:41:18 AM

1
English
GB
FR DE ES IT NL PT DK SE FI NO RU PL CZ HU RO LV LT EE HR SI SK GR TR
SPECIAL RULES
Q Wear ear protectors with impact drills. Exposure to
noise can cause hearing loss.
Q Use auxiliary handles supplied with the tool. Loss
of control can cause personal injury.
Q Hold power tool by insulated gripping surfaces,
when performing an operation where the cutting
accessory may contact hidden wiring or its own
cord. Cutting accessory contacting a "live" wire may
make exposed metal parts of the power tool "live" and
could give the operator an electric shock.
SPECIFICATIONS
EID11002RV
Voltage 230 V 50 Hz
Chuck capacity 13 mm (1/2”)
Drilling capacity
in wood 50 mm
in steel 13 mm
in masonry 20 mm
Input 1100 W
No load speed 0-1,200 / 0-3,200 min
-1
Blows per minute 0-19,000 / 0-51,000 min
-1
Weight 3.38 kg
DESCRIPTION
1. Trigger Switch
2. Forward / Reverse Selector
3. Keyless Chuck
4. Variable Speed Selector
5. Lock-on Button
6. Drill Mode Shift Knob
7. Depth Gauge
8. Auxiliary Handle
9. Bit (Not included)
10. Air Vents
11. Livetool Indicator™
12. To Tighten Chuck
13. To Loosen Chuck
14. To Tighten Handle
15. To Loosen Handle
16. Bit Storge
17. Spindle Lock
18. Bubble Level
19. Gear Setting Switch
STANDARD ACCESSORIES
Auxiliary handle and Depth Gauge.
OPERATION
APPLICATIONS
(Use only for the purposes listed below.)
Q Drilling wood, materials and resin boards.
Q Drilling concrete (impact drilling only).
Q Drilling metal: steel, brass, aluminum sheets, stainless
steel & pipe.
SWITCH
See Figure 1 & 3.
Q This tool can be started and stopped by squeezing
and releasing the trigger switch (1).
Q The speed can be adjusted in either gear by
controlling the force applied to the trigger.
Q The maximum speed of the drill may be set at different
speeds by adjusting the variable speed selector (4).
Q For continuous operation, press the lock-on button (5)
while squeezing the trigger. Squeeze the trigger again
to release the lock.
CHANGING THE ROTATION DIRECTION
See Figure 2.
Q To change the direction of rotation, stop the tool and
push the forward / reverse selector (2).
Q When the forward selector is pushed in, the bit rotates
clockwise when viewed from the handle end of the tool.
Q When the reverse selector is pushed in, the bit rotates
counterclockwise.
MOUNTING AND REMOVING THE BIT
See Figure 4.
Q Insert the drill bit (9) into the chuck as far as the plain
part of its shank will go.
Q Tighten the chuck securely by rotating the chuck head
in a clockwise direction (12).
Q The bit can be removed by rotating the chuck in a
counterclockwise direction (13).
CHANGING BETWEEN DRILLING AND IMPACT
DRILLING MODE
See Figure 5.
The drilling mode shift knob (6) for changing between
the drilling mode and impact drilling mode is positioned
on the top of the tool.
DRILLING MODE: Shift the knob to the " " and
showing " " symbol for drilling.
EID11002RV_24lgs manual_v2B.indd Sec1:1EID11002RV_24lgs manual_v2B.indd Sec1:1 1/16/10 9:41:18 AM1/16/10 9:41:18 AM

2
English
GB
FR DE ES IT NL PT DK SE FI NO RU PL CZ HU RO LV LT EE HR SI SK GR TR
OPERATION
IMPACT DRILLING MODE: Shift the knob to the " "
and showing "
" symbol for impact drilling.
OPERATING
NEVER COVER THE AIR VENTS (10) SINCE THEY
MUST ALWAYS BE OPEN FOR PROPER MOTOR
COOLING.
DRILLING IN WOOD
To prevent ugly splits around the drill hole on the reverse
side of the workpiece, put a piece of scrap timber under
the work piece.
DRILLING IN METAL
Metals such as steel, brass, aluminum sheets, stainless
steel, and pipe may also be drilled. Mark the point to be
drilled with a nail or punch.
Do not use impact drilling mode on these materials.
DRILLING IN CONCRETE
Stone and masonry are generally drilled in the impact
drilling mode.
When drilling in delicate materials such as wall tiles,
it is essential to start with ordinary drilling and, once the
tile is pierced, to continue with impact drilling.
In deep bore holes the drill bit should be pulled out
occasionally in order to remove the debris from the
drill and hole.
AUXILIARY HANDLE AND DEPTH GAUGE
See Figure 6.
Auxiliary handle
The auxiliary handle (8) can be rotated 360º.
Loosen the handle grip by turning in direction (15),
and tighten it at an easy to use position by turning
the grip in direction (14).
Depth gauge
Holes of a fixed depth can be accurately bored by using
the depth gauge (7).
The depth of the hole will be the distance from the end
of the bit to the end of the depth gauge.
By turning the handle grip in direction (14), the depth
gauge can be released and the depth adjusted. After
adjusting the depth, fix the depth gauge again by turning
the handle grip in direction (15).
BIT STORAGE
See Figure 7.
The auxiliary handle also contains a compartment to
store drill bits. To access this compartment unscrew
the end cap below the grey trim on the handle in an
anticlockwise direction.
SPINDLE LOCK
See Figure 8.
For easy changing of the drill bit this drill is equipped with
an automatic spindle lock (17) which holds the spindle
stationary when loosening and tightening the chuck.
CHANGING THE ROTATION SPEED
See Figure 6.
The rotation speed can only be changed when the tool is
at a standstill.
The gear setting switch (19) is on the left side of the
housing.
Q When the switch is in position “1” the tool is in the low
gear.
Q When the switch is in position “2” the tool is in the
high gear.
BUBBLE LEVEL
See Figure 1.
A bubble vial is located on the top of the motor housing
to help keep the drill bit level during use. This ensures
maximum accuracy in drilling.
LIVETOOL INDICATOR™
This tool features a Livetool Indicator™ (11) which
illuminates as soon as the tool is connected to the power
supply. This warns the user that the tool is connected and
will operate when the switch is pressed.
MAINTENANCE
After use, check the tool to make sure that it is in good
condition. It is recommended that you take this tool to
a RYOBI Authorized Service Center for a thorough
cleaning and lubrication at least once a year.
DO NOT MAKE ANY ADJUSTMENTS WHILE
THE MOTOR IS IN MOTION. ALWAYS DISCONNECT
THE POWER CORD FROM THE POWER SUPPLY
BEFORE CHANGING REMOVABLE OR CONSUMABLE
PARTS (BLADE, BIT, ETC.), LUBRICATING OR
WORKING ON THE UNIT.
EID11002RV_24lgs manual_v2B.indd Sec1:2EID11002RV_24lgs manual_v2B.indd Sec1:2 1/16/10 9:41:18 AM1/16/10 9:41:18 AM

3
English
GB
FR DE ES IT NL PT DK SE FI NO RU PL CZ HU RO LV LT EE HR SI SK GR TR
MAINTENANCE
WARNING
To ensure safety and reliability, all repairs should
be performed by an AUTHORIZED SERVICE
CENTER or other QUALIFIED SERVICE
ORGANIZATION.
SAVE THESE INSTRUCTIONS FOR FUTURE
REFERENCE.
ENVIRONMENTAL PROTECTION
Recycle raw materials instead of disposing as
waste. The machine, accessories
and packaging should be sorted for
environmental-friendly recycling.
SYMBOL
Safety Alert
V Volts
Hz Hertz
Alternating Current
W Watts
n
o No load Speed
min
-1
Revolutions or reciprocations per minute
CE Conformity
Double Insulation
Please read the instructions carefully before
starting the machine.
Recycle raw materials instead of disposing as
waste. The machine, accessories and
packaging should be sorted for environmental-
friendly recycling
EID11002RV_24lgs manual_v2B.indd Sec1:3EID11002RV_24lgs manual_v2B.indd Sec1:3 1/16/10 9:41:18 AM1/16/10 9:41:18 AM

4
Français
FR
GB
DE ES IT NL PT DK SE FI NO RU PL CZ HU RO LV LT EE HR SI SK GR TR
CONSIGNES DE SÉCURITÉ SPÉCIFIQUES
Q Portez des protections auditives lorsque vous
utilisez une perceuse à percussion. Une exposition
au bruit peut provoquer une perte d’audition.
Q Utilisez la poignée auxiliaire fournie avec votre
outil. Une perte de contrôle peut entraîner des
blessures graves.
Q Maintenez l’outil électrique par ses surface de
préhension isolées lorsque vous effectuez des
opérations susceptibles de faire entrer en contact
l’accessoire de coupe avec des câbles cachés ou
avec le propre câble d’alimentation de l’outil. Un
accessoire de coupe qui entrerait en contact avec un
câble “sous tension” pourrait véhiculer cette tension
électrique vers les parties métalliques de l’outil et
exposer l’opérateur à un choc électrique.
CARACTÉRISTIQUES PRODUIT
EID11002RV
Tension 230 V 50 Hz
Capacité du mandrin 13 mm (1/2”)
Capacité de perçage
bois 50 mm
acier 13 mm
béton 20 mm
Puissance absorbée 1100 W
Vitesse à vide 0-1,200 / 0-3,200 tr/min
Coups par minute 0-19,000 / 0-51,000 tr/min
Poids net 3.38 kg
DESCRIPTION
1. Gâchette Interrupteur
2. Sélecteur Avant / Arrière
3. Mandrin Auto Serrant
4. Variateur de Vitesse
5. Bouton de Verrouillage
6. Sélecteur de Mode de Perçage
7. Butée de Profondeur
8. Poignée auxiliaire
9. Foret (Non compris)
10. Fentes de Ventilation
11. Indicateur Live Tool
12. Pour Serrer le Mandrin
13. Pour Desserrer le Mandrin
14. Pour Serrer la Poignée
15. Pour Desserrer la Poignée
16. Logement pour Forets
17. Blocage de Broche
18. Niveau à Bulle
19. Sélecteur de Vitesse Mécanique
ACCESSOIRES STANDARDS
Poignée auxiliaire et Jauge de Profondeur.
UTILISATION
APPLICATIONS
(A n’utiliser que pour les applications listées ci-dessous.)
Q Perçage dans le bois, les matériaux et les panneaux
de résine.
Q Perçage dans le béton (uniquement avec la
percussion).
Q Perçage dans le métal: acier, laiton, tôles
d’aluminium, inox & tuyaux.
INTERRUPTEUR
Voir Figures 1 & 3.
Q Cet outil peut être mis en route et arrêté en enfonçant
et en relâchant la gâchette interrupteur (1).
Q La vitesse peut être ajustée en contrôlant la force
appliquée sur la gâchette interrupteur.
Q La vitesse maximale de la perceuse peut être ajustée
en agissant sur le variateur de vitesse (4).
Q Pour une utilisation en continu, appuyez sur le bouton
de verrouillage (5) tout en enfonçant la gâchette.
Enfoncez à nouveau la gâchette pour déverrouiller le
bouton.
CHANGEMENT DE SENS DE ROTATION
Voir Figure 2.
Q Pour changer le sens de rotation, arrêtez l’outil et
poussez sur le sélecteur avant / arrière (2).
Q Lorsque le sélecteur de sens de rotation est poussé
du côté “forward”, le foret tourne dans le sens des
aiguilles d’une montre lorsqu’on le regarde côté
poignée de l’outil.
Q Lorsque le sélecteur est poussé du côté “reverse”, le
foret tourne dans le sens inverse des aiguilles d’une
montre.
MISE EN PLACE ET RETRAIT DU FORET
Voir Figure 4.
Q Insérez la queue du foret (9) aussi profond que
possible dans le mandrin.
Q Serrez fermement le mandrin en le faisant tourner
dans le sens des aiguilles d’une montre (12).
Q Le foret peut être retiré en tournant le mandrin dans
le sens inverse des aiguilles d’une montre (13).
ACTIVATION ET DÉSACTIVATION DE LA
PERCUSSION
Voir Figure 5.
Le bouton de sélection du mode de perçage (6)
permettant d’engager et de désengager la percussion est
situé sur le dessus de l’outil.
EID11002RV_24lgs manual_v2B.indd Sec1:4EID11002RV_24lgs manual_v2B.indd Sec1:4 1/16/10 9:41:18 AM1/16/10 9:41:18 AM

5
Français
FR
GB
DE ES IT NL PT DK SE FI NO RU PL CZ HU RO LV LT EE HR SI SK GR TR
UTILISATION
MODE DE PERÇAGE: Appuyez sur le côté “ ” du
bouton afin d’afficher le symbole “
” pour percer sans
percussion.
PERÇAGE AVEC PERCUSSION: Appuyez sur le côté
“
” du bouton afin d’afficher le symbole “ ” pour
percer en utilisant la percussion.
UTILISATION
NE COUVREZ JAMAIS LES FENTES DE VENTILATION
(10), ELLES DOIVENT TOUJOURS ÊTRE DÉGAGÉES
POUR ASSURER UN REFROIDISSEMENT CORRECT
DU MOTEUR.
PERÇAGE DANS LE BOIS
Pour éviter qu’en débouchant le foret ne crée
d’inesthétiques éclats, mettez une chute de bois sous la
pièce à percer.
PERÇAGE DANS LE MÉTAL
Les métaux tels que l’acier, le laiton, la tôle d’aluminium,
l’inox et les tuyaux peuvent également être percés.
Marquez l’emplacement du perçage à effectuer à l’aide
d’un clou ou d’un pointeau.
N’utilisez pas la percussion pour percer dans ce genre
de matériaux.
PERÇAGE DANS LE BÉTON
La pierre et la maçonnerie se percent généralement en
utilisant la percussion.
Lorsque vous percez dans des matériaux fragiles tels
que le carrelage, il est essentiel de commencer à percer
sans utiliser la percussion, et de l’activer une fois le
carreau percé.
Lors du perçage de gros trous profonds, il est
recommandé de retirer le foret de temps à autre pour
dégager les débris accumulés dans le trou et autour du
foret.
POIGNÉE AUXILIAIRE ET JAUGE DE PROFONDEUR
Voir Figure 6.
Poignée auxiliaire
La poignée auxiliaire (8) peut pivoter sur 360º.
Desserrez la poignée en la faisant tourner dans la
direction (15), puis serrez-la dans la position désirée en
la tournant dans la direction (14).
Butée de profondeur
Les trous de profondeur prédéterminée peuvent être percés
de façon précise grâce à la butée de profondeur (7).
La profondeur du trou correspondra à la distance
entre l’extrémité du foret et l’extrémité de la butée de
profondeur.
La butée se règle en tournant la poignée dans la direction
(14), ce qui la libère et permet de l’ajuster. Une fois la
profondeur ajustée, resserrez la butée de profondeur en
tournant la poignée dans la direction (15).
LOGEMENT POUR FORETS
Voir Figure 7.
La poignée auxiliaire comporte également un logement
pour ranger les forets. Pour accéder à ce compartiment,
dévissez le bouchon d’extrémité situé sous le liseré gris
de la poignée.
BLOCAGE DE BROCHE
Voir Figure 8.
Pour faciliter le changement de foret, cette perceuse
est équipée d’un blocage automatique de la broche (17)
qui maintient la broche immobile lorsque vous serrez ou
desserrez le mandrin.
CHANGEMENT DE LA VITESSE DE ROTATION
Voir Figure 6.
La vitesse mécanique de rotation ne peut être changée
que quand l’outil est à l’arrêt.
Le sélecteur de vitesse mécanique (19) est situé sur le
côté gauche du boîtier.
Q La position “1” du sélecteur correspond à la vitesse
lente.
Q La position “2” du sélecteur correspond à la vitesse
rapide.
NIVEAU À BULLE
Voir Figure 1.
Un niveau à bulle se trouve se trouve au dessus du
carter moteur pour vous aider à garder le foret droit
pendant utilisation. Un maximum de précision dans le
perçage est ainsi assuré.
INDICATEUR LIVE TOOL
Cet outil est équipé d’un indicateur “live tool” (11) qui
s’allume une fois l’outil raccordé au secteur. L’utilisateur
est ainsi averti que l’outil est branché et qu’il peut se
mettre en marche une fois la gâchette enfoncée.
ENTRETIEN
Après utilisation, assurez-vous que votre outil est en bon
état de marche. Il est recommandé d'apporter votre outil
au moins une fois par an dans un Centre Service Agréé
Ryobi pour une lubrification et un nettoyage complets.
EID11002RV_24lgs manual_v2B.indd Sec1:5EID11002RV_24lgs manual_v2B.indd Sec1:5 1/16/10 9:41:18 AM1/16/10 9:41:18 AM

6
Français
FR
GB
DE ES IT NL PT DK SE FI NO RU PL CZ HU RO LV LT EE HR SI SK GR TR
ENTRETIEN
N'EFFECTUEZ AUCUN RÉGLAGE LORSQUE LE
MOTEUR EST EN MARCHE. VEILLEZ À TOUJOURS
DÉBRANCHER LE CORDON D'ALIMENTATION
AVANT DE CHANGER LES ACCESSOIRES OU LES
PIÈCES D'USURE (LAME, EMBOUT, ETC.), AVANT DE
LUBRIFIER OU DE MANIPULER L'OUTIL.
ATTENTION
Pour plus de sécurité et de fiabilité, toutes les
réparations doivent être effectuées par un Centre
Service Agréé Ryobi.
CONSERVEZ CES INSTRUCTIONS POUR POUVOIR
VOUS Y REPORTER ULTÉRIEUREMENT.
PROTECTION DE L'ENVIRONNEMENT
Recyclez les matières premières au lieu de
les jeter. Pour le respect de l'environnement,
triez vos déchets et déposez l'outil usagé,
les accessoires et l'emballage dans des
conteneurs spéciaux ou auprès d'organismes
chargés de leur recyclage.
SYMBOLES
Alerte de Sécurité
V Volts
Hz Hertz
Courant alternatif
W Watts
n
o Vitesse à vide
min
-1
Nombre de tours ou de mouvements par
minute
Conformité CE
Double isolation
Lisez le manuel d'utilisation
Recyclez les matières premières au lieu de
les jeter. Pour le respect de l'environnement,
triez vos déchets et déposez l'outil usagé, les
accessoires et l'emballage dans des
conteneurs spéciaux ou auprès d'organismes
chargés de leur recyclage
EID11002RV_24lgs manual_v2B.indd Sec1:6EID11002RV_24lgs manual_v2B.indd Sec1:6 1/16/10 9:41:19 AM1/16/10 9:41:19 AM

7
Deutsch
DE
GB ES IT NL PT DK SE FI NO RU PL CZ HU RO LV LT EE HR SI SK GR TRFR
SPEZIFISCHE SICHERHEITSVORSCHRIFTEN
Q Tragen Sie bei der Verwendung eines
Schlagbohrers einen Gehörschutz. Lärmbelastung
kann zu einem Verlust des Hörvermögens führen.
Q Verwenden Sie den mit Ihrer Maschine gelieferten
Zusatzgriff. Sollte die Kontrolle über die Maschine
verloren gehen, kann dies zu schweren Verletzungen
führen.
Q Halten Sie das Elektrowerkzeug bei Arbeiten,
die versteckte Verkabelung oder das Stromkabel
des Werkzeugs beschädigen könnten, an den
isolierten Griffen. Bei Beschädigung einer
stromführenden Leitung können Metallteile des
Elektrowerkzeugs unter Spannung stehen, und dem
Anwender einen elektrischen Schlag zufügen.
PRODUKTDATEN
EID11002RV
Spannung 230V
50 Hz
Max Bohrfutterspannweite
13 mm (1/2”)
Bohrleistung
Holz 50 mm
Stahl 13 mm
Mauerwerk 20 mm
Leistungsaufnahme 1100 W
Leerlaufdrehzahl 0-1,200 / 0-3,200 U./Min.
Schläge pro Minute
0-19,000 / 0-51,000 U./Min.
Nettogewicht 3.38 kg
BESCHREIBUNG
1. Ein-/Ausschalter
2. Drehrichtungsumschalter
3. Schnellspannbohrfutter
4. Stellrad Drehzahlvorwahl
5. Feststelltaste für Ein-/Ausschalter
6. Umschalter „Bohren/Schlagbohren“
7. Tiefenanschlag
8. Zusatzhandgriff
9. Bohrer (nicht im Lieferumfang enthalten)
10. Kühlluftein-/ auslaß
11. Spannungsanzeige
12. Bohrfutter spannen
13. Bohrfutter lösen
14. Griff arretieren
15. Griff lösen
16. Aufbewahrung von Bohrern
17. Spindelarretierung
18. Wasserwaage
19. Gangwahlschalter
STANDARDZUBEHÖR
Zusatzhandgriff und Tiefenanschlag.
BEDIENUNG
EINSATZGEBIETE
(Einsatz nur für die unten genannten Zwecke.)
Q Bohren von Holz und Kunststoff.
Q Bohren von Mauerwerk (nur Schlagbohren).
Q Bohren von Metall: Stahl, Messing, Aluminiumblech,
Edelstahl & Rohre.
SCHALTER
Siehe Abb. 1 & 3.
Q Dieses Werkzeug kann durch drücken des Ein-/
Ausschalters (1) gestartet und gestoppt werden.
Q Die Drehzahl kann durch den Druck auf den Schalter
werden.
Q Die maximale Drehzahl kann mit dem Stellrad für die
Drehzahlvorwahl (4) eingestellt werden.
Q Drücken Sie für Dauerbetrieb die Feststelltaste (5)
während Sie den Ein-/Ausschalter drücken. Drücken
Sie zum Entriegeln den Ein-/Ausschalter erneut.
UMKEHRUNG DER DREHRICHTUNG
Siehe Abb. 2.
Q Stoppen Sie das Werkzeug und verschieben Sie den
Drehrichtungsumschalter (2) um die Drehrichtung zu
ändern.
Q Wenn der Drehrichtungsumschalter auf der Position
“Vorwärts” steht, dreht sich das Bohrfutter im
Uhrzeigersinn (aus Sicht des Werkzeuggriffs).
Q Wenn der Drehrichtungsumschalter auf der Position
“Rückwärts” steht, dreht sich das Bohrfutter gegen
den Uhrzeigersinn.
EINSETZEN UND ENTFERNEN DES BOHRERS
Siehe Abb. 4.
Q Schieben Sie den Schaft des Bohrers (9) so weit wie
möglich in das Bohrfutter.
Q Ziehen Sie das Bohrfutter fest indem Sie den Ring
des Bohrfutters im Uhrzeigersinn drehen (12).
Q Der Bohrer kann durch drehen des Bohrfutterrings
gegen den Uhrzeigersinn entfernt werden. (13).
BOHRFUTTERSPERRE
Siehe Abb. 8.
Zum einfachen Bohrerwechsel ist diese Bohrmaschine
mit einer automatischen Bohrfuttersperre (17)
ausgestattet, wodurch die Welle beim Spannen oder
Lösen des Bohrfutters arretiert wird.
EID11002RV_24lgs manual_v2B.indd Sec1:7EID11002RV_24lgs manual_v2B.indd Sec1:7 1/16/10 9:41:19 AM1/16/10 9:41:19 AM

8
Deutsch
DE
GB ES IT NL PT DK SE FI NO RU PL CZ HU RO LV LT EE HR SI SK GR TRFR
BEDIENUNG
UMSCHALTEN ZWISCHEN BOHREN UND
SCHLAGBOHREN BOHREN
Siehe Abb. 5.
Der Umschalter „Bohren/Schlagbohren“ (6) um zwischen
Bohren und Schlagbohren zu wechseln befindet sich auf
der Oberseite des Geräts.
NORMALES BOHREN: Schieben Sie den Schalter auf
die „
“ Position, so dass „ “ zum Bohren angezeigt
wird.
SCHLAGBOHREN: Schieben Sie den Schalter auf die
„
“ Position, so dass „ “ zum Schlagbohren
angezeigt wird.
BETRIEB
DECKEN SIE NIE DEN KÜHLLUFTEIN-/ AUSLASS (10)
AB, DA SIE IMMER FÜR DIE KÜHLUNG DES MOTORS
FREI SEIN MÜSSEN.
BOHREN VON HOLZ
Legen Sie ein Reststück Holz auf die Rückseite des
Werkstücks um ein Splittern am Bohrloch zu vermeiden.
BOHREN VON METALL
Metalle wie Stahl, Messing, Aluminiumblech, Edelstahl
und Rohre können ebenfalls gebohrt werden. Markieren
Sie den Bohrungspunkt mit einem Körner.
Verwenden Sie für solche Materialien nicht die
Schlagbohrfunktion.
BOHREN VON BETON
Stein und Mauerwerk werden gewöhnlich mit der
Schlagbohrfunktion gebohrt.
Wenn Sie zerbrechliches Material wie Wandfliesen
bohren, müssen Sie zuerst die Fliese im normalen
Bohrmodus durchbohren und erst danach mit der
Schlagbohrfunktion fortfahren.
In tiefen Bohrlöchern sollte der Bohrer immer wieder
herausgezogen werden um Bohrmehl aus dem Loch und
vom Bohrer zu entfernen.
ZUSATZHANDGRIFF UND TIEFENANSCHLAG
Siehe Abb. 6.
Zusatzhandgriff
Der Zusatzhandgriff (8) kann um 360° gedreht werden.
Lockern Sie den Griff durch Drehung in Richtung (15)
und ziehen Sie ihn in einer bequemen Position fest,
indem Sie in Richtung (14) drehen.
Tiefenanschlag
Löcher mit einer bestimmten Tiefe können mit dem
Tiefenanschlag (7) exakt gebohrt werden.
Die Tiefe der Löcher ist die Entfernung von der
Bohrerspitze bis zum Ende des Tiefenanschlags.
Der Tiefenanschlag kann gelockert werden, indem der
Griff in Richtung (14) gedreht wird. Stellen Sie den
Tiefenanschlag durch Drehung des Griffs in Richtung (15)
wieder fest, nachdem Sie die Tiefe eingestellt haben.
AUFBEWAHRUNG VON BOHRERN
Siehe Abb. 7.
Der Zusatzgriff ist hohl und enthält ein Fach für die
Aufbewahrung von Bohrern. Schrauben Sie die Endkappe
unterhalb der grauen Zierleiste des Griffs gegen den
Uhrzeigersinn ab, um an dieses Fach zu gelangen.
WECHSELN DER GÄNGE
Siehe Abb. 6.
Die Gänge können nur gewechselt werden, wenn sich
das Gerät im Stillstand befindet.
Der Gangwahlschalter (19) befindet sich auf der linken
Seite des Gehäuses
Q Wenn der Schalter auf Position “1” steht, ist das
Werkzeug im niedrigen Gang.
Q Wenn der Schalter auf Position “2” steht, ist das
Werkzeug im hohen Gang.
WASSERWAAGE
Siehe Abb. 1.
Eine Wasserwaage ist auf der Oberseite des
Motorgehäuses vorhanden um zu helfen die
Bohrmaschine beim Bohren waagerecht zu halten.
Dadurch wird größtmögliche Genauigkeit beim Bohren
gewährleistet.
SPANNUNGSANZEIGE
Dieses Werkzeug ist mit einer Spannungsanzeige (11)
ausgestattet, die aufleuchtet sobald das Werkzeug an
das Stromnetz angeschlossen ist. Dadurch wird der
Benutzer gewarnt, dass das Werkzeug angeschlossen
ist, und in Betrieb geht, wenn der Ein-/Ausschalter
gedrückt wird.
WARTUNG UND PFLEGE
Vergewissern Sie sich nach der Verwendung, dass Ihr
Gerät in einwandfreiem Zustand ist. Es empfiehlt sich,
Ihr Gerät mindestens einmal pro Jahr zu einem
Autorisierten Ryobi-Kundendienst zu bringen, um es
komplett zu schmieren und zu reinigen.
EID11002RV_24lgs manual_v2B.indd Sec1:8EID11002RV_24lgs manual_v2B.indd Sec1:8 1/16/10 9:41:19 AM1/16/10 9:41:19 AM

9
Deutsch
DE
GB ES IT NL PT DK SE FI NO RU PL CZ HU RO LV LT EE HR SI SK GR TRFR
WARTUNG UND PFLEGE
NEHMEN SIE KEINE EINSTELLUNG VOR, WÄHREND
DER MOTOR IN BETRIEB IST. ACHTEN SIE DARAUF,
DAS STROMKABEL STETS ZU ENTFERNEN, BEVOR
SIE DIE ZUBEHÖRTEILE ODER DIE VERSCHLEISS-
TEILE AUSWECHSELN (SÄGEBLATT, EINSATZ-
STÜCK, USW.) UND BEVOR SIE DAS GERÄT
SCHMIEREN ODER HANDHABEN.
ACHTUNG
Für eine höhere Sicherheit und Zuverlässigkeit
müssen alle Reparaturen von einem autorisierten
Ryobi-Kundendienst durchgeführt werden.
BEWAHREN SIE DIESE ANWEISUNGEN AUF, UM SIE
SPÄTER HERANZIEHEN ZU KÖNNEN.
UMWELTSCHUTZ
Rohstoffe dürfen nicht in den Abfall geworfen
werden, sondern müssen dem
Recyclingsystem zugeführt werden. Trennen
Sie Ihre Abfälle und entsorgen Sie
abgenutzte Geräte, Zubehör und Ver-
packungen über die entsprechenden
Recycling-Container.
SYMBOLE
Sicherheitswarnung
V Volt
Hz Hertz
Wechselstrom
W Watt
U/min Leerlaufdrehzahl
min
-1
Anzahl Umdrehungen oder Bewegungen pro
Minute
CE-Konformität
Schutzisolierung
Bitte lesen Sie die Anweisungen sorgfältig,
bevor Sie das Gerät einschalten
Rohstoffe dürfen nicht in den Abfall geworfen
werden, sondern müssen dem
Recyclingsystem zugeführt werden. Trennen
Sie Ihre Abfälle und entsorgen Sie abgenutzte
Geräte, Zubehör und Ver-packungen über die
entsprechenden Recycling-Container
EID11002RV_24lgs manual_v2B.indd Sec1:9EID11002RV_24lgs manual_v2B.indd Sec1:9 1/16/10 9:41:19 AM1/16/10 9:41:19 AM

10
Español
ES
GB IT NL PT DK SE FI NO RU PL CZ HU RO LV LT EE HR SI SK GR TRFR DE
INSTRUCCIONES DE SEGURIDAD
ESPECÍFICAS
Q Utilice elementos de protección auditiva cuando
trabaje con un taladro de percusión. La exposición
a un nivel de ruidos excesivo puede provocar una
pérdida de la capacidad auditiva.
Q Utilice la empuñadura auxiliar suministrada con la
máquina. La pérdida de control de la máquina puede
causar heridas graves.
Q Sujete la herramienta motorizada por las
superficies de agarre aisladas al realizar una
operación en la que el accesorio de corte pueda
estar en contacto con el cableado oculto o con
su propio cable. Si el accesorio de corte entra en
contacto con un cable con corriente, las partes de
metal expuestas de la herramienta podrían cargarse
de corriente y provocar una descarga eléctrica al
operario.
CARACTERÍSTICAS DEL PRODUCTO
EID11002RV
Tensión 230 V
50 Hz
Capacidad del mandril
13 mm (1/2”)
Capacidad de taladrado
madera 50 mm
acero 13 mm
hormigón 20 mm
Potencia absorbida 1100 W
Velocidad sin carga 0-1,200 / 0-3,200 r.p.m.
Golpes por minuto 0-19,000 / 0-51,000 r.p.m.
Peso neto 3.38 kg
DESCRIPCIÓN
1. Gatillo interruptor
2. Selector giro derecha/izquierda
3. Portabrocas sin llave
4. Selector de velocidad variable
5. Botón de bloqueo
6. Botón de cambio al modo perforación
7. Medidor de profundidad
8. Mango auxiliar
9. Broca (no incluida)
10. Rejilla de aire
11. Indicador de presencia de tensión eléctrica
12. Ajustar broca
13. Aflojar broca
14. Ajustar mango
15. Aflojar mango
16. Almacenamiento de las brocas
17. Bloqueo del eje
18. Nivel de burbuja
19. Botón de configuración del engranaje
ACCESORIOS ESTÁNDAR
Mango auxiliar y medidor de profundidad.
FUNCIONAMIENTO
APLICACIONES
(Utilice únicamente la unidad para los fines que se
indican a continuación.)
Q Perforación de madera, tablas de resina y materiales.
Q Perforación de hormigón (sólo perforación de
impacto).
Q Perforación de metal: acero, latón, láminas de
aluminio, tuberías y acero inoxidable.
INTERRUPTOR
Véase la figura 1 y 3.
Q Esta herramienta puede encenderse y detenerse
pulsando o soltando el gatillo interruptor (1).
Q La velocidad puede ajustarse controlando la fuerza
aplicada al gatillo.
Q Puede fijar la velocidad máxima del taladro a
diferentes velocidades ajustando el selector de
velocidad variable (4).
Q Para un funcionamiento continuo, pulse el botón de
bloqueo (5), mientras aprieta el gatillo. Apriete el
gatillo de nuevo para desbloquear.
CAMBIO EN LA DIRECCIÓN DE ROTACIÓN
Véase la figura 2.
Q Para cambiar el sentido de giro, detenga la
herramienta y pulse el selector de dirección derecha/
izquierda (2).
Q Cuando esté accionado el selector de dirección
derecha, la broca rotará en dirección de las agujas
del reloj, visto desde el extremo del mango la
herramienta.
Q Cuando esté accionado el selector de dirección
izquierda, la broca rotará en dirección contraria a las
agujas del reloj.
MONTAJE Y DESMONTAJE DE LA BROCA
Véase la figura 4.
Q Inserte la broca (9) en el portabrocas tanto como lo
permita la parte plana de su extremo.
Q Apriete firmemente el portabrocas girándolo desde su
extremo en la dirección de las agujas del reloj (12).
Q La broca puede extraerse girando el portabrocas en
dirección contraria a las agujas del reloj (13).
CAMBIO ENTRE MODO TALADRO Y
TALADRO CON PERCUSIÓN
Véase la figura 5.
El botón de cambio de posición (6) de modo taladro a
modo taladro con percusión, está situado en la parte
superior de la herramienta.
EID11002RV_24lgs manual_v2B.indd Sec1:10EID11002RV_24lgs manual_v2B.indd Sec1:10 1/16/10 9:41:19 AM1/16/10 9:41:19 AM

11
Español
ES
GB IT NL PT DK SE FI NO RU PL CZ HU RO LV LT EE HR SI SK GR TRFR DE
FUNCIONAMIENTO
MODO TALADRO: Ponga el botón en “ “ hasta que
aparezca el símbolo “
“ para taladrar.
MODO TALADRO DE PERCUSIÓN: Ponga el botón en
“
“ hasta que aparezca el símbolo “ “ para taladrar
con percusión.
FUNCIONAMIENTO
NO CUBRA LAS REJILLAS DE VENTILACIÓN (10),
PUESTO QUE DEBEN ESTAR SIEMPRE ABIERTAS
PARA QUE EL MOTOR SE REFRIGERE.
PERFORACIÓN EN MADERA
Para evitar grietas indeseables alrededor del orificio de
perforación en el reverso de la pieza, coloque un trozo
de madera bajo la pieza de trabajo.
PERFORACIÓN EN METALES
Metales como el latón, aluminio, acero inoxidable y
tuberías también pueden perforarse. Marque el punto
que se perforará con un calvo o punzón.
No utilice el modo de taladro con percusión en estos
materiales
PERFORACIÓN EN HORMIGÓN
Las piezas de mampostería y piedra se perforan
normalmente en modo de taladro con percusión.
Cuando la perforación se realice en materiales delicados,
como baldosas, es fundamental comenzar con una
perforación normal y, una vez que la baldosa esté
perforada, continúe con la perforación con percusión.
En orificios con un diámetro ancho, puede extraer las
brocas de vez en cuando con el fin de eliminar los restos
de la perforación en el taladro y en el agujero.
MANGO AUXILIAR Y MEDIDOR DE PROFUNDIDAD
Véase la figura 6.
Mango auxiliar
El mango auxiliar (8) puede girarse 360º.
Afloje el mango girándola en la dirección de la figura (15),
y apriétela hasta una posición de fácil manejo girando el
mango en la dirección de la figura (14).
Medidor de profundidad
Los agujeros de una profundidad fija pueden ser
perforados de forma precisa utilizando el medidor de
profundidad (7).
La profundidad del orificio será la distancia desde el
extremo de la broca hasta el extremo del medidor de
profundidad.
Al girar el mango en la dirección de la figura (14), el
medidor de profundidad podrá extraerse, ajustando así la
profundidad. Después de ajustar la profundidad, vuelva
a girar el medidor de profundidad girando el mango en la
dirección de la figura (15).
ALMACENAMIENTO DE BROCAS
Véase la figura 7.
El mango auxiliar también contiene un compartimento
para almacenar brocas. Para acceder a este
compartimento desatornille la tapa que se encuentra
debajo de la pieza gris del mango en sentido antihorario.
BLOQUEO DEL EJE
Véase la figura 8.
Para un fácil cambio de la broca del taladro, éste está
equipado con un sistema automático de bloqueo del eje
(17) que bloquea el eje al aflojar y ajustar el portabrocas.
CAMBIO DE LA VELOCIDAD DE ROTACIÓN
Véase la figura 6.
La velocidad de rotación sólo se puede modificar cuando
la herramienta se haya detenido.
El interruptor de configuración de engranaje (19) se
encuentra en el lado izquierdo de la carcasa.
Q Cuando el interruptor se encuentre en posición “1” la
herramienta estará funcionando a la velocidad más
baja.
Q Cuando el interruptor se encuentre en posición “2” la
herramienta estará funcionando en el engranaje más
largo.
NIVEL DE BURBUJA
Véase la figura 1.
Un nivel de burbuja está situado en la parte superior
del motor que ayuda a mantener el nivel de la broca
durante su uso. Esto garantiza la máxima precisión en la
perforación.
INDICADOR DE PRESECIA DE TENSIÓN
ELÉCTRICA
Su herramienta está equipada con un Indicador de
presencia de tensión eléctrica (11) que se enciende
cuando la herramienta está conectada. Indicando que
la herramienta está encendida y que se pondrá en
funcionamiento al pulsar el gatillo.
MANTENIMIENTO
Después de utilizar la máquina, cerciórese
de que se encuentre en perfecto estado.
Le recomendamos que lleve la máquina al menos una
vez al año a un Servicio Técnico Autorizado Ryobi para
una lubricación y limpieza completa.
EID11002RV_24lgs manual_v2B.indd Sec1:11EID11002RV_24lgs manual_v2B.indd Sec1:11 1/16/10 9:41:19 AM1/16/10 9:41:19 AM

12
Español
ES
GB IT NL PT DK SE FI NO RU PL CZ HU RO LV LT EE HR SI SK GR TRFR DE
MANTENIMIENTO
NO HAGA NINGÚN AJUSTE CUANDO EL MOTOR
ESTÉ EN MARCHA. DESENCHUFE SIEMPRE EL
CABLE DE ALIMENTACIÓN ANTES DE CAMBIAR LOS
ACCESORIOS (BROCA, ETC.) Y ANTES DE LUBRICAR
O MANIPULAR LA HERRAMIENTA.
ATENCIÓN
Para más seguridad y fiabilidad, todas las
reparaciones deben realizarse en un Servicio
Técnico Autorizado Ryobi.
CONSERVE ESTAS INSTRUCCIONES PARA
CONSULTARLAS POSTERIORMENTE.
PROTECCIÓN DEL MEDIOAMBIENTE
Recicle las materias primas en lugar de
tirarlas. Para respetar el medioambiente,
separe los residuos y deposite la herramienta
usada, los accesorios y los envases en
contenedores especiales o entréguelos a los
organismos encargados del reciclado.
SÍMBOLOS
Alerta de seguridad
V Voltios
Hz Hertzios
Corriente alterna
W Vatios
n
o
Velocidad sin carga
min
-1
Número de revoluciones o movimientos por
minuto
Conformidad con CE
Doble aislamiento
Por favor lea las instrucciones detenidamente
antes de arrancar la máquina
Recicle las materias primas en lugar de
tirarlas. Para respetar el medioambiente,
separe los residuos y deposite la herramienta
usada, los accesorios y los envases en
contenedores especiales o entréguelos a los
organismos encargados del reciclado
EID11002RV_24lgs manual_v2B.indd Sec1:12EID11002RV_24lgs manual_v2B.indd Sec1:12 1/16/10 9:41:19 AM1/16/10 9:41:19 AM

13
Italiano
IT
GB NL PT DK SE FI NO RU PL CZ HU RO LV LT EE HR SI SK GR TRFR DE ES
NORME DI SICUREZZA SPECIFICHE
Q Durante l’utilizzo di un trapano a percussione,
indossare dispositivi di protezione uditiva.
L’esposizione al rumore può causare la perdita
dell’udito.
Q Utilizzare l’impugnatura ausiliaria fornita
in dotazione con l’apparecchio. La perdita del
controllo può provocare gravi lesioni.
Q Reggere l’utensile dall’impugnatura in gomma
isolata, quando si svolgono operazioni durante
le quali l’accessorio di taglio potrà entrare in
contatto con cavi nascosti o con il suo stesso
cavo. Nel caso in cui la punta o accessorio di taglio
entrasse in contatto con un cavo scoperto, le parti
metalliche dell’utensile potrebbero agire da conduttori
e trasmettere una scossa elettrica all’operatore.
CARATTERISTICHE DEL PRODOTTO
EID11002RV
Tensione 230V 50 Hz
Capacità del mandrino
13 mm (1/2”)
Capacità di foratura
legno 50 mm
acciaio 13 mm
calcestruzzo 20 mm
Potenza assorbita 1100 W
Velocità a vuoto 0-1,200 / 0-3,200 giri/min
Colpi al minuto
0-19,000 / 0-51,000 giri/min
Peso netto 3.38 kg
DESCRIZIONE
1. Interruttore a grilletto
2. Selezionatore direzionale Avanti / Indietro
3. Mandrino senza chiave
4. Selezionatore velocità variabile
5. Tasto di blocco
6. Manopola di regolazione modalità di trapanazione
7. Utensile di regolazione calibro di profondità
8. Impugnatura ausiliaria
9. Punta (Non inclusa)
10. Griglie per l’aria
11. Indicatore Live Tool
12. Per serrare il mandrino
13. Per allentare il mandrino
14. Per serrare il manico
15. Per allentare il manico
16. Vano porta punte
17. Dispositivo di blocco mandrino
18. Livella a bolla
19. Interruttore impostazione velocità
ACCESSORI STANDARD
Impugnatura ausiliaria e utensile di regolazione
profondità.
FUNZIONAMENTO
APPLICAZIONI
(Utilizzare solo per gli scopi indicati di seguito.)
Q Forare materiali legnosi e resinosi.
Q Forare cemento (solo foratura a percussione).
Q Forare metalli: acciaio, ottone, fogli di alluminio, acciaio
inossidabile e tubi.
INTERRUTTORE
Vedere le Figure 1 & 3.
Q L’utensile può essere messo in funzione e bloccato
premendo e rilasciando l’interruttore a grilletto (1).
Q Velocità regolabile controllando la pressione applicata
all’interruttore a grilletto.
Q La velocità massima del trapano può essere
impostata diversamente regolando il selezionatore di
velocità variabile. (4).
Q Per operazioni di lavoro continue, premere il tasto
di blocco (5) tenendo premuto il grilletto. Premere di
nuovo il grilletto per rilasciare il tasto di blocco.
CAMBIARE LA DIREZIONE DI ROTAZIONE
Vedere la Figura 2.
Q Per cambiare la direzione di rotazione, arrestare
l’utensile e spingere il selezionatore avanti / indietro
(2).
Q Quando si spingerà in avanti il selezionatore, la
punta ruoterà in senso orario rispetto al manico
dell’utensile.
Q Quando si spingerà indietro il selezionatore, la punta
ruoterà in senso antiorario.
INSERIRE ED ESTRARRE LA PUNTA
Vedere la Figura 4.
Q Inserire tutta la parte liscia della punta del trapano (9)
nel mandrino.
Q Assicurare il mandrino ruotando la testa dello stesso
in senso orario (12).
Q La punta potrà essere rimossa ruotando il mandrino
in senso antiorario (13).
DALLA MODALITA’ FORATURA ALLA MODALITA’
PERCUSSIONE
Vedere la Figura 5.
La manopola modalità (6) che permette di cambiare la
modalità da quella di foratura a quella a percussione è
posizionata sulla parte superiore dell’utensile.
EID11002RV_24lgs manual_v2B.indd Sec1:13EID11002RV_24lgs manual_v2B.indd Sec1:13 1/16/10 9:41:19 AM1/16/10 9:41:19 AM

14
Italiano
IT
GB NL PT DK SE FI NO RU PL CZ HU RO LV LT EE HR SI SK GR TRFR DE ES
FUNZIONAMENTO
MODALITA’ DI FORATURA: Spostare la manopola su “
“ con il simbolo per la trapanazione
MODALITÀ DI PERCUSSIONE: Spostare la manopola
su “
“ con il simbolo per la percussione
FUNZIONAMENTO
NON COPRIRE MAI LE GRIGLIE DELL’ARIA (10) ESSE
DOVRANNO SEMPRE SGOMBRE DA EVENTUALI
OSTACOLI PER RAFFREDDARE ADEGUATAMENTE
IL MOTORE.
FORATURA NEL LEGNO
Per evitare la formazione di schegge attorno ai fori,
inserire un pezzo di legno di scarto dietro alla parte sulla
quale si stanno svolgendo le operazioni di foratura.
FORATURA NEL METALLO
E’ possibile forare metalli quali ottone, fogli di alluminio
e tubi.
Segnare il punto da forare con un chiodo o un
punteruolo.
Non utilizzare la modalità di foratura a percussione con
questi materiali.
FORATURA NEL CEMENTO
Per forare nel cemento e in opere di muratura si utilizza
generalmente la modalità a percussione.
Quando si fora in materiali delicati come piastrelle da
muro, è importante iniziare a forare a ritmo sostenuto e,
una volta forato il pezzo, continuare con una foratura a
percussione.
Quando si fanno fori profondi si dovrebbe tirare ogni
tanto il trapano fuori dal foro per rimuvere le eventuali
schegge dal trapano e dal buco.
MANICO SECONDARIO E UTENSILE DI
REGOLAZIONE PROFONDITÀ
Vedere la Figura 6.
Manico secondario
Il manico secondario (8) può ruotare a 360º.
Allentare l’impugnatura del manico svitandola (15), e
assicurarla in una posizione che permetta di utilizzare
l’utensile in modo pratico girandola in senso inverso (14).
Regolazione calibro di profondità
Si possono fare fori di una profondità fissa accuratamente
utilizzando l’utensile di regolazione profondità (7).
La profondità del foro sarà indicata dalla distanza
dall’estremità della punta dell’utensile fino all’estremità
dell’utensile di calibro profondità.
Girando l’impugnatura in direzione (14), l’utensile di
regolazione profondità potrà essere rilasciato e la
profondità regolata. Dopo aver regolato la profondità,
assicurare l’utensile di regolazione profondità avvitando
l’impugnatura (15).
VANO PORTA PUNTE
Vedere la Figura 7.
Il manico secondario contiene un vano per riporre le
punte del trapano. Per accedere a questo vano, svitare
il coperchio sul fondo del manico situato sotto la linea
grigia del manico, in senso antiorario.
DISPOSITIVO DI BLOCCO MANDRINO
Vedere la Figura 8.
Per cambiare facilmente le punte del trapano, l’utensile
è dotato di un dispositivo di blocco automatico (17) che
blocca l’asse quando si allenta o si serra il mandrino.
CAMBIO DELLA VELOCITÀ DI ROTAZIONE
Vedere la Figura 6.
È possibile cambiare la velocità di rotazione solo quando
l’utensile è fermo.
L’interruttore di impostazione velocità (19) si trova a
sinistra della sede del motore.
Q Quando l’interruttore è in posizione “1” l’utensile è
impostato a velocità bassa.
Q Quando l’interruttore è in posizione “2” l’utensile è
impostato a velocità alta.
LIVELLA A BOLLA
Vedere la Figura 1.
Una livella a bolla è situata sulla parte superiore della
sede del motore per aiutare a mantenere la punta del
trapano al giusto livello durante l’utilizzo. Essa assicura
la massima accuratezza durante le operazioni di
trapanazione.
NDICATORE LIVE TOOL
Questo attrezzo è dotato di indicatore live tool (11)
che si accende non appena l’utensile viene collegato
all’alimentazione elettrica. Ciò indica che l’utensile è
collegato e che sarà in grado di funzionare quando
l’interruttore verrà premuto.
MANUTENZIONE
Dopo ogni utilizzo, verificare sempre lo stato
dell’apparecchio. Si consiglia di portare l’apparecchio
almeno una volta all’anno presso un Centro di Assistenza
Autorizzato Ryobi per una completa lubrificazione
e pulitura.
EID11002RV_24lgs manual_v2B.indd Sec1:14EID11002RV_24lgs manual_v2B.indd Sec1:14 1/16/10 9:41:19 AM1/16/10 9:41:19 AM

15
Italiano
IT
GB NL PT DK SE FI NO RU PL CZ HU RO LV LT EE HR SI SK GR TRFR DE ES
MANUTENZIONE
NON EFFETTUARE ALCUN TIPO DI REGOLAZIONE
QUANDO L’APPARECCHIO È IN FUNZIONE.
STACCARE SEMPRE IL CAVO D’ALIMENTAZIONE
PRIMA DI PROCEDERE AL CAMBIO DEGLI
ACCESSORI, DEI PEZZI USURATI (LAMA, PUNTA,
ECC.) O PRIMA DI LUBRIFICARE O MANEGGIARE
L’APPARECCHIO.
ATTENZIONE
Per maggiore sicurezza ed affidabilità, effettuare
tutte le riparazioni presso un Centro di Assistenza
Autorizzato Ryobi.
CONSERVARE LE PRESENTI ISTRUZIONI PER
POTERLE CONSULTARE ULTERIORMENTE.
TUTELA DELL'AMBIENTE
Si raccomanda di riciclare le materie prime
anziché gettarle come rifiuti. A garanzia della
tutela dell'ambiente, si raccomanda di
effettuare la raccolta differenziata dei rifiuti e
di depositare l'apparecchio usato, gli
accessori e l'imballaggio in appositi
contenitori o di portarli presso un centro
autorizzato al loro riciclaggio.
SIMBOLI
Allarme di sicurezza
V Volt
Hz Hertz
Corrente alternata
W Watt
n
o
Velocità a vuoto
min
-1
Numero di giri o di movimenti al minuto
Conformità CE
Doppio isolamento
Leggere attentamente le istruzioni prima di
avviare l’utensile
Si raccomanda di riciclare le materie prime
anziché gettarle come rifiuti. A garanzia della
tutela dell'ambiente, si raccomanda di effettuare
la raccolta differenziata dei rifiuti e di depositare
l'apparecchio usato, gli accessori e l'imballaggio
in appositi contenitori o di portarli presso un
centro autorizzato al loro riciclaggio
EID11002RV_24lgs manual_v2B.indd Sec1:15EID11002RV_24lgs manual_v2B.indd Sec1:15 1/16/10 9:41:19 AM1/16/10 9:41:19 AM

16
Nederlands
NL
GB PT DK SE FI NO RU PL CZ HU RO LV LT EE HR SI SK GR TRFR DE ES IT
SPECIFIEKE VEILIGHEIDSVOORSCHRIFTEN
Q Draag gehoorbeschermers wanneer u een
klopboormachine gebruikt. Het lawaai kan namelijk
gehoorverlies veroorzaken.
Q Gebruik de hulphandgreep die bij het apparaat
is meegeleverd. Als u de macht over het apparaat
verliest, kan dat ernstig lichamelijk letsel tot gevolg
hebben.
Q Houd het gereedschap bij de geïsoleerde
handvaten vast wanneer u een handeling
uitvoert waarbij het snijaccessoire in contact
kan komen met verborgen bekabeling of de
eigen stroomkabel. Wanneer het snijaccessoire in
contact komt met een stroomkabel onder spanning
kunnen blootgestelde metalen onderdelen van het
gereedschap eveneens onder spanning komen te
staan waardoor de bedienen geëlektrocuteerd kan
worden.
PRODUCTGEGEVENS
EID11002RV
Spanning 230V 50 Hz
Spanwijdte boorhouder
13 mm (1/2”)
Boorcapaciteit
hout 50 mm
staal 13 mm
beton 20 mm
Opgenomen vermogen
1100 W
Toerental bij nullast 0-1,200 / 0-3,200 tpm
Aantal slagen per minuut
0-19,000 / 0-51,000 tpm
Nettogewicht 3.38 kg
OVERZICHT
1. Aan/uit-schakelaar
2. Links/rechtskeuzeschakelaar
3. Sleutelloze boorhouder
4. Variabele snelheidskeuzeschakelaar
5. Vergrendelknop
6. Boormoduskeuzeknop
7. Dieptemeter
8. Hulphandgreep
9. Boorstift (niet inbegrepen)
10. Luchtinlaten
11. Live Tool Indicator
12. Boorhouder aanspannen
13. Boorhouder lossen
14. Handvat aanspannen
15. Handvat lossen
16. Boorstiftopslag
17. Draaivergrendeling
18. Luchtbelwaterpas
19. Snelheidsinstellingsschakelaar
STANDAARDACCESSOIRES
Bijkomend handvat en dieptemeter.
WERKING
TOEPASSINGEN
(Gebruik enkel voor onderstaande doeleinden
Q Het boren van hout, materiaal en harshout.
Q Het boren in beton (enkel klopboren)
Q Het boren van metaal: staal, koper, bladaluminium,
inox en buizen.
SCHAKELAAR
Zie figuren 1 & 3
Q Dit toestel kan worden gestart en stilgelegd door de
aan/uit-schakelaar (1) in te drukken en los te laten.
Q De snelheid kan worden geregeld via de kracht die op
de trekker wordt uitgeoefend.
Q De maximumsnelheid van de boor kan op
verschillende snelheden worden ingesteld a.h.v. de
variabele snelheidskeuzeschakelaar (4).
Q Voor ononderbroken gebruik, drukt u op de
vergrendelknop (5) terwijl u de aan/uit-schakelaar
ingedrukt houdt. Druk opnieuw op de knop om de
vergrendeling op te heffen.
DRAAIRICHTING OMKEREN
Zie figuur 2
Q Om de draairichting te wijzingen, legt u het toestel stil
en drukt u op de links/rechtskeuzeschakelaar (2).
Q Wanneer de keuzeschakelaar links wordt ingedrukt,
draait de boorstift in wijzerzin, gezien vanaf het
handvat op het einde van het toestel.
Q Wanneer de keuzeschakelaar rechts wordt ingedrukt,
draait de boorstift in tegenwijzerzin.
BOORSTIFT MONTEREN EN VERWIJDEREN
Zie figuur 4.
Q Breng de boorstift (9) zover in de boorhouder tot het
platte deel van de schacht niet meer zichtbaar is.
Q Maak de boorhouder stevig vast door de
boorhouderkop in wijzerzin (12) te draaien.
Q De boorstift kan worden verwijderd door de
boorhouder in tegenwijzerzin (13) te draaien.
WISSELEN TUSSEN BOREN EN KLOPBOREN
BOORMODUS
Zie figuur 5.
De boormoduskeuzeknop (6) om te kiezen tussen
boormodus en klopboormodus bevindt zich aan de
bovenkant van het toestel.
BOORMODUS: Om te boren schuift u de knop in de “
“ stand, waarbij “
“ wordt weergegeven.
KLOPBOORMODUS: Om te klopboren schuift u de knop
in de “
“ stand, waarbij “ “ wordt weergegeven.
EID11002RV_24lgs manual_v2B.indd Sec1:16EID11002RV_24lgs manual_v2B.indd Sec1:16 1/16/10 9:41:19 AM1/16/10 9:41:19 AM
/