Page is loading ...

Hand Shower Units
Do-It-Yourself
Instructions
1
3/9/12
72634 Rev. B
Congratulations. You’ve purchased
what we believe is the world’s finest hand
shower. These are general instructions
that cover several similar models, so
don’t be alarmed if parts are displayed
that are not included in the unit you
purchased.
TOOLS REQUIRED
You will need a pair of pliers, a piece of
cloth, six inches of plumber tape, and a
large towel.
IMPORTANT
n Always protect the finish of parts with
a heavy cloth when using pliers or a
wrench.
n Align threads properly when
assembling components to avoid
damaging or stripping threads.
n Suggestion: Place a towel on the
bottom of the tub beneath the old
shower head. If you accidentally drop
something this can help avoid losing
it down the drain or chipping the finish
of your tub.
REMOVE THE EXISTING
SHOWER HEAD
Your goal is to unscrew the existing
shower head without
unscrewing or
rotating the shower
arm that it is
attached to. Your
existing shower
head will un-screw
COUNTERCLOCKWISE.
Note: If your shower arm has a ball
on the end, it will not work with this
shower unit and will need to be
replaced with a standard shower arm.
We suggest a Delta
®
model RP40593.
After removing the
shower head clean the
threads of the shower
arm with a piece of
cloth or wire brush if
necessary. Then wrap the six inches of
plumber tape around the threads of the
shower arm in a CLOCKWISE manner.
Be careful to stretch the tape into the
grooves of the threads. The tape provides
a lubricant and added sealant for the
threads even when a gasket is used.
NEVER USE PIPE DOPE.
1.
Write purchased model number here.
Models
51551 & 51751
1.
REMOVE
SHOWER HEAD
2.
INSTALL
MOUNT
3.
ATTACH
HOSE
4.
ATTACH
HAND SHOWER
5.
CHECK FOR
LEAKS
www.deltafaucet.com

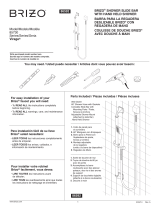
INSTALLING SHOWER
MOUNTS
Shower arm pin mount
Insert the thick gasket into the nut on
the end of the shower arm mount and
screw the nut
CLOCKWISE
onto the exposed
shower arm
threads until tight.
The mounting pin
must be pointing
straight up when
finished. This is
a joint you will
check for leaks after installation and can
re-tighten if needed.
Wall mount with screws
This wall mount can be installed
anywhere on the wall within hose reach
of the water supply outlet and at any
convenient height (normal 72 inches)
adjusting for
tall or short
bathers.
Remember
to install the
mount so the
pin is pointing
straight up.
It comes with
2 screws and anchors that must be
secured to the wall. For tiled or masonry
walls use 1/4 inch carbide tipped drills
to penetrate the hard surface. Do not
attempt to drill a tile joint. Then insert the
anchors and attach the mount.
Hint: Complete one hole first before
determining the second hole location.
Shower arm fork mount
Insert the thick gasket into the nut on
the end of the shower arm mount and
screw the nut CLOCKWISE onto the
exposed shower
arm threads until
tight. The fork may
be rotated after
to put it into the
proper position
for holding the hand shower. (Check for
leaks after installation.)
Wall mount adhesive
This wall mount can be installed
anywhere on the wall within hose reach
of the water supply outlet and at any
convenient height (normal 72 inches)
adjusting for tall or short bathers.
Remember to install the mount so the
hand shower will be pointing straight
up when finished. Pick your location,
clean the wall following directions on
the back of the
mount and mark
it; remove the
release paper
form the back of
the mount without
touching the
adhesive; then
with the mount
pointing in the
correct direction press it firmly to the wall.
THE FIRST TRY MUST BE CORRECT;
YOU CANNOT MOVE IT AFTER. The
adhesive takes 24 hours to reach full
strength, so allow the cure time before
full use
2.
2

CONNECT THE HOSE TO
WATER
The hose must connect to the source
of water: either the outlet of the shower
arm, or the outlet of the shower arm
mount. If a gasket is provided (some of
our hoses are gasketless) be sure it is
inserted into the
hose nut and
firmly tighten
CLOCKWISE
onto the water
outlet. Do not
use a wrench.
If your shower
comes with a
vacuum breaker
attached to
one end of
your hose, that is the end that must
be attached to the water outlet. If you
install it backwards it will not function.
Note: A vacuum breaker is a device that
is required by certain code authorities to
protect your community’s water supply
from the back-
flow of water.
The vacuum
breaker
will usually
discharge a
small amount
of the water
when you first
turn on your shower. It may also drain
water when you shut it off. Both are
normal conditions – the water is draining,
not leaking. DO NOT TRY TO TIGHTEN
THE VACUUM BREAKER. This will
damage the mechanism and make things
worse.
CONNECT THE OTHER
END OF THE HOSE
Hose to hand shower
The hose will
connect directly to
the hand shower.
Insert a gasket,
if provided, and
carefully aligning
threads hand
tighten to the hand shower.
Hose to swivel to hand shower
The hose must
first attach to a
swivel device,
which in turn
attaches to the
hand shower.
A swivel is
what hooks
onto the pin
of the mount.
It provides full side to side rotation and
up and down adjustment of the hand
shower while on its mount. Insert a
gasket, if provided, and carefully aligning
threads tighten the hose to the swivel
and repeat again when attaching to the
hand shower.
3. 4.
3

FINISH AND CHECK FOR
LEAKS
Note: Any distrtion the hose may
have assumed in packaging will relax
soon after warm water has run through
the hose.
Hang your hand shower on its mount.
Slowly turn on the cold water and
look for leaks. If leaks occur re-tighten
connections in small steps being careful
not to over tighten and strip threads.
Operation and Maintenance
Your shower operation is designed for
optimum performance and still meet
ANSI code A112.18.1M requirements
of 2.5 gallon per minute (9.5 LPM)
maximum flow rate at 20 to 80 PSI for the
preservation of water and energy. The
flow restricter that performs this function
is located in the end of the hand shower.
Removal of this device will increase your
water and energy consumption.
Impurities in any water system will over
time generally accumulate at the shower
orifice, slowly closing then off.
Cleaning these deposits is best achieved
by washing with a soap solution and
simply adjusting the mechanism which
will flush them out. For calcium deposits,
soaking them in vinegar and then
flushing them usually works.
Clean your shower’s finish with warm
sudsy water to avoid destroying your
products finish.
Models with Pause Controls incorporate
a pause in the flow to allow time for other
bathing activities. This is not a shut off
position. A small drip is designed into
the unit to reduce temperature build up
and remind you that the shower is just
paused, not off. To shut it off, use your
shower valve.
OPTIONS TO CONSIDER
Add a hand shower unit -
to a shower head
Keep your existing shower head and ADD
the CONVENIENCE of a hand held shower
unit by inserting a shower arm diverter,
Delta
®
Model U4923, between the shower
head and the
shower arm.
The diverter
gives you
the choice of
either the hand
shower or the
shower head.
Just a pull on
a knob ot the turn of a lever and your water
diverts where you want it. The shower arm
diverter installs easily onto the shower arm
with a gasket and plumber tape the shower
head installs on to the diverter, again with
plumber tape and a gasket. The hand
shower unit’s hose attaches to the lower
outlet of the diverter. Only wall mounted
hand shower units will provide a place for
mounting the hand shower.
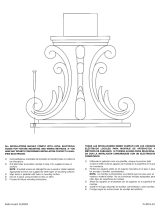
Adjustable height mounting -
Glide Rail accessory
Your Glide Rail adjustable shower mount is
designed for easy installation using the special
adhesive tape and screws supplied. However,
before you
proceed, we
recommend you
carefully read
these instructions
to help determine
the best
mounting method
and assure a
satisfactory
installation.
1. SELECT
LOCATION
Select wall
position at
convenient
location suitable for height of bathers. Hold
the Glide Rail against the wall to check height
and make sure it is located to permit full height
5.
4

adjustment with the shower hose to be used.
2. DECIDE ON MOUNTING METHOD
On any smooth surface such as tile, fiberglass,
marble, etc., the special mounting tape attached
to the rail is usually satisfactory by itself. For
best adhesion of the mounting tape, do not
mount rail directly over a vertical ceramic tile
line. On any rough surface such as uneven tile,
etc., the screws provided should be used in
addition to the tape.
3. MOUNT GLIDE RAIL
A. Adhesive Bonded Mounting Procedure:
Clean Surface - If mounting tape only is used,
the wall surface must be thoroughly cleaned. To
achieve maximum adhesion, it is necessary that
the surface be free of any residue. If the wall
surface is not absolutely dry and clean, the self-
adhesive backing will not stick properly. To clean
most surfaces, nail polish remover, rubbing
alcohol, or lighter fluid can be used, (Be sure to
follow the precautions noted on the container.)
A mild abrasive cleaner should be used if
silicone or wax has been applied to the wall.
Mount Rail - Peel protective covering from
tape, being careful not to touch or otherwise
contaminate the adhesive. Position rail and
press firmly into place by rubbing on the rail with
the heel of your hand. NOTE: For best results
allow the adhesive to dry for a minimum of 4
hours before using shower.
B. Screw Mounting Procedure:
Mark screw hole positions on the wall. Drill 1/4”
holes as near the center of the slotted holes as
possible for the screw anchors provided (use a
carbide tipped drill for ceramic tile or concrete).
Peel adhesive protective covering from Glide
Rail and install as in 3A above, being sure the
slotted holes are aligned with the screw anchors
before pressing into place. Install screws and
tighten until the tape is slightly compressed.
Replace chrome end caps by tapping on the
caps lightly with a hammer until they snap into
place. Protect the caps with a cloth or other soft
substance while striking.
4. MOUNT HAND SHOWER
.
Mount the hand shower on glide rail and attach
to water supply. Tighten hose nuts sufficiently to
slightly compress the urethane hose ends which
act as gasket seals.
Lifetime Faucet and Finish
Limited Warranty
All parts and finishes of the Delta
®
faucet
are warranted to the original consumer
purchaser to be free from defects in material
& workmanship for as long as the original
consumer purchaser owns their home. Delta
Faucet Company recommends using a
professional plumber for all installation & repair.
Delta will replace, FREE OF CHARGE,
during the warranty period, any part or finish
that proves defective in material and/or
workmanship under normal installation, use &
service. Replacement parts may be obtained
by calling 1-800-345-DELTA (in the U.S. and
Canada) or by writing to:
In the United States:
Delta Faucet Company
Product Service
55 E. 111th Street
Indianapolis, IN 46280
In Canada:
Masco Canada Limited, Plumbing Group
350 South Edgeware Road,
St. Thomas, Ontario, Canada N5P 4L1
This warranty is extensive in that it covers
replacement of all defective parts and even
finish, but these are the only two things that
are covered. LABOR CHARGES AND/OR
DAMAGE INCURRED IN INSTALLATION,
REPAIR, OR REPLACEMENT AS WELL AS
ANY OTHER KIND OF LOSS OR DAMAGES
ARE EXCLUDED. Proof of purchase (original
sales receipt) from the original consumer
purchaser must be made available to
Delta for all warranty claims. THIS IS THE
EXCLUSIVE WARRANTY BY DELTA FAUCET
COMPANY, WHICH DOES NOT MAKE
ANY OTHER WARRANTY OF ANY KIND,
INCLUDING THE IMPLIED WARRANTY OF
MERCHANTABILITY.
This warranty excludes all industrial,
commercial & business usage, whose
purchasers are hereby extended a five year
limited warranty from the date of purchase,
with all other terms of this warranty applying
except the duration of the warranty. This
warranty is applicable to Delta
®
faucets
manufactured after January 1, 1995.
Some states/provinces do not allow the
exclusion or limitation of incidental or
consequential damages, so the above
limitation or exclusion may not apply to you.
Any damage to this faucet as a result of
misuse, abuse, or neglect, or any use of other
than genuine Delta
®
replacement parts WILL
VOID THE WARRANTY.
This warranty gives you specific legal rights,
and you may also have other rights which vary
from state/province to state/province. It applies
only for Delta
®
faucets installed in the United
States of America, Canada, and Mexico.
© 2012 Masco Corporation of Indiana
5
/