Aeg-Electrolux 241737900 User manual

Category
Side-by-side fridge-freezers
Type
User manual

This manual is also suitable for

241737900 (Aug 2006)
Dishwasher
Use & Care Guide
Side-By-Side Refrigerator
2
Finding Information
PLEASE READ AND SAVE THIS GUIDE
Thank you for choosing Electrolux. This Use & Care Guide is part of our
commitment to customer satisfaction and product quality throughout the service life
of your new refrigerator.
We view your purchase as the beginning of a relationship. To ensure our ability to
continue serving you, please use this page to record key product information.
MAKE A RECORD FOR QUICK REFERENCE
________________________________________________
Purchase Date
________________________________________________
Electrolux Model Number
________________________________________________
Electrolux Serial Number (see picture for location)
©2006 Electrolux Home Products, Inc.
All rights reserved. Printed in the USA
NONO
NONO
NO
TETE
TETE
TE
Registering your product with Electrolux enhances our ability to
serve you. You can register by dropping your Product Registration
Card in the mail.
Attach your sales
receipt to this
page for future
reference.
TABLE OF CONTENTS
Finding Information ............................................ 2
Safety ................................................................... 3
Installation ........................................................... 5
Removing The Doors .......................................... 6
Connecting The Water Supply ........................... 8
Feature Overview ................................................ 9
Controls & Settings .......................................... 10
Storage Features............................................... 14
Automatic Ice & Water Dispenser ................... 18
Changing The Filters ........................................ 23
Storing Food & Saving Energy ........................ 25
Normal Operating Sounds & Sights ............... 27
Care & Cleaning ................................................ 28
Solutions To Common Problems .................... 31
3
Safety
IMPORTANT SAFETY INSTRUCTIONS
General Safety
Do not store or use gasoline, or other flammable liquids, near this or any
other appliance. Read product labels for warnings regarding flammability and
other hazards.
Do not operate the refrigerator in the presence of explosive fumes.
Avoid contact with any moving parts of the automatic ice maker.
Remove all staples from the carton to avoid cut injuries. Staples can also
damage finishes if they come in contact with other appliances or furniture.
Child Safety
Packing Materials:
Packing cartons covered with rugs, bedspreads, plastic sheets or stretch
wrap may become airtight chambers and can quickly cause suffocation.
Destroy or recycle the product’s carton, plastic bags, and any other exterior
wrapping material immediately after the refrigerator is unpacked. Children
should never play with these items.
Child Entrapment And Suffocation:
These problems are not limited to the past. Whether junked, abandoned or
temporarily stored (even for a few hours), unattended refrigerators and
freezers are dangerous.
ELECTRICAL INFORMATION
If the power cord is damaged, it should be replaced by the manufacturer,
service technician or a qualified person to prevent any risk.
Never unplug the refrigerator by pulling on the power cord. Always grip the
plug firmly, and pull straight out from the receptacle to prevent damaging the
power cord.
Unplug the refrigerator before cleaning and before replacing a light bulb to
avoid electrical shock.
!
WARNINGWARNING
WARNINGWARNING
WARNING
Please read all safety instructions before using your new Electrolux refrigerator.
!
WARNINGWARNING
WARNINGWARNING
WARNING
You must follow these guidelines to ensure that your refrigerator’s safety mechanisms are
operating correctly.
4
Safety
Performance may be affected if the voltage varies by 10% or more. Operating
the refrigerator with insufficient power can damage the compressor. Such
damage is not covered under your warranty.
Do not plug the unit into an outlet controlled by a wall switch or pull cord to
prevent the refrigerator from being turned off accidentally.
Installation
LOCATION
Choose a place that is near a grounded electrical outlet. Do Not use an
extension cord or an adapter plug.
If possible, place the refrigerator out of direct sunlight and away from the
range, dishwasher or other heat sources.
The refrigerator must be installed on a floor that is level and strong enough to
support a fully loaded refrigerator.
Consider water supply availability for models equipped with an automatic ice
maker.
INSTALLATION
Installation Clearances
Allow the following clearances for ease of installation and plumbing and electrical
connections:
Sides & Top 10 mm (3/8 inch)
Back 25 mm (1 inch)
IMPORIMPOR
IMPORIMPOR
IMPOR
TT
TT
T
ANTANT
ANTANT
ANT
To turn off power to your refrigerator, unplug the power cord from the wall outlet.
!
CACA
CACA
CA
UTIONUTION
UTIONUTION
UTION
Do Not install the refrigerator where the temperature will drop below 13°C (55°F) or rise
above 43°C (110°F). The compressor will not be able to maintain proper temperatures inside
the refrigerator. Do Not block the toe grille on the lower front of your refrigerator. Sufficient
air circulation is essential for the proper operation of your refrigerator.
5
Installation
Door Opening
Your refrigerator should be positioned to allow easy access to a counter when
removing food. For best use of drawers and freezer baskets, the refrigerator
should be in a position where both the refrigerator and freezer doors can be fully
opened.
Removing And Replacing The Toe Grille
To remove the toe grille:
1 Open freezer and refrigerator compartment doors.
2 Remove the screw from each side of the toe grille.
3 Pull the toe grille forward and lift it off.
Reverse these instructions to install the toe grille.
Leveling
All four corners of your refrigerator must rest firmly on a solid floor. Your refrigerator
is equipped with adjustable front rollers to help level your unit. To ensure proper
door seal and assist door closing, the refrigerator should be tilted 6 mm (1/4 inch),
front to back.
To level your refrigerator:
1 Remove toe grille (see above) to access the front
rollers.
2 Adjust the rollers by turning each roller adjustment
bolt with a wrench until the refrigerator is level and
stable.
3 Check both doors to be sure seals touch cabinet on all
four sides.
4 Replace the toe grille.
Tips:
If the freezer door is higher than the refrigerator door, raise the right corner
and/or lower the left corner until the doors align across the top of the cabinet.
If the refrigerator door is higher than the freezer door, raise the left corner
and/or lower the right corner until doors align across the top of the cabinet.
NONO
NONO
NO
TETE
TETE
TE
If your refrigerator is placed with the door hinge side against a wall, you may have to allow
additional space so the door can be opened wider.
6
Removing The Doors
GETTING THROUGH NARROW SPACES
If your refrigerator will not fit through an entrance area, you can reduce its size by
removing the doors. Check first by measuring the entrance.
Required Tools
You will need the following tools:
To prepare for removing the doors:
1 Make sure the electrical power cord is unplugged from the wall outlet.
2 Open both doors and remove the toe grille.
3 Remove any food from the door shelves.
4 Close the doors.
To remove the top hinge cover:
1 Remove the three screws from the cover over the top door hinges.
2 Pull the cover forward about a half-inch and
lift it off.
NONO
NONO
NO
TETE
TETE
TE
For more information on removing the toe grille, please refer to the Installation section.
Adjustable
Wrench
Socket
Wrench Set
OR
Phillips Head
Tools Necessary:
3/8” Fixed
Wrench
AND
OR
7
Removing The Doors
To remove the refrigerator door:
1 Trace lightly around the door’s top hinge with a pencil. This makes
reinstallation easier.
2 Remove the two screws from the top hinge. Lift the door off of the
bottom hinge and and set it aside.
3 Remove the three bottom hinge screws and hinge if necessary.
To reinstall the refrigerator door, reverse the above steps.
Once both doors are in place, also replace the
top hinge cover.
To remove the freezer door:
1 Detach the multi-wire cable connector
located above the top hinge. Grasp both
sides of the connector firmly and pull apart.
2 Trace lightly around the hinge with a pencil.
This makes reinstallation easier.
3 Detach the water tube from the connector
located below the freezer door. The
connector releases when you press its
outer sleeve inward.
4 Remove the screws from the top hinge.
Leave the multi-wire cable inside the hinge.
Do not unscrew the ground wire that
attaches the cable to the hinge. Lift the
door off of the bottom hinge.
5 Remove the three bottom hinge screws and
hinge if necessary.
6 Lay the door on its side to avoid damage to
the water tube extending from the bottom hinge.
To reinstall the freezer door, reverse the above steps. Once both doors are in
place, also replace the top hinge cover.
!
CACA
CACA
CA
UTIONUTION
UTIONUTION
UTION
Be sure doors are set aside in a secure position
where they cannot fall and cause personal injury.
8
Connecting The Water Supply
ABOUT YOUR REFRIGERATOR’S WATER SUPPLY
The automatic ice & water dispenser on your refrigerator requires a permanent
water supply to function correctly. During installation, you (or a service
professional) establish this water supply by connecting a copper tube from your
household water system to a valve at the rear of the refrigerator.
What you will need:
Access to a cold water line with pressure of 1.4-6.9 bars.
The water connector kit that comes with your refrigerator, which provides all
materials for a water supply installation, including 7.6 m (25 feet) of copper
tubing.
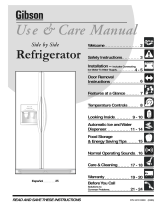
To connect the water supply to the rear of your
refrigerator:
1 Ensure that the refrigerator is not plugged in.
2 Flush the supply line until water is clear by placing the
end of the copper tube in a sink or bucket and opening
the shut-off valve.
3 Unscrew the plastic cap from the water valve inlet at
the rear of your refrigerator. Discard the cap.
4 Slide the brass compression nut, then the ferrule
(sleeve) onto copper tube.
5 Push the copper tube into water valve inlet as far as it
will go (6.5mm).
6 Slide the ferrule (sleeve) into valve and finger-tighten
the compression nut onto valve. Tighten another half
turn with a wrench. Do not over-tighten.
7 Secure the copper tube to your refrigerator’s rear panel
with a steel clamp and screw (see illustration).
!
CACA
CACA
CA
UTIONUTION
UTIONUTION
UTION
To avoid property damage:
Use copper tubing for the water supply line (plastic tubing is more
likely to leak). Manufacturer is not responsible for any damage if
plastic tubing is used for supply line.
Ensure water supply complies with local plumbing codes.
For proper dispenser operation, recommended water supply pressure
should fall between 1.4 and 6.9 bars. Excessive pressure may cause
water filter to malfunction.
9
Connecting The Water Supply
8 Coil the excess copper tubing (about 2½ turns) behind your refrigerator as
shown. Arrange coiled tubing to avoid vibration or wear against other
surfaces.
9 Open water supply shut-off valve and tighten any connections that leak.
Feature Overview
NONO
NONO
NO
TETE
TETE
TE
After connecting the water supply, see information in this guide about priming an empty
water supply system. Also read all topics in the “Automatic Ice & Water Dispenser” section
to learn about normal operating procedures.
Fixed
Door Bin
Ice Maker
Ice Cream Shelf
Freezer and Refrigerator
Controls
Dairy
Compartment
CAUTION:
Do Not Remove
Magnet Behind
Dairy
Compartment
Door Bin
Door Bin
Fixed
Door Bin
Toe Grille
Tall Bottle
Retainer
Can Rack
Special Item
Rack
Sliding Shelf
SpillProof
TM
Crisper Pan
and Cover
Water Filter
SpillProof
Aspect Shelf
TM
Tilt Out
Door Bin
Tilt Out
Door Bin
Tilt Out
Door Bin
Large Basket
Large
Glide Out
Basket
Shelf
Shelf
Small Basket
Ice Container
Door Bin
Meat Keeper
and Cover
NONO
NONO
NO
TETE
TETE
TE
Features may vary according to model.
10
Controls & Settings
ALLOWING COOLING TIME BEFORE USE
To ensure reliable food storage, allow your refrigerator and freezer to operate with
the doors closed for 8 to 12 hours before placing food inside. During this cooling
period, you do not need to adjust the controls, which are preset at the factory.
SETTING COOLING TEMPERATURES
Your refrigerator comes with a state-of-the-art electronic digital control system. The
system’s control panel is located at the top of the the fresh food compartment. The
two digital displays
on the left half of the
control panel
indicate the current
temperatures of
your freezer and
fresh food
compartments.
To adjust the temperature to a higher or lower setting, press the Up or Down
Arrow button closest to the display. The first time you press the button, the display
shows the last setting you entered. Each press of the button after that increments
the setting by one degree.
The display shows your new setting momentarily, then changes back to the current
temperature. (Refer to following pages for more about temperature settings.)
Choosing Centigrade or Fahrenheit
Depending on which temperature standard you prefer to
use, you can set your control panel to display in
centigrade or fahrenheit. To change between fahrenheit
and centigrade, press the Mode button (located between
the two digital temperature displays).
NONO
NONO
NO
TETE
TETE
TE
The advanced electronic control system in your refrigerator includes additional display
modes that service professionals can use to rapidly diagnose performance issues.
Press to alternate between
Centigrade and Fahrenheit
11
Controls & Settings
Making Temperature Adjustments
After running your refrigerator for 24 hours, you can adjust temperatures as
needed. Make your adjustments small and gradual, allowing time for temperatures
to change and stabilize. Refer to the following guidelines for temperature settings.
What To Do If The Temperature Displays Flash
If ever you you see both temperature displays continuously flashing, it may indicate
that the control system has detected a performance problem. Call your Electrolux
service representative, who can interpret the flashing message.
SYSTEM-MONITORING ALARMS
The electronic control system continuously monitors your
refrigerator/freezer for temperature consistency, doors left
ajar, and power failures. Variances from normal operating
conditions are communicated by audible tones and a set of
four status indicator lights.
Temperature Control Range
Freezer Fresh Food
Fahrenheit Centigrade Fahrenheit Centigrade
Warmest
6° -14°
47° 8°
Warmer
Factory Setting
Midpoint
0° -18°
37° 3°
Coldest
-10° -23°
33° 1°
Colder
Temperature Adjustment Guide
If Fresh Food compartment is too warm
Adjust Fresh Food control one degree
colder by pressing Down Arrow button.
If Fresh Food compartment is too cold
Adjust Fresh Food control one degree
warmer by pressing the Up Arrow button.
If Freezer compartment is too warm
Adjust Freezer control one degree colder
by pressing Down Arrow button.
If Freezer compartment is too cold
Adjust Freezer control one degree warmer
by pressing the Up Arrow button.
Alarm Reset Button
Indicator Lights
NONO
NONO
NO
TETE
TETE
TE
Each time you make settings on the control panel, a single
audible tone acknowledges your input.
12
!
CACA
CACA
CA
UTIONUTION
UTIONUTION
UTION
The alarm system does not automatically reset if you disconnect and reconnect your
refrigerators power cord. It can only be reactivated by pressing the Alarm Reset button.
Controls & Settings
Responding to Alarms (Audible Tones & Indicator Lights)
Your refrigerator’s control system can convey the following information through
audible tones and the alarm indicator lights.
Using The Alarm Reset Button
You can disable or activate the alarm system by pressing and holding the Alarm
Reset button for three seconds. Use it, for example, to turn off audible tones and/
or flashing indicator lights.
Once you disable the alarm system, you must again press and hold the Alarm
Reset button for three more seconds to reset (activate) the alarm system. The On
indicator light remains off while the Freezer and Fresh Food compartments cool
toward the current temperature settings. When temperature settings are reached,
the On light displays green to indicate an active alarm system.
Alarm
Name
Indicator
Light
Audible
Tones
Condition
How To Respond
On
(light is
off)
Alarm system is not active
while Freezer and Fresh
Food compartments are
cooling toward the current
temperature settings.
If Freezer and Fresh Food
compartments do not match your
temperature settings in three hours,
expect the control system to signal
other conditions.
Steady
Green
Alarm system is active. No response required.
Door
Ajar
Flashing
Green
9
Freezer or Fresh Food
door has been open for
over five minutes.
Close door to disable and reset alarm.
High
Temp
Flashing
Amber
9
Freezer or Fresh Food
compartment has been too
warm (7.2° C or higher) for
over an hour.
Press Alarm Reset button to turn off
alarm.
Power
Failure
Flashing
Amber
A power outage was
detected.
Press Alarm Reset button to turn off
alarm and again to reset. Check if the
power failure lasted long enough to
affect stored food temperatures.
13
Controls & Settings
Checking the Air Filter Status
Your refrigerator’s fresh food air filter needs to be
replaced from time to time. You can monitor the need
for replacement by pressing and holding the Air Filter
On/Off button for three seconds.
To check the air filter status:
1 Press the Air Filter On/Off button. This activates
a test cycle, and one of the three filter status
lights displays, indicating one of the following:
Filter OK Air filter does not need changing.
Order Filter Air filter is about 80 percent used. Please order new one.
Change Filter Air filter is 100 percent used. Please change now.
2 Press the Air Filter On/Off button to turn off the status light.
TURNING THE COOLING SYSTEM ON AND OFF
You can disable the cooling system in your refrigerator
by pressing the On/Off button located on the left side of
the temperature control panel.
To ensure that you do not accidentally turn off the
cooling system, the button does not work unless you
press and hold it for three seconds.
Once you disable the cooling system, all refrigeration to
the freezer and fresh food compartments stops.
To turn the cooling system back on, you must again
press and hold the On/Off button for three more
seconds.
Air Filter On/Off Button
Indicator Lights
NONO
NONO
NO
TETE
TETE
TE
See the later section in this Use & Care Guide for instructions on replacing the air filter.
Cooling System On/Off Button
IMPORIMPOR
IMPORIMPOR
IMPOR
TT
TT
T
ANTANT
ANTANT
ANT
The On/Off button only controls your refrigerators cooling system. Power to lights and
other electrical components continues unless you unplug the power cord.
14
Storage Features
CANTILEVER SHELVES
You can easily adjust shelf positions in the freezer and fresh food compartments to
suit your needs. The shelves have mounting brackets, which attach to slotted
supports at the rear of each compartment.
To change the position of a shelf:
1 Before adjusting a shelf, remove all food.
2 Lift the front edge up.
3 Pull the shelf out.
4 Replace by inserting the mounting bracket hooks into
the desired support slots.
5 Lower the shelf and lock into position.
Shelf Features
Your refrigerator includes SpillSafe
TM
glass shelves, which
are designed to catch and hold accidental spills. These
shelves slide out for easy access to food and faster
cleaning.
Sliding shelves can be pulled forward as far as their built-in
stops allow. Sliding shelves cannot be separated from their
mounting brackets.
!
CACA
CACA
CA
UTIONUTION
UTIONUTION
UTION
To avoid injury from breakage, handle tempered glass shelves carefully.
Cantilever
Glass Shelf
Cantilever
Sliding Glass
Shelf
Cantilever Aspect
Glass Shelf
15
Storage Features
DRAWERS
Your refrigerator includes a variety of storage drawers.
These drawers usually are located in fixed positions at the
bottom of the fresh food compartment.
Crispers
Crisper drawers are designed for storing fruits, vegetables,
and other fresh produce. Before storing items in a crisper:
Wash items in clear water and remove excess water.
Wrap any items that have strong odors or high
moisture content.
Crisper Humidity Control
Crisper drawers include a sliding control for adjusting the humidity inside the
crisper. This feature can extend the life of certain fresh vegetables that keep
longer in high humidity.
Meat Keeper
Some models are equipped with a meat keeper drawer for
short term storage of bulk meat items. This drawer includes
a sliding control for adjusting the temperature inside.
Any meat to be kept longer than two days should be frozen.
If you store fruits or vegetables in this drawer, set it to a
warmer temperature to prevent freezing.
NONO
NONO
NO
TETE
TETE
TE
Leafy vegetables keep best when stored with the Humidity Control set on Higher Humidity,
or in a drawer without a Humidity Control. This keeps incoming air to a minimum and
maintains maximum moisture content.
Crisper
Meat Keeper
16
Storage Features
DOORS
Storage Bins
The doors to your freezer and fresh food compartments use a
system of modular storage bins. All of these bins are removable
for easy cleaning. Some of them have fixed positions, while
others can be adjusted to your needs.
Door bins are ideal for storing jars, bottles, cans, and large drink
containers. They also enable quick selection of frequently used
items.
To change the position of an adjustable door bin:
1 Before adjusting a bin, remove all food.
2 Grip the bin firmly with both hands and lift it upward.
3 Remove the bin.
4 Place the bin just above desired position.
5 Lower the bin onto supports until locked in place.
Door Bin With
Tilt Shelf
17
Storage Features
ACCESSORIES
Tall Bottle Retainer
The tall bottle retainer keeps tall containers in the bin from falling forward
when opening or closing the refrigerator door. To install, snap the ends of
the retainer over the edge of the retainer wall as shown in the illustration.
Special Items Rack
The innovative design of the special items rack allows you to store a six-
pack of drink cans, a bottle of wine, a two-liter soft drink bottle, or a
carton of eggs. To install, slide the special item rack onto the left side of
any shelf as shown in the illustration.
Dairy Compartment
Use the dairy compartment, at the top of the fresh food compartment
door, for short term storage of cheese, spreads, or butter. The dairy
compartment, which includes a lift-up cover, is designed to be warmer
than the open storage area to accommodate these types of food.
Can Rack
The can rack allows you to efficiently and securely store up to six cans of
beverage drink.
Ice Cream Shelf
The ice cream shelf attaches to the top of the ice dispenser container. It
allows storage of both round and rectangular cartons of your favorite ice
cream.
!
CACA
CACA
CA
UTIONUTION
UTIONUTION
UTION
To avoid errors in your refrigerators control system, do not remove the magnet
that is mounted behind the dairy compartment.
Can Rack
Tall Bottle
Retainer
Special
Items Rack
Dairy
Compartment
Ice Cream
Shelf
18
Automatic Ice & Water Dispenser
USING THE DISPENSER
Your automatic ice & water dispenser includes a control panel, a
drinking glass bay, and two push-paddles for turning on the ice and
water supplies.
Using the dispenser control panel is necessary for the ice dispenser
but not the water dispenser. The control panel also includes options
for lighting, filter monitoring, and increasing the rates of ice making
and freezing.
Dispensing Ice
To operate the ice dispenser, press
an option for crushed or cubed ice
on the control panel. Press a
drinking glass against the
dispensing paddle (as far up as
possible to catch all the ice). To
stop, pull the glass away from the
dispensing paddle.
See details for operating the
dispenser controls on next page.
Dispensing Water
To operate the water dispenser, press a drinking glass against the dispensing
paddle. To stop dispensing water, pull the glass away from the dispensing paddle.
The dispensed water is not cold. For colder water, first add crushed ice or cubes to
your drinking glass.
Drip Tray
A drip tray located at the base of the dispenser bay catches small spills and allows
them to evaporate. This drip tray is removable for easy cleaning.
NONO
NONO
NO
TETE
TETE
TE
Please do not pour excess water and ice into the drip tray. It does not have a drain.
19
Automatic Ice & Water Dispenser
USING THE DISPENSER CONTROL PANEL
Cube Button
& Indicator Light
Press button to get cubed ice. Light displays blue.
Press glass against ice dispensing paddle, holding high up to catch
all ice.
Crush Button
& Indicator Light
Press button to get crushed ice. Light displays blue.
Press glass against ice dispensing paddle, holding high up to catch
all ice.
Light Button
& Indicator Light
Press button to turn on dispenser light. Light displays blue.
Press button again to turn off dispenser light.
Dispenser light also turns on automatically when ice and/or water is
dispensed.
Filter Status Button
& Indicator Light
Light displays in one of three possible colors each time the dispenser
is used to show status of water filter:
Green Water filter does not need changing.
Amber Water filter is about 80 percent used.
Please order a new one.
Red Water filter is 100 percent used.
Please change as soon as possible.
After replacing the water filter, reset the filter status by pressing and
holding Filter Status button for 10-15 seconds.
Lock Button
& Indicator Light
The dispenser can be locked to prevent unwanted use.
To lock, press and hold button for 3-5 seconds. Light displays blue.
To unlock, press and hold button for 3-5 seconds until light goes out.
Express Freeze Button
& Indicator Light
Press and hold button for 3-5 seconds to activate faster rate for
freezing food (preserving freshness). Light displays blue.
Press and hold button for 3-5 seconds again to deactivate.
Express Ice
Button
& Indicator Light
Press and hold button for 3-5 seconds to increase ice production for
special occasions, such as parties. Light displays blue.
Press and hold button for 3-5 seconds again to deactivate.
20
IMPORIMPOR
IMPORIMPOR
IMPOR
TT
TT
T
ANTANT
ANTANT
ANT
The ice maker is turned on at the factory so it can work as soon as you install your
refrigerator. If you cannot connect a water supply, turn the ice maker’s On/Off switch to Off.
Otherwise, the ice makers fill valve may be noisy when it attempts to operate without water.
Automatic Ice & Water Dispenser
PRIMING THE WATER SUPPLY SYSTEM
Your refrigerator’s water supply system includes several tubing lines, an advanced
water filter, a distribution valve bank, and a reserve tank to ensure ample supply to
the ice and water dispenser at all times. This system needs to be completely filled
with water when first connected to an external supply line.
To prime the water supply system:
1 Begin filling the tank by pressing and holding a drinking glass against the
water dispenser paddle.
2 Keep the glass in this position until water comes out of the dispenser. It may
take about 1½ minutes.
3 Continue dispensing water for about 3 minutes to flush the system and
plumbing connections of any impurities (stopping to empty the glass as
necessary).
ICE DISPENSER OPERATION & CARE
The ice maker, ice bin, and dispenser feeding mechanism are located in the top of
the freezer compartment. After the refrigerator is installed properly and has cooled
for several hours, the ice maker can produce ice within 24 hours. It can completely
fill an ice bin in about two days.
The ice maker produces 4-6 pounds of ice every 24 hours depending on usage
conditions. Ice is produced at a rate of 8 cubes every 75 to 90 minutes.
!
CACA
CACA
CA
UTIONUTION
UTIONUTION
UTION
For proper dispenser operation, recommended water supply pressure should fall between
between 1.4 and 6.9 bars. Excessive pressure may cause water filter to malfunction.
NONO
NONO
NO
TETE
TETE
TE
The water dispenser has a built-in device that shuts off the water flow after 3 minutes of
continuous use. To reset this shutoff device, simply release the dispenser paddle.
!
CACA
CACA
CA
UTIONUTION
UTIONUTION
UTION
Pushing the dispensing paddle in for more than 4 minutes may cause the dispenser motor
to overload and stop. The overload protector resets automatically after 3-4 minutes.
1 / 1

Aeg-Electrolux 241737900 User manual

Category
Side-by-side fridge-freezers
Type
User manual
This manual is also suitable for

Ask a question and I''ll find the answer in the document

Finding information in a document is now easier with AI

Ask the document