Page is loading ...

36"28"
30"
5'9"
8' 13'
90"
5'9"
30"
30"
8'
38"
5'9"
Pendants & Linear Pendants Above a Kitchen Island
Center a linear pendant over the island. If hanging pendants, use one
pendant for every 24" of island. Fixtures should hang at least 30"
above the countertop.
Pendentifs et pendentifs linéaires au-dessus d’un îlot de cuisine
Centrez un pendentif linéaire sur l’île. Si des pendentifs suspendus,
utilisez un pendentif pour chaque 24 po d’îlot. Les luminaires doivent
être suspendus à au moins 30 po au-dessus du comptoir.
Colgantes y colgantes lineales sobre una isla de cocina
Centre un colgante lineal sobre la isla. Si cuelga colgantes, use un
colgante por cada 24" de isla. Los accesorios deben colgar al menos
30" por encima de la encimera.
Pendants & Chandeliers Above a Dining Room Table
Fixtures should stay at least 30" above the table. Use a xture that is
12" narrower than the width of the table.
Pendentifs et lustres au-dessus d’une table de salle à manger
Les luminaires doivent rester au moins 30 po au-dessus de la table.
Utilisez un luminaire de 12 po plus étroit que la largeur de la table.
Colgantes y candelabros sobre una mesa de comedor
Los accesorios deben permanecer al menos 30" por encima de la
mesa. Use un accesorio que sea 12" más largo que el ancho de la
mesa.
Pendants and Chandeliers in Open Areas
The bottom should hang at least 7.5 feet from the oor.
Allow clearance for any opening doors.
Pendentifs et lustres dans les zones ouvertes
Le fond doit pendre au moins 7,5 pieds du sol. Laisser le
dégagement pour toute porte qui s’ouvre.
Colgantes y candelabros en áreas abiertas
La base debe colgar al menos a 7.5 pies del piso. Deje
espacio libre para las puertas que se abran.
We appreciate your business and hope
you love your new light!
Great lighting can add value and enhance the look of your home. To ensure
the best lighting in your space, remember to layer your lighting. This ensures
that your space will have both task and ambient lighting. Coordinating
xtures like sconces, ush mounts, and pendants can help you meet your
layered lighting needs and reinforce your desired aesthetic. Install the lights
with dimmers that allow you to control the level of light output at any given
moment.
Get function and style! Browse our site for coordinating lights and expert
lighting advice.
Nous apprécions votre entreprise et espérons
que vous aimerez votre nouvelle lumière!
Un bon éclairage peut ajouter de la valeur et rehausser l’apparence de
votre maison. Pour assurer le meilleur éclairage de votre espace, pensez
à superposer votre éclairage. Cela garantit que votre espace aura à la fois
un éclairage de tâche et un éclairage ambiant. Les luminaires coordonnés
tels que les appliques, les supports afeurants et les pendentifs peuvent
vous aider à répondre à vos besoins d’éclairage en couches et à renforcer
l’esthétique souhaitée. Installez les lumières avec des gradateurs qui vous
permettent de contrôler le niveau de sortie de lumière à tout moment.
Obtenez fonctionnalité et style! Parcourez notre site pour coordonner les
lumières et les conseils d’experts en éclairage.
¡Apreciamos su negocio y esperamos
que le guste su nueva luz!
Buena iluminación puede agregar valor y mejorar el aspecto de su hogar. Para
garantizar la mejor iluminación en su espacio, recuerde colocar su iluminación
en capas. Esto asegura que su espacio tendrá iluminación ambiental y de
trabajo. La coordinación de accesorios como apliques, montajes empotrados
y colgantes puede ayudar a satisfacer sus necesidades de iluminación en
capas y reforzar la estética deseada. Instale las luces con atenuadores que le
permitan controlar el nivel de salida de luz en cualquier momento.
¡Obtén funcionalidad y estilo! Explore nuestro sitio para coordinar luces y
consejos de expertos en iluminación.
Thank You for Choosing Us for Your Lighting Needs!
2866-OSF 2866-OSF NB-NT

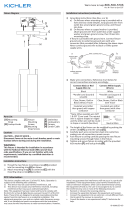
Assembly Instructions
How to Identify the Fixture’s Wires
Comment identier les ls du luminaire
Cómo identicar los cables del dispositivo
Chargé
Vivo
Chargé
Vivo
Neutre
Neutro
Mise à la Terre
Cable De Tierra
Mise à la Terre
Cable De Tierra
Neutre
Neutro
House Wires
Fils de la Maison
Cables De La Casa
Fils de L’appareil DéClairage
Cables del Artefacto
Hot
Neutral
Ground
Hot
Neutral
Ground
Fixture Wires
Neutral: Ribbed, White or Transparent with White Inner Thread
Hot: Smooth, Black, or Transparent with Black Inner Thread
Neutre: Côtelé, blanc ou transparent avec letage intérieur blanc
Chargé: Lisse, noir ou transparent avec letage intérieur noir
Neutro: Acanalado, blanco o transparente con hilo interior blanco
Vivo: Suave, negro o transparente con hilo interior negro
Ground: Copper, Bare Metal, Green, or Transparent Inner Thread
Mise à la Terre: Filetage intérieur en cuivre, métal nu,
vert ou transparent
Cable De Tierra: Rosca interior de cobre, metal desnudo,
verde o transparente
Get help, quick tips,
and explore curated
content
GND
A
E
D
B
C
F
G
H
I
J
K
Lightinginstructions.com

ENGLISH
For Customer Service, contact the place of purchase to
arrange for replacement parts.
IMPORTANT:
• All installation work should be done by accredited professional.
• Shut off power supply at fuse or circuit breaker!
• Use only the specied bulbs. Do not exceed the maximum wattage!
Assembly Instructions:
PREPARING FOR INSTALLATION
Carefully remove the new xture from the carton as well as the yellow
bag that holds all of the parts. See the important notes above. Shut off
power at the circuit breaker and remove old xture from wall, including the
old mounting strap. PLEASE NOTE: INDOOR/OUTDOOR FIXTURE - IF
INSTALLED OUTDOORS, MUST BE PLACED UNDER A COVERED AREA.
1. Mounting strap (B) contains several threaded holes. Two sets of mounting
screws (A & D) should be attached to mounting strap (B). You may need to
tighten nuts (C) that hold mounting screws (A) in place. If the screws are not
attached, please hold canopy (F) up to mounting strap (B). Line up the holes
in canopy (F) with the holes in mounting strap (B) and insert mounting screws
(A) into mounting strap (B) so that mounting screws (A) protrude through the
holes in canopy (F). Mounting screws (A) are long, so please test the canopy
against the mounting strap to see how far you should insert the screws. 2.
Attach mounting strap (B) to the junction box using mounting screws (D) and
a screwdriver. Tighten the screws securely. Pull the house wires through the
center of mounting strap (B).
ASSEMBLING THE FIXTURE
No Assembly Required - This item arrives assembled and ready for
installation. Please proceed to the next step.
CONNECTING THE WIRES
3. Have an assistant support the xture’s weight while completing the wiring.
Refer to the wiring diagram and attach the xture’s wires to the power supply
wires from the junction box. Attach the xture’s wires to the power supply
wires from the junction box. Connect Hot to Hot (transparent wire with black
inner thread, black, or smooth wire) Neutral to Neutral (transparent wire with
white inner thread, white, or ribbed wire), and Ground to Ground (transparent
wire with green inner thread, green wire, or copper). Twist the ends of the wire
pairs together, and then twist on a wire connector. Make sure all twists are in
the same direction. If there is no house ground wire coming from the junction
box, locate ground screw (E) on the mounting bracket/mounting strap and
wrap the xture’s ground wire around the ground screw. Use a screwdriver
to tighten the top of ground screw (E) onto the wires and into the mounting
bracket/mounting strap. Tuck the wires into the junction box.
FINISHING THE INSTALLATION
4. Push canopy (F) up to the ceiling and tightly thread nuts (G) and rubber
washer (H) onto the exposed threads of mounting screws (A) until the
canopy is snug against the ceiling. 5. Slide metal shade (J) over socket (I).
Secure the metal shade (J) in place using socket ring (K) on the threads of
socket (I). Thread until secure. Install light bulb (not included) into socket
(I) in accordance with the xture’s specications. Do not exceed maximum
recommended wattage. Your installation is complete. Turn on the power and
test the xture.
FRANÇAIS
Pour le service client, contactez le lieu d’achat pour
organiser les pièces de rechange.
• IMPORTANTE
• Tous les travaux d’installation doivent être effectués par un profes-
sionnel accrédité.
• Coupez l’alimentation électrique au fusible ou au disjoncteur!
• Utilisez uniquement les ampoules spéciées. Ne dépassez pas la
puissance maximale!
Instructions de montage:
PRÉPARATION À L’INSTALLATION
Retirez soigneusement le nouveau luminaire du carton ainsi que le sac jaune
contenant toutes les pièces. Voir les notes importantes ci-dessus. Coupez
l’alimentation au disjoncteur et retirez l’ancien appareil du mur, y compris
l’ancienne sangle de montage. VEUILLEZ NOTER: LUMINAIRE INTÉRIEUR/
EXTÉRIEUR - SI INSTALLÉ À L’EXTÉRIEUR, DOIT ÊTRE PLACÉ SOUS UNE
ZONE COUVERTE. 1. La sangle de montage (B) contient plusieurs trous
letés. Deux jeux de vis de montage (A et D) doivent être xés à la sangle de
montage (B). Vous devrez peut-être serrer les écrous (C) qui maintiennent les
vis de montage (A) en place. Si les vis ne sont pas xées, veuillez maintenir
l’auvent (F) jusqu’à la sangle de montage (B). Alignez les trous de l’auvent (F)
avec les trous de la sangle de montage (B) et insérez les vis de montage (A)
dans la sangle de montage (B) de sorte que les vis de montage (A) dépassent
des trous de l’auvent (F). Les vis de montage (A) sont longues, veuillez donc
tester l’auvent contre la sangle de montage pour voir jusqu’où vous devez
insérer les vis. 2. Fixez la sangle de montage (B) à la boîte de jonction à l’aide
des vis de montage (D) et d’un tournevis. Serrez fermement les vis. Tirez les
ls de la maison à travers le centre de la sangle de montage (B).
MONTAGE DU FIXTURE
Aucun assemblage requis – Cet article arrive assemblé et prêt à être installé.
Veuillez passer à l’étape suivante.
CONNEXION DES FILS
3. Demandez à un assistant de supporter le poids du luminaire pendant que
vous effectuez le câblage. Reportez-vous au schéma de câblage et xez
les ls du luminaire aux ls d’alimentation de la boîte de jonction. Fixez les
ls du luminaire aux ls d’alimentation de la boîte de jonction. Connectez
Chaud à Chaud (l transparent avec l intérieur noir, l noir ou lisse) Neutre
à Neutre (l transparent avec l intérieur blanc, l blanc ou nervuré) et Terre
à Terre (l transparent avec l intérieur vert, l vert , ou cuivre). Torsadez les
extrémités des paires de ls ensemble, puis vissez un connecteur de l.
Assurez-vous que toutes les torsions sont dans la même direction. S’il n’y a
pas de l de terre provenant de la boîte de jonction, localisez la vis de terre
(E) sur le support de montage/la sangle de montage et enroulez le l de terre
du luminaire autour de la vis de terre. Utilisez un tournevis pour serrer le haut
de la vis de terre (E) sur les ls et dans le support de montage/sangle de
montage. Rentrez les ls dans la boîte de jonction.
FIN DE L’INSTALLATION
4. Poussez l’auvent (F) jusqu’au plafond et vissez fermement les écrous (G)
Assembly Instructions
et la rondelle en caoutchouc (H) sur les letages exposés des vis de montage
(A) jusqu’à ce que l’auvent soit bien ajusté contre le plafond. 5. Faites glisser
l’abat-jour métallique (J) sur la douille (I). Fixez l’abat-jour métallique (J) en
place à l’aide de l’anneau de douille (K) sur les letages de la douille (I).
Enlez jusqu’à ce qu’il soit sécurisé. Installez l’ampoule (non incluse) dans la
douille (I) conformément aux spécications du luminaire. Ne dépassez pas la
puissance maximale recommandée. Votre installation est terminée. Mettez
sous tension et testez l’appareil.
ESPAÑOL
Para obtener servicio al cliente, comuníquese con el
lugar de compra para solicitar piezas de repuesto.
• IMPORTANTE:
• Todo el trabajo de instalación debe ser realizado por un profesional
acreditado.
• ¡Apague el suministro de electricidad en el fusible o disyuntor!
• Utilice solo las bombillas especicadas. ¡No exceda la potencia
máxima!
Instrucciones de montaje:
PREPARACIÓN PARA LA INSTALACIÓN
Retire con cuidado el nuevo accesorio de la caja, así como la bolsa amarilla
que contiene todas las piezas. Vea las notas importantes arriba. Apague la
energía en el disyuntor y retire el artefacto viejo de la pared, incluyendo la
correa de montaje vieja. TENGA EN CUENTA: ACCESORIOS INTERIORES/
EXTERIORES: SI SE INSTALA AL AIRE LIBRE, DEBE COLOCARSE DEBAJO
DE UN ÁREA CUBIERTA. 1. La correa de montaje (B) contiene varios oricios
roscados. Se deben jar dos juegos de tornillos de montaje (A y D) a la correa
de montaje (B). Es posible que necesite apretar las tuercas (C) que sujetan
los tornillos de montaje (A) en su lugar. Si los tornillos no están colocados,
sostenga la cubierta (F) hasta la correa de montaje (B). Alinee los oricios
de la cubierta (F) con los oricios de la correa de montaje (B) e inserte los
tornillos de montaje (A) en la correa de montaje (B) de modo que los tornillos
de montaje (A) sobresalgan a través de los oricios de la cubierta (F). Los
tornillos de montaje (A) son largos, así que pruebe la cubierta contra la correa
de montaje para ver hasta dónde debe insertar los tornillos. 2. Fije la correa
de montaje (B) a la caja de conexiones usando tornillos de montaje (D) y un
destornillador. Apriete los tornillos rmemente. Pase los cables de la casa a
través del centro de la correa de montaje (B).
MONTAJE DEL APARATO
No requiere ensamblaje: este artículo llega ensamblado y listo para su
instalación. Continúe con el siguiente paso.
CONECTANDO LOS CABLES
3. Haga que un asistente sostenga el peso del dispositivo mientras completa
el cableado. Consulte el diagrama de cableado y conecte los cables del
dispositivo a los cables de alimentación de la caja de conexiones. Conecte
los cables del dispositivo a los cables de alimentación de la caja de
conexiones. Conecte Vivo a Vivo (cable transparente con hilo interno negro,
cable negro o liso) Neutro a Neutro (cable transparente con hilo interno
blanco, cable blanco o acanalado) y Tierra a Tierra (cable transparente con
hilo interno verde, cable verde , o cobre). Tuerza los extremos de los pares
de cables y luego gire un conector de cable. Asegúrate de que todos los
2866-OSF

giros estén en la misma dirección. Si no sale ningún cable de tierra de la
casa desde la caja de conexiones, ubique el tornillo de tierra (E) en el soporte
de montaje/correa de montaje y envuelva el cable de tierra del dispositivo
alrededor del tornillo de tierra. Utilice un destornillador para apretar la parte
superior del tornillo de tierra (E) en los cables y en el soporte de montaje/
correa de montaje. Meta los cables en la caja de conexiones.
TERMINANDO LA INSTALACIÓN
4. Empuje la cubierta (F) hacia el techo y enrosque rmemente las tuercas (G)
y la arandela de goma (H) en las roscas expuestas de los tornillos de montaje
(A) hasta que la cubierta quede ajustada contra el techo. 5. Deslice la pantalla
metálica (J) sobre el casquillo (I). Asegure la pantalla de metal (J) en su lugar
usando el anillo del casquillo (K) en las roscas del casquillo (I). Enhebre hasta
que esté seguro. Instale la bombilla (no incluida) en el casquillo (I) de acuerdo
con las especicaciones del dispositivo. No exceda la potencia máxima
recomendada. Su instalación está completa. Encienda la alimentación y
pruebe el dispositivo.
Assembly Instructions
/