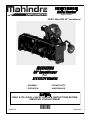
Bercomac 700811-22H-EPA User manual
- Category
- Snow throwers
- Type
- User manual
This manual is also suitable for

1
For
READ&FOLLOWALLSAFETYRULES&INSTRUCTIONSBEFORE
OPERATINGYOUREQUIPMENT
R
-
08312016
*ASSEMBLY *REPAIRPARTS
*OPERATION *MAINTENANCE
*108443*
OriginalVersion
700811
-
22hp
-
EPA66’’Snowblower
108443
-
EN

2
LIMITED WARRANTY
Conditions and Products Covered:
BERCOMAC guarantees any part of the product or accessory
manufactured by BERCOMAC and found in the reasonable
judgment of BERCOMAC to be defective in material and or
workmanship will be repaired or replaced by an authorized
dealer without charge up to our maximum labor rates and pre-
established times. For replacement parts only standard ground
freight services are covered. This warranty applies to the
products bought and used in North America.
Warranty Period
(from date of the original retail purchase)
Residential or light commercial (regular agricultural) use:
1 year
Commercial regular or intense use (intense agricultural),
industrial or rental use: 90 days
Exceptions Noted Below; the following items have a different
coverage conditions and limited time:
Tire Chains:
o90 days residential or light commercial use
oNo warranty for other application
Engines: Will vary as per the manufacturer
Please refer to the engine manufacturer’s warranty
statement included with the unit. BERCOMAC is not
authorized to handle warranty adjustments on engines.
Items and Conditions NOT Covered:
This warranty does not cover the following:
Pick-up or delivery charges or in-home services fees.
Any damage or deterioration of the unit, parts and or finish
of these due to normal use, wear and tear, or exposure.
Cost of regular use or maintenance service or parts, such as
gas, oil, lubricants, tune-up parts, and adjustments.
Any part or accessory which has been altered, modified,
misused, neglected, accidentally damaged or not properly
installed, maintained, stored or repaired not in accordance
withtheinstructionsintheowner’smanual.
Repair due to normal wear and or any wear items such as
shear pins, bolts, belts, winch cable, cutting edge, skid
shoes, etc.
Expedited freight fee services for replacement parts.
Shear bolts and shear pins are to be considered as a
preventive measure not as an assured protection, any
damages resulting from the lack of shear bolts breakage are
not covered.
NOTE: All warranty work must be performed by an authorized
dealer using original (manufacturer) replacement parts.
Owner’sResponsibilities:
BERCOMAC’s defective equipment or part must be returned
to an authorized dealer within the warranty period for repairs.
In the event that defective merchandise must be returned to
manufacturer for repairs, freight fees are prepaid and a written
authorization from BERCOMAC must be obtained by dealer
prior to the shipment. This warranty extends only to
equipment operated under normal conditions. To validate a
warranty claim, it is the user’s responsibility to maintain and
servicetheunitasspecifiedintheowner’smanualortohave
the unit serviced at their dealer at their expense.
General Conditions:
The sole liability of BERCOMAC with respect to this warranty
shall be strictly and exclusively repair and replacement as
mentioned herein. BERCOMAC shall not have any liability for
any other costs, loss or damage, including but not limited to,
any incidental or consequential loss or damage.
Taking advantage of the warranty does not in any way extend
the length or renewal of the warranty.
In particular, without being limited to, BERCOMAC shall have
no liability or responsibility for:
Travel time, overtime, after hours time or other
extraordinary repair charges or relating to repairs and or
replacements outside of normal business hours.
Rental of like or similar replacement equipment during the
period of any, repair or replacement work.
Any communicating or travel charges.
Loss or damage to person or property other than that
covered by the terms of this warranty.
Any claims for lost revenue, lost profit or any similar costs
as a result of damage or repair.
Attorney’sfees.
BERCOMAC’s responsibility in respect to claims is limited to
making the required repairs or replacement without charge up
to our maximum labor rates and pre-established times and no
claim of breach of warranty shall be cause for cancellation or
rescission of the contract of sale of any product or accessory.
In no event shall recovery of any kind be greater than the
amount of the purchase price of the product sold.
This warranty gives you specific legal rights. You may also
have other rights, which vary from state to state.
NOTE: Bercomac reserves the right to change or improve the design of any part or accessory without assuming any obligation to modify
any product previously manufactured.
Instructions for Obtaining Warranty Services: Contact the Mahindra dealer where equipment was purchased or any other Mahindra
service dealer to arrange service at their dealership. To locate a dealer convenient to you, access our website at
www.mahindrausa.com. Don't forget to bring your proof of purchase (sales receipt) to the Mahindra dealer.
Revised 11-23-2012

3
TABLEOFCONTENTS
INTRODUCTION
...............................................................................................................................................
1
SAFETYPRECAUTIONS
..................................................................................................................................
2
SAFETYDECALS
..............................................................................................................................................
4
ASSEMBLY
ToolsRequired
.....................................................................................................................................
5
SnowblowerPreparation
......................................................................................................................
6
VehiclePreparation
...............................................................................................................................
7
PreparingtheSubframe
.......................................................................................................................
8
InstallingontheVehicle
........................................................................................................................
9
ControlBoxInstallation
.........................................................................................................................
9
Connectingthewinch’slimitswitchtothewinch'srelay
.........................................................................
11
OPERATION
SnowblowerOperation
..........................................................................................................................
14
ElectricalControls
..................................................................................................................................
14
LiftingandLoweringtheSnowblower
...................................................................................................
14
BurnishingProcedure
.............................................................................................................................
17
SnowblowingTechnique
......................................................................................................................
15
SkidShoeAdjustment
.........................................................................................................................
15
MAINTENANCE
EngineMaintenance
.............................................................................................................................
16
SnowblowerMaintenance
....................................................................................................................
16
Pressureofthetiresonthesubframe
....................................................................................................
16
ClearingaCloggedDischargeChute
...................................................................................................
16
CuttingEdgeMaintenance
...................................................................................................................
16
Lubrication
............................................................................................................................................
17
AugerandFanShearBoltReplacement
..............................................................................................
17
BeltReplacement
.................................................................................................................................
18
ReplacingtheAugers,Fanand/orGearBox
.....................................................................................
19
MAINTENANCE&DISMOUNTING
..................................................................................................................
20
TROUBLESHOOTING
.......................................................................................................................................
21
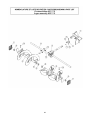
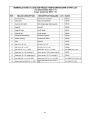
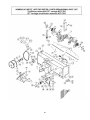
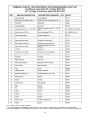
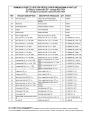
PARTSBREAKDOWNANDPARTSLIST
SnowblowerwithHondaEngine22hpEPA
.........................................................................................
23
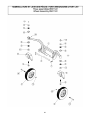
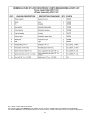
Subassemblies
.........................................................................................................................
26
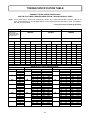
TORQUESPECIFICATIONTABLE
..................................................................................................................
39
OPTIONS&ACCESSORIES…….
....................................................................................................................
40
PAGE

1
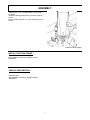
INTRODUCTION
TO THE PURCHASER
This new accessory was carefully designed to give years of dependable service. This manual has been provided to
assist in the safe operation and servicing of your attachment.
NOTE: All photographs and illustrations in the manual may not necessarily depict the actual models or attachment, but
are intended for reference only and are based on the latest product information available at the time of publication.
Familiarize yourself fully with the safety recommendations and operating procedures before putting the machine to
use. Carefully read, understand and follow these recommendations and insist that they be followed by those who will
use this attachment.
THIS SAFETY ALERT SYMBOL IDENTIFIES AN IMPORTANT SAFETY MESSAGE IN THIS
MANUAL THAT HELPS YOU AND OTHERS AVOID PERSONAL INJURY OR EVEN DEATH.
DANGER, WARNING, AND CAUTION ARE SIGNAL WORDS USED TO IDENTIFY THE LEVEL OF
HAZARD. HOWEVER, REGARDLESS OF THE HAZARD, BE EXTREMELY CAREFUL.
DANGER: Signals an extreme hazard that will cause serious injury or death if recommended precautions
are not followed.
WARNING:
Signals a hazard that may cause serious injury or death if the recommended precautions are
not followed.
CAUTION: Signals a hazard that may cause minor or moderate injury if the recommended precautions are
not followed.
Record your attachment serial number and purchase date in the section reserved below (there is no serial number on
the subframe). Your dealer requires this information to give you prompt, effi
cient service when ordering replacement
parts. Use only genuine parts when replacements are required.
If warranty repairs are required please present this registration booklet and original sales invoice to your selling dealer
for warranty service.
This manual should be kept for future reference.
Please check if you have received all the parts for your kit with the list of the
bag and the list of the box.
SERIAL NUMBER : ___________________________
(IF APPLICABLE)
MODEL NUMBER: ___________________________
PURCHASE DATE : ___________________________

2
SAFETY PRECAUTIONS
Careful operation is your best insurance against an accident. Read this section carefully before operating the vehicle
and accessory. This accessory is capable of amputating hands and feet and throwing objects. Failure to observe the
following safety instructions could result in serious injury. All operators, no matter how experienced they may be,
should read this and other manuals related to the vehicle and accessory before operating. It is the owner's legal
obligation to instruct all operators in safe operation of the accessory to prevent accidents or injuries.
These are common practices that may or may not be applicable to the product described in this manual.
GLOSSARY:
In this manual, right and left sides are determined by
sitting on the seat of the vehicle facing forward.
In this manual, "accessories" means attachments
(snowblower, rotary broom, blade, etc.) that you install
on the vehicle (lawn tractors, A.T.V. s etc).
TRAINING:
This symbol, "Safety Alert Symbol", is used
throughout this manual and on the
accessory’s safety labels to warn of the
possibility of serious injury. Please take
special care in reading and understanding
the safety precautions before operating the
vehicle and accessory.
1. Read this owner's manual carefully. Be thoroughly
familiar with the controls and proper use of the
vehicle and accessory. Know how to stop the unit
and disengage the controls quickly.
2. Never allow children to operate the vehicle nor the
accessory. Never allow adults to operate the vehicle
nor the accessory without proper instructions. Local
regulations restrict the age of the operator. Children
are often attracted to accessories. Never assume
children will stay in place where you have last seen
them. Keep children under surveillance of a
responsible adult at all times.
3. No one should operate the vehicle nor the
accessory while intoxicated or while taking
medication that impairs the senses or reactions. The
operator should, if taking over the counter drugs,
seek medical advice on whether he/she can safely
operate the equipment.
4. Keep the area of operation clear of all people,
particularly small children and pets.
5. Never start or operate the accessories except from
the operator’s station on the power unit except if
this is impossible.
PREPARATION:
1. Thoroughly inspect the area where the accessory
is to be used and remove door mats, all foreign
objects and the like which could be pick up and
projected by accessory.
2. For motorized accessories, disengage all clutches
and shift into neutral before starting engine.
3. Prepare for emergencies. Be prepared if a fire
starts. Keep first aid kit and fire extinguisher
handy. Keep emergency phone numbers (doctor,
ambulance, ect) near a phone
4. Do not operate the accessory without wearing
adequate clothing and safety equipment. Long hair,
loose clothing or jewelry can get caught in moving
parts. Wear footwear that will improve footing on
slippery surfaces.
5. Handle fuel with care, it is highly flammable and
vapors are explosive.
a) Extinguish all cigarettes, cigars, pipes and other
sources of ignition.
b) Use approved fuel container.
c) Never add fuel to a running engine or hot engine.
d) Fill fuel tank outdoors with extreme care. Never fill
fuel tank indoors.
e) Never fill containers inside a vehicle, or on a
truck or a trailer bed with a plastic liner. Always
place containers on the ground, away from your
vehicle, before filling.
f) When practical, remove gas-powered
equipment from the truck or trailer and refuel it
on the ground. If this is not possible, then refuel
such equipment on a trailer with a portable
container, rather than directly from a gasoline
dispenser nozzle.
g) Keep the nozzle in contact with the rim of the
fuel tank or container opening at all times, until
refueling is complete. Do not use a nozzle lock-
open device.
h) Never overfill fuel tank. Replace fuel cap
securely and wipe up spilled fuel.
i) If fuel is spilled on clothing, change clothing
immediately.
6. Never attempt to make any adjustments while the
engine (motor) is running (except when specifically
recommended by manufacturer).
7. Let the vehicle and accessory adjust to outdoor
temperatures before using.
8. Never use an accessory without proper guards,
plates, or other safety protective devices in place
9. Always make sure to wear the appropriate safety
equipment required (glasses, muffs, mask…) for
each type of product. See operation section.
10. Always make sure of having safe traction on the
vehicle by using the recommended accessories
(chains, A.T.V. tracks, counterweights…). See
operation section.
11. Always make sure all components are correctly
installed. (driveline securely attached and locked at
bothends,beltsproperlyinstalled…)
12. If applicable, always handle the winch cable with
thick leather gloves.
13. Never modify the accessory or any part without
the written consent from the manufacturer.

3
OPERATION:
1. Do not put hands or feet near, under or inside rotating
parts.
2. Exercise extreme caution when operating on or
crossing gravel drives, walks or roads. Stay alert for
hidden hazards or traffic. Do not carry passengers.
3. After striking a foreign object, stop the engine (motor),
disconnect the wire from the spark plug(s) and keep
wire away to prevent accidental starting. Thoroughly
inspect the accessory for any damage and repair
damage before restarting and using the accessory.
4. If the unit should start to vibrate abnormally, stop the
engine (motor) and check immediately for the
cause. Vibration is generally a warning of trouble.
Don not use equipment until properly repaired.
5. Take all possible precautions when leaving the
vehicle unattended. Disengage the power take-off,
lower the attachment, place the transmission into
neutral, set the parking brake, stop the engine and
remove the ignition key.
6. Do not run the engine indoors, except when starting
the engine and for transporting in or out of the
building. Do not operate or let motor run in a storage
area without ventilation because gas contains
carbon monoxide which is odorless, colorless and
can cause death.
7. Never use the accessories across the face of
slopes, go from top to bottom. Exercise extreme
caution when using equipment on slopes, on wet
ground or near drop-off. Do not attempt to use
accessory on a steep slope.
8. Never tolerate bystanders in the working zone.
Never use an accessory in the direction of
bystanders, it might throw gravel or debris that can
hurt people or damage property.
9. Never operate the accessory at high transport
speeds on slippery surfaces. Use care when
backing up.
10. Do not carry passengers.
11. Disengage power to the accessory when it is
transported or not in use.
12. Never operate the accessory without good visibility
or light.
13. Keep the accessory away from heat sources or
flames.
14. If applicable, never handle the winch cable or hook
while under tension.
15. Never use accessory if it has been dropped or
damaged. Repair if necessary before re-using.
MAINTENANCE AND STORAGE
1. When cleaning, repairing or inspecting the vehicle
and accessory: park on a solid level ground,
disengage drives, lower implement, set parking
brake, stop the engine, remove ignition key, and
wait that all moving parts have stopped. For
gasoline engine, disconnect wire from the spark
plug(s) and keep wire away to prevent accidental
starting.
2. Check all the bolts and components at frequent
intervals to make sure that they are properly
tightened and in safe working condition.
3. Never store a motorized accessory with fuel in the
fuel tank inside a building where ignition sources are
present such as hot water and space heaters,
clothes dryers, and the like. Allow the engine to cool
before storing in any enclosure.
4. Alwaysrefertotheowner’smanualwhenyoustore
the accessory and vehicle for a prolonged or an
unspecified length of time.
5. Maintain or replace safety and instruction labels, as
necessary.
6 For winter accessories, (if applicable), let the engine
run for a few minutes after clearing snow in order to
prevent the rotary parts from freezing.
7. Inspect the vehicle’s and accessory’s air filter (if
applicable) every day. Clean it or replace it as
necessary. Change the oil more often when working
in dusty conditions. See the vehicle’s and
accessory'sowner’smanual.
8. When inflating tires, stand on one side NOT in front
or over the tire assembly. Use a safety cage if
available
TRANSPORT
1. Review Transport Safety instructions in vehicle
manual before moving or hauling.
2. Check with local authorities regarding transport on
public roads and off road. Obey all applicable laws
and regulations.
3. Make sure all lights and reflectors that are required
by the local highway and transport authorities
(exemple : SMV (Slow Moving Vehicle)) are in
place, are clean, and can be seen clearly by all
overtaking and oncoming traffic.
4. Never have the equipment in operation during
transport.
5. Always travel at a safe speed.
SAFETY PRECAUTIONS

4
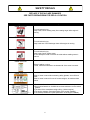
REPLACEIFDECALSAREDAMAGED
SEEPARTSBREAKDOWNFORDECALLOCATION
SAFETYDECALS
Symbol Description
Decal#105126
Toavoidseriousinjury:
Keephands,feet&clothingawayfromrotatingaugerwhileengineis
running.
Decal#105127
Toavoidseriousinjury:
Keephandsoutofthisdischargechutewhileengineisrunning.
Decal#105128
Toavoidseriousinjury:
Keephands,feet&clothingaway.
Donotattempttoinstallorremovedrivebeltwithoutreadingowner’s
manual.
Decal#105130
Beforeinstallingorusing:
Locate,readandmakesuretounderstandalloftheowner’smanual.
Decal#105131
Refertoowner’smanualaboutwearingsafetyglasses,earmuffsand
mask.
Refertoowner’smanualforuseofcounterweights,cattracksandtire
chains.
1
-
Donotdrivefasterthan3KM/Hwhenthesnowblowerisinoperation.
2
-
Donotdrivefasterthan10KM/Hwhenthesnowblowerisintheraised
position.
3
-
Theheadofthesnowblowerweighs96kg.(withoutengine).
4
-
Theenginewattage.(Seespecificationoftheengineinstalled).
5
-
Thesoundpressurelevel(Seespecificationoftheengineinstalled).

5
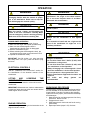
ASSEMBLY
IMPORTANT:UNLESSOTHERWISESPECIFIED,TORQUEALLBOLTSACCORDINGTOTORQUE
SPECIFICATIONTABLE(SEETABLEOFCONTENTS)WHENSTATED:TIGHTENFIRMLY.REFERTO
PARTSBREAKDOWNSECTIONFORPARTIDENTIFICATION.
TOOLSREQUIRED
1Ratchet
3Wrenches7/16’’,1/2’’,9/16’’
3Sockets7/16’’,1/2’’,9/16’’
1Hexagonalwrench5/32’’
1 Wrench (for the nuts on the vehicle's battery
post)
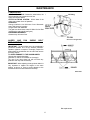
Overallviewofthesnowblower
CONVERSIONTABLE
1’’(po,in) 25.4mm
1’(pi,ft) 0.3m
1psi(lb/in
2
) 6.89kPa
1lb 0.45kg
1lbf 4.4N
1m/h(mi/h) 1.61km
1hp(cv) 0.75kW
GLOSSARY
Quad=V.T.T.,A.T.V.
Véhiculetoutterrain V.T.T.
Allterrainvehicle A.T.V.
UtilityVehicle U.V
VéhiculeUtilitaire V.U.
P.T.O.=P.D.F
Powertake
-
off (P.T.O)
Prisedeforce (P.D.F)

6
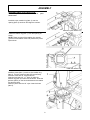
ASSEMBLY
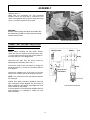
SNOWBLOWERPREPARATION:
Refer to parts breakdown section for parts
identification.
Installthenylonrotationring
Installthechute
Installtherotationring
Installthenylonrotationring(item1)overthe
opening(item2)asshownandalignthenotches.
Installtherotationring(item1)overtheopeningas
shown.
NOTE:Placegroovesoftherotationringontothe
groovesoftherotationmotorandplacenotch(Aand
B)asshown.
Installthechute(item1)overthenylonrotationring
(item2).Turnthechutetomakesureitturnsfreely.
Placethechuteata45°angleasshown.
Insertthehexbolts1/4’’x1’’(item3)underthe
rotationring(item6)ineachholeasshown.Insertthe
spacers(item4)onthehexboltsbetweentherotation
ringandthechute.
Secureinplacewiththe1/4’’nyloninsertlocknuts
(item5).

7
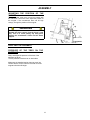
Installtheretainingplate
ASSEMBLY
Insertthe1/4’’x1/2’’hexbolts(item1)intheholes
asshown.
Installtheretainingplate(item2)underthechuteas
shown.
Secureinplacewiththe1/4’’nyloninsertlocknutsas
shown.
Installtheplate.
Seeinstallationinstructionssuppliedwiththe
#700816kit.
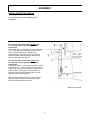
VEHICLEPREPARATION:
INSTALLTHEPUSHFRAME:
Seeinstallationinstructionssuppliedwiththe
#700829kit.

8
Installthesnowblower(item1)tothewheelsupport
(item2).Slidethepin(item3)throughtheassembly
toholdeverythingtogether.Holdthepininplacewith
thehairpin4mm(item4)asshown.
NOTE:Makesurethepinisinthelockedposition.
Installsnowblower
ASSEMBLY
Installthemagnet(item1)onthemagnetsupport
(item2)withamachinescrew#6
-
32x9/16(item3)
andanyloninsertlocknut#6
-
32(item4).
Installthemagnetsupport(item2)onthesnowblower
withacarriagebolt3/8x1
-
1/4(item5),awasher
7/16(item6)andanyloninsertlocknut3/8(item7).
Positiontheassemblyapproximatelylikeinthe
drawing,thefinalpositionwillbedeterminedlaterin
theinstallation.
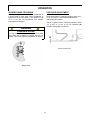
PREPARINGTHESUBFRAME
Installthelimitswitch(item2)ontheswitchsupport
(item1)withtwoscrews(item3)andtwonuts(item
4).
Theninstalltheswitchsupport(item1)onthewheel
support(item8).Securewithtwobolts(item5),two
washers(item6)andtwonuts(item7).

9
ASSEMBLY
INSTALLINGONTHEVEHICLE
Seeinstallationinstructionssuppliedwiththe
#700829kit.
Forvehicleswithawinchthatishigherthan
20’’(510mm)fromtheground,followthese
instructions:
Installpulley(item1)inthetopholeoftheleverwitha
1/2’’x13/4’’hexbolt(item2)andsecureinplace
withthenyloninsertlocknut.Tightenfirmly.
Insertthewinchhook(item3)intherod(item4).
Securethewinchcablebyinsertingthelynchpin
(item5)inthesmallhole(item6).
Forvehicleswithawinchthatislowerthan
20’’(510mm)fromtheground,followthese
instructions:
Installpulley(item1)inthebottomhole(item7)ofthe
leverwitha1/2’’x13/4’’hexbolt(item2)andsecure
inplacewiththenyloninsertlocknut.Tightenfirmly.
Insertthewinchhook(item3)intherod(item4).
Securethewinchcablebyinsertingthelynchpin
(item5)inthesmallhole(item6).
TIP:Threadthewinchhookinfrontofthehitchas
shownandthenthreadthecableoverthepulley.
Donotliftthesnowblowerrightnow.
Installthewinchhook

10
ASSEMBLY
CONTROLBOXINSTALLATION:
Installthecontrolbox
Connectwireassembly(104017)tothepositivepost
onthevehicle’sbattery.Connecttheblackwireon
thevehicle’sframe.
IMPORTANT:Thecontrolboxisequippedwithared
emergencykillswitchincaseyouneedtostopthe
enginequickly.
NOTE:Theemergencykillswitchmustbepulledout
tostarttheaccessory’sengine.
Connectthewireonthebattery
Disconnectthewiresthatareconnectedtothe
controlbox(item3).
Installtheboxsupport(item1)inanappropriate
place.Drillholesifnecessary.Securethebox
supportwiththetwo1/4’’x1/2’’hexbolts(item2)
andflangenuts.
Tightenfirmly.
Installthecontrolboxontheboxsupport.
Threadthewiresthatunitestheaccessoryunderthe
hoodtothefrontofthevehicle.
NOTE: A surplus of wiring is available, if needed,
undertheengine.
Wireassembly
Connectthesnowblower‘swiring.

11
Connectthewireconnectoronthemotorofthechute
deflector(item1)
Make sure the connectors are well connected
together and tie the wire that is connected to the
motorofthedeflectorwithanylontiewrap(item2)as
shown.Cutoffanyexcessofthetiewrap.
Securethewiresasshown
ASSEMBLY
WARNING:
Besuretoleaveenoughwirelengthtobeabletoturn
thechutefreelyandthatnowiringcomesintocontact
withthemotor’smuffler.
1
2
CONNECTINGTHELIMITSWITCHFOR
THEWINCHTOTHERELAYFORTHE
WINCH
NOTE: Before installing the limit switch, identify
which wire (the one used tolift the accessory, item
1)ontherelaythatcomesfromthecontrolswitchfor
thewinchwithahi/lowvoltagetester.
Disconnect the relay from the winch control by
separatingtheconnectors(items1&2.)
Connect the relay for the limit switch by joining the
connectors(items1&3)andtheconnectors(items2
&4)together.
Connect the negative wire of the relay for the limit
switchtothenegativepostoftherelayforthewinch.
NOTE: Theconnectorsonthelimitswitchextension
areaflattype.
Another limit switch extension (#106079) with ball
type connectors is also supplied with the broom in
order to make the limit switch compatible with most
ofthevehiclesonthemarket.
Iftheconnectorsonthevehiclearedifferentthanthe
ones proposed, it is possible to modify the limit
switchextension.
Connectthelimitswitch
Winchcontrol Battery
Relay
Winch
Relayforthe
limitswitch
1 2
3
4
5

12
ASSEMBLY
IMPORTANT: Take time to familiarize yourself with
thelocationoftheswitchesandwiththeirfunctions.
DANGER:Alwaysmakesurethatalltheguardsare
installedbeforestartingthesnowblowerengine.
DANGER: It is the responsibility of the person who
installs the accessory to make sure the engaging
system works well and that the snowblower
disengageseffectivelyat all times. It is imperative to
makethenecessaryadjustmentsifapplicable.
Identificationoftheswitches:
1.Emergencykillswitch.(Pullouttostart).
2.Joysticktomovethechuteandthedeflector.
3.Switchtoactivatetheelectricclutch.
4.Switchforoptionallightkit.
Identifythecontrols.
DANGER:Forthenextmanipulations,makesureto
cleartheareainfrontofthesnowblowerandthe
outflowofthechuteofallpeopleorobjects.
1.Manipulatethefourpositionswitch(item2)and
makesurethechutedeflectorandrotationworks
well.
2.Activatetheelectromagneticclutchswitch(item
3).Makesuretheclutchengagesand
disengages.
3.Engagetheelectromagneticclutch.Trytostart
thesnowblowerengine.Makesuretheengine
doesnotstart.
4.Disengagetheelectromagneticclutch.Trytostart
thesnowblowerengine.Makesuretheengine
starts.
5.Whiletheengineisrunning,activatethekillswitch
(item1).Makesuretheenginestops.Deactivate
thekillswitchbyturningitclockwise.
6.Ifthesnowblowerisequippedwithalight,activate
thelightswitch(item4)makesureitactivatesthe
light.

13
ASSEMBLY
VERIFYINGTHEASSEMBLY
PRESSURE OF THE TIRES ON THE
SUBFRAME
Verifyandadjustthepressureofthetiresofthe
subframeat50psi.
Thetirepressuremustbeevenonbothsides.
Makesuretheinstalledenginedoesnotcomeinto
contactwiththevehicle,ifthatisthecasemovethe
magnettolimittheliftheight.
WARNING
Toavoidinjuries
Operate thewinch controlfromthedriver’sseat
only. This is to avoid putting any body parts
between the snowblower’s frame and the wheel
support.
ADJUSTING THE POSITION OF THE
MAGNET
The snowblower must never come into contact with
thesubframe.Ifthisisthecase,adjustthepositionof
the magnet. If the snowblower does not lift high
enough,changethepositionofthemagnet.

14
OPERATION
WARNING
Read thevehicle'sowner’smanualcarefully. Be
thoroughly familiar with the controls & proper
use of the attachment. Know how to stop the
unit&disengagethecontrolsquickly
.
WARNING
To prevent injuries and for more traction when
usingthesnowblower:
-
Do not drive faster than 3 km/hr (2 m/hr) with
snowblowerontheground.
-
Do not drive faster than 10 km/hr (6 m/hr) with
thesnowblowerinraisedposition.
-
Always disengage the electromagnetic clutch
whenthesnowblowerisintheraisedposition.
-
Donotoperateonaslopegreaterthan10%.
-
Vehicle manufacturer approved tire chains are
required.
-
Ear muffs and safety glasses are
recommended.
SNOWBLOWEROPERATION
1.Makesurethesnowblowerisclearofsnow;
2.Makesuretheaugerandimpelleroperatefreely.
3.Makesuretheelectromagneticclutchis
deactivatedandthekillswitchisdisengaged.
4.Startthesnowblowerengine
5.Beforeactivatingtheelectromagneticclutch,the
snowblowerenginemustrunatmaximumR.P.M.
6.Operatethesnowblowersafely.
IMPORTANT: Use full engine r.p.m. when removing
wet, sticky snow. low r.p.m. power will tend to plug
thechute.
WARNING
Never touch with your hands or feet the
snowblower’s fan, auger or the chute because
this is the most frequent cause of accidents
associatedwithsnowblowers.
DANGER
Never let the snowblower motor run without all
guardsinplace.
LIFTING AND LOWERING THE
SNOWBLOWER
Usethewinchcontrolswitchtoraiseandlowerthe
snowblower.
IMPORTANT:Beforeeachuse,checktomakesurethe
snowblowerframedoesnotcomeintocontactwiththe
wheelsupportwhenitisraised.
WARNING
Topreventaccidents :
-
Always use the snowblower in well lighted
areas.
-
It is essential to install and use a light on the
front of the snowblower for night use or in
shadowyconditions.
WARNING
TOPREVENTINJURIES:
Start the engine, engage and disengage the
clutch to be sure it functions normally. Make
suretheemergencyswitchisworkingperfectly.
Makesureallthecontrolsareworkingwell.
ELECTRICALCONTROLS
See the ’’Installation of the control box’’ section for
the identification of the electrical controls of the
snowblower.
BURNISHINGPROCEDURE
Theburnishingproceduremustbeperformedbefore
thefirstutilisationofthesnowblowerandafterapro-
longedperiodofinactivity.Burnishingtheengaging
systemwillensureproperperformanceandwillhelp
avoiddamages.
1. Makesurethefanandtheaugersarefreeofany
obstruction.Startthemotor.
2. Engageelectricclutch.
3. Disengageelectricclutchandwaitforallmoving
partstostop.
4. Repeatprocedure(steps2&3)10times.
ENGINEOPERATION
Operatetheengineaccordingtotheinstructionsinthe
engine’sowner’smanual.

15
OPERATION
SKIDSHOEADJUSTMENT
Levelpavedsurface:Adjustskidshoestoallow3/16”
to1/4"or5mmto7mmclearance(A)between
cuttingedgeandsurface.
Uneven or gravel surface:Adjust skid shoesto allow
1/2” to 5/8" or 13 mm to 16 mm clearance (A)
betweencuttingedgeandsurface.
Skidshoeadjustment
DANGER
DANGERZONE
It is the snowblower operator’s obligation to make
sure there are no people or objects that can be
throwninthiszonewhenthesnowblowerisrunning.
SNOWBLOWINGTECHNIQUE
Whenremovingsnow,donotusethesnowbloweras
a dozer blade to push snow. Allow snowblower to
ingest snow at its own speed. If the speed of your
A.T.V. is too fast, the snowblower may become
overloadedandplugged.
Dangerzone

16
MAINTENANCE
ENGINEMAINTENANCE
Maintaintheengineaccordingtotheinstructioninthe
engine’sowner’smanual.
SNOWBLOWERMAINTENANCE
Checkmountingboltsatfrequentintervalsforproper
tightnessinordertopreventcostlyrepairs.Makesure
yoursnowblowerisinsafeworkingcondition.
PRESSURE OF THE TIRES ON THE
SUBFRAME
Verifyandadjustthepressureofthetiresofthe
subframeat50psi.
Thetirepressuremustbeevenonbothsides.
WARNING
Beforedoinganysnowblowermaintenance,
assemblingordismounting:
Applyparkingbrakesofthevehicle.
Stopthesnowblowerengineandremovethe
ignitionkey
Disconnect the wire from the spark plug(s) and
keep away from spark plug(s) to prevent
accidentalstarting.
CUTTINGEDGEMAINTENANCE
Verify from time to time the wearing on the cutting
edge to make sure you do not wear out the base of
the snowblower’s chassis. This cutting edge is
reversible. Unscrew the bolts and turn the cutting
edge,
Reinstallwithnewcarriagebolts5/16’’x3/4’’grade5
andnewlocknuts5/16’’.
WARNING
If the snowblower is in the raised position,
alwaysmakesuretoprovideadequateblocking
beforeworkingunderthesnowblower.
SNOWBLOWERPULLEYREPLACEMENT
ORALIGNMENT
Cleanthepartsbeforealigningorreplacingthepulleys.
Apply some "Locktite" 2760 on the key and the set
screws.Tightenfirmly.
WARNING
-
Do not attempt to clear plugged chute, auger or
fan of snow while the snowblower's engine is
running.
-
Disengagesnowblower.
-
Lowersnowblowerontoground.
-
Settheparkingbrake.
-
Stopengine,removetheignitionkey,disconnect
thewirefromsparkplug(s)andkeepawayfrom
sparkplug(s)topreventaccidentalstarting.
-
Makesureallmovingpartshavestopped.
-
Donotusehandtounplug chute,usethe chute
shovelsuppliedwiththesnowblower.
CLEANING A CLOGGED DISCHARGE
CHUTE
Whetheritisthesnowblowerauger,thefanorthe
chutethatclogged,itisessentialtofollowthese
instructionstotheletter.
1. Disengagetheelectromagneticclutch
2. Lowerthesnowblowertothegroundandapply
thevehicle’shandbrake;
3. Stopthesnowblowerengine,removethekeyand
waitforalltherotatingpartstostopturning.
4. Disconnectthewirefromthesparkplug(s)and
keepawayfromsparkplug(s)toprevent
accidentalstarting;
WARNING:Alwaysusethechuteshovelsuppliedwith
thesnowblowerinordertounclogthesnowblower,
neveruseyourfeetorhands.

17
MAINTENANCE
LUBRICATION
SUBFRAME WHEELS
:
Grease the wheel axles, the
forkpivotsaftereverysixteenhoursofuse.
Applyoilatallpivotpoints.
CHUTE ROTATION SYSTEM
:
Oil the base of the
chuteeverysixteenhoursofoperation.
GEARBOX :
Change oil after the 1st100 hours of use.Afterwards,
every2500hoursor6months.
Oiltypeused:SAE980W900
Thegearboxshouldhaveatotalof500mlofoilorfilled
justabovetheoutputshaft(seefigure)
GREASABLEBEARINGS:
Greaseevery16hoursofuse.
Oillevelinthegearbox
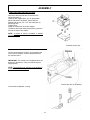
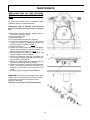
AUGER AND FAN SHEAR BOLT
REPLACEMENT
IMPORTANT: Theshear bolts aretobeconsidereda
preventive measure and not an assured protection.
Operator vigilance is required. Thoroughly inspect the
areaswherethesnowbloweristobeusedandremove
allforeignobjects.
TOAVOIDDAMAGETOTHESNOWBLOWER:
Useonlytheoriginalshearbolts
(#105627forthefanet#106443fortheauger).
The use of any other shear bolt will not insure any
protectionandmayvoidthewarranty.
IMPORTANT:Whenreplacingtheaugershearboltsitis
very important to replace the augers in the same
position as shown in figure to avoid damage to the
snowblowerandtoensuremaximumefficiency.
Shearbolt
Beltreplacement
106443
Grease
fitting Oilfitting
Page is loading ...
Page is loading ...
Page is loading ...
Page is loading ...
Page is loading ...
Page is loading ...
Page is loading ...
Page is loading ...
Page is loading ...
Page is loading ...
Page is loading ...
Page is loading ...
Page is loading ...
Page is loading ...
Page is loading ...
Page is loading ...
Page is loading ...
Page is loading ...
Page is loading ...
Page is loading ...
Page is loading ...
Page is loading ...
Page is loading ...
Page is loading ...
-
 1
1
-
 2
2
-
 3
3
-
 4
4
-
 5
5
-
 6
6
-
 7
7
-
 8
8
-
 9
9
-
 10
10
-
 11
11
-
 12
12
-
 13
13
-
 14
14
-
 15
15
-
 16
16
-
 17
17
-
 18
18
-
 19
19
-
 20
20
-
 21
21
-
 22
22
-
 23
23
-
 24
24
-
 25
25
-
 26
26
-
 27
27
-
 28
28
-
 29
29
-
 30
30
-
 31
31
-
 32
32
-
 33
33
-
 34
34
-
 35
35
-
 36
36
-
 37
37
-
 38
38
-
 39
39
-
 40
40
-
 41
41
-
 42
42
-
 43
43
-
 44
44


Bercomac 700811-22H-EPA User manual
- Category
- Snow throwers
- Type
- User manual
- This manual is also suitable for
Ask a question and I''ll find the answer in the document
Finding information in a document is now easier with AI
Related papers
-
Bercomac 700416 User manual
-
-
-
-
-
-
-
-
-
