Page is loading ...

Instruction Manual
For
Lithium Ion Rechargeable Battery Charger
ConceptionⅠ
ⅠⅠ
Ⅰ
Lithium ion rechargeable battery charger can adjust and control the charging parameters with its
constant current & voltage charging mode. Along with BMS, it can protect the Li-ion batteries under
the following circumstance: Over Voltage (OV), Under Voltage (UV), Over Current (OC), Short Circuit
(SC) and Over Temperature (OT), and/or emergencies.
Before charging, when any cell in the battery pack appears OV, charging will be prohibited
automatically. Recharging can be started unless the failure is solved.
During charging, when any cell in the battery pack appears OV, OC, OT, BMS should give signals,
and the charger will automatically adjust the charge voltage and current to prevent the cells from OV,
OC.
During charging, if the operating termperature is too low, BMS will give signals to warn the users
that they should take actions, and adjust charging methods at low temperature according to the
Instruction Manual for Lithium Power Battery (hereinafter “Li Battery Manual”).
During charging, if any abnormal circumstance occurs, such as too high voltage, BMS short
circuit, too high temperature and so on, BMS will give signals, burn out the main circuit fuse and cut
the power supply to the charger.
Ⅱ
ⅡⅡ
Ⅱ Charging mode, methods and controlling functions
1. Charging mode
Constant current & voltage charging mode
2. Charging methods and controlling functions
1) Constant current charging mode
In the beginning of charging, charge the cells under constant curent at its limit maximum
(Generally, max curent ≤ 0.3CA, CA means the charge and discharge current, C means Capacity, A
means Ampere, 0.3CA means the current is 0.3 times of the capacity). During constant current charging,
the charge current keeps the same, but the charge voltage will gradually increase until it reaches the
limit maximum charge voltage.
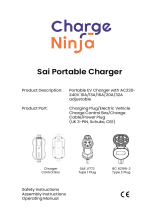
2) Constant voltage charging mode
When the charge voltage reaches the limit maxium charge voltage (according to the Li Battery
Manual ), then it will be under constant voltage charging mode. At this moment, charge current will
decrease as time goes by. When it reaches at 0.015CA, charging stops. You can refer to the following
charging procedure chart, it shows the relation among charge voltage, current and capacity.

2
charging time
charging
completed
charging current
0.3CA
nX4.25V(total)
charge volage
charging
stop
charge capacity
consant current
charge
consant voltage
charge
0.015CA
charge voltage(xn)
charge current
charge capacity
3) Adjust voltage automatically
During charging, especially when it is under constant voltage charging mode, if the charge voltage
of any cell in the battery pack exceeds the limit (Generally, limit charge voltage is 4.3V), the charger
can decrease the charge voltage and current to prevent the cell from OV charging.
4) Prohibit charging automatically
Before charging, if the voltage of any cell in the battery pack is less than 2.5V (or 2.8V), the
charger will cut charging automatically. When it is confirmed that it can be charged again, the charger
will automatically adjust the charge current to 1/3 of that in constant charging mode. Only when the
battery voltage reaches 2.5V (or 2.8V), the charging mode will be nomal. When the charge current
decrease to 0.015CA, charging stops.
5) OT protection
During charging, if the temperature of the battery is higher than 75 , the charger will
automatically decrease the charge current until charging stops.
6) OC, SC protection
During charging, if the charge current is too high or any short circuit occurs, the charger will stop
charging automatically.
Charger operation mⅢ
ⅢⅢ
Ⅲethod and standard
1. Preparation
1) Pay attention to the positive and negative pole of the 12V power-supply, DON’T connect them
in a wrong way.
2) Set the “Power Switch” to “OFF”, and connect AC 380V power-supply, the input is AC 380V
3-phase 4-line system. Connect the yellow green cable with neutral cable, and connect the cable outside
the charger with the earth wire.
3) Set the “Power Switch” (which is only equipped on the medium power charger) on the charger
board to “OFF”; Set the “Charging Switch” to “Adjust”; Set the “Voltage Adjust” button & “Current
Adjust” button clockwise to minimum, then rotate 1/4 circle anti-clockwise.

3
4) Connect the battery pack charging lead with the charger, tighten it clockwise. Pay attention to
the positive and negative pole, DON’T connect them in a wrong way.
2. Start to charge
1) Switch on the AC 380V power-supply, the charger in turn. 8 seconds later, the charger starts to
work.
2) Check the status of the battery pack; If it is abnormal or any failure occurs, deal with the failure
first, then charging is allowed.
3) Under the circumstances that the “Charging Switch” is set to “Adjust”, rotate the “Charge
voltage” button clockwise to set the charge voltage under constant voltage charging mode (the voltage
= N×4.25V, N stands for the quantity of batteries connected in series, 4.25V is the maximum charge
voltage of a single cell. Different battery model and temperature will result in different maximum
charge voltage. Detail technical information please refer to the Li Battery Manual ). During adjustment,
if the green indicator light is on (30 seconds later the green indicator light will be on), press the “UV
Recharge” button, continue to adjust until it reaches to the limit voltage.
4) Set the “Charging Switch” (which is on the charger board) to “Charging”, then charging begins;
Rotate the “Charge current” button to set the charge current under the constant current charging mode
(Generally, the current ≤ 0.3CA).
5) When charging begins, if UV occurs violently in any cell, the UV indicator light will be on and
there is no voltage output, charging is not allowed. Only after the failure is solved, press the “UV
Recharge” button, the charger begins charging slow, which is 1/3 of that under constant current
charging mode. When the voltage of this cell increases to the “UV alarm” voltage, the charging mode
will be nomal again.
6) If the battery quantity decreases, reset and re-adjust the charge voltage under constant charging
mode according to the methods mentioned above.
3. Observation during charging
Since the charging proceeds automatically, users only need to check at times the charger. If any
abnomality or failure occurs, deal with it immediately.
During charging, if you need a pause, you can set “Charging Switch” to “Limit Voltage”. At this
moment, there is no voltage output, the charge capacity will stay the same. If the power is off, the
capacity data display will disappear. And because once the maxium capacity exceeded, it will go back
to “zero” and circle again, so DO memorize the circle times.
4. Charge complete
When the charge voltage reaches the limit voltage under constant charging mode, the charge
current decreases to (generally) 0.015CA, and has a limited time lapse, the charger stops charging
automatically. Cut the power-supply and remove the charging lead from the battery pack.
If you need to stop charging halfway, set the “Charging Switch” to “Adjust” first, then cut the
power-supply and remove the charging lead from the battery pack.
IV Technical Specification of the charger

4
Technical Specification of the charger(1)
Charger
Model
Output Power
Power-Supply
Output Voltage
Output Current
Fuse Fuse Fuse
Input Protection Disconnect Disconnect Disconnect
Input Input Input
Output Output Output
Requirement of
cable section Earth wire Earth wire Earth wire
Dimension
Weight
Technical Specification of the charger(2)
Charger
Model
Output Power
Power-Supply
Output Voltage
Output Current
Fuse Fuse Fuse
Input Protection Disconnect Disconnect Disconnect
Input Input Input
Output Output Output
Requirement of
cable section Earth wire Earth wire Earth wire
Dimension
Weight
Technical Specification of the charger(3)
Charger
Model
Output Power
Power-Supply
Output Voltage
Output Current
Input Protection Fuse Fuse Fuse

5
Disconnect Disconnect Disconnect
Input Input Input
Output Output Output
Requirement of
cable section Earth wire Earth wire Earth wire
Dimension
Weight
Technical Specification of the charger(4)
Charger
Model
Output Power
Power-Supply
Output Voltage
Output Current
Fuse Fuse Fuse
Input Protection Disconnect Disconnect Disconnect
Input Input Input
Output Output Output
Requirement of
cable section Earth wire Earth wire Earth wire
Dimension
Weight
Technical Specification of the charger(5)
Charger
Model
Output Power
Power-Supply
Output Voltage
Output Current
Fuse Fuse Fuse
Input Protection Disconnect Disconnect Disconnect
Input Input Input
Output Output Output
Requirement of
cable section Earth wire Earth wire Earth wire
Dimension
Weight
Technical Specification of the charger(6)

6
Charger
Model
Output Power
Power-Supply
Output Voltage
Output Current
Fuse Fuse Fuse
Input Protection Disconnect Disconnect Disconnect
Input Input Input
Output Output Output
Requirement of
cable section Earth wire Earth wire Earth wire
Dimension
Weight
Technical Specification of the charger(7)
Charger
Model
Output Power
Power-Supply
Output Voltage
Output Current
Fuse Fuse Fuse
Input Protection Disconnect Disconnect Disconnect
Input Input Input
Output Output Output
Requirement of
cable section Earth wire Earth wire Earth wire
Dimension
Weight
Technical Specification of the charger(8)
Charger
Model
Output Power
Power-Supply
Output Voltage
Output Current
Fuse Fuse Fuse
Input Protection Disconnect Disconnect Disconnect

7
Input Input Input
Output Output Output
Requirement of
cable section Earth wire Earth wire Earth wire
Dimension
Weight
Technical Specification of the charger(9)
Charger
Model
Output Power
Power-Supply
Output Voltage
Output Current
Fuse
Input Protection Disconnect
Input
Output
Requirement of
cable section Earth wire
Dimension
Weight
Technical Specification of the charger(10)
Charger
Model
Output Power
Power-Supply
Output Voltage
Output Current
Fuse Fuse Fuse
Input Protection Disconnect Disconnect Disconnect
Input Input Input
Output Output Output
Requirement of
cable section Earth wire Earth wire Earth wire
Dimension
Weight
/