Page is loading ...

Page 1 2000000888 (Rev. B - 08/23)
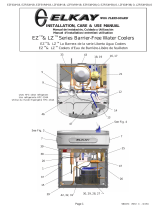
EZFMK, EZFMTLK
INSTALLATION MANUAL
To insure you install this Kit easily and correctly, PLEASE READ THESE
SIMPLE INSTRUCTIONS BEFORE STARTING THE INSTALLATION. CHECK
YOUR INSTALLATION FOR COMPLIANCE WITH PLUMBING, ELECTRICAL, AND
OTHER APPLICABLE CODES.
IMPORTANT
THIS IS AN INDOOR APPLICATION ONLY. ALL SERVICE TO BE
PERFORMED BY AN AUTHORIZED SERVICE PERSON.
IMPORTANT! INSTALLER PLEASE NOTE.
INSTALLER
TOOLS REQUIRED
BUT NOT PROVIDED:
GLOVES
SAFETY GLASSES
5/16 NUT DRIVER (HIGHLY RECOMMENDED)
OR FLAT HEAD SCREWDRIVER
EZ FILTER MAINTENANCE KIT
WARNING: Cancer and Reproductive Harm - www.P65Warnings.ca.gov
ADVERTENCIA: Cáncer y daño reproductivo - www.P65Warnings.ca.gov
AVERTISSEMENT: Cancer et e ets néfastes sur la reproduction - www.P65Warnings.ca.gov
Patent zurn-elkay.com/patents

Page 2
EZFMK, EZFMTLK
2000000888 (Rev. B - 08/23)
EZFMK, EZFMTLK
Rough in
NOTE: APPLIES TO BOTH SINGLE AND BI-LEVEL KITS

Page 3 2000000888 (Rev. B - 08/23)
EZFMK, EZFMTLK
EZFMK, EZFMTLK
Wrappers
EZFMK WRAPPER
EZFMTLK WRAPPER
LEFT SIDE RIGHT SIDE
LEFT SIDE RIGHT SIDE

Page 4
EZFMK, EZFMTLK
2000000888 (Rev. B - 08/23)
1. Installation Procedure - Single level EZ coolers
1. Remove existing lower wrapper on the cooler by
removing the (4) screws using a 5/16 nut driver.
2. If you are replacing the lter, do that now with the
lower wrapper removed. Refer to the Filter
Replacement Instructions in Section 2, Step 3 or
instruction sheet included with the replacement lter. If
not, skip to the next step.
3. Unpack new side access wrapper from the box, peel
o protective wrap and install it using the (4) supplied
screws.
CAUTION Do not operate unit with access
panel removed.
Note: While the side access wrapper is being
secured, verify the upper profile (left, front, and
right side) of the wrapper frame slides up and
under the plastic basin shroud assembly for a
tight fit (as shown).
4. Dispose of old lower wrapper. It can be brought to
a scrap metal recycler. Please check with your local
waste hauler prior to placing scrap metal into a
municipal recycling cart.
Side Access
Wrapper
Screw
Access
Panel
Lower
Wrapper
Screws
Plastic Basin
Shroud
Assembly
Side Access Wrapper

Page 5 2000000888 (Rev. B - 08/23)
EZFMK, EZFMTLK
2. Installation Procedure - Bi-level EZ coolers
1. Remove existing lower wrapper on the cooler by
removing the (4) screws using a 5/16 nut driver.
Remove and retain the trim kit pieces that are attached
to the lower wrapper for re-installation on the new
wrapper.
2. If you are replacing the lter, do that now with the
lower wrapper removed. Refer to the Filter
Replacement Instructions in Section 2, Step 3 or
instruction sheet included with the replacement lter. If
not, skip to the next step.
3. Unpack new side access wrapper from the box, peel
o protective wrap and install it using the (4) supplied
screws. Reapply trim kit to the new wrapper
(if necessary) For Versatile wrapper trim kit instructions
refer to the original installation instruction manual
provided the Bi-Level unit.
CAUTION Do not operate unit with access
panel removed.
Note: While the side access wrapper is being
secured, verify the upper profile (left, front, and
right side) of the wrapper frame slides up and
under the plastic basin shroud assembly for a
tight fit (as shown).
4. Dispose of old lower wrapper. It can be brought to
a scrap metal recycler. Please check with your local
waste hauler prior to placing scrap metal into a
municipal recycling cart.
Bi-Level
Side Access
Wrapper
Screw
Access
Panel
Plastic Basin
Shroud
Assembly
Side Access Wrapper
Lower
Wrapper
Screws

Page 6
EZFMK, EZFMTLK
2000000888 (Rev. B - 08/23)
3. Future Filter Replacement Steps (Side Access)
1. Remove (4) security Torx screws using Torx T25 bit
(included).
2. Remove side access panel and set it aside.
3. Refer to the following lter replacement steps.
CAUTION To avoid danger of an electric
shock hazard, disconnect power
to your unit before replacing the lter.
●Turn o water supply; dispense water to relieve
pressure.
●Turn used lter counterclockwise 1/4 turn to remove
from lter head.
●Remove cap from new lter and use to seal used
lter.
●Write the date of lter installation on the label.
Insert new lter into exiting lter head and turn fully
clockwise so the label with date is clearly visible.
●Turn on water supply and run water for 10 minutes
to purge air and ne carbon particles from lter.
●Reset the lter monitor, if necessary. See the Use
Manual of the dispenser for instructions.
4. Take the side access panel and place it back on
opening of the side access wrapper. Align the access
panel by inserting the alignment pins on the back side
of the panel into the alignment slots above wrapper
frame opening (as shown).
5. Once the access panel is set in place, refasten the
(4) security Torx screws bits starting by hand and rmly
secure each screw in place.
CAUTION Do not operate unit with
access panel removed.
REPAIR SERVICE INFORMATION TOLL FREE NUMBER 1.800.260.6640
PRINTED IN U.S.A.
ELKAY MANUFACTURING COMPANY • 1333 BUTTERFIELD ROAD SUITE 200 DOWNERS GROVE, IL 60515 • 630.574.8484 • www.elkay.com
FOR PARTS, CONTACT YOUR LOCAL DISTRIBUTOR OR CALL 1.800.834.4816
Alignment Pins
Alignment Slots
Torx Screw
Replacement Parts
Part Number Description
2000000859 Wrapper Frame Assembly - Single - EZFMK
Bit - Pinned Torx T-25
Replacement Filter - 3000 Gallons
2000000853
75520C
51300C
Access
Panel
1000000888 Kit - Panel Wrapper Stainless TL
2000001072 Wrapper Frame Assembly - Bi-Level - EZFMTLK
Kit - Replacement Filter Access Door W/Hardware
/