Spirit 16117400 Owner's manual
- Type
- Owner's manual

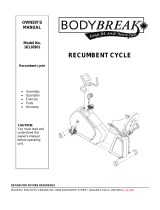
OWNER’S MANUAL
MODEL NO.
16117400
Assembly
Operation
Trouble –Shooting
Parts
Warranty
CAUTION:
You must read and
understand this owner’s
manual before operating
unit.

Manufacture’s One-Year Limited Warranty
TABLE OF CONTENTS
WARRANTY 1 COMPUTER INSTRUCTIONS 14-26
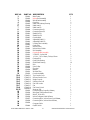
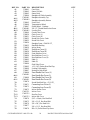
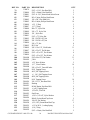
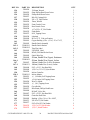
SAFETY PRECAUTIONS 2 PARTS LIST & DIAGRAM 27-31
ASSEMBLY INSTRUCTION 3-12 TRAINING GUIDELINE 32-34
TRANSPORTATION & LUBRICATION 13 STRETCHING 35-36
CUSTOMER SERVICE 1-888-707-1180 1 MAURICE PINCOFFS CANADA©2007

SAFETY PRECAUTIONS
Thank you for purchasing our product. Even though we go to great efforts to ensure the quality of
each product we produce, occasional errors and /or omissions do occur. In any event should you find
this product to have either a defective or a missing part please contact the manufacturer at 1-888-
707-1880 for a replacement.
This product has been designed for home use only. Product liability and guarantee conditions will
not be applicable to products being subjected to professional use or products being used in a gym
center.
This exercise equipment was designed and built for optimum safety. However, certain precautions
apply whenever you operate a piece of exercise equipment. Be sure to read the entire manual before
assembly and operation of this machine. Also, please note the following safety precautions:
1. Read the OWNER’S OPERATING MANUAL and all accompanying literature and
follow it carefully before using your elliptical.
2. If dizziness, nausea, chest pains, or any other abnormal symptoms are experienced
while using this equipment, STOP the workout at once. CONSULT A PHYSICIAN
IMMEDIATELY.
3. Inspect your exercise equipment prior to exercising to ensure that all nuts and bolts
are fully tightened before each use.
4. The elliptical must be regularly checked for signs of wear and damage. Any part found
defective must be replaced with a new part from the manufacturer.
5. Fitness equipment must always be installed on a flat surface, do not place the unit on a loose rug
or uneven surface. It is recommended to use an equipment mat to prevent the unit from moving
while it is being used, which could possibly scratch or damage the surface of your floor.
6. No changes must be made which might compromise the safety of the equipment.
7. It is recommended to have a minimum of 2’ safe clearance around the exercise equipment while
in use.
8. Keep children and pets away from this equipment at all times while exercising.
9. Warm up 5 to 10 minutes before each workout and cool down 5 to 10 minutes afterward. This
allows your heart rate to gradually increase and decrease and will help prevent you from
straining muscles.
10. Never hold your breath while exercising. Breathing should remain at a normal rate in conjunction
with the level of exercise being performed
11. Always wear suitable clothing and footwear while exercising. Do not wear loose
fitting clothing that could become entangled with the moving parts of your elliptical.
12. Care must be taken when lifting or moving the equipment, so as not to injure your back. Always use
proper lifting techniques.
13. User weight should not exceed 350 lbs.
WARNING:
BEFORE BEGINNING ANY EXERCISE PROGRAM CONSULT YOUR PHYSICIAN. THIS
IS ESPECIALLY IMPORTANT FOR INDIVIDUALS OVER THE AGE OF 35 OR PERSONS
WITH PRE-EXISTING HEALTH PROBLEMS. READ ALL INSTRUCTIONS BEFORE
USING ANY FITNESS EQUIPMENT. WE ASSUME NO RESPONSIBILITY FOR
PERSONAL INJURY OR PROPERTY DAMAGE SUSTAINS BY OR THROUGH THE USE
OF THIS PRODUCT.
CUSTOMER SERVICE 1-888-707-1180 2 MAURICE PINCOFFS CANADA©2007

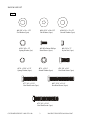
HARDWARE LIST
Step 1
#179. ψ5/16"
Raised Washer (4pcs)
#178. ψ5/16" x 1.5T
Spring Washer (4pcs)
#77. 3/8" x 1-1/2"
Hex Head Screw (2pcs)
#167. 5/16" x 2-1/4"
Hex Head Screw (4 pcs)
#85 M5x12m/m Phillips
Head Screw (4 pcs)
#89. 3/8" x 7T
N
ylon Nu
t
(2 pcs)
#100. 5/16" x 20x 1.5T
Flat Washer (4 pcs)
#76. 3/8" x 3/4"
Hex Head Screw (2pcs)
#128. 3/8" x 2T
Spring Washer (1pc)
#104. 3/8" x 23 x 2T
Curved Washer (2pcs)
#96. 3/8" x 19 x 1.5T
Flat Washer (2pcs)
#75. 3/8" x 2-1/4"
Hex Head Screw (1pcs)
CUSTOMER SERVICE 1-888-707-1180 3 MAURICE PINCOFFS CANADA©2007

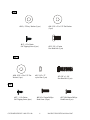
Step 2
#103.ψ17Wavy Washer (2 pcs)
#99. 5/16" x 23 x 1.5T Flat Washer
(2 pcs)
#107.ψ3.5x12m/m
Self Tapping Screw (6 pcs)
#123. 5/6" x 15 m/m
Hex Head Bolt (2 pcs)
Step 3
#100. 5/16" x 20 x 1.5T Flat
Washer (2 pcs)
#91. 5/16" x 7T
N
ylon Nu
t
(2 pcs)
#79. 5/6" x 1-1/4"
Hex Head Bolt (2 pcs)
Step 4
#157 M6x10m/m Phillips
Head Screw (4 pcs)
#82 M5 x 15m/m Phillips
Head Screw (23pcs)
#107. ψ3.5x12m/m
Self Tapping Screw (4pcs)
CUSTOMER SERVICE 1-888-707-1180 4 MAURICE PINCOFFS CANADA©2007

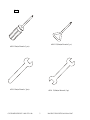
Tools
#106. 13/14m/m Wrench (1 pc)
#109. 12m/m Wrench (1 pcs)
#129. 12m/m Wrench ( 2pcs)
#124. 13/14m/m Wrench ( 1pc)
CUSTOMER SERVICE 1-888-707-1180 5 MAURICE PINCOFFS CANADA©2007

CUSTOMER SERVICE 1-888-707-1180 6 MAURICE PINCOFFS CANADA©2007
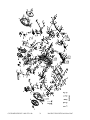
ASSEMBLY INSTRUCTION
This manual is designed to help you easily assemble, adjust and use this machine. Please read this
manual carefully. For the sake of familiarizing yourself with the parts identified in the instruction,
first study the overview drawing.
It will take two people to assemble your unit.
Ensure all bolts are firmly tightened after each step.
■ UNPACKING THE UNIT
1. Using a razor knife (Box Cutter) cut the outside, bottom, edge of box along the dotted Line. Lift
Box over the unit and unpack.
2. Carefully remove all parts from carton and inspect for any damage or missing parts. If damaged
parts are found, or parts are missing, contact your dealer immediately.
3. Locate the hardware package. The hardware is separated into four steps. Remove the tools first.
Remove the hardware for each step as needed to avoid confusion. The numbers in the instructions
that are in parenthesis (#) are the item number from the assembly drawing, for reference.
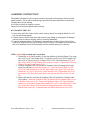
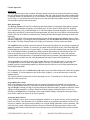
STEP 1: Incline Rail Assembly and Console Mast
1. Connect the Incline Rail Assembly (2) with rear stabilizer of the Main Frame (1) by using
2pcs of 3/8”x1-1/4” Hex Head Screws (77) with 2pcs of 3/8”x19x1.5T Flat Washers (96),
2pcs of 3/8”x7T Nyloc Nut (89) and 4pcs of 5/16”x2-1/4” Hex Head Screws (167) with
4pcs of 5/16”x20x1.5T Flat Washers (100), as shown in figure 1. Tighten with 13/14 mm
Wrench (124) and 14 mm Wrench (129).
2. Guide the Computer Cable (39) and Incline Computer Cable (36) through the Console
Mast Cover (49) and into the Console Mast (12). Secure the Console Mast (12) with
3/8”x2-1/4” Hex Head Bolts(75), 3/8”x2T Split Washer (128), 2pcs of 3/8”x3/4” Hex
Head Bolts (76), 2pcs of 3/8”x23x2T Curved Washers (104). Tighten them with 13/14
mm Wrench (124). Slide the Console Mast Cover (49) onto the Chain Covers (50) and
(51).
3. Remove the cable tie, which ties the Computer Cable (39) and Incline Computer Cable
(36) together. Connect the Computer Cable (39) and the Incline Computer Cable (36) on
to the back of the console (32). Connect the Handpulse Cables (44), Upper Resistance
Handle Wire (146) and the Upper Incline Handle Wire (146-1) to the back of the Console
(32). Secure the Console (32) on the console holding plate with 4pcs of M5x10m/m
Phillips Head Screws (85). Tightening them with Phillips Head Screw Driver (126).

STEP 1
12
44
36
146
39
146-1
2
126
124
125
129
85
85
32
89
100
179
179
178
100
178
167
77
96
1
77
37
96
38
75
128
104
76
49
CUSTOMER SERVICE 1-888-707-1180 7 MAURICE PINCOFFS CANADA©2007

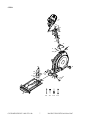
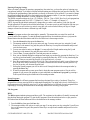
STEP 2: Handlebar Assembling
1. Put one of ψ17 Wave Washer (103) and then Handlebars (L) and (R), (10) and (11), at
each side of Console Mast shaft and secure with 2pcs of 5/16”x15mm Hex Head Bolts
(123) and 2pcs of 5/16”x23x1.5T Flat Washers (99) by using 14mm Wrench (129).
Connect Upper Resistance Handle Wire (146) and Upper Incline Handle Wire (146-1)
with Lower Resistance Handle Wire (147) and Lower Incline Handle wire (147-1), push
the excessive wires into the Console Mast (12) and Plug in the Wire Cap (145) at each
side on the Mast (12).
2. Match the Left Front Handlebar Cover (68) with Left Rear Handlebar Cover (68-1) on
Left Handlebar (10) and secure with 3pcs of ψ3.5x12mm Self Tapping Screws (107) by
using Phillips Head Screw Driver (126). Repeat for Right Handlebar (11).
69
69-1
107
68
107
68-1
103
99
10
123
123
103
11
99
12
147
145
147
145
146
146
CUSTOMER SERVICE 1-888-707-1180 8 MAURICE PINCOFFS CANADA©2007

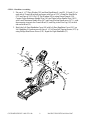
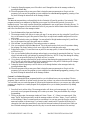
STEP 3: Connecting Arm Assembling
1. Untie the wire on the Fish-eye Bearing, connect the Handlebar (10) with Connecting Arm (8)
and secure with 5/16”x1-1/4” Hex Head Bolt, Fish-eye Sleeve (22) 5/16”x20x1.5T Flat
Washer (100) and 5/16”x7T Nyloc Nut (91) by using 13/14 mm Wrench (124) and 14 mm
Wrench (129). Repeat for the Right Connecting Arm (9) and Right Handlebar (11).
10
100
91
22
100
11
91
22
79
8
9
79
CUSTOMER SERVICE 1-888-707-1180 9 MAURICE PINCOFFS CANADA©2007

CUSTOMER SERVICE 1-888-707-1180 10 MAURICE PINCOFFS CANADA©2007
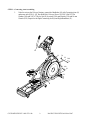
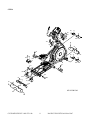
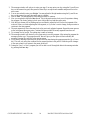
STEP 4:Plastic Parts Assembling
1. Match Connecting Arm Covers (L) and (R), (71) and (72), on Left Connecting Arm (8)
and secure with 2pcs of M5x15mm Phillips Head Screws (82) and
ψ
3.5x12mm Self
Tapping Screw (107) by using Short Phillips Head Screw Driver (125). Repeat for the
other side.
2. Install Sliding Wheel Covers (64) on each side of the Sliding Wheels (47) and secure
with 4pcs of M5x15mm Phillips Head Screws (82) by using Phillips Head Screw Driver
(126).
3. Use 2pcs of M5x15mm Phillips Head Screws (82) to secure left and right Stabilizer
Covers (60) and (61) on the stabilizer in the middle with Phillips Head Screw Driver
(126).
4. Use 2pcs of M5x15mm Phillips Head Screws (82) to secure Front Stabilizer Covers (59)
on the front stabilizer with Phillips Head Screw Driver (126).
5. Use one of M5x15mm Phillips Head Screw (82) to hold Front Console Cover (132) on
the Console Mast then match the Rear Console Cover (133) with Front Console Cover
(132) and secure both covers with two more pieces of M5x15mm Phillips Head Screws
(82) and 2pcs ofψ3.5x12mm Self Tapping Screws (107) by using Phillips Head Screw
Driver (126).
6. Install the Cover Holders B (156), with the hole facing backward, and secure them on the
Incline Rail Assembly (2) with 4pcs of M6x10mm Phillips Head Screws (157) by using
Phillips Head Screw Driver (126). Use 2pcs of M5x15mm Phillips Head Screws to secure
Rear Bar Cover (73-2) on the rail base with Phillips Head Screw Driver (126).
7. Secure Rear Stabilizer Cover (73-3) on the Rear Stabilizer and the Cover Holders B (156)
with 4pcs of M5x15mm Phillips Head Screws (82) by using Phillips Head Screw Driver
(126).
8. Run the incline to position “8” and secure the Rail Bottom Cover (73) with 2pcs of
M5x15mm Phillips Head Screws (82) by using Phillips Head Screw Driver (126).

STEP 4
72
82
107
71
82
73
82
133
107
82
82
59
82
61
132
82
82
60
82
82
82
82
82
73-3
961012PM1348
8
9
107
82
71
82
72
73-2
82
82
64
82
157
156
156
157
64
82
CUSTOMER SERVICE 1-888-707-1180 11 MAURICE PINCOFFS CANADA©2007

CUSTOMER SERVICE 1-888-707-1180 12 MAURICE PINCOFFS CANADA©2007
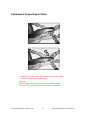
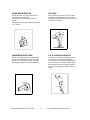
Adjustment of Footpad Support Plates
1
2
1. Holding the footpad, pull the adjustment pin out from the footpad.
2. Raise the footpad to your desired angle.
Suggestion
Different angles of the footpad are for the users different heights.
If the user is tall, we suggest to keep the footpad at a flatter angle.

CUSTOMER SERVICE 1-888-707-1180 13 MAURICE PINCOFFS CANADA©2007
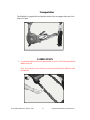
Transportation
The
elliptical
is equipped with two transport wheels which are engaged when rear of the
elliptical is lifted.
LUBRICATION
1. You must lubricate the rails every three months. Pour 2c.c of the lubricant under the
middle of the rail.
Note: If your exercise is not smooth or you hear noise lubricate the middle rail with
the lubricant.

COMPUTER OPERATION INSTRUCTIONS
Fan
Data display
Dot matrix
Message window
Program Buttons
Power up
The Elliptical is supplied with an external power supply. When power is connected to the Elliptical, the
console will automatically power up. If there is no input to the console for 20 minutes the console will go to
stand-by mode. In stand-by mode the console display will turn off. To turn the console on press any key.
When initially powered on the console will perform an internal self test. During this time all the lights will
turn on. When the lights go off the dot matrix display will show a software version (ie: VER 1.0) and the
message window will display an odometer reading. The odometer reading displays how many hours the
elliptical has been used and how many virtual miles the elliptical has gone. The display will look like this:
ODO 123 MI 123 HRS.
The odometer will remain displayed for only a few seconds then the console will go to the start up display.
The dot matrix display will be scrolling through the different profiles of the programs and the message
window will be scrolling the start up message. You may now begin to use the console.
CUSTOMER SERVICE 1-888-707-1180 14 MAURICE PINCOFFS CANADA©2007

Console Operation
Quick Start
This is the quickest way to start a workout. After the console powers up you just press the Start key to begin,
this will initiate the Quick Start mode. In Quick Start the Time will count up from zero and the workload may
be adjusted manually by pressing the Up or Down buttons. The dot matrix display will have only the bottom
row lit at first. As you increase the work load more rows will light indicating a harder workout. The elliptical
will get harder to pedal as the rows increase.
Basic information
The Message Window will initially be displaying Speed information. Each time the Enter button is pressed
the next set of information will appear, five windows in all. In order: Speed in RPM and MPH, Workload
Level (include max level), Watts and Ramp level. If the Enter button is pressed during the Level and Watts
display the Scan light will come on and the message window will show each set of data for four seconds then
switch to the next set of data in a continuous loop. Pressing the Enter button again will bring you back to the
beginning.
The E25 Elliptical has a built in heart rate monitoring system. Simply grasping the hand pulse sensors on the
stationary handle bars, or wearing the heart rate transmitter, will start the Heart Icon blinking (this may take a
few seconds). The Pulse Display Window will display your heart rate, or Pulse, in beats per minute.
The Stop/Reset button actually has several functions. Pressing the Stop/Reset key once during a program will
Pause the program for 5 minutes. If you need to get a drink, answer the phone or any of the many things that
could interrupt your workout, this is a great feature. To resume your workout during Pause just press the Start
key. If the Stop/Reset button is pressed twice during a workout the program will end and the console will
return to the start up screen. If the Stop/Reset key is held down for 3 seconds the console will perform a
complete Reset. During data entry for a program the Stop/Reset key performs a Previous Screen function.
This allows you to go back one step in the programming each time you press the Stop/Reset key.
The Program Keys are used to preview each program. When you first turn the console on you may press
each program key to preview what the program profile looks like. If you decide that you want to try a
program, press the corresponding program key and then press the Enter key to select the program and enter
into the data setting mode.
The program keys also act as a Number Key Pad when you are in the data setting mode. Under each program
key is a number. If you are setting new data, such as Age, weight etc., you can use these keys to enter the
numbers quickly.
The E series consoles include a built-in fan to help keep you cool. To turn the fan on, flip the switch on the
right side of the console case.
Programming the console
Each of the programs can be customized with your personal information and changed to suit your needs.
Some of the information asked for is necessary to ensure the readouts are correct. You will be asked for your
Age and Weight. Entering your Age is necessary during the Heart Rate control programs to ensure the correct
settings are in the program for your Age. Otherwise the work settings could be too high or low for you.
Entering your Weight aides in calculating a more correct Calorie reading. Although we cannot provide an
exact calorie count we do want to be as close as possible.
A message about Calories:
Calorie readings on every piece of exercise equipment, whether it is in a gym or at home, are not accurate and
tend to vary widely. They are meant only as a guide to monitor your progress from workout to workout. The
only way to measure your calorie burn accurately is in a clinical setting connected to a host of machines. This
is because every person is different and burns calories at a different rate. Some good news is that you will
continue to burn calories at about the same rate as during exercise for 20-30 minutes after you have finished
exercising!
CUSTOMER SERVICE 1-888-707-1180 15 MAURICE PINCOFFS CANADA©2007

Entering/Changing Settings
When you enter a program, by pressing a program key, then enter key, you have the option of entering your
own personal settings. If you want to workout without entering new settings then just press the Start key. This
will bypass the programming of data and take you directly to the start of your workout. If you want to change
the personal settings then just follow the instructions in the message window. If you start a program without
changing the settings the default, or saved, settings will be used.
The default computer settings are: Age = 35, Weight = 150 Lbs., Time = 30:00, Max Level, each program has
a different maximum work level: Hill = 7, Fatburn = 5, Cardio = 7, Strength = 8, Interval = 7.
NOTE: Age and Weight default settings will change when you enter a new number. So the last Age and
Weight entered will be saved as the new default settings. If you enter your Age and Weight the first time you
use the Elliptical you will not have to enter it every time you work out unless either your Age or Weight
changes or someone else enters a different Age and Weight.
Manual
The Manual program works as the name implies; manually. This means that you control the work load
yourself and not the computer. To start the Manual program follow the instructions below or just press the
Manual button then the Enter button and follow the directions in the message window.
1. Press the Manual key then press the Enter key.
2. The message window will ask you to enter your Age. You may enter your Age, using the Up and
Down keys or the numeric key pad, then press the Enter key to accept the new number and proceed
on to the next screen.
3. You are now asked to enter your Weight. You may adjust the Weight number using the Up and
Down keys or the numeric key pad, then press enter to continue.
4. Next is Time. You may adjust the Time and press enter to continue.
5. Now you are finished editing the settings and can begin your workout by pressing the Start key. You
can also go back and modify your settings by pressing the Enter key. NOTE: At any time during the
editing of Data you can press the Stop key to go back one level, or screen.
6. Once the program starts you will be at level one. This is the easiest level and it is a good idea to stay
at level one for a while to warm up. If you want to increase the work load at any time press the Up
key; the Down key will decrease the work load.
7. During the Manual program you will be able to scroll through the data in the message window by
pressing the Enter key.
8. When the program ends you may press Start to begin the same program again or Stop to exit the
program or you can save the program you just completed as a custom user program by pressing a
User key and following the instructions in the message window.
Preset Programs
The Elliptical has five different programs that have been designed for a variety of workouts. These five
programs have factory preset profiles for achieving different goals. The initial built-in level of difficulty for
each program is set to a relatively easy level. You may adjust the level of difficulty for each program before
beginning by following the instructions in the message window after selecting your program.
The Programs
HILL
The Hill program simulates going up and down a hill. The resistance in the pedals will steadily increase and
then decrease during the program. To start the Hill program follow the instructions below or just press the
Hill button then the Enter button and follow the directions in the message window.
1. Press the Hill key then press the Enter key.
2. The message window will ask you to enter your Age. You may enter your Age, using the Up and Down
keys or the numeric key pad, then press the Enter key to accept the new number and proceed on to the
next screen.
CUSTOMER SERVICE 1-888-707-1180 16 MAURICE PINCOFFS CANADA©2007

3. You are now asked to enter your Weight. You may adjust the Weight number using the Up and Down
keys or the numeric key pad, then press enter to continue.
4. Next is Time. You may adjust the Time and press enter to continue.
5. Now you are asked to adjust the Max Level. This is the peak exertion level you will experience during
the program, at the top of the hill. The factory setting is level seven. Adjust the level and then press enter.
6. Ramp profile setting. You can select turn on profile to run ramp profile, or turn off and the ramp profile
will be set level 1.
7. Now you are finished editing the settings and can begin your workout by pressing the Start key. You can
also go back and modify your settings by pressing the Enter key. NOTE: At any time during the editing
of Data you can press the Stop key to go back one level, or screen.
8. If you want to increase or decrease the work load at any time during the program press the Up or Down
key. This will only affect the workload for the present position in the profile. When the profile changes
to the next column it will return to the preset work level.
9. During the Hill program you will be able to scroll through the data in the message window by pressing
the Enter key.
10. When the program ends you may press Start to begin the same program again or Stop to exit the
program or you can save the program you just completed as a custom user program by pressing a User
key and following the instructions in the message window.
Fat Burn
The Fat Burn program is designed, as the name implies, to maximize the burning of fat. There are many
schools of thought on the best way to burn fat but most experts agree that a lower exertion level which stays
steady is the best. The absolute best way to burn fat is to keep your heart rate at around 60% to 70% of it’s
maximum potential. This program does not use heart rate but simulates a lower, steady, exertion workout.
To start the Fat Burn program follow the instructions below or just press the Fat Burn button then the Enter
button and follow the directions in the message window.
1. Press the Fat Burn key then press the Enter key.
2. The message window will ask you to enter your Age. You may enter your Age, using the Up and Down
keys or the numeric key pad, then press the Enter key to accept the new number and proceed on to the
next screen.
3. You are now asked to enter your Weight. You may adjust the Weight number using the Up and Down
keys or the numeric key pad, then press enter to continue.
4. Next is Time. You may adjust the Time and press enter to continue.
5. Now you are asked to adjust the Max Level. This is the peak exertion level you will experience during
the program. The factory setting is level five. Adjust the level and then press enter.
6. Ramp profile setting. You can select turn on profile to run ramp profile, or turn off and the ramp profile
will be set level 1.
7. Now you are finished editing the settings and can begin your workout by pressing the Start key. You can
also go back and modify your settings by pressing the Enter key. NOTE: At any time during the editing
of Data you can press the Stop key to go back one level, or screen.
8. If you want to increase or decrease the work load at any time during the program press the Up or Down
key. This will only affect the workload for the present position in the profile. When the profile changes
to the next column it will return to the preset work level.
9. During the Fat Burn program you will be able to scroll through the data in the message window by
pressing the Enter key.
10. When the program ends you may press Start to begin the same program again or Stop to exit the
program or you can save the program you just completed as a custom user program by pressing a User
key and following the instructions in the message window.
CUSTOMER SERVICE 1-888-707-1180 17 MAURICE PINCOFFS CANADA©2007

Cardio
The Cardio program is designed to increase your Cardio vascular function. This is, simply said, exercise for
your heart and lungs. It will build up your heart muscle and increase blood flow and lung capacity. This is
achieved by incorporating a higher level of exertion with slight fluctuations in work. To start the Cardio
program follow the instructions below or just press the Cardio button then the Enter button and follow the
directions in the message window.
1. Press the Cardio key then press the Enter key.
2. The message window will ask you to enter your Age. You may enter your Age, using the Up and Down
keys or the numeric key pad, then press the Enter key to accept the new number and proceed on to the
next screen.
3. You are now asked to enter your Weight. You may adjust the Weight number using the Up and Down
keys or the numeric key pad, then press enter to continue.
4. Next is Time. You may adjust the Time and press enter to continue.
5. Now you are asked to adjust the Max Level. This is the peak exertion level you will experience during
the program. The factory setting is level seven. Adjust the level and then press enter.
6. Ramp profile setting. You can select turn on profile to run ramp profile, or turn off and the ramp profile
will be set level 1.
7. Now you are finished editing the settings and can begin your workout by pressing the Start key. You can
also go back and modify your settings by pressing the Enter key. NOTE: At any time during the editing
of Data you can press the Stop key to go back one level, or screen.
8. If you want to increase or decrease the work load at any time during the program press the Up or Down
key. This will only affect the workload for the present position in the profile. When the profile changes
to the next column it will return to the preset work level.
9. During the Cardio program you will be able to scroll through the data in the message window by
pressing the Enter key.
10. When the program ends you may press Start to begin the same program again or Stop to exit the
program or you can save the program you just completed as a custom user program by pressing a User
key and following the instructions in the message window.
Strength
The Strength program is designed to increase muscular strength in your lower body. This program will
steadily increase in resistance to a high level and then keeps you there. This is designed to strengthen and tone
your legs and gluteus. To start the Strength program follow the instructions below or just press the Strength
button then the Enter button and follow the directions in the message window.
1. Press the Strength key then press the Enter key.
2. The message window will ask you to enter your Age. You may enter your Age, using the Up and Down
keys or the numeric key pad, then press the Enter key to accept the new number and proceed on to the
next screen.
3. You are now asked to enter your Weight. You may adjust the Weight number using the Up and Down
keys or the numeric key pad, then press enter to continue.
4. Next is Time. You may adjust the Time and press enter to continue.
5. Now you are asked to adjust the Max Level. This is the peak exertion level you will experience during
the program. The factory setting is level eight. Adjust the level and then press enter.
6. Ramp profile setting. You can select turn on profile to run ramp profile, or turn off and the ramp profile
will be set level 1.
7. Now you are finished editing the settings and can begin your workout by pressing the Start key. You can
also go back and modify your settings by pressing the Enter key. NOTE: At any time during the editing
of Data you can press the Stop key to go back one level, or screen.
8. If you want to increase or decrease the work load at any time during the program press the Up or Down
key. This will only affect the workload for the present position in the profile. When the profile changes
to the next column it will return to the preset work level.
CUSTOMER SERVICE 1-888-707-1180 18 MAURICE PINCOFFS CANADA©2007

9. During the Strength program you will be able to scroll through the data in the message window by
pressing the Enter key.
10. When the program ends you may press Start to begin the same program again or Stop to exit the
program or you can save the program you just completed as a custom user program by pressing a User
key and following the instructions in the message window.
Interval
The Interval program takes you through high levels of intensity followed by periods of low intensity. This
program increases your endurance by depleting your oxygen level followed by periods of recovery to
replenish oxygen. Your cardio vascular system gets programmed to use oxygen more efficiently this way. To
start the Interval program follow the instructions below or just press the Interval button then the Enter button
and follow the directions in the message window.
1. Press the Interval key then press the Enter key.
2. The message window will ask you to enter your Age. You may enter your Age, using the Up and Down
keys or the numeric key pad, then press the Enter key to accept the new number and proceed on to the
next screen.
3. You are now asked to enter your Weight. You may adjust the Weight number using the Up and Down
keys or the numeric key pad, then press enter to continue.
4. Next is Time. You may adjust the Time and press enter to continue.
5. Now you are asked to adjust the Max Level. This is the peak exertion level you will experience during
the program. The factory setting is level seven. Adjust the level and then press enter.
6. Ramp profile setting. You can select turn on profile to run ramp profile, or turn off then the ramp profile
will be set level 1.
7. Now you are finished editing the settings and can begin your workout by pressing the Start key. You can
also go back and modify your settings by pressing the Enter key. NOTE: At any time during the editing
of Data you can press the Stop key to go back one level, or screen.
8. If you want to increase or decrease the work load at any time during the program press the Up or Down
key. This will only affect the workload for the present position in the profile. When the profile changes
to the next column it will return to the preset work level.
9. During the Interval program you will be able to scroll through the data in the message window by
pressing the Enter key.
10. When the program ends you may press Start to begin the same program again or Stop to exit the
program or you can save the program you just completed as a custom user program by pressing a User
key and following the instructions in the message window.
Custom User Defined Programs
There are two customizable User programs that allow you to build and save your own workout. The two
programs, User 1 and User 2, operate exactly the same way so there is no reason to describe them separately.
You can build your own custom program by following the instructions below or you can save any other preset
program you complete as a custom program. Both programs allow you to further personalize it by adding
your name.
1. Press the User 1 or User 2 key. The message window will show a welcome message. If you had
previously saved a program the message will contain your name. Then press the Enter key to begin
programming.
2. When you press enter, the message window will show “Name – A”, if there is no name saved. If the
name “David” had been previously saved the message window will show “Name – David” and the D
will be blinking. If there is a name saved you can change it or you may press the Stop key to keep the
name and continue to the next step. If you want to enter a name use the Up and/or the Down key to
change the first letter then press Enter to save the first letter and continue to the next letter. When you
have finished entering the name press the Stop key to save the name and continue to the next step.
CUSTOMER SERVICE 1-888-707-1180 19 MAURICE PINCOFFS CANADA©2007
Page is loading ...
Page is loading ...
Page is loading ...
Page is loading ...
Page is loading ...
Page is loading ...
Page is loading ...
Page is loading ...
Page is loading ...
Page is loading ...
Page is loading ...
Page is loading ...
Page is loading ...
Page is loading ...
Page is loading ...
Page is loading ...
Page is loading ...
-
 1
1
-
 2
2
-
 3
3
-
 4
4
-
 5
5
-
 6
6
-
 7
7
-
 8
8
-
 9
9
-
 10
10
-
 11
11
-
 12
12
-
 13
13
-
 14
14
-
 15
15
-
 16
16
-
 17
17
-
 18
18
-
 19
19
-
 20
20
-
 21
21
-
 22
22
-
 23
23
-
 24
24
-
 25
25
-
 26
26
-
 27
27
-
 28
28
-
 29
29
-
 30
30
-
 31
31
-
 32
32
-
 33
33
-
 34
34
-
 35
35
-
 36
36
-
 37
37


Spirit 16117400 Owner's manual
- Type
- Owner's manual
Ask a question and I''ll find the answer in the document
Finding information in a document is now easier with AI
Related papers
-
Spirit XE 195 Owner's manual
-
-
-
-
-
-
-
-
-
Other documents
-
Sole E95 Owner's manual
-
Sears FREE SPIRIT C249 30737 0 Owner's manual
-
 Solo Fitness E95 Owner's manual
-
BH FITNESS S2Xi Owner's manual
-
BLADEZ X450 Owner's manual
-
-
 Body Break 16116901 Owner's manual
-
 Body Break 16116828 Owner's manual
-
 Fuel Fitness SU135-30 UPRIGHT Owner's manual
-
Keys Fitness CARDIO ZONE E-CZ400 User manual


