Page is loading ...

Binks Model 81-382
8 oz. PRESSURE ASSIST
CUP ASSEMBLY
Replaces
Part Sheet
2724R
Part
Sheet
2724R-1
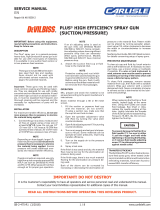
ITEM PART
NO. NO. DESCRIPTION QTY.
1 54-4325 10-32 CONNECTOR.......................................... 2
2 54-3925 GASKET ............................................................ 2
3 81-386 CUP COVER ASSEMBLY
w/1/4 NPS(f) Swivel ...... 1
4 20-6685 O-RING
(Lid Gasket) .......................................... 1
5 54-4475 8 OZ. CUP ONLY .............................................. 1
6 54-4476
STORAGE COVER
(Not Shown)
........................ 1
7 54-4327* CHECK VALVE ASSEMBLY................................ 1
8 ** PICK-UP TUBE ONLY ........................................ 1
*Also available in 3-pack 54-4322.
**
Replacements available in 3-pack only 54-4561.
PARTS LIST
When ordering, please specify Part No.
2
1
2
1
7
3
4
8
5
The Binks 8 Ounce Pressure Assist
Cup Assembly is designed to be used
with Binks Cub SL HVLP Spray
Guns. Molded from high-density
polyethylene (HDPE), your 8 ounce
cup will last for years with proper use.
This part sheet describes use and
cleaning of the cup.
Please call 1-800-992-4657 if any of
the parts below are not included in
this package.

2
Sales and Service Through a Nationwide Network of Industrial Distributors.
Customer Service in USA / 1-800-992-4657
Technical Support in USA / 1-888-992-4657
195 Internationale Blvd.
Glendale Heights, IL 60139 Part Sheet 2724R-1 Printed in USA 3/01, All Rights Reserved
HOW TO USE THE CUP
To attach the 8 ounce cup to your Binks gun, simply
screw the swivel nut onto the threaded fluid inlet of your
Cub SL HVLP Gun.
1. Fill the cup with fluid.
2. Screw the cup cover onto the cup.
3. Screw the swivel nut onto the gun’s fluid inlet.
4. Remove the 10-32 x 1/4 hex head plug from the
underside of the gun barrel. Replace the plug with one
gasket and 10-32 connector supplied with this cup
assembly. Tighten the connector to 10-12" lbs. of
torque. Insert the long tube of the check valve assembly
onto this connector. Place the valve assembly’s short
tube over the connector on the cup cover.
See illustration.
Unused paint may be stored in the cup for brief periods.
Remove the cup from the gun and replace the cup cover
with the storage cover. Binks recommends that you not
store paint or other coating materials in this cup for
more than 30 days.
HOW TO CLEAN THE CUP
HOW TO CLEAN THE CUP
1. Loosen swivel nut and remove the cup assembly.
2. Unscrew cup cover.
3. Rinse cup, cover and siphon tube with solvent.
4. Wipe paint spatter from the outside of the check valve
assembly with a solvent-soaked cloth. Never immerse
the check valve assembly in solvent.
Binks 8 Ounce PRESSURE ASSIST CUP ASSEMBLY
CAUTION
Take care not to overtighten the nut so as to not damage
threads on the inlet. If damage occurs to these parts, the
entire cup assembly may have to be replaced.
!
CAUTION
Never immerse plastic cup parts in solvent for long
periods of time. Plastic cup parts may be damaged by
prolonged exposure to solvent.
!
WARNING
REGARDING SOLVENT SAFETY
Do not use open containers for storage or disposal of
solvents, cloth, or paper used for surface preparation or
cleanup. Solvents contain volatile chemicals that are a
cause of pollution and a health and fire hazard. Always
wear appropriate clothing, including gloves, eye protec-
tion, and a respirator when cleaning the cup.
!
NOTE
You may wish to clean your Binks gun and cup assembly
by triggering solvent through the gun under siphon
pressure into a closed collection system. Refer to the Part
Sheet that came with your gun for detailed instructions.
/