Tuff Shed 6X12 Lean-To Endwall Door with Paint Installation guide
- Type
- Installation guide

WHAT TO EXPECT
1 TYPES OF BUILDING PURCHASES
There are two main types of TUFF SHED building purchases.
Most purchases are new buildings, with components
fabricated at our factories, then transported to the
customer’s site where the building is assembled and
installed.
A small percentage of purchases are buildings that have
been used as displays. In these cases, the fully assembled
building is picked up, then transported to the customer’s
site where it is delivered into place via tilt-bed trailer.
This document outlines what to expect with both types of
purchases.
Items that are specic to display buildings are
notated with this icon.
2 THE PLANNING PROCESS
You’ve decided on the building style, size and design.
Important planning remains for you and for us, including:
• Review your Building Order – This tells us how to fabricate
your building, where to place items and what colors to use
for shingles and paint (if you’ve selected this upgrade).
If you Purchased a Display Building – Display
buildings are sold in “as is” condition, and can include
wear and tear that ranges from minor blemishes
to more signicant issues such as damaged trim,
missing shingles or bent or dented oor joists.
Display purchases are discounted to reect their
condition. We recommend inspecting the building
rst-hand to determine for yourself if the display’s
condition is acceptable.
• Vents - We strongly recommend adding vents to your
building. Along with paint and roong, there may be no
other feature that can help your building perform better.
• Insulation - If you are planning to insulate or nish the
inside of your building, we need to know so that we can
design the building to perform as an insulated structure.
• Building Permit(s)/HOA Requirements – Customers
need to conrm with their HOA and/or municipality for
appropriate building permit and setbacks requirements.
Contact us immediately if you need help.
3 PREPARATION
Your building will be here before you know it.
Now it’s time to prepare the site and yourself for the
upcoming installation:
• Prepare the Job Site – Clean the site of all debris (i.e. old
tree stumps, trash, dog waste, etc) and a pathway to and
from where the delivery vehicle parks.
• Review Access to Delivery Area – For new buildings,
installers will need to carry building components in large
sections to the assembly/installation site. If fence gate
has a top “bar”, please measure the height and width of
the gate opening and provide us with this info prior to
installation.
• Identify and Mark Underground Utilities - When choosing
the location of the building, the customer must take into
account any underground utilities that may be impacted
by the delivery or installation of the building. It is the
customer’s responsibility to have marked all underground
utilities that will aect the delivery/installation site.
Remember that these buildings and delivery trucks are
heavy, and that if your building was purchased with earth
anchors, that these anchors will be driven into the ground
at a typical depth range of up to three feet deep. Many
municipalities will help you locate underground electrical,
natural gas, ber optic, cable TV and sewer. They generally
will not be able to help you mark location of sprinkler
heads, underground irrigation, or septic tanks/drain elds.
For display building purchases, the building will be
delivered into place via a heavy-duty truck and long,
tilt-bed trailer. The truck and trailer MUST have a clear
12’ wide, relatively straight path from paved road,
as trailers are unable to make tight turns, similar to
a boat trailer or camper. It is vitally important that
there are NOT obstacles which cannot be navigated
around, such as: fences, trees, branches, playsets or
underground septic systems.
Don’t Over-Irrigate Prior to Delivery – This is
especially true if your building is a display building,
as our delivery vehicles are heavy, and can leave tire
tracks when driving across grass or other vegetation.
• Scheduling – If we haven’t scheduled already, give us
a call to schedule installation date and time range.

• Pre-fabrication – For new building purchases, we will
begin pre-fabricating your building several days in
advance of the installation. For many installs, we begin
pre-fabrication 5 business days before installation. Our
outbound locations may begin manufacturing 10-12
business days before installation. At this time, we will
begin placing the rough openings for items like doors,
windows and vents.
• Restocking/Rescheduling Fee – If changes or
cancellation occurs within pre-fabrication period, a
restocking/rescheduling or cancellation fee may apply. At
this point, building materials have already been ordered,
inventoried and have potentially been pre-fabricated,
specic to your design.
4 LEVELING YOUR SHED
Check out our video at tushed.com/leveling
It’s important that buildings are constructed on a level
site. Providing a clean and level site is the customer’s
responsibility. However, for a reasonable fee, TUFF SHED can
help create a level building foundation by adding concrete
blocks and wood shims beneath the structure.
TUFF SHED does NOT dig into the ground to level
a building.
If a small amount of leveling is necessary (up to 4”), it will be
provided by TUFF SHED at no charge. If more substantial
leveling is required, the customer must choose between
paying TUFF SHED an additional fee for leveling using
the concrete block and wood shim method, or having the
ground leveled by someone other than TUFF SHED.
TUFF SHED charges for leveling vary by severity of site
condition and building size. See Figure 1.
Blocking up or “shimming” a building is not always the best
solution from an appearance standpoint. Please consider
the appearance and your long term satisfaction in the
building when making the leveling decision. See gure 2.
Buildings used as displays will be leveled by placing
concrete blocks and wooden shims under the
perimeter oor joists only. Display buildings may also
include wood skids under the oor joists, which will
not be removed or leveled upon delivery. See gure 3.
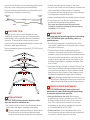
5 HOW TO DETERMINE IF YOUR SITE IS LEVEL
To accomplish this, you will need wood stakes and a string
bubble level and long piece of nylon string, OR a carpenter’s
level and a long, straight 2x4. The string or 2x4 must be
longer than the distance from the high point corner to the
other three corners.
Determine where the building will be placed, then drive a
stake into each of the four corners and determine which of
the corners appear to be the highest and the lowest points.
At the high point stake place the string or 2x4 (short-edge
down) on the ground and fasten it (i.e. tie or clamp) to the
high point stake.
Then position the opposite end of the string or 2x4 at the
low point stake. Using the string or 2x4 and the level, raise
or lower the string or 2x4 at the low point stake until the
level bubble oats exactly centered between the two vertical
lines in the center glass vile. Now measure the distance from
the ground to the bottom edge of the string or 2x4. This is
the distance this rst dimension is out of level. Repeat this
Figure 2 - Close-up of leveling with blocks & shims
Figure 1 - Leveling Fees
Inches
Out of
Level
up to 200 s.f.
>200 s.f.
5” - 8” Out
$
150
Bid Only
9” - 12” Out
$
200 Bid Only
>12” Out Bid Only Bid Only
Sheds that have been leveled using concrete blocks and wood shims
on a variety of surfaces and in a range of leveling severity.
Figure 3 - Display building with wood skids beneath the oor joists

process for the other two corners, measuring again from the
high point corner, writing down your measurements.
Now you can determine the distance your build site is out of
level and select a method to level the site.
6 ROOF TRUSS TYPES
The type of roof truss that comes standard with your
building will vary by the roof type, pitch (steepness) and
building width. This is especially important on buildings
starting at 12’ wide as these trusses include a bottom
chord or collar tie (see diagrams below) that can impact the
amount of usable space overhead.
See truss examples here and contact the TUFF SHED factory
with questions.
7 INSTALLATION DAY
Your TUFF SHED building is about to become a reality.
Important details for installation day:
• Our installers will arrive on the site, unload materials and
components, and begin to assemble your building.
If you purchased a display building, our delivery driver
will arrive on the site, review your desired building
location, and the access route for his truck and trailer.
• Please have someone over the age of 18 at home.
• An out of level site will force our installers to stop work and
collect an additional leveling fee prior to resuming.
• Our installers will need a power source so they can plug in
the compressors that power their tools.
• Inspect the building before the installers leave for the day.
• It may surprise you – but like most home builders, the
weather seldom interferes with installation.
Rain, snow, and sleet will most likely not prevent
installation and will not damage the structure during
installation. Ask for details.
8 HOW WE PAINT
If you have selected the paint upgrade on a new building,
then TUFF SHED will paint your building. Here’s our
painting process:
• Before being transported to the building site, the rst
coat of paint is applied at our factories by roller to exterior
siding and trim surfaces.
• The second coat of paint is applied during on-site
installation. A Seasonal Second Coat Paint Discount is
available in select winter markets during cold/wet months.
If this discount has been applied to your order, then the
installers will not apply the second coat of paint to your
building during installation regardless of weather at the
time of install.
• Customers who have received our Seasonal Second Coat
Paint Discount will be provided with siding and trim paint,
a roller and two small brushes. These customers should
apply the second coat of paint to their building on a dry
day when the temperature is higher than 35 degrees.
Display buildings received the rst and second coats
of paint prior to being put into service as a display. No
additional painting will be included in the purchase.
9 PROPER CARE AND MAINTENANCE
Your TUFF SHED building will need routine care &
maintenance to ensure the building withstands things
like weather and wear & tear over time:
• Keep your Building on the Level – When normal
ground settling occurs, it can aect your TUFF SHED
building, making it dicult to open, close or latch the
door. This is not a warranty issue, but in most cases,
the building can be easily re-leveled by the customer
or for a reasonable fee by TUFF SHED.
• Protect your Floor – Do not add rubber mats or vinyl
ooring inside as they can create a serious moisture and
rot issue. Do not block oor track vent holes.
High Point
Stake
Low Point
Stake
Inches out of level
String Level
String

• Redirect Water – Water is the enemy of most structures.
Take care to redirect water from your building whenever
possible. Rain water runo from other structures and
misdirected irrigation systems can damage your
TUFF SHED building, and is not covered by warranty.
• Re-paint Regularly – Painting is one of the easiest ways
to protect the exterior wood surfaces of a TUFF SHED
building. Your building’s warranty coverage requires
that the building be re-painted every ve years.
We recommend using high quality materials like
Glidden Paints.
•
•
10 APPEARANCE OF MATERIALS
Wondering about the appearance of a certain feature
of your TUFF SHED building?
This information can help you better understand why
some components look the way they do.
Displays
Display buildings are sold in “as is” condition, which
can vary, ranging from minor blemishes like faded
paint to more signicant issues such as damaged
trim, missing shingles, and dented or bent oor joists.
Roong Nails
• It’s not a mistake that nails are poking through the roof
on the inside of your building. This is necessary due to
building codes requiring shingle nails to “pierce the roof
decking material” and does not aect the performance of
the roof.
Galvanized Steel Floor Joists
• Most of our sheds include 16-gauge, hot-dipped
galvanized steel oor joists, which are designed to be
placed directly on any rm, level surface.
• White “Chalking” on the Steel – This appearance is normal
and does not aect the performance of the steel or the
40-year industry-rating on the material.
• Exposed Steel – These joists are designed to withstand
the elements and are exposed after installation.
Some customers prefer to cover the steel with “skirting”
made from siding. While we can add a skirting, we don’t
recommend it, since wood siding material contacting the
ground can wick up moisture into the building.
• Small Rectangular Holes in the Steel – During production,
small vent holes are punched into the steel. These holes
allow for airow beneath the building. Snap-in screen
vents are available as an inexpensive upgrade.
Lumber
• We use dimensional lumber for wall and roof framing that
has been dried, then stored in a controlled environment
(our factories) prior to installation. It is unlikely that this
wood will have a uniform appearance, and may have
blemishes or “waning and knots”. This is normal and will
not aect the structural integrity of the building.
Weathertight or Airtight
• We strive to make the building weathertight. But they are
not airtight. Air and mice can inltrate your building as
they can your home.
Roong nails piercing roof decking
White “chalking” on the steel
Waning and Knotted Lumber
WANING
KNOT
Routine painting is essential to a shed’s overall protection
-
 1
1
-
 2
2
-
 3
3
-
 4
4


Tuff Shed 6X12 Lean-To Endwall Door with Paint Installation guide
- Type
- Installation guide
Ask a question and I''ll find the answer in the document
Finding information in a document is now easier with AI
Related papers


Other documents
-
Duramax Building Products 53661 Specification
-
Grip-Rite STKR36 Installation guide
-
 TUFF TANK 06096 Operating instructions
-
 TUFF TANK 06092 Operating instructions
-
Unbranded PHS-SKIPPER User guide
-
La Crosse 705-109 Installation guide
-
 TUFF TANK 06091 Operating instructions
-
 Lumabase 61308 Operating instructions
-
Handy Home Products 18160-3 User manual
-
STYRO Industries TTTS Installation guide


