Neff B48FT78H0B Installation guide
- Category
- Kitchen & houseware accessories
- Type
- Installation guide


en Safety
2
Table of contents
USER MANUAL
1 Safety....................................................................2
2 Preventing material damage ...............................4
3 Environmental protection and saving en-
ergy .......................................................................5
4 Familiarising yourself with your appliance ........6
5 Accessories..........................................................9
6 Before using for the first time ...........................12
7 Basic operation ..................................................13
8 Steam..................................................................14
9 Time-setting options..........................................18
10 Meat probe..........................................................19
11 Baking and roasting assistant ..........................20
12 Steam programs.................................................21
13 Childproof lock...................................................22
14 Rapid heat-up .....................................................23
15 Sabbath mode ....................................................23
16 Basic settings.....................................................24
17 HomeConnect ...................................................25
18 Cleaning and servicing......................................27
19 Cleaning functions.............................................29
20 Rails ....................................................................31
21 Appliance door...................................................32
22 Troubleshooting.................................................37
23 Disposal..............................................................39
24 Customer Service...............................................39
25 How it works.......................................................40
26 INSTALLATION INSTRUCTIONS .......................50
26.1 General installation instructions....................
...50
1 Safety
Observe the following safety instructions.
1.1 General information
¡ Read this instruction manual carefully.
¡ Keep the instruction manual and the
product information safe for future refer-
ence or for the next owner.
¡ Do not connect the appliance if it has been
damaged in transit.
1.2 Intended use
This appliance is designed only to be built
into kitchen units. Read the special installation
instructions.
Only a licensed professional may connect ap-
pliances without plugs. Damage caused by in-
correct connection is not covered under the
warranty.
Only use this appliance:
¡ To prepare meals and drinks.
¡ In private households and in enclosed
spaces in a domestic environment.
¡ Up to an altitude of max. 2000m above
sea level.
1.3 Restriction on user group
This appliance may be used by children aged
8 or over and by people who have reduced
physical, sensory or mental abilities or inad-
equate experience and/or knowledge,
provided that they are supervised or have
been instructed on how to use the appliance
safely and have understood the resulting
dangers.
Children must not play with the appliance.
Children must not perform cleaning or user
maintenance unless they are at least 15 years
old and are being supervised.
Keep children under the age of 8 years away
from the appliance and power cable.
1.4 Safe use
Always place accessories in the cooking com-
partment the right way round.
→"Accessories", Page9
WARNING‒Risk of fire!
Combustible objects that are left in the cook-
ing compartment may catch fire.
▶
Never store combustible objects in the
cooking compartment.
▶
If smoke is emitted, the appliance must be
switched off or the plug must be pulled out
and the door must be held closed in order
to stifle any flames.

Safety en
3
Loose food remnants, fat and meat juices
may catch fire.
▶
Before using the appliance, remove the
worst of the food residues and remnants
from the cooking compartment, heating ele-
ments and accessories.
Opening the appliance door creates a
draught. Greaseproof paper may come into
contact with the heating element and catch
fire.
▶
Never place greaseproof paper loosely
over accessories when preheating the ap-
pliance and while cooking.
▶
Always cut greaseproof paper to size and
use a plate or baking tin to hold it down.
WARNING‒Risk of burns!
The appliance and its parts that can be
touched become hot during use.
▶
Caution should be exercised here in order
to avoid touching heating elements.
▶
Young children under 8 years of age must
be kept away from the appliance.
Accessories and cookware get very hot.
▶
Always use oven gloves to remove ac-
cessories or cookware from the cooking
compartment.
When the cooking compartment is hot, any al-
coholic vapours inside may catch fire.
▶
Only use small quantities of drinks with a
high alcohol content in food.
▶
Open the appliance door carefully.
WARNING‒Risk of scalding!
The accessible parts of the appliance become
hot during operation.
▶
Never touch these hot parts.
▶
Keep children at a safe distance.
Hot steam may escape when you open the
appliance door. Steam may not be visible, de-
pending on the temperature.
▶
Open the appliance door carefully.
▶
Keep children at a safe distance.
If there is water in the cooking compartment
when it is hot, this may create hot steam.
▶
Never pour water into the cooking compart-
ment when the cooking compartment is
hot.
WARNING‒Risk of injury!
Scratched glass in the appliance door may
develop into a crack.
▶
Do not use any harsh or abrasive cleaners
or sharp metal scrapers to clean the glass
on the oven door, as they may scratch the
surface.
The hinges on the appliance door move when
the door is opened and closed, which could
trap your fingers.
▶
Keep your hands away from the hinges.
Components inside the appliance door may
have sharp edges.
▶
Wear protective gloves.
WARNING‒Risk of electric shock!
Incorrect repairs are dangerous.
▶
Repairs to the appliance should only be
carried out by trained specialist staff.
▶
Only use genuine spare parts when repair-
ing the appliance.
▶
If the power cord of this appliance is dam-
aged, it must be replaced by trained spe-
cialist staff.
If the insulation of the power cord is dam-
aged, this is dangerous.
▶
Never let the power cord come into contact
with hot appliance parts or heat sources.
▶
Never let the power cord come into contact
with sharp points or edges.
▶
Never kink, crush or modify the power
cord.
An ingress of moisture can cause an electric
shock.
▶
Do not use steam- or high-pressure clean-
ers to clean the appliance.
If the appliance or the power cord is dam-
aged, this is dangerous.
▶
Never operate a damaged appliance.
▶
Never operate an appliance with a cracked
or fractured surface.
▶
Never pull on the power cord to unplug the
appliance. Always unplug the appliance at
the mains.
▶
If the appliance or the power cord is dam-
aged, immediately unplug the power cord
or switch off the fuse in the fuse box.
▶
Call customer services. →Page39
WARNING‒Danger: Magnetism!
Permanent magnets are used in the control
panel or in the controls. These may affect
electronic implants, e.g. heart pacemakers or
insulin pumps.
▶
Wearers of electronic implants must stay at
least 10 cm away from the control panel.

en Preventing material damage
4
WARNING‒Risk of suffocation!
Children may put packaging material over
their heads or wrap themselves up in it and
suffocate.
▶
Keep packaging material away from chil-
dren.
▶
Do not let children play with packaging ma-
terial.
Children may breathe in or swallow small
parts, causing them to suffocate.
▶
Keep small parts away from children.
▶
Do not let children play with small parts.
1.5 Steam
Follow these instructions when using a steam
function.
WARNING‒Risk of scalding!
The water in the water tank may become very
hot if you operate the appliance for long peri-
ods.
▶
Always empty the water tank after using the
steam function.
Hot steam is generated in the cooking com-
partment.
▶
Do not reach into the cooking compartment
when using steam.
Hot liquid may spill over the sides of the ac-
cessory when it is removed from the cooking
compartment.
▶
Remove hot accessories with care and al-
ways wear oven gloves.
WARNING‒Risk of fire!
Due to the hot surfaces, vapours from flam-
mable liquids may catch fire in the cooking
compartment (explosion). The appliance door
may spring open. Hot steam and jets of flame
may escape.
▶
Do not pour flammable liquids (e.g. alco-
holic drinks) into the water tank.
▶
Only fill the water tank with water or with
the descaling solution we have recommen-
ded.
1.6 Meat probe
WARNING‒Risk of electric shock!
Using the wrong meat probe could damage
the insulation.
▶
Only use the meat probe for this specific
appliance.
1.7 Cleaning function
WARNING‒Risk of burns!
The outside of the appliance gets very hot
when the cleaning function is in progress.
▶
Never touch the appliance door.
▶
Allow the appliance to cool down.
▶
Keep children at a safe distance.
2 Preventing material damage
2.1 General
ATTENTION!
Objects on the cooking compartment floor at over
50°C will cause heat to build up. The baking and
roasting times will no longer be correct and the enamel
will be damaged.
▶
Do not place any accessories, greaseproof paper or
foil of any kind on the cooking compartment floor.
▶
Only place cookware on the cooking compartment
floor if a temperature above 50°C has been set.
When the cooking compartment is hot, any water in-
side it will create steam. The change in temperature
may cause damage.
▶
Never pour water into the cooking compartment
when it is still hot.
▶
Never place cookware containing water on the
cooking compartment floor.
The prolonged presence of moisture in the cooking
compartment leads to corrosion.
▶
Allow the cooking compartment to dry after use.
▶
Do not keep moist food in the cooking compartment
for a long time with the door closed.
▶
Do not store food in the cooking compartment.
Leaving the appliance to cool down with the door open
will damage the front of neighbouring kitchen units over
time.
▶
Always allow the cooking compartment to cool
down with the door closed after cooking at high
temperatures.
▶
Take care not to trap anything in the appliance
door.
▶
Only leave the cooking compartment to dry with the
door open if a lot of moisture was produced during
operation.
Fruit juice dripping from the baking tray leaves stains
that cannot be removed.
▶
When baking very juicy fruit flans, do not pack too
much on the baking tray.
▶
If possible, use the deeper universal pan.

Environmental protection and saving energy en
5
Using oven cleaner in a hot cooking compartment
damages the enamel.
▶
Never use oven cleaner in the cooking compartment
when it is still warm.
▶
Remove all food remnants from the cooking com-
partment and the appliance door before you next
heat up the appliance.
If the seal is very dirty, the appliance door will no
longer close properly during operation. This may dam-
age the front of adjacent kitchen units.
▶
Keep the seal clean at all times.
▶
Never operate the appliance if the seal is damaged
or missing.
Sitting or placing objects on the appliance door may
damage it.
▶
Do not place or hang objects on the appliance door.
▶
Do not place cookware or accessories on the appli-
ance door.
With certain models, accessories may scratch the door
pane when closing the appliance door.
▶
Always push accessories fully into the cooking com-
partment.
2.2 Steam
Follow these instructions when using the steam func-
tion.
ATTENTION!
Silicone bakeware is not suitable for combined opera-
tion with steam.
▶
Cookware must be heat- and steam-resistant.
Using cookware with rust spots may cause corrosion in
the cooking compartment. Even the smallest spots of
rust can cause corrosion.
▶
Do not use cookware with rust spots.
Dripping liquids make the cooking compartment floor
dirty.
▶
When steaming with a perforated cooking container,
always place the baking tray, the universal pan or
the unperforated cooking container underneath. This
will catch any liquid that drips down.
Hot water in the water tank may damage the steam
system.
▶
Only fill the water tank with cold water.
If there is water on the cooking compartment floor
when operating the appliance at temperatures above
120°C, this will damage the enamel.
▶
Do not use the appliance if there is water on the
cooking compartment floor.
▶
Wipe away any water on the cooking compartment
floor before operation.
If descaling solution comes into contact with the control
panel or other delicate surfaces, it will damage them.
▶
Remove descaling solution immediately with water.
Cleaning the water tank in the dishwasher will damage
it.
▶
Do not clean the water tank in the dishwasher.
▶
Clean the water tank with a soft cloth and standard
washing-up liquid.
3 Environmental protection and saving energy
3.1 Disposing of packaging
The packaging materials are environmentally compat-
ible and can be recycled.
▶
Sort the individual components by type and dispose
of them separately.
3.2 Saving energy
If you follow these instructions, your appliance will use
less power.
Only preheat the appliance if the recipe or the recom-
mended settings tell you to do so.
¡
Not preheating the appliance can reduce the en-
ergy used by up to 20%.
Use dark-coloured, black-coated or enamelled baking
tins.
¡
These types of baking tin absorb the heat particu-
larly well.
Open the appliance door as little as possible during
operation.
¡
This will maintain the temperature in the cooking
compartment and eliminate the need for the appli-
ance to reheat.
When baking multiple dishes, do so in succession or
in parallel.
¡
The cooking compartment is heated after baking
the first dish. This reduces the baking time for the
second cake.
If the cooking time is relatively long, you can switch
the appliance off 10minutes before the cooking time
ends.
¡
There will be enough residual heat to finish cooking
the dish.
Remove any accessories that are not being used from
the cooking compartment.
¡
Accessories that are not being used do not need to
be heated.
Allow frozen food to defrost before cooking.
¡
This will save the energy that would otherwise be
required to defrost it.

en Familiarising yourself with your appliance
6
4 Familiarising yourself with your appliance
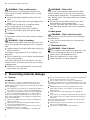
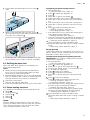
4.1 Control panel
You can use the control panel to configure all functions of your appliance and to obtain information about the operat-
ing status.
1
2
1
Display
2
Buttons
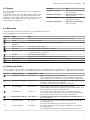
4.2 Buttons
The buttons are touch-sensitive areas. To select a function, press the corresponding button.
Symbol Name Use
On/off Switch the appliance on or off
Steam assistance Switch on steam assistance
Time-setting options/
childproof lock
¡ Set the "timer", "cooking time" or "Ready at" time for delayed starts
¡ Activate or deactivate the "childproof lock"
Main menu Select operating modes and settings
Rapid heat-up ¡ Activate or deactivate the "Rapid heat-up" function
¡ Activate or deactivate the "PowerBoost" function
Information ¡ View additional information
¡ View the current temperature
Open control panel Fill or empty the water tank
Start/stop Start or pause the appliance

Familiarising yourself with your appliance en
7
4.3 Display
You can configure all the functions on your appliance
via the display.
To adjust a setting, touch the appropriate place on the
display with your finger. The settings area will then be
displayed more brightly. Swipe left or right over this set-
tings area on the display with your finger until the re-
quired setting is magnified.
Direction Use
Navigate to the left Swipe right on the display
with your finger
Navigate to the right Swipe left on the display
with your finger
Navigate upwards Swipe down on the dis-
play with your finger
Navigate downwards Swipe up on the display
with your finger
4.4 Main menu
The main menu provides an overview of your appliance's functions.
Press the button to open the main menu.
Function Name Use
Heating functions Select the required heating function and temperature for your food
Steam Cooking with steam
Baking and roasting
assistant
Recommended settings for baking and roasting
Steam programs Cooking food with steam
MyProfile Individually adjust the appliance settings
HomeConnect Connect the oven to a mobile end device and remotely control it.
→"HomeConnect ", Page25
Descale Descale the steam system
Dry Dry the cooking compartment after cooking with steam
Floor cleaning aid Clean less stubborn dirt from the cooking compartment floor
EcoClean Clean the cooking compartment
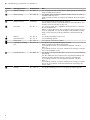
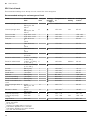
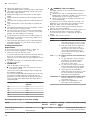
4.5 Heating functions
Here you will find an overview of the heating functions. You will find recommendations on using the heating functions.
For temperatures above 275°C, the appliance reduces the temperature to approx. 275°C after approx. 40minutes.
Symbol Heating function Temperature Use
CircoTherm hot air 40-200°C Bake or roast on one or more levels.
The fan distributes the heat from the ring-shaped heating ele-
ment in the back wall evenly around the cooking compartment.
Top/bottom heating 50-275°C Traditionally bake or roast on one level. This heating function
is ideal for cakes with moist toppings.
The heat is emitted evenly from above and below.
Circo-roasting 50-250°C Roast poultry, whole fish or large pieces of meat.
The grill element and the fan switch on and off alternately. The
fan circulates the hot air around the food.
Pizza setting 50-275°C Cook pizza or food that requires a lot of heat from below.
The bottom heating element and the ring-shaped heating ele-
ment in the back wall heat the cooking compartment.
Bread-baking setting 180-240°C For baking bread, bread rolls and baked goods that require
high temperatures.
Full-surface grill 50-290°C For grilling thin items such as steaks, sausages or bread and
for browning food.
The entire area below the grill element becomes hot.
Centre-area grill 50-290°C For grilling small amounts of steaks, sausages or bread and
for browning food.
The central area underneath the grill element becomes hot.

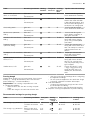
en Familiarising yourself with your appliance
8
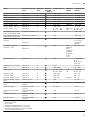
Symbol Heating function Temperature Use
Bottom heating 50-250°C For cooking in a bain marie and for baking food for extra time.
Heat is emitted from below.
Slow cooking 70-120°C For gentle, slow cooking of seared, tender pieces of meat in
ovenware without a lid.
Heat is emitted evenly from above and below at a low temper-
ature.
Dough proving 2settings For proving dough and culturing yoghurt.
Dough will prove more quickly than at room temperature. The
surface of the dough will not dry out.
Sous-vide 50-95°C For cooking meat, fish, vegetables and desserts in a vacuum
at low temperatures.
Before cooking the food, use a chamber vacuum-packing ma-
chine to heat-seal it in special air-tight, heat-resistant cooking
bags. The protective envelope retains the nutrients and fla-
vours.
Defrost 30-60°C For gently defrosting frozen food.
Preheat dishes 30-70°C For preheating dishes.
Keep warm 60-100°C For keeping cooked food warm.
Top/bottom heating
eco
50-275°C For gently cooking selected types of food.
Heat is emitted from above and below.
This heating function is most effective between 150 and
250°C.
This heating function is used to measure the energy consump-
tion in the standard mode.
CircoTherm eco 40-200°C For gently cooking selected types of food on one level without
preheating.
The fan distributes the heat from the ring-shaped heating ele-
ment in the back wall around the cooking compartment.
This heating function is most effective between 125 and
200°C.
This heating function is used to measure the energy consump-
tion in air recirculation mode and determine the energy effi-
ciency class.
Reheat 80-180°C For gently reheating food or for crisping up baked goods.

Accessories en
9
4.6 Cooking compartment
The functions in the cooking compartment make your
appliance easier to use.
Shelf supports
The rails in the cooking compartment enable you to
place accessories at different heights.
→"Accessories", Page9
Your appliance has four shelf positions. The shelf posi-
tions are numbered from bottom to top.
You can remove the rails, e.g. for cleaning.
→"Rails", Page31
Self-cleaning surfaces
The self-cleaning surfaces in the cooking compartment
are coated with a porous, matt ceramic layer and have
a rough surface. When the appliance is in operation,
the self-cleaning surfaces absorb splashes from roast-
ing or grilling and break them down.
The following surfaces are self-cleaning:
¡ Back wall
¡ Ceiling
¡ Side walls
Use the cleaning function regularly to help retain the
cleaning ability of the self-cleaning surfaces and pre-
vent damage.
→"EcoClean cleaning function", Page29
Lighting
One or more oven lights illuminate the cooking com-
partment.
When you open the appliance door, the light in the
cooking compartment switches on. If the appliance
door remains open for longer than 15minutes, the light
switches off again.
For most operating modes, the lighting is switched on
during operation. The lighting switches off again when
the operation ends.
Cooling fan
The cooling fan switches on and off depending on the
appliance's temperature. The hot air escapes above
the door.
ATTENTION!
Do not cover the ventilation slot above the appliance
door. The appliance overheats.
▶
Ensure that the ventilation slots are unobstructed.
To ensure that the appliance cools down more quickly
after operation, the cooling fan continues to run for a
certain period afterwards.
Appliance door
If you open the appliance door during operation, the
operation stops. When you close the appliance door,
the operation continues automatically.
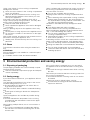
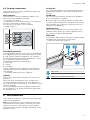
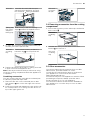
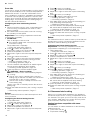
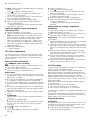
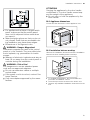
Water tank
You need the water tank for the types of steam heating.
The water tank is behind the control panel.
→"Filling the water tank", Page14
1 2
3
1
Tank cover
2
Opening for filling and emptying
3
Handle for removing and inserting
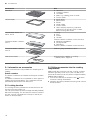
5 Accessories
Use original accessories. These have been made espe-
cially for your appliance.
Note:Accessories may become deformed if they get
hot. Deformation has no effect on function. As the ac-
cessory cools down, it will regain its original shape.
The accessories supplied may differ depending on the
appliance model.

en Accessories
10
Accessories Use
Wire rack ¡ Cake tins
¡ Ovenproof dishes
¡ Cookware
¡ Meat, e.g. roasting joints or steak
¡ Frozen meals
Universal pan ¡ Moist cakes
¡ Baked items
¡ Bread
¡ Large roasts
¡ Frozen meals
¡ Catch dripping liquids, e.g. fat when
grilling food on the wire rack or water
when cooking with steam.
Unperforated steam con-
tainer, size S
Cooking:
¡ Rice
¡ Pulses
¡ Cereals
Place the steam container on the wire rack.
Perforated steam container,
size S
¡ Steaming vegetables.
¡ Juicing berries.
¡ Defrosting.
Place the steam container on the wire rack.
Perforated steam container,
size XL
Steaming large quantities of food.
Meat thermometer High-precision roasting or cooking.
→"Meat probe", Page19
5.1 Information on accessories
Some accessories are only suitable for certain types of
heating.
Steam container
The steam containers are suitable for all types of steam
heating.
The steam containers are not suitable for other types of
heating at high temperatures. The containers become
permanently discoloured and deformed.
5.2 Locking function
The locking function prevents the accessories from tilt-
ing when they are pulled out.
You can pull out the accessories approximately halfway
without them tipping. The accessories must be inserted
into the cooking compartment correctly for the tilt pro-
tection to work properly.
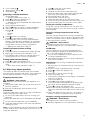
5.3 Sliding accessories into the cooking
compartment
Always slide the accessory into the cooking compart-
ment the right way round. This is the only way to en-
sure that accessories can be pulled out approximately
halfway without tipping.
1.
Turn the accessories so that the notch is at the
rear and is facing downwards.
2.
Insert the accessory between the two guide rods for
a shelf position.

Accessories en
11
Wire rack Insert the wire rack with the open
side facing the appliance door and
the curved lip facing downwards.
Baking tray
E.g. univer-
sal pan or
baking tray
Slide the tray in with the sloping
edge towards the appliance door.
3.
To place the accessory at shelf positions with pull-
out rails, pull out the pull-out rails.
Wire rack
or baking
tray
Position the accessory so that it is
below the lug on the pull-out rail.
4.
Push the accessory all the way in, making sure that
it does not touch the appliance door.
Note:Take any accessories that you will not be using
out of the cooking compartment while the appliance is
in operation.
Combining accessories
You can combine the wire rack with the universal pan
to catch any liquid that drips down.
1.
Place the wire rack on the universal pan so that
both spacers are on the rear edge of the univer-
sal pan.
2.
Insert the universal pan between the two guide rods
for a shelf position. In so doing, the wire rack is on
top of the upper guide rod.
Wire rack
on univer-
sal pan
5.4 Removing accessories from the cooking
compartment
1.
Pull out the accessory on the telescopic shelf as far
as the notch .
Wire rack
or baking
tray
2.
Hold the accessory on both sides in the area
marked and remove it.
Wire rack
or baking
tray
5.5 Other accessories
You can purchase other accessories from our after-
sales service, specialist retailers or online.
You will find a comprehensive range of products for
your appliance in our brochures and online:
www.neff-international.com
Accessories vary from one appliance to another. When
purchasing accessories, always quote the exact
product number (E no.) of your appliance.
You can find out which accessories are available for
your appliance in our online shop or from our after-
sales service.

en Before using for the first time
12
6 Before using for the first time
Implement the settings for the initial configuration. Calibrate the appliance. Clean the appliance and accessories.
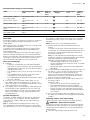
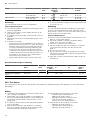
6.1 Before using for the first time
Before using the appliance for the first time, ask your
water supplier about the hardness of your tap water. To
ensure that the appliance can reliably remind you to
descale it when required, you must set your water hard-
ness range correctly.
ATTENTION!
If the wrong water hardness has been set, the appli-
ance cannot remind you to descale it at the right time.
▶
Set the water hardness correctly.
Using unsuitable liquids may damage the appliance.
▶
Do not use distilled water, highly chlorinated tap wa-
ter (>40 mg/l) or other liquids.
▶
Only use cold, fresh tap water, softened water or
non-carbonated mineral water.
Malfunctions may occur when using filtered or deminer-
alised water. The appliance may request that you top
up the water tank even though it may be full, or opera-
tion with steam is cancelled after approx. twominutes.
▶
If required, mix filtered or demineralised water with
the bottled non-carbonated mineral water with a ra-
tio of onetoone.
Tip:If you use mineral water, set the water hardness
range to "very hard". If you use mineral water, you must
only use non-carbonated mineral water.
Tip:If your tap water is very hard, we recommend that
you use softened water. If you use only softened water,
you can set your appliance to the "softened" water
hardness range.
Setting Water hardness in
mmol/l
German hardness in
°dH
French hardness °fH
0 (softened)
1
- - -
1 (soft) Up to 1.5 Up to 8.4 Up to 15
2 (moderately hard) 1.5-2.5 8.4-14 15-25
3 (hard) 2.5-3.8 14-21.3 25-38
4 (very hard)
2
Above 3.8 Above 21.3 Above 38
1
Only set when solely using softened water if your water is very hard.
2
Also set for mineral water. Only use non-carbonated mineral water.
6.2 Initial use
When the appliance is connected to the power supply
for the first time or following a lengthy power failure, the
settings that you will need to configure before you can
use it will appear.
Notes
¡ You can change these settings at any time by going
to the basic settings.
→"Basic settings", Page24
¡ You can also use HomeConnect to configure the
settings. If your appliance is connected, follow the
instructions in the app.
Setting the language
1.
Connect the appliance to the power supply.
a The first setting will appear after a few seconds.
2.
Press the bottom row.
3.
Swipe left or right to select the required language.
4.
Press the top row.
Setting the time
1.
Press "Time".
2.
Press the bottom row.
3.
Swipe left or right to select the correct hour.
4.
Press "Minutes".
5.
Swipe left or right to select the correct number of
minutes.
6.
Use the button to save your settings.
Setting the date
1.
Press "Date".
2.
Press the bottom row.
3.
Swipe left or right to select the correct day.
4.
Press "Month".
5.
Swipe left or right to select the correct month.
6.
Press "Year".
7.
Swipe left or right to select the correct year.
8.
Use the button to save your settings.
Setting the water hardness
1.
Press "Water hardness".
2.
Swipe left or right to select the appropriate water
hardness.
→"Before using for the first time", Page12
3.
Use the button to finalise the initial configuration
process.
4.
Open and close the appliance door once.
a The appliance will perform a self-test, after which it
will be ready to use.
a Initial configuration is now complete.

Basic operation en
13
6.3 Calibrating and cleaning the appliance
You will need to calibrate the appliance and clean the
cooking compartment and accessories before using it
to cook food for the first time.
Note:The boiling point of water depends on the air
pressure. During the calibration process, the appliance
makes adjustments to adapt it to the pressure condi-
tions in the location where it is installed.
Requirement:The cooking compartment must have
cooled down completely.
1.
Remove the product information, accessories and
any leftover packaging (e.g. polystyrene pellets)
from the cooking compartment.
2.
Wipe the smooth surfaces in the cooking compart-
ment with a soft, damp cloth.
3.
Press to switch the appliance on.
→"Switching on the appliance", Page13
4.
Fill the water tank.
→"Filling the water tank", Page14
5.
Set the required type of heating, temperature and
cooking time for the calibration process and press
to start.
→"Steam", Page15
Calibration
Type of heating Steam
Temperature 100 °C
Duration 30minutes
Tip:Do not open the appliance door while calibra-
tion is in progress. Calibration will otherwise be in-
terrupted.
a Calibration starts. This generates a lot of steam.
6.
ATTENTION!
If there is water on the cooking compartment floor
when operating the appliance at temperatures
above 120°C, this will damage the enamel.
▶
Do not use the appliance if there is water on the
cooking compartment floor.
▶
Wipe away any water on the cooking compart-
ment floor before operation.
Allow the appliance to cool down and then wipe
away the water from the cooking compartment floor.
7.
Set the required type of heating and temperature for
the heat-up process and press to start.
→"Setting the type of heating and temperature",
Page13
Heating up
Type of heating CircoTherm hot air
Temperature Maximum
Duration 30minutes
8.
Ventilate the kitchen while the appliance is heating.
9.
Press to switch off the appliance after
30minutes.
→"Switching off the appliance", Page13
10.
Allow the appliance to cool down.
11.
Clean the smooth surfaces with soapy water and a
dish cloth.
12.
Empty the water tank and dry the cooking compart-
ment.
→"After every steam operation", Page17
13.
Thoroughly clean any accessories you used with
soapy water and a dish cloth.
Note:The appliance retains the calibration settings,
even in the event of a power cut or disconnection from
the mains.
Tip:To ensure that the calibration settings are updated
to accommodate the conditions at the new location
when you move house, restore the appliance's factory
settings in the basic settings. Then repeat the calibra-
tion procedure.
→"Basic settings", Page24
7 Basic operation
7.1 Switching on the appliance
▶
Press to switch the appliance on.
Notes
¡ In the basic settings, you can specify whether the
heating functions or the main menu should appear
when you switch on the appliance.
→"Basic settings", Page24
¡ If you do not perform any actions on the appliance
for an extended period, it will automatically switch it-
self off.
7.2 Switching off the appliance
▶
Press to switch the appliance off.
Notes
¡ The residual heat indicator will appear on the dis-
play while the cooking compartment is still hot.
→"Residual heat indicator", Page13
¡ The cooling fan will continue to run until the cooking
compartment has cooled down.
→"Cooling fan", Page9
7.3 Residual heat indicator
After you have switched off the appliance, the residual
heat indicator will appear on the display.
Display Temperature
Residual heat high Over 120°C
Residual heat low Between 60 and 120°C
7.4 Setting the type of heating and
temperature
1.
Press to switch the appliance on.
a The heating functions will then be displayed.

en Steam
14
2.
Swipe left or right until the required heating function
appears in the middle.
3.
Press the temperature.
4.
Swipe left or right until the required temperature ap-
pears in the middle.
5.
Press to start.
a The cooking time will appear on the display.
a The heat-up indicator bar visualises the rising tem-
perature.
6.
When the food is ready, press to switch the appli-
ance off.
7.5 Changing the temperature
You can also change the temperature once you have
started the appliance.
1.
Press the temperature.
2.
Swipe left or right until the required temperature ap-
pears in the middle.
a The temperature will now be changed.
7.6 Changing the type of heating
If you switch to a different heating function, the appli-
ance will reset all the settings.
1.
Press to pause operation.
2.
Press the heating function.
3.
Swipe left or right until the required heating function
appears in the middle.
4.
Set the temperature and start the appliance.
7.7 Pausing operation
1.
Press .
2.
Press again to resume operation.
7.8 Cancelling operation
Note:Some functions, e.g. cleaning functions, cannot
be cancelled.
▶
Press and hold the button until the function that is
currently in progress is cancelled.
a Operation will stop and all the settings will be reset.
a The cooling fan will continue to run until the cooking
compartment has cooled down.
7.9 Viewing the current temperature
You can view the current temperature while the appli-
ance is heating up.
▶
Press .
a The temperature will be displayed for a few
seconds.
7.10 Displaying information
Requirement:The button must be lit.
▶
Press .
a The information will be displayed for a few seconds.
8 Steam
Food can be cooked particularly gently using steam.
You can use the special types of steam heating, or use
steam assistance with certain types of heating.
WARNING‒Risk of scalding!
Hot steam may escape when you open the appliance
door. Steam may not be visible, depending on the tem-
perature.
▶
Open the appliance door carefully.
▶
Keep children at a safe distance.
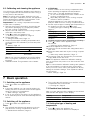
8.1 Filling the water tank
WARNING‒Risk of fire!
Due to the hot surfaces, vapours from flammable li-
quids may catch fire in the cooking compartment (ex-
plosion). The appliance door may spring open. Hot
steam and jets of flame may escape.
▶
Do not pour flammable liquids (e.g. alcoholic drinks)
into the water tank.
▶
Only fill the water tank with water or with the descal-
ing solution we have recommended.
WARNING‒Risk of burns!
The water tank may heat up while the appliance is in
operation.
▶
Wait until the water tank has cooled down from the
previous operation.
▶
Remove the water tank from the tank recess.
Requirement:The water hardness must be set cor-
rectly.
→"Before using for the first time", Page12
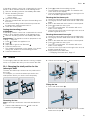
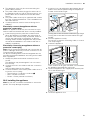
1.
Press .
a The control panel will pop out automatically.
2.
Pull the control panel towards you with both hands
and then push it upwards until it clicks into place .
3.
Lift the water tank and remove it from the water tank
recess .
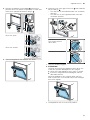
4.
Press down on the water tank lid along the seal to
prevent water from leaking out of the water tank.

Steam en
15
5.
Fill the water tank with water up to the "max"
mark.
6.
Slide the full water tank back into the recess .
When doing so, make sure that the water tank clicks
into place in the retainers .
7.
Slowly slide the control panel downwards and then
push it away from you until it is closed completely.
8.2 Refilling the water tank
When "Fill water tank" appears on the display, you
must refill the water tank.
Notes
¡ Steam, Dough proving, Defrost and Reheat func-
tions: If you do not refill the water tank, the appli-
ance will stop. Refill the water tank.
¡ Steam-assisted heating: If you do not refill the water
tank, the appliance will continue to heat but without
injecting steam into the cooking compartment.
1.
Open the control panel.
2.
Remove and refill the water tank.
3.
Insert the full water tank and close the control panel.
8.3 Steam heating functions
Your appliance has several steam heating functions:
¡ Steam
¡ Dough proving
¡ Sous-vide
¡ Defrost
¡ Reheat
Steam
With the "Steam" heating function, the food is envel-
oped by hot steam, which helps to retain the nutrients.
This cooking method also helps to retain the shape,
colour and typical flavour of the food.
Configuring the Steam heating function
1.
Fill the water tank.
→"Filling the water tank", Page14
2.
Press to switch the appliance on.
3.
Press .
4.
Swipe left or right to set "Steam" .
5.
Press the bottom row to select the temperature.
6.
Swipe left or right to select the required temperat-
ure.
7.
Press the bottom row to select the cooking time.
8.
Swipe left or right to select the required cooking
time.
9.
Press to start the steaming process.
→"Pausing operation", Page14
→"Cancelling operation", Page14
a If the water tank runs dry during the steaming pro-
cess, steaming will be paused.
→"Refilling the water tank", Page15
a Once the cooking time has elapsed, an audible sig-
nal will sound and the appliance will stop heating.
→"Switching off the appliance", Page13
10.
Press any button to end the audible signal.
11.
Empty the water tank and dry the cooking compart-
ment.
→"After every steam operation", Page17
Dough proving
Yeast dough will prove considerably more quickly us-
ing the "Dough proving" heating function than at room
temperature, and it will not dry out.
Configuring the Dough proving heating function
Requirement:The cooking compartment must have
cooled down completely.
1.
Fill the water tank.
→"Filling the water tank", Page14
2.
Press to switch the appliance on.
3.
Swipe left or right to set "Dough proving" .
4.
To select the setting, press "1" in the bottom row.
5.
To set setting 2, swipe left.
6.
Press to save your settings.
7.
Press to select the proving time.
8.
Swipe left or right to select the required proving
time.
9.
Press to save your settings.
10.
Press to start the dough proving process.
→"Pausing operation", Page14
→"Cancelling operation", Page14
a If the water tank runs dry during the dough proving
process, dough proving will be paused.
→"Refilling the water tank", Page15
a Once the duration has elapsed, an audible signal
will sound and the appliance will stop heating.
→"Switching off the appliance", Page13
11.
Press any button to end the audible signal.
12.
Empty the water tank and dry the cooking compart-
ment.
→"After every steam operation", Page17

en Steam
16
Sous-vide
"Sous-vide" is a type of low-temperature cooking during
which vacuum-sealed food is cooked at temperatures
between 50 and 95°C and with 100% steam. Sous-
vide is suitable for meat, fish, vegetables and desserts.
A chamber vacuum-packing machine is used to heat-
seal the food in special air-tight, heat-resistant vacuum-
sealing bags. The protective vacuum-sealing bags re-
tain the nutrients and flavours.
Configuring the Sous-vide heating function
Notes
¡ During sous-vide cooking, more condensate forms
on the cooking compartment floor than for other
types of heating.
¡ If the water tank runs dry while sous-vide cooking,
the operation is interrupted.
Requirement:The cooking compartment must have
cooled down completely.
1.
ATTENTION!
Risk of damage to kitchen units
▶
Do not fill the water tank a second time for the
sous-vide cooking.
Fill the water tank completely.
→"Filling the water tank", Page14
2.
Press to switch the appliance on.
3.
Swipe left or right to set "Sous-vide" .
4.
Press the temperature to select it.
5.
Swipe left or right to select the required temperat-
ure.
6.
Press to select the duration.
7.
Swipe left or right to select the required duration.
8.
Press to start the sous-vide cooking process.
→"Pausing operation", Page14
→"Cancelling operation", Page14
a Once the duration has elapsed, an audible signal
sounds and the appliance stops heating.
→"Switching off the appliance", Page13
9.
Press any button to end the audible signal.
10.
WARNING‒Risk of scalding!
Hot water collects on the vacuum-sealing bag dur-
ing cooking.
▶
Use an oven cloth to carefully lift the vacuum-
sealing bag so that the hot water runs off into the
universal pan or the cooking container.
▶
Use the oven cloth to carefully remove the va-
cuum-sealing bag.
Use an oven cloth to carefully remove the vacuum-
sealing bag.
11.
Empty the water tank and dry the cooking compart-
ment.
→"After every steam operation", Page17
Defrost
Use the "Defrost" function to defrost deep-frozen and
frozen products.
Configuring the Defrost heating function
1.
Fill the water tank.
→"Filling the water tank", Page14
2.
Press to switch the appliance on.
3.
Swipe left or right to set "Defrost" .
4.
Press the temperature to select it.
5.
Swipe left or right to select the required temperat-
ure.
6.
Press to save your settings.
7.
Press to select the defrosting time.
8.
Swipe left or right to select the required defrosting
time.
9.
Press to save your settings.
10.
Press to start the defrosting process.
→"Pausing operation", Page14
→"Cancelling operation", Page14
a If the water tank runs dry during the defrosting pro-
cess, defrosting will be paused.
→"Refilling the water tank", Page15
a Once the duration has elapsed, an audible signal
will sound and the appliance will stop heating.
→"Switching off the appliance", Page13
11.
Press any button to end the audible signal.
12.
Empty the water tank and dry the cooking compart-
ment.
→"After every steam operation", Page17
Reheat
The "Reheat" function is used to warm up food that has
already been cooked, or bread and pastries from the
day before, without affecting its quality.
Configuring the Reheat heating function
Requirement:The cooking compartment must have
cooled down completely (to room temperature).
1.
Fill the water tank.
→"Filling the water tank", Page14
2.
Press to switch the appliance on.
3.
Swipe left or right to set "Reheat" .
4.
Press the temperature to select it.
5.
Swipe left or right to select the required temperat-
ure.
6.
Press to save your settings.
7.
Press to select the reheating time.
8.
Swipe left or right to select the required reheating
time.
9.
Press to save your settings.
10.
Press to start the reheating process.
→"Pausing operation", Page14
→"Cancelling operation", Page14
a If the water tank runs dry during the reheating pro-
cess, reheating will be paused.
→"Refilling the water tank", Page15
a Once the duration has elapsed, an audible signal
will sound and the appliance will stop heating.
→"Switching off the appliance", Page13
11.
Press any button to end the audible signal.
12.
Empty the water tank and dry the cooking compart-
ment.
→"After every steam operation", Page17
8.4 Steam-assisted cooking
When you cook with steam assistance, the appliance
introduces steam into the cooking compartment at vari-
ous intervals. This gives your food a crispy crust and a
shiny surface. Meat stays juicy, tender and only under-
goes a minimum reduction in volume.
Heating functions compatible with steam
assistance
You can switch on steam assistance for the following
heating functions:
¡ "CircoTherm hot air"
¡ "Top/bottom heating"

Steam en
17
¡ "Circo-roasting"
¡ "Bread-baking setting"
¡ "Keep warm"
Switching on steam assistance
1.
Fill the water tank.
→"Filling the water tank", Page14
2.
Press to switch the appliance on.
3.
Set a suitable heating function.
→"Heating functions compatible with steam assist-
ance", Page16
4.
Set the required temperature.
5.
Use the button to switch on steam assistance.
6.
Swipe left or right to select the required steam
intensity :
– Low
– Medium
– High
7.
Press to save your settings.
8.
Press to start steam-assisted heating.
a If the water tank runs dry during steam-assisted
heating, "Fill water tank" will appear on the display.
The appliance will continue to heat but without in-
jecting steam into the cooking compartment.
→"Refilling the water tank", Page15
Cancelling steam-assisted cooking
1.
Press .
2.
Press the bottom row featuring the steam intensity.
3.
Swipe right to set the steam intensity to "Off".
a The appliance will continue to heat but without in-
jecting steam into the cooking compartment.
Ending steam-assisted heating
1.
Press to switch the appliance off.
2.
Empty the water tank and dry the cooking compart-
ment.
→"After every steam operation", Page17
8.5 After every steam operation
The remaining water is pumped back into the water
tank after every operation with steam. Then empty and
dry the water tank and the cooking compartment.
Emptying the water tank
WARNING‒Risk of burns!
The water tank may heat up while the appliance is in
operation.
▶
Wait until the water tank has cooled down from the
previous operation.
▶
Remove the water tank from the tank recess.
ATTENTION!
Drying the water tank in the hot cooking compartment
leads to damage to the water tank.
▶
Do not dry the water tank in the hot cooking com-
partment.
Cleaning the water tank in the dishwasher will damage
it.
▶
Do not clean the water tank in the dishwasher.
▶
Clean the water tank with a soft cloth and standard
washing-up liquid.
Note:Once the appliance has been switched off, the
button remains lit for a little longer to remind you to
empty the water tank.
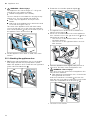
1.
Use to open the control panel.
2.
Remove the water tank.
3.
Carefully remove the lid of the water tank.
4.
Empty the water tank, clean it with detergent and
then rinse it thoroughly with clean water.
5.
Dry all parts with a soft cloth.
6.
Rub the seal on the lid until dry.
7.
Leave the water tank to dry with the lid open.
8.
Place the lid on the water tank and push down on it.
9.
Insert the water tank and close the control panel.
Drying the cooking compartment
To dry the cooking compartment, you can either use
the "Dry" function or you can dry the cooking compart-
ment manually.
Drying the cooking compartment with the Dry
function
The "Dry" function heats up the cooking compartment
so that the moisture in the cooking compartment evap-
orates. You will then need to open the appliance door
to allow the steam to escape.
WARNING‒Risk of burns!
The appliance becomes hot during operation.
▶
Allow the appliance to cool down before cleaning.
ATTENTION!
If there is water on the cooking compartment floor
when operating the appliance at temperatures above
120°C, this will damage the enamel.
▶
Do not use the appliance if there is water on the
cooking compartment floor.
▶
Wipe away any water on the cooking compartment
floor before operation.
Requirement:The cooking compartment must have
cooled down.
1.
Remove any food remnants from the cooking com-
partment.
2.
Dry the cooking compartment with a sponge.
3.
Press to switch the appliance on.
4.
Press .
5.
Swipe left or right to select "Dry" .
6.
Press the bottom row.
a The duration will appear on the display. The duration
cannot be changed.
7.
Press the bottom row.
8.
Press to start drying the appliance.
a Once the duration has elapsed, an audible signal
will sound and the appliance will stop heating.
9.
Press to switch the appliance off.
10.
Remove limescale marks with a cloth soaked in vin-
egar, then wipe with clean water and dry with a soft
cloth.
11.
Leave the appliance door open for 1-2minutes so
that the cooking compartment dries completely.
Drying the cooking compartment manually
WARNING‒Risk of burns!
The appliance becomes hot during operation.
▶
Allow the appliance to cool down before cleaning.

en Time-setting options
18
ATTENTION!
If there is water on the cooking compartment floor
when operating the appliance at temperatures above
120°C, this will damage the enamel.
▶
Do not use the appliance if there is water on the
cooking compartment floor.
▶
Wipe away any water on the cooking compartment
floor before operation.
Requirement:The cooking compartment must have
cooled down.
1.
Remove any food remnants from the cooking com-
partment.
2.
Dry the cooking compartment with a sponge.
3.
Leave the cooking compartment to dry with the ap-
pliance door open for 1hour.
4.
Remove limescale marks with a cloth soaked in vin-
egar, then wipe with clean water and dry with a soft
cloth.
5.
Leave the appliance door open for 1-2minutes so
that the cooking compartment dries completely.
9 Time-setting options
Your appliance has different time-setting options, with
which you can control its operation.
9.1 Overview of the time-setting options
When you are setting a time, the time values will in-
crease by greater increments as you scroll through the
higher values. The cooking time, for example, can be
set in 1-minute increments up to 1 hour, and then in 5-
minute increments thereafter.
Time-setting
option
Use
Timer When you set a time on the timer,
the timer will run independently of
the appliance and will not intervene
in its operation. The timer does not
affect the appliance.
Cooking
time
Once the cooking time has elapsed,
the appliance automatically stops
heating.
Ready at Along with the cooking time (dura-
tion), you can set the time at which
you want cooking to end. The appli-
ance will start up automatically so
that it finishes cooking at the re-
quired time.
9.2 Timer
You can set the timer regardless of whether the appli-
ance is on or off.
Setting the timer
1.
Press .
2.
Once the appliance is switched on, press "Timer" .
3.
Swipe left or right to select the required timer dura-
tion.
4.
Press to start the timer.
a will appear on the display. The timer duration will
then count down.
a Once the timer duration has elapsed, an audible sig-
nal will sound.
5.
Press any button to end the audible signal.
Changing the timer
1.
Press .
2.
Swipe left or right to change the timer duration.
a The setting will then be applied.
Cancelling the timer
1.
Press .
2.
Swipe right to set the timer duration to "00:00".
a This cancels the current timer duration.
9.3 Cooking time
Once the set cooking time has elapsed, the appliance
switches off automatically. You can only use the cook-
ing time in conjunction with a heating function.
Setting the cooking time
1.
Set a heating function and a temperature.
2.
Press .
3.
Swipe left or right to select the required cooking
time.
4.
Once the cooking time has been set, press to
start.
a The cooking time will appear on the display. The
cooking time will count down.
a Once the cooking time has elapsed, an audible sig-
nal will sound.
5.
Press any button to end the audible signal.
Changing the cooking time
1.
Press .
2.
Swipe left or right to change the cooking time.
a The setting will then be applied.
Cancelling the cooking time
1.
Press .
2.
Swipe right to set the cooking time to "00:00".
a This cancels the current cooking time.
3.
To continue without setting a cooking time, press .
9.4 Delayed start/"Ready at" time
With this function, the appliance automatically switches
itself on, and then switches itself off at the preselected
end time. To enable it to do this, you set the cooking
time (duration) and specify when you want your food to
be ready. You can only use the delayed start function
in conjunction with a heating function.
Setting the Ready at time for delayed starts
Notes
¡ Do not leave food that spoils easily in the cooking
compartment for too long.
¡ You cannot use the delayed start function with every
heating function.

Meat probe en
19
1.
Place the food into the cooking compartment and
close the appliance door.
2.
Set a heating function and a temperature.
3.
Press .
4.
Swipe left or right to select the required cooking
time.
5.
Press "Ready at" .
a The time at which your food will be ready will ap-
pear on the display.
6.
Swipe left to select the required end time.
7.
Press to confirm the delayed start.
a The appliance will start at the appropriate time.
a Once the cooking time has elapsed, an audible sig-
nal will sound.
8.
Press any button to end the audible signal.
Changing the Ready at time for delayed starts
1.
Press .
2.
Press "Ready at" .
3.
Swipe left or right to change the end time.
a The setting will then be applied.
Cancelling the Ready at time for delayed starts
1.
Press .
2.
Swipe right to reset the end time.
a The end time corresponds to the current time plus
the set cooking time.
a The appliance will start heating using the set cook-
ing time.
10 Meat probe
Cook with precision by inserting the meat probe into
the food and setting a core temperature on the appli-
ance. Once the set core temperature has been
reached in the food, the appliance automatically stops
heating.
10.1 Suitable heating functions for the meat
probe
Only certain heating functions are compatible with the
meat probe.
Once you have inserted the meat probe into the
cooking compartment, the following heating functions
are available for you to choose from:
¡ CircoTherm hot air
¡ Top/bottom heating
¡ Circo-roasting
¡ Pizza setting
¡ Bread-baking setting
¡ Top/bottom heating eco
¡ CircoTherm eco
¡ Reheat
¡ Steam
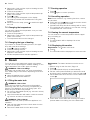
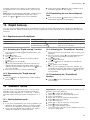
10.2 Inserting the meat thermometer
Use the meat probe supplied or order a suitable meat
probe from our after-sales service.
WARNING‒Risk of electric shock!
Using the wrong meat probe could damage the insula-
tion.
▶
Only use the meat probe for this specific appliance.
ATTENTION!
Otherwise the meat probe may be damaged.
▶
Do not trap the cable of the meat probe.
▶
To prevent the meat probe from being damaged by
excessive heat, there must be a gap of a few centi-
metres between the grill element and the meat
probe. The meat may expand during the cooking
process.
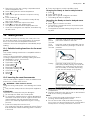
1.
Insert the meat probe into the food.
The meat probe has three measuring points. Ensure
that at least the middle measuring point is inserted
in the food.
Thin
pieces
of meat
Insert the meat probe into the thickest
part of the meat from the side.
Thick
pieces
of meat
Insert the meat probe diagonally into the
meat from above, pushing it in as far as
possible.
Poultry Insert the meat probe into the thickest
part of the breast, pushing it in as far as
possible. The meat probe can be inser-
ted horizontally or vertically depending
on the size and shape of the poultry.
Turn the poultry and place it on the wire
rack breast-side down.
2.
Place the food with the meat probe into the cooking
compartment.
3.
Plug the meat probe into the socket on the left-hand
side of the cooking compartment.
Notes
¡ If you remove the meat probe while the food is
cooking, all the settings will be reset.
¡ Do not remove the meat probe when turning the
food. Once you have turned the food, check that the
meat probe is correctly positioned in the food.

en Baking and roasting assistant
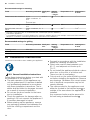
20
10.3 Core temperatures of different foods
Here you can find the suggested core temperatures of
various different foods.
These suggestions depend on the quality and the size/
shape of the food. Do not use frozen food.
Food Core temperature
in °C
Poultry 75
Pork 75
Beef, rare 50
Beef, medium 60
Beef, well done 70
Lamb 70
Heating food, reheating 65–75
10.4 Setting the oven temperature and core
temperature
The meat probe measures the temperature inside the
food between 30°C and 99°C.
Requirements
¡ The food with the meat probe is in the cooking com-
partment.
¡ The meat probe is inserted in the cooking compart-
ment.
1.
Press to switch the appliance on.
2.
Select a suitable heating function.
3.
Press "Cooking compartment temperature" on the
left in the bottom row.
4.
Swipe left or right to select the required cooking
compartment temperature.
Set the cooking compartment temperature at least
10°C higher than the core temperature.
Do not set the cooking compartment temperature to
higher than 250°C.
5.
Press to save the cooking compartment temper-
ature.
6.
Press "Core temperature" on the right in the bot-
tom row.
7.
Swipe left or right to select the required core tem-
perature.
8.
Press to start cooking using the meat probe.
a Once the required core temperature has been
reached, an audible signal will sound and the appli-
ance will stop heating.
9.
Press to switch the appliance off.
10.
WARNING‒Risk of burns!
The cooking compartment, accessories and meat
probe become very hot.
▶
Always use oven gloves to remove hot accessor-
ies and the meat probe from the cooking com-
partment.
Pull the meat probe out of the socket in the cooking
compartment.
10.5 Changing the cooking compartment
temperature or core temperature
1.
Press the cooking compartment temperature or
core temperature twice.
2.
Swipe left or right to change the temperature.
3.
Press to save your setting.
10.6 Cancelling operation with the meat
probe
▶
WARNING‒Risk of burns!
The cooking compartment, accessories and meat
probe become very hot.
▶
Always use oven gloves to remove hot accessor-
ies and the meat probe from the cooking com-
partment.
To continue cooking without the meat probe, pull
the meat probe out of the socket in the cooking
compartment and out of the food, and then press
to resume operation.
‒ To cancel operation, press to switch the appli-
ance off.
11 Baking and roasting assistant
The baking and roasting assistant helps you to use
your appliance to cook various dishes by suggesting
the optimal settings.
The baking and roasting assistant helps you to make
classic cakes, bread and roasts. The appliance selects
the optimal heating function for you. The default tem-
perature and cooking time can be changed according
to your requirements.
11.1 Overview of available foods
You can choose from the following foods:
¡ Rich fruit cake
¡ Victoria sponge cake
¡ Victoria sponge cake, on two levels
¡ Swiss roll
¡ Jam tarts
¡ Jam tarts, on two levels
¡ Fruit crumble
¡ Pavlova
¡ Vol au vents
¡ Small cakes
¡ Small cakes, on two levels
¡ White bread
¡ Scones
¡ Scones, on two levels
¡ Pizza, frozen
¡ Oven chips
¡ Baked potatoes
¡ Baked potatoes, on two levels
¡ Lasagne, chilled
¡ Roast pork
¡ Top rump
¡ Slow roasting joint
¡ Leg of lamb
¡ Whole chicken
¡ Chicken drumsticks
¡ Duck
Page is loading ...
Page is loading ...
Page is loading ...
Page is loading ...
Page is loading ...
Page is loading ...
Page is loading ...
Page is loading ...
Page is loading ...
Page is loading ...
Page is loading ...
Page is loading ...
Page is loading ...
Page is loading ...
Page is loading ...
Page is loading ...
Page is loading ...
Page is loading ...
Page is loading ...
Page is loading ...
Page is loading ...
Page is loading ...
Page is loading ...
Page is loading ...
Page is loading ...
Page is loading ...
Page is loading ...
Page is loading ...
Page is loading ...
Page is loading ...
Page is loading ...
Page is loading ...
Page is loading ...
Page is loading ...
Page is loading ...
Page is loading ...
-
 1
1
-
 2
2
-
 3
3
-
 4
4
-
 5
5
-
 6
6
-
 7
7
-
 8
8
-
 9
9
-
 10
10
-
 11
11
-
 12
12
-
 13
13
-
 14
14
-
 15
15
-
 16
16
-
 17
17
-
 18
18
-
 19
19
-
 20
20
-
 21
21
-
 22
22
-
 23
23
-
 24
24
-
 25
25
-
 26
26
-
 27
27
-
 28
28
-
 29
29
-
 30
30
-
 31
31
-
 32
32
-
 33
33
-
 34
34
-
 35
35
-
 36
36
-
 37
37
-
 38
38
-
 39
39
-
 40
40
-
 41
41
-
 42
42
-
 43
43
-
 44
44
-
 45
45
-
 46
46
-
 47
47
-
 48
48
-
 49
49
-
 50
50
-
 51
51
-
 52
52
-
 53
53
-
 54
54
-
 55
55
-
 56
56


Neff B48FT78H0B Installation guide
- Category
- Kitchen & houseware accessories
- Type
- Installation guide
Ask a question and I''ll find the answer in the document
Finding information in a document is now easier with AI
Related papers
-
Neff B58VT68H0B Installation guide
-
Neff C18FT56H0B Installation guide
-
Neff B57VS24H0B Installation guide
-
Neff B58CT68H0B Installation guide
-
Neff B57VS26.0B Oven User manual
-
Neff B57VR22N0B Installation guide
-
Neff B47CS34H0B Installation guide
-
Neff B57CS24H0B Installation guide
-
Neff B6ACH7HH0B Installation guide
-
Neff B5ACH7AH0B Installation guide
Other documents
-
Bosch HSG958DB1/D2 User manual and assembly instructions
-
-
-
Siemens HS858KXB6 Installation guide
-
-
-
-
-
-