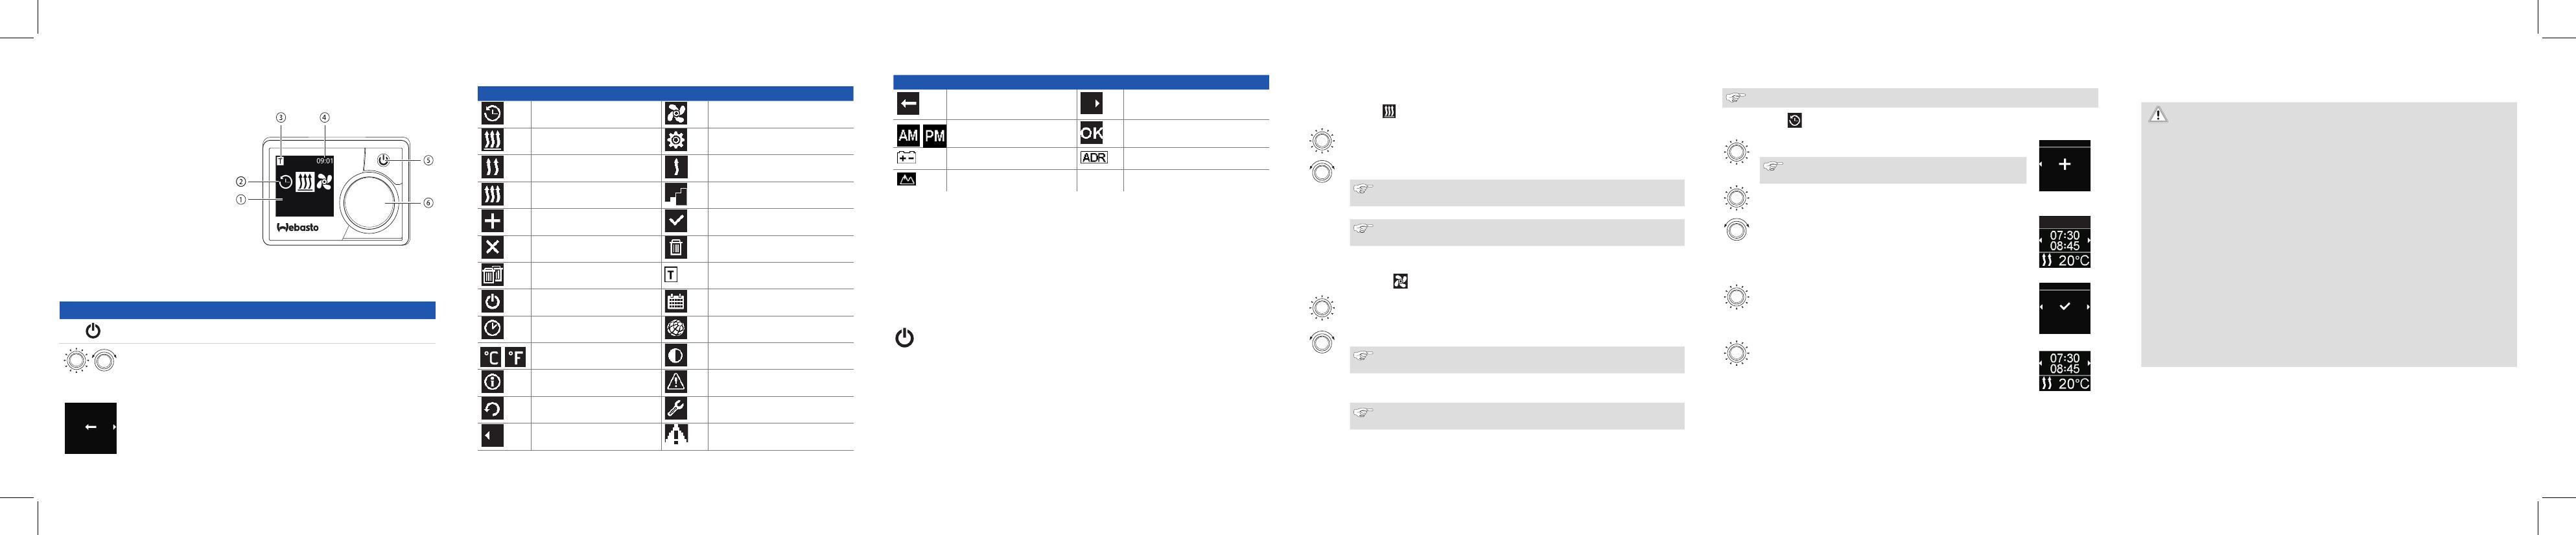
1 Control Element and menu
1 Submenu name
2 Submenu symbol
3 Activated time settings
4 Time
5 Quick start button
6 Control knob
*: if installed
2 Buttons and control
Button Control and function
Quick start button (5) with status display.
Control knob (turn/push button) (6) for selection and confirmation of
the selected functions.
3 Back-function
Back
Exit the selected menu with the "Back" function.
The settings are saved and the higher-level menu level is displayed.
4 Symbols
Symbol Description Symbol Description
Timer menu (programme
time setting) Ventilation menu
Heating-Normal Settings menu
Heating level Normal Heating level Eco
Heating level Boost Fan speed (level 1-4)
Add timer Activate timer
Deactivate timer Delete timer
Delete all timers Active timer
Quick start Day of the week
Time Language
Temperature unit Day/Night
System information Error message
Reset Service indicator (service
required)
To the left Attention
Symbol Description Symbol Description
Back To the right
12 hour format Symbol for confirmation
Operating voltage too low ADR display
Altitude correction
At temperatures below –20 °C protective function of control element display is active.
Display and background illumination are switched off, heating status is indicated by
status of LED diode. The heater can be tuned on and off by quick start button without
any limits.
5 Switching on and off by quick start button
“Quick start” function enables heating or ventilation by simply pressing the button. Ope-
ration time, temperature and heating mode can be preset in the settings in menu item
“Setting the quick start”.
X Press quick start button (5).
Heating or ventilation starts functioning.
The quick start button (5) lights up when the heater is in operation:
■Green (Heating)
■Blue (Ventilation)
By pressing quick start button (5) heating or ventilation can be ended prematurely
at any moment.
6 Switching on and off through the menu
Switching on the heating through the menu
3Heating menu has been selected in the main menu.
X Press the control knob (6).
The heating level, required temperature and/or operation time must be set in
accordance with the installed heater. Follow the instructions displayed in the
menu.
You can select the setting by turning the control knob. You confirm
selection by pressing the control knob.
The heating starts functioning as soon as all the settings have been chosen.
By pressing quick start button (4) heating can be ended prematurely at
any moment.
Setting ventilation through the main menu (optional)
3Ventilation menu has been selected in the main menu.
X Press the control knob (6).
The fan speed, required temperature and/or operation time must be set in
accordance with the installed heater. Follow the instructions displayed in the
menu.
You can select the setting by turning the control knob. You confirm
selection by pressing the control knob.
The ventilation starts functioning as soon as all the settings have been cho-
sen.
By pressing quick start button (5) during functioning, ventilation can be
ended prematurely at any moment.
7 Timer
The function is not available in ARD operation (hazardous substance transporta-
tion).
3Timer menu has been selected in the main menu.
X Press the control knob (6).
”Add timer” message (if no timer has been saved yet)
appears in the display. Add timer
Timers
X Press the control k nob in order to add new timer.
In order to programme the timer you should enter the desired
day of the week and switch-on and switch-off time. Follow the
instructions displayed in the menu.
As soon as settings are entered, the programmed timer is saved
and shown in the display.
X Press the control knob in order to activate the programmed
timer.
“Activate” message appears in the display. Activate
Timers
X Press the control knob in order to confirm activation.
All programmed times can be deactivated, edited or removed. If the “Timer” symbol has
been selected in the main menu, all saved timers appear in the display in chronological
order. The following functions are at the disposal after selecting the desired timer: “acti-
vate”, “deactivate”, “edit” and “delete”.
8 Important Information on Operating and Installation Instruc-
tions
DANGER
■Do not operate the heater in closed rooms due to the danger of poisoning
and suffocation.
■Always switch off the heater before refuelling.
■The improper operation, installation or repair of Webasto heaters and control
elements can cause fire or the leakage of deadly carbon monoxide. This can
lead to serious injury or death.
■Webasto shall not assume liability for defects or damage that are the result
that the installation and operating instructions as well as the instructions
contained therein being disregarded.
This liability exclusion particularly applies for:
- installation by untrained personnel
- improper use
- repairs not carried out by a Webasto service workshop
- use of non-genuine parts
- Conversion of the heater without permission from Webasto
■If faulty always replace the complete control element.
9 Intended use
The control element MultiControl | SmartControl is used to operate the Webasto water
or air heaters for cabin and engine preheating.
The control element MultiControl | SmartControl is currently approved for connection to
certain Webasto water or air heaters.


