
INSTRUCTION BOOK
DISHWASHER
ZDT 5895
153 1123 13
GB

2
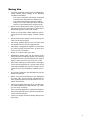
Dear Customer
Please read these operating instructions carefully.
Please make sure you read the safety instructions on
the first pages of these operating instructions! Keep
the operating instructions for future reference. Pass
them on to any future owners.
With the warning triangle and/or by means of
key words (Warning!, Caution!, Important!),
information is emphasized which is important
for your safety or the correct functioning of the
appliance. It is essential that this information is
observed.
1. This symbol guides you step by step when opera-
ting the appliance.
2. . . .
3. . . .
Next to this symbol you receive additional in-
formation and practical tips on using the ap-
pliance.
Tips and information about the economical
and environmentally friendly use of the ma-
chine are marked with the clover.
These operating instructions contain information ab-
out how to independently solve any problems which
may arise. See ”Something Not Working“.
In the event of technical problems, please contact your
local Service Force Centre.
Please also take note of the contents of the «Service
& Spare Parts» section.

3
Content
Safety Instructions 4. . . . . . . . . . . . . . . . . . . . . . . . . . . . . . . . . . . . . . . . . . . . . . . . . . . . . . . . . . . . . . .
Description of the Appliance 6. . . . . . . . . . . . . . . . . . . . . . . . . . . . . . . . . . . . . . . . . . . . . . . . . . . . . .
Dishwasher 6. . . . . . . . . . . . . . . . . . . . . . . . . . . . . . . . . . . . . . . . . . . . . . . . . . . . . . . . . . . . . . . . . . . . . . . . . . .
Control Panel 6. . . . . . . . . . . . . . . . . . . . . . . . . . . . . . . . . . . . . . . . . . . . . . . . . . . . . . . . . . . . . . . . . . . . . . . . .
Important Information 7. . . . . . . . . . . . . . . . . . . . . . . . . . . . . . . . . . . . . . . . . . . . . . . . . . . . . . . . . . . .
General Hints 7. . . . . . . . . . . . . . . . . . . . . . . . . . . . . . . . . . . . . . . . . . . . . . . . . . . . . . . . . . . . . . . . . . . .
Disposal 8. . . . . . . . . . . . . . . . . . . . . . . . . . . . . . . . . . . . . . . . . . . . . . . . . . . . . . . . . . . . . . . . . . . . . . . . .
Prior to Using for the first Time 9. . . . . . . . . . . . . . . . . . . . . . . . . . . . . . . . . . . . . . . . . . . . . . . . . . .
Filling with rinsing aid 9. . . . . . . . . . . . . . . . . . . . . . . . . . . . . . . . . . . . . . . . . . . . . . . . . . . . . . . . . . . . . . . . . . .
Setting the rinse aid dosage 9. . . . . . . . . . . . . . . . . . . . . . . . . . . . . . . . . . . . . . . . . . . . . . . . . . . . . . . . . . . . .
Filling the salt dispenser 9. . . . . . . . . . . . . . . . . . . . . . . . . . . . . . . . . . . . . . . . . . . . . . . . . . . . . . . . . . . . . . . .
Setting the special salt dosage 10. . . . . . . . . . . . . . . . . . . . . . . . . . . . . . . . . . . . . . . . . . . . . . . . . . . . . . . . . .
The first rinse cycle 10. . . . . . . . . . . . . . . . . . . . . . . . . . . . . . . . . . . . . . . . . . . . . . . . . . . . . . . . . . . . . . . . . . . .
Baskets 11. . . . . . . . . . . . . . . . . . . . . . . . . . . . . . . . . . . . . . . . . . . . . . . . . . . . . . . . . . . . . . . . . . . . . . . . .
Cutlery basket 11. . . . . . . . . . . . . . . . . . . . . . . . . . . . . . . . . . . . . . . . . . . . . . . . . . . . . . . . . . . . . . . . . . . . . . . . .
Lower basket 12. . . . . . . . . . . . . . . . . . . . . . . . . . . . . . . . . . . . . . . . . . . . . . . . . . . . . . . . . . . . . . . . . . . . . . . . . .
Upper basket 14. . . . . . . . . . . . . . . . . . . . . . . . . . . . . . . . . . . . . . . . . . . . . . . . . . . . . . . . . . . . . . . . . . . . . . . . . .
Filling with detergent 16. . . . . . . . . . . . . . . . . . . . . . . . . . . . . . . . . . . . . . . . . . . . . . . . . . . . . . . . . . . . .
Use of “3 in 1” / Combi Detergent Tablets 16. . . . . . . . . . . . . . . . . . . . . . . . . . . . . . . . . . . . . . . . . . . . . . . . .
Selecting and starting the programme 17. . . . . . . . . . . . . . . . . . . . . . . . . . . . . . . . . . . . . . . . . . . . .
Delay start 17. . . . . . . . . . . . . . . . . . . . . . . . . . . . . . . . . . . . . . . . . . . . . . . . . . . . . . . . . . . . . . . . . . . . . . . . . . . .
Programme selection / Correcting or cancelling delay start 18. . . . . . . . . . . . . . . . . . . . . . . . . . . . . . . . . .
Save energy 18. . . . . . . . . . . . . . . . . . . . . . . . . . . . . . . . . . . . . . . . . . . . . . . . . . . . . . . . . . . . . . . . . . . . . . . . . .
End of the programme 18. . . . . . . . . . . . . . . . . . . . . . . . . . . . . . . . . . . . . . . . . . . . . . . . . . . . . . . . . . . . . . . . . .
Acoustic signal 18. . . . . . . . . . . . . . . . . . . . . . . . . . . . . . . . . . . . . . . . . . . . . . . . . . . . . . . . . . . . . . . . . . . . . . . .
Mains power loss 18. . . . . . . . . . . . . . . . . . . . . . . . . . . . . . . . . . . . . . . . . . . . . . . . . . . . . . . . . . . . . . . . . . . . . .
Programme chart 19. . . . . . . . . . . . . . . . . . . . . . . . . . . . . . . . . . . . . . . . . . . . . . . . . . . . . . . . . . . . . . . . . . . . . .
Error message 20. . . . . . . . . . . . . . . . . . . . . . . . . . . . . . . . . . . . . . . . . . . . . . . . . . . . . . . . . . . . . . . . . . . . . . . .
Unloading the baskets 20. . . . . . . . . . . . . . . . . . . . . . . . . . . . . . . . . . . . . . . . . . . . . . . . . . . . . . . . . . . .
Cleaning and care 21. . . . . . . . . . . . . . . . . . . . . . . . . . . . . . . . . . . . . . . . . . . . . . . . . . . . . . . . . . . . . . . .
Refilling the special salt 21. . . . . . . . . . . . . . . . . . . . . . . . . . . . . . . . . . . . . . . . . . . . . . . . . . . . . . . . . . . . . . . . .
Refilling the rinse aid 21. . . . . . . . . . . . . . . . . . . . . . . . . . . . . . . . . . . . . . . . . . . . . . . . . . . . . . . . . . . . . . . . . . .
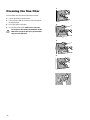
Cleaning the large filter 21. . . . . . . . . . . . . . . . . . . . . . . . . . . . . . . . . . . . . . . . . . . . . . . . . . . . . . . . . . . . . . . . .
Cleaning the fine filter 22. . . . . . . . . . . . . . . . . . . . . . . . . . . . . . . . . . . . . . . . . . . . . . . . . . . . . . . . . . . . . . . . . .
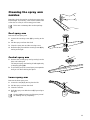
Cleaning the spray arm nozzles 23. . . . . . . . . . . . . . . . . . . . . . . . . . . . . . . . . . . . . . . . . . . . . . . . . . . . . . . . . .
Something Not Working 24. . . . . . . . . . . . . . . . . . . . . . . . . . . . . . . . . . . . . . . . . . . . . . . . . . . . . . . . . .
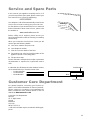
Service & Spare Parts 25. . . . . . . . . . . . . . . . . . . . . . . . . . . . . . . . . . . . . . . . . . . . . . . . . . . . . . . . . . . .
Guarantee Conditions 26. . . . . . . . . . . . . . . . . . . . . . . . . . . . . . . . . . . . . . . . . . . . . . . . . . . . . . . . . . . .
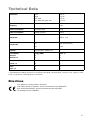
Technical Data 27. . . . . . . . . . . . . . . . . . . . . . . . . . . . . . . . . . . . . . . . . . . . . . . . . . . . . . . . . . . . . . . . . . .
Directives 27. . . . . . . . . . . . . . . . . . . . . . . . . . . . . . . . . . . . . . . . . . . . . . . . . . . . . . . . . . . . . . . . . . . . . . . . . . . . .
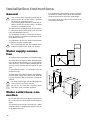
Installation Instructions 28. . . . . . . . . . . . . . . . . . . . . . . . . . . . . . . . . . . . . . . . . . . . . . . . . . . . . . . . . .
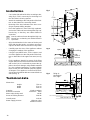
General 28. . . . . . . . . . . . . . . . . . . . . . . . . . . . . . . . . . . . . . . . . . . . . . . . . . . . . . . . . . . . . . . . . . . . . . . . . . . . . .
Water supply connection 28. . . . . . . . . . . . . . . . . . . . . . . . . . . . . . . . . . . . . . . . . . . . . . . . . . . . . . . . . . . . . . . .
Water outlet hose connection 28. . . . . . . . . . . . . . . . . . . . . . . . . . . . . . . . . . . . . . . . . . . . . . . . . . . . . . . . . . . .
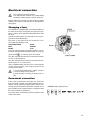
Electrical connection 29. . . . . . . . . . . . . . . . . . . . . . . . . . . . . . . . . . . . . . . . . . . . . . . . . . . . . . . . . . . . . . . . . . .
Installation 30. . . . . . . . . . . . . . . . . . . . . . . . . . . . . . . . . . . . . . . . . . . . . . . . . . . . . . . . . . . . . . . . . . . . . . . . . . . .
Technical data 30. . . . . . . . . . . . . . . . . . . . . . . . . . . . . . . . . . . . . . . . . . . . . . . . . . . . . . . . . . . . . . . . . . . . . . . . .
Information for Test Institutes 31. . . . . . . . . . . . . . . . . . . . . . . . . . . . . . . . . . . . . . . . . . . . . . . . . . . . .

4
Safety Instructions
The safety aspects of this appliance comply with the accepted technical standards and the applicable safety regula-
tions. Nevertheless, we consider it our obligation to make you aware of the following safety information:
Installation
• Any electrical work required to install this ap-
pliance must be carried out by a qualified electri-
cian / competent person.
• Any plumbing work required to install this ap-
pliance must be carried out by a qualified plumber
/ competent person.
• Before using your dishwasher for the first time, en-
sure that the nominal voltage and current indicated
on the rating plate are the same as the nominal vol-
tage and current available at the installation loca-
tion. The necessary electrical fusing is indicated
on the rating plate.
• Do not install the appliance where it could be expo-
sed to extreme temperatures, either hot or cold.
Correct Use
• Only use the dishwasher for the cleaning of house-
hold crockery. If the appliance is used for purposes
for which it is not intended, or is operated incor-
rectly, the manufacturer will decline liability for any
damage.
• Our guarantee is only valid if these operating in-
structions and installation instructions are obser-
ved.
• Modifications or changes to the dishwasher are
not permitted for reasons of safety.
Before using the dishwasher
for the first time
• Check your dishwasher for any transport damage.
Never connect a damaged appliance. If your dish-
washer has been damaged, contact your supplier.
• The dishwasher must be correctly installed and
connected. The installation instructions give all the
information that is necessary for this.
Child safety
• Packaging parts (e.g., foil, styrene foam) may be
dangerous for children, due to the danger of suffo-
cation! Keep all packaging away from children.
• Children may not recognise the dangers of the im-
proper use of electrical appliances. Always ensure
the necessary supervision during operation of the
appliance, do not allow your children to play with
the dishwasher - there is the danger that children
could lock themselves inside it, or could injure
themselves.
• If this appliance is installed in a raised position (i.e.
in column), always ensure that childrens’ fingers
are are kept away from the door as they could be-
come trapped when the door is closed.
• Rinsing agents can cause burning in the eyes,
mouth and throat, and may even cause suffoca-
tion! Keep all detergents in a safe place out of chil-
dren’s’ reach.
• The water in the dishwasher should not be used for
drinking. Detergent residues in the appliance
could cause burning! Keep children away from the
appliance when the door is open.

5
During Use
• The water protection system ensures reliable pro-
tection against water damage if the following
conditions are fulfilled:
- The mains connection must remain connected
even when the dishwasher is switched off.
- The dishwasher must be properly installed
- Always turn off the water taps when the dish-
washer is left unattended for longer periods.
• Never use the dishwasher if there any signs of da-
mage to the mains lead, the supply or drain hoses,
the operating panel or the lower section.
• If there is a fault, switch off the appliance and dis-
connect from the mains supply. Close the water
tap.
• Never pull the mains plug out of the socket by the
cable, but by the plug itself.
• Place long, pointed objects (such as knives) with
the handle to the front in the upper basket.
• After filling or emptying the appliance, ensure that
you have properly closed the door. An open door
can be a source of danger.
• Never sit or stand on the open door.
• Dishwasher repairs must only be carried out by
trained personnel. Improper repairs may seriously
endanger the user. If your dishwasher is in need of
repair, contact your local Service Force Centre.
• If the mains cable of your dishwasher is damaged,
it must only be replaced by a special cable of the
same type available from your local Service Force
Centre. It must only be fitted by qualified person-
nel.
• Do not place solvents in the dishwasher due to the
danger of explosion.
• Before using special dishwasher salt, detergents
and rinse aids, ensure that the manufacturer of
these products expressly specifies their use in do-
mestic dishwashers.
• Always turn off the water taps when your dishwas-
her is left unattended for longer periods, e.g., when
you are away on holiday.
• If the connected appliance is exposed to tempera-
tures below freezing point, it must be correctly drai-
ned by customer service.
• There is no danger of freezing during delivery from
the factory!

6
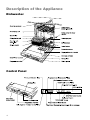
Description of the Appliance
Dishwasher
Control Panel

7
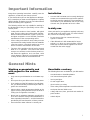
Important Information
Keep these operating instructions carefully near the
appliance, so that they are always at hand.
If you should sell or pass on the appliance to third par-
ties, ensure that you hand over the appliance complete
with this leaflet, so that the new user can inform himself
about the working of the appliance.
The following articles are only suitable for washing in
the dishwashers if they are specifically sold as ”dish-
washer proof”:
• Cutlery with wooden or horn handles, with glued
parts, bronze cutlery, pans with wooden handles,
articles made from aluminium, copper, crystal, lea-
ded glass and plastic. In case of doubt, consult the
manufacturer of the corresponding article.
• Silver cutlery and stainless steel cutlery must be
separated in the cutlery basket. If the two materials
come into contact, a chemical reaction can occur
which can lead to discoloration of the silver.
• The door of the appliance should not be opened
while it is in operation. The steam that would
escape can condense on the furniture parts loca-
ted above the appliance, and, over time, could
cause damage. If the door is accidentally opened,
a safety device switches the dishwasher off.
Installation
• In areas with hard water and on newly developed
estates, we recommend that you install a water fil-
ter directly near the supply tap. The water filter re-
duces wear in your dishwasher and can be easily
cleaned. Ask your plumber to fit such a filter.
In daily use
Clean and care for your appliance regularly. In this way
you will avoid costly service work. For more informa-
tion, refer to the Cleaning chapter.
• Do not use any hand or commercial rinsing
agents or cleaners.
• If the dishwasher is left unattended for longer
periods, e.g., when you are on holiday, close the
water taps. Ensure that the appliance is discon-
nected from the mains supply.
General Hints
Washing economically and
with regard to the environ−
ment
• Only connect your dishwasher to a cold water sup-
ply.
• Do not pre-rinse your dishes under running water.
• If you make use of the full capacity of your dishwas-
her, you will be washing economically and with re-
gard to the environment.
• Always select a wash programme suitable to the
type of crockery being washed and to the level of
soiling (see ”Programme Overview”).
• Never over or underdose detergent, special salt or
rinse aid. Follow the dosage recommendations in
these operating instructions , and the instructions
provided by the manufacturers of these products.
• Ensure that the water softener is correctly set.
Unsuitable crockery
The following items are unsuitable for your dishwasher
- wooden boards or breakfast platters
- non heat-resistant plastic parts
- lead crystal glass
- tin and copper items
- glued crockery or cutlery
- older cutlery with temperature-sensitive adhesive
- steel parts that are liable to rust
- cutlery with wood, horn, porcelain and mother-of-
pearl handles
- artistic objects

8
Crockery that may be suitable
There are limitations for the following parts
- Only wash earthenware crockery in the dishwas-
her if the manufacturer has expressly indicated
that it is suitable.
- Some glazed finishes may fade after frequent ma-
chine washing.
- Silver and aluminium parts tend to discolour during
machine washing. Many food residues such as
egg white, egg yolk, mustard often cause discolou-
ration and/or staining on silver. Food residues
should be cleaned from crockery or cutlery straight
away if it is not going to be washed immediately af-
ter a meal.
- Some types of glass may become cloudy after
many washing cycles.
When buying new crockery, glasses and cutlery, con-
firm that they are dishwasher-proof.
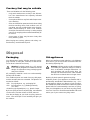
Disposal
Packaging
Our dishwashers require effective protective packa-
ging in transit. In doing this, however, we limit oursel-
ves to what is absolute necessary.
Warning! Packaging parts (e.g., foil, styrene
foam) can be dangerous for children due to the
danger of suffocation! Keep packaging parts
away from children.
All packaging materials used are environmentally-
friendly and reusable.
The cardboard parts are made from recycled paper,
and the wooden parts are untreated. The plastics are
marked as follows:
«PE» for polyethylene, e.g., packaging foil
«PS» for polystyrene, e.g., padding (basically
CFC-free)
«POM»for polyoxymethylene, e.g., plastic clamps
By the recycling and reuse of packaging, raw materials
can be saved, and the volume of waste reduced.
Give the packaging to your local recycling centre for
reuse. Your municipal or local authority will give you
the address.
Old appliances
When your appliance needs replacing, or is withdrawn
from service, you should render it unserviceable be-
fore having disposing of it.
Warning! Children at play could lock themsel-
ves inside your appliance (danger of suffoca-
tion) or otherwise endanger themselves. Al-
ways therefore pull out the mains plug. Cut
through and discard the mains cable. Disable
the door lock so that the door no longer closes.
Marking of plastic parts for graded recycling:
All plastic parts in your appliance are marked with in-
ternationally standardised abbreviations (e.g., «PS»
for polystyrene). When you dispose of your machine,
this enables the plastic waste to be sorted into graded
plastic balls for environmentally-conscious recycling.
Take your old appliance to your local recycling centre.
Your local Council or Environmental Health Office will
advise you of your nearest recycling centre.

9
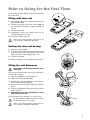
Prior to Using for the first Time
Do the following steps before using your dishwasher
for the first time.
Filling with rinse aid
1. If the display indicator is lit, open the dispenser by
pushing button (A).
2. Fill with rinse aid up to the ”max.” marking (B). Do
not exceed the maximum container quantity of
150 ml!
3. Close the dispenser.
4. Immediately remove any spilled rinse aid, as
otherwise foaming can occur.
The rinse aid indicator goes out.
When using “3in1” products, please see ad-
vice in section “Filling with detergent”.
Setting the rinse aid dosage
1. Open the dispenser (A).
2. To increase the dosage (C), turn the dosage arrow
to the left using a coin or a screwdriver. The factory
setting is Level 3 (ideal setting level 2 - 4).
3. Close the dispenser.
For further information see ”Something Not Working”.
Filling the salt dispenser
Never fill the salt dispenser with rinse aid or
detergent!
Use only special dishwasher salt in your dishwasher.
Fill with salt as follows:
1. Open the cap (A) of the salt dispenser.
2. Fill the dispenser with water (B).
3. Fill with 1 kg of special salt (C). As a result, approx.
1 litre of water will be displaced.
4. Remove salt from around the opening of the dis-
penser.
5. Close the salt dispenser by turning the cap until the
stop is reached.
6. Immediately run a wash programme to wash
away any salt residues.
The salt display will go off after 1 or 2 rinse cycles.
Do not remove the water feed valve, and do not
fill with detergent for any reason.
When using “3in1” products, please see ad-
vice in section “Filling with detergent”.
A
B
C

10
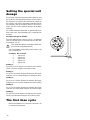
Setting the special salt
dosage
The dosage of special salt for the water softening must
be set to the corresponding hardness of the water. If
the dosage is too small, scale particles will remain on
the crockery and cutlery. Information regarding the wa-
ter hardness and the hardness areas in the area in
which you live can be obtained from the local Water
Authority.
For a water hardness under 5dH, no special salt is nee-
ded. In this case, the salt display (9) is continually illu-
minated.
Set up the dosage as follows:
Turn the setting button using a coin or a screwdriver
(Size 4) until the arrow on the knob points to the desi-
red number (1 to 5):
The arrow must point to a number and the posi-
tion must be engaged positively.
- Salt consumption: Depending on the setting 1 kg
salt is sufficient for
at setting No. of rinses
1 approx. 45
2 approx. 25
3 approx. 20
4 approx. 15
5 approx. 10
Setting 1:
Up to 12.5 French degrees of hardness (fH) (equiva-
lent to 7 German degrees of hardness (dH))
Setting 2:
For 12.5 to 25 French degrees of hardness (fH) (equi-
valent to 7 to 14 German degrees of hardness (dH))
Setting 3:
For 25 to 37.5 French degrees of hardness (fH) (equi-
valent to 14 to 21 German degrees of hardness (dH))
Setting 4:
For 37.5 to 50 French degrees of hardness (fH) (equi-
valent to 21 to 28 German degrees of hardness (dH))
Setting 5:
For over 50 French degrees of hardness (fH) (equiva-
lent to over 28 German degrees of hardness (dH))
The first rinse cycle
- Before the appliance is used for the first time, run
an Intensive programme.
1
4
3
2
5

11
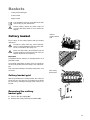
Baskets
- Cutlery basket with grid
- Lower basket
- Upper basket
The illustration gives you some tips for the opti-
mal loading of your dishwasher.
Before loading, remove any food scraps. Do
not rinse with warm water or use a manual de-
tergent.
Cutlery basket
Place cutlery in the cutlery basket with the handles
downward.
Except for cutlery with very narrow handles,
which could penetrate through the cutlery bas-
ket and could block the spray arm.
Make sure that cutlery and tall items near the
basket handle do not prevent the lid of the de-
tergent dispenser from opening.
Important:
Long bladed knives stored in an upright position are a
potential hazard.
Long and/or sharp items of cutlery such as carving kni-
ves must be positioned horizontally in the upper bas-
ket.
Take care when loading or unloading sharp items such
as knives.
Cutlery basket grid
With the grid fitted to the cutlery basket, the cutlery no
longer touches. All parts are accessible for the water
jet. In this way, cleaning and drying of the cutlery is im-
proved.
Removing the cutlery
basket grid
1. Press in the clips slightly (A).
2. Remove the cutlery basket grid upwards (B).
with cutlery
basket grid
without
cutlery basket
grid

12
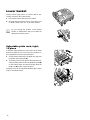
Lower basket
Heavily soiled, large pieces of crockery will be tho-
roughly cleaned in the lower basket.
1. Pull out the lower basket to its full extent.
2. Arrange large and heavy pieces of crockery, such
as plates, bowls, pots etc., in the lower basket.
Do not change the position of the basket
handle, as malfunctions may occur when the
detergent container opens.
Adjustable plate rack, right,
10 piece
In order to make optimal use of the space in the lower
basket, the plate racks can be set in two positions, in
the longitudinal and transverse directions.
1. To take out the plate racks, the plate rack grip must
be pulled away upwards (A).
2. The plate racks are then put into the transverse po-
sition by fitting them into the longitudinal struts (D)
on the lower basket, and then pressing down the
plate rack (B) until it snaps into place.
The plate rack can be adjusted sideways (C). Positio-
ning as described above.
A
B
D
C

13
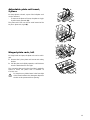
Adjustable plate rail insert,
5 piece
For deep plates or bowls, a part of the left plate rack
can be removed.
- To remove the plate rail insert, the plate rack grip
is pulled away upwards (A).
The plate rack insert can also be used instead of the
10-piece plate rack, right (B).
Hinged plate rack, left
For large bowls and pots, the plate rack can be unhin-
ged.
1. Remove the 5 piece plate rack inserts and cutlery
basket.
2. Pull the plate rack slightly upwards, and fold down
onto the basket base to the right.
The crosswise plate rack on the front right is optimally
suited to small, flat plates with a diameter of
170-210 mm.
Do not place any hollow items in the front right
of the lower basket as the detergent dispenser
should not be prevented from opening.
A
B
D
B
1
2

14
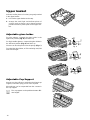
Upper basket
Delicate, smaller pieces of crockery are gently washed
in the upper basket.
1. Pull out the upper basket to the stop.
2. Arrange the small, light and delicate pieces of
crockery such as saucers, cup’s, glasses and tem-
perature-resistant plastic parts in the upper bas-
ket.
Adjustable glass holder
For wine glasses, suspend the glass holder in the
right-hand position (Fig. A) and fold it up.
For high, tumbler glasses, suspend the glass holder in
the left-hand position (Fig. B) and fold it up.
Glasses can also be placed over the prongs (Fig. C).
To unload the glass holder, or if it is not being used, fold
it back to the right.
Adjustable Cup Support
Arrange crockery offset on and below the hinged cup
support, so that the spray jet can reach all parts.
Wine glasses can be suspended from the cut-outs in
the cup support.
The cup support can be positioned at two diffe-
rent heights.
Fig. A
Fig. B
Fig. C

15
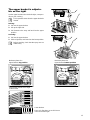
The upper basket is adjusta−
ble on the right
Set the upper basket to the desired height, correspon-
ding to your crockery.
This is possible even when the upper basket is
loaded.
Raising:
1. Pull out the upper basket.
2. Lift up the right side.
3. Pull forward to the stop, and latch into the upper
position.
Lowering:
1. Pull out the upper basket
2. Lift the right side, and lower into the lower position.
Before washing, check that the spray arm can
rotate freely.
∅ 19
∅ 25
∅ 30
Maximum plate size
Upper basket: top position
Maximum plate size
Upper basket: bottom position
∅ 21
∅ 25
∅ 28
Large plates placed at an angle
Lower basket
Lower Basket:
Place only flat plates up to Ø 210 mm
in the front at the right.

16
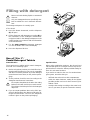
Filling with detergent
Never use hand cleaning liquids or commercial
cleaners.
Only use detergents that are specifically mar-
ked as suitable for use in domestic dishwas-
hers.
The detergent dispenser is normally open.
If it is closed:
1. Press the button downwards, and the dispenser
(A) will open.
2. Fill the dispenser with detergent according (B) to
the instructions of the detergent manufacturer.
Only place ”tabs” in the detergent dispenser or the
cutlery basket in accordance with the information
of the manufacturer.
3. For the warm prewash programme, detergent
can also be filled in the second hollow (C).
4. Press the dispenser lid shut.
Use of 3 in 1" /
Combi Detergent Tablets
General Advice
These products are tablets which contain detergent,
rinse-aid and a softening agent.
1. Before using these products you should first check
that the water hardness in your area is compatible
with the use of these products as per the detergent
manufactures instructions (on the product packa-
ging).
2. These products should be used according to the
detergent manufacturers instructions.
Do not place the tablets in the tub or the cutlery
basket as this will result in poor wash results.
The tablets should be placed in the detergent
dispenser.
3. If you encounter problems when using “3in1” pro-
ducts for the first time, then please contact the de-
tergent manufacturers care line (the telephone
number is given on the product packaging).
Special Advice
When using combination products, the rinse-aid and
salt indicator lights are no longer useful. It may be hel-
pful therefore to select the lowest possible setting for
rinse-aid and water hardness.
If you decide to switch to the use of a standard teter-
gent system, we advise that you:
- refill both the salt and rinse aid compartments.
- switch the water hardness setting to the highest
possible position and run for three normal cycles
without a load.
- re-adjust the setting according to the water hard-
ness in your area (as per the instruction manual).

17
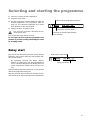
Selecting and starting the programme
1. Push the crockery basket completely in.
2. Press the main switch.
3. Use the programme selection button to select the
desired programme. See programme table on
page 19. The selected programme and control
lamp will flash on the control panel.
4. Fold up the door, and press it shut.
The door lock must latch, otherwise the ma-
chine will not start.
The programme starts after 3 seconds.
Do not open the door after the programme has
started! To prevent scolding and damage to units
by escaping steam.
Delay start
The start of the selected programme can be delayed
between 1 and 9 hours in steps of 1 hour using the “DE-
LAY START” button.
- By repeatedly pressing the button “DELAY
START”, the delay time can be programmed in
hours, and will be displayed in the display field. The
control lamp flashes until the door has been clo-
sed.
Before washing commences the door can be opened
without the programme being lost.
After the pre-selected start time has expired, the ma-
chine starts up the selected programme automatically.
Programme selection button
Control lamp for programme selection
Start time / Remaining time display /
Error message
Delay start control lamp
Delay start button

18
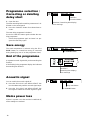
Programme selection /
Correcting or deleting
delay start
1. Open the door.
The time remaining before washing commences is in-
dicated on the control panel.
2. Press the “CANCEL” button for at least three se-
conds.
The start delay programme is deleted.
Press the “CANCEL” button again to delete the was-
hing programme.
- Select the programme again and start it or pro-
gram the start delay again.
Save energy
The wash temperature is reduced using the “ECO
PLUS” button, as a result less energy is consumed
during heating up (see “e” on the programme chart).
End of the programme
A repeated acoustic signal tells you that washing has
finished.
A line flashing in the programme display also indicates
that washing has finished.
Acoustic signal
You can switch the acoustic signal off.
1. Press the “ECO PLUS” and “DELAY START” but-
tons simultaneously until the acoustic signal stops.
2. Press the “ECO PLUS” and “DELAY START” but-
tons again to switch the acoustic signal on again.
Mains power loss
If there is a power cut or the machine is switched off,
all the settings are retained.
CANCEL /
Correction butto
n
Start time / Remaining time display /
Error message
”ECO PLUS” button
Start time /
Remaining time display /
Error message
Delay start button
”ECO PLUS” button

19
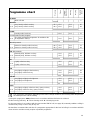
Programme chart
Pre-rinse
Clean
Interme-
diate Rinse
Rinsing
Drying
Duration
(min.)
Pre-wash
1 Wash off cold 5
Intensive
2
2 + e
Very heavily-soiled crockery
Very heavily-soiled crockery
45°C
40°C
65°C
60°C
70°C
65°C
87
81
Normal
3 Heavily-soiled crockery 60°C 70°C 75
Recommended routine program
3 + e
The most economical programme for stubborn dirt.
“Energielabel” AAB *)
50°C 68°C 2.5 h
BIO with prewash
4
4 + e
Normal to heavily-soiled crockery
Normal to heavily-soiled crockery
40°C
35°C
45°C
40°C
70°C
65°C
75
68
ECO with prewash
5
5 + e
Normally dirty, delicate crockery
Normally dirty, delicate crockery
50°C
40°C
70°C
65°C
65
61
BIO
6
6 + e
Lightly soiled crockery
Lightly soiled crockery
45°C
40°C
70°C
65°C
65
61
ECO
7
7 + e
Very lightly to lightly soiled crockery
Very lightly soiled crockery
50°C
40°C
70°C
65°C
59
54
Delicate
8
8 + e
Very lightly to lightly soiled glasses
Very lightly soiled glasses
45°C
40°C
65°C
60°C
53
50
Quick
9
9 + e
Very lightly to lightly soiled crockery / party crockery
Very lightly soiled crockery / party crockery
45°C
40°C
65°C
60°C
42
37
The programme data differs depending on the mains voltage variations, the incoming water temperature,
the water pressure and the loading.
*) Using this programme, AAB performance in accordance with the EN 50242 is achieved.
A = Best energy efficiency A = Best cleaning result A = Best drying result
For the test washes in accordance with the test standard EN 50 242 (see page 31) extremely stubborn soiling is
used that only rarely occurs in day to day use.
We therefore recommend the selection of a programme appropriate for the level of soiling in accordance with this
chart. Dried-on residues mostly requires a powerful programme.

20
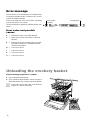
Error message
The electronics of the dishwasher can independently
recognise and display faults. If a fault occurs, an error
code in the display will blink.
Please note down this error code before contacting
your local Service Force Centre.
The error message is deleted by switching off the main
switch.
Error codes and possible
causes
A = Water tap closed, or feed filter blocked.
C = Drain hose, coarse or fine filter or sink trap
blocked
E = Water pressure too low, water tap not comple-
tely opened, feed line or feed filter blocked,
machine losing water.
H = Call Service Force
L = Call Service Force
P = Call Service Force
U = Call Service Force
Unloading the crockery basket
After the washing programme is complete:
1. First unload the lower basket.
2. Then unload the upper basket, so that no drops of
water fall onto the dry crockery in the lower basket.
Inspect the coarse filter after every washing
sequence. Clean as necessary.
Main switch
ON/OFF
Control panel
Page is loading ...
Page is loading ...
Page is loading ...
Page is loading ...
Page is loading ...
Page is loading ...
Page is loading ...
Page is loading ...
Page is loading ...
Page is loading ...
Page is loading ...
Page is loading ...
-
 1
1
-
 2
2
-
 3
3
-
 4
4
-
 5
5
-
 6
6
-
 7
7
-
 8
8
-
 9
9
-
 10
10
-
 11
11
-
 12
12
-
 13
13
-
 14
14
-
 15
15
-
 16
16
-
 17
17
-
 18
18
-
 19
19
-
 20
20
-
 21
21
-
 22
22
-
 23
23
-
 24
24
-
 25
25
-
 26
26
-
 27
27
-
 28
28
-
 29
29
-
 30
30
-
 31
31
-
 32
32


Ask a question and I''ll find the answer in the document
Finding information in a document is now easier with AI
Related papers
Other documents
-
LG D1450LF1 Owner's manual
-
Whirlpool WP 75/4 User guide
-
-
-
-
-
-
-
Bauknecht GSXA 7525 BK Program Chart
-