Power Fist 8234387 is a robust tool designed to tackle various scaling tasks efficiently. Its key features and potential applications include:
-
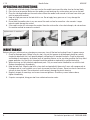
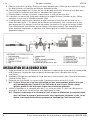
Scaling: The tool boasts 12 hardened steel needles that deliver 2,800 blows per minute, making it highly effective for removing rust, paint, and other coatings from metal surfaces.
-
Cleaning: With a working pressure of 90 PSI and an air consumption of 4.0 CFM, it effortlessly removes dirt, grime, and debris from concrete, stone, and other hard surfaces.
-
Shaping: Its precise needle action allows for controlled shaping and contouring of metal and stone, making it ideal for sculpting, carving, and creating artistic designs.
Power Fist 8234387 is a robust tool designed to tackle various scaling tasks efficiently. Its key features and potential applications include:
-
Scaling: The tool boasts 12 hardened steel needles that deliver 2,800 blows per minute, making it highly effective for removing rust, paint, and other coatings from metal surfaces.
-
Cleaning: With a working pressure of 90 PSI and an air consumption of 4.0 CFM, it effortlessly removes dirt, grime, and debris from concrete, stone, and other hard surfaces.
-
Shaping: Its precise needle action allows for controlled shaping and contouring of metal and stone, making it ideal for sculpting, carving, and creating artistic designs.


-
 1
1
-
 2
2
-
 3
3
-
 4
4
-
 5
5
-
 6
6
-
 7
7
-
 8
8
-
 9
9
-
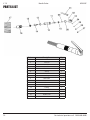 10
10
-
 11
11
-
 12
12
-
 13
13
-
 14
14
-
 15
15
-
 16
16
-
 17
17
-
 18
18
-
 19
19
-
 20
20
-
 21
21
-
 22
22
-
 23
23
-
 24
24


Power Fist 8234387 is a robust tool designed to tackle various scaling tasks efficiently. Its key features and potential applications include:
-
Scaling: The tool boasts 12 hardened steel needles that deliver 2,800 blows per minute, making it highly effective for removing rust, paint, and other coatings from metal surfaces.
-
Cleaning: With a working pressure of 90 PSI and an air consumption of 4.0 CFM, it effortlessly removes dirt, grime, and debris from concrete, stone, and other hard surfaces.
-
Shaping: Its precise needle action allows for controlled shaping and contouring of metal and stone, making it ideal for sculpting, carving, and creating artistic designs.
Ask a question and I''ll find the answer in the document
Finding information in a document is now easier with AI
in other languages
- français: Power Fist 8234387 Manuel utilisateur
Related papers
-
Power Fist 0450071 Owner's manual
-
-
-
-
-
-
-
-
-
Other documents
-
 pro.point 8345381 User manual
-
Powermate 024-0299CT User manual
-
Sioux Tools 5263 User manual
-
Chicago Pneumatic Lubricator 43, 1300 Operating instructions
-
Powerfist 3400217 Owner's manual
-
Sealey SA501 Operating instructions
-
Ryobi RLT36 User manual
-
Harbor Freight Tools Compact Air Needle Scaler Owner's manual
-
Global Industrial 133716 18 Inch Industrial Grade Air Needle Scaler User manual
-
Sealey SA660 Operating instructions
