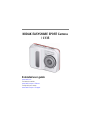
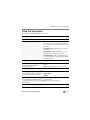
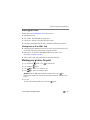
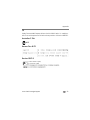
Kodak C135 User manual
- Category
- Action sports cameras
- Type
- User manual
This manual is also suitable for


Eastman Kodak Company
Rochester, New York 14650
© Eastman Kodak Company, 2012
All screen images are simulated.
Kodak, EasyShare Sport, Max, Perfect Touch, and Pulse are trademarks of Eastman
Kodak Company.
4H8874_en

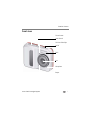
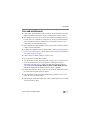
Product features
www.kodak.com/go/support
i
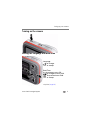
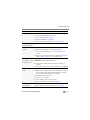
Front view
Lens
On/Off
Microphone
Video Record
Self-timer/Video light
Shutter button
Flash
Beeper

ii www.kodak.com/go/support
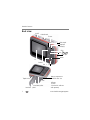
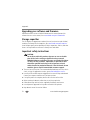
Product features
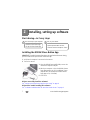
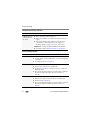
Back view
OK
Wide Angle/
Telephoto
(Magnify)
SD/SDHC Card* slot
Tripod socket
LCD
Share
On/Off
Video Record
Shutter
Delete
Strap post
Flash
USB port,
A/V Out*
Menu
Review
Inner battery door
Outer battery door
*Card and AV cable are
sold separately
Battery compartment

www.kodak.com/go/support iii
Table of contents 1
1 Setting up your camera .........................................................................1
Attaching the wrist strap............................................................................... 1
Opening the doors ........................................................................................2
Loading the AA batteries...............................................................................3
Inserting an SD or SDHC Card (not included)..................................................4
Closing the doors..........................................................................................5
Turning on the camera ..................................................................................6
Setting the language and date/time............................................................... 6
2 Installing, setting up software ...............................................................7
Start sharing—in 2 easy steps.......................................................................7
Installing the KODAK Share Button App.........................................................7
Setting up the Share Button App (one-time setup) .........................................8
After setting up the Share Button App ...........................................................9
3 Taking pictures/videos .........................................................................10
Taking pictures............................................................................................10
Taking a video ............................................................................................10
Understanding the picture-taking icons........................................................12
Know when your batteries need attention....................................................12
Using the digital zoom ................................................................................13
Using the flash............................................................................................13
Using different modes .................................................................................14
Using shortcuts ...........................................................................................16
Using the self-timer and burst .....................................................................17
Using the camera under water.....................................................................18
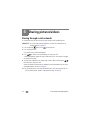
4 Sharing pictures/videos .......................................................................19
Sharing through social networks..................................................................19
Tagging pictures/videos with keywords........................................................20
Marking pictures/videos for emailing ...........................................................21

iv www.kodak.com/go/support
Table of contents
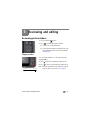
5 Reviewing and editing .........................................................................22
Reviewing pictures/videos ...........................................................................22
Deleting pictures/videos ..............................................................................23
Viewing pictures/videos in different ways.....................................................24
A smarter way to find and enjoy your pictures..............................................25
Understanding the review icons...................................................................26
Creating a slide show..................................................................................27
Displaying pictures/videos on a television.....................................................28
Using the menu button in review.................................................................29
Cropping pictures........................................................................................29
Editing videos .............................................................................................30
Selecting multiple pictures/videos ................................................................32
Rotating pictures.........................................................................................32
Using KODAK PERFECT TOUCH Technology.................................................33
Adding a date stamp...................................................................................33
6 Doing more with your camera .............................................................34
Using the menu button to change settings in picture taking mode................34
Using the Setup menu.................................................................................36
7 Transferring, printing pictures .............................................................38
Printing pictures..........................................................................................39
Marking your pictures for print ....................................................................40
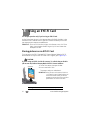
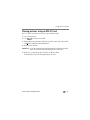
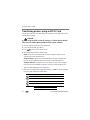
8 Using an EYE-FI Card ...........................................................................41
Storing pictures on an EYE-FI Card ..............................................................41
Sharing pictures using an EYE-FI Card..........................................................42
Transferring pictures using an EYE-FI Card...................................................43
Other EYE-FI Information.............................................................................44
9 Troubleshooting ..................................................................................45
Camera problems........................................................................................45
Getting help on the Web.............................................................................49
10 Appendix ...........................................................................................50

www.kodak.com/go/support v
Camera specifications .................................................................................50
Care and maintenance ................................................................................52
Upgrading your software and firmware........................................................ 53
Storage capacities.......................................................................................53
Important safety instructions .......................................................................53
Battery replacement, battery life..................................................................54
Limited warranty .........................................................................................55
Regulatory compliance ................................................................................56

1 www.kodak.com/go/support
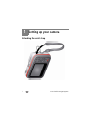
1 Setting up your camera
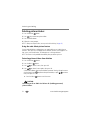
Attaching the wrist strap

Setting up your camera
www.kodak.com/go/support
2
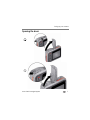
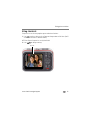
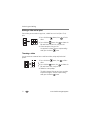
Opening the doors
1
2


Setting up your camera
www.kodak.com/go/support
4
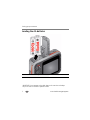
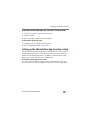
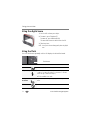
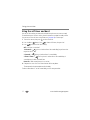
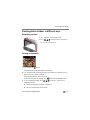
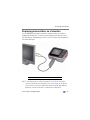
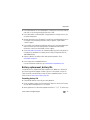
Inserting an SD or SDHC Card (not included)
You must insert an SD or SDHC Card (up to 32 GB) to store pictures/videos.
NOTE: Your camera also accepts EYE-FI Cards, X2 or higher, with a firmware version of 4.5174 or higher.
View and update firmware using the Eye-Fi Center Software that accompanies the card.
CAUTION:
A card can only be inserted one way; forcing it may cause
damage. Inserting or removing a card while the camera is on may
damage the pictures, the card, or the camera.
Purchase accessories www.kodak.com/go/accessories
1
Turn off the camera.
2
Insert a card until
it clicks.
3
Turn on the camera.
SD/SDHC Card (Accessory)

5 www.kodak.com/go/support
Setting up your camera
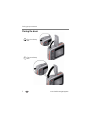
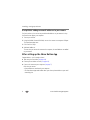
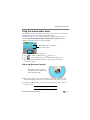
Closing the doors
1
2
Close inner battery
door.
Close outer battery
door.

Setting up your camera
www.kodak.com/go/support
6
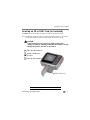
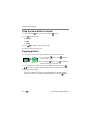
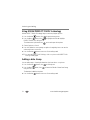
Turning on the camera
Setting the language and date/time
NOTE: To change language in the future, use the Setup Menu (see page 36).
to change current field.
for previous/next field.
OK
to accept.
At the prompt, press OK.
to change.
OK
to accept.
Language:
Date/Time:

7 www.kodak.com/go/support
2 Installing, setting up software
Start sharing—in 2 easy steps
Installing the KODAK Share Button App
IMPORTANT:
To enable the camera Share button for email and social network sharing,
you must install and set up the KODAK Share Button App.
1 Verify that the computer is connected to the Internet.
2 Turn on the camera.
3 Using the KODAK Camera USB Cable, connect the
camera to a computer USB port.
4 Watch your computer—when the KODAK Camera
Setup App prompts you, click Install Now. (If your
computer asks you to allow the KODAK Camera
Setup App to run, click Allow.)
5 Click Finish.
Did you successfully install the software?
See “Setting up the Share Button App (one-time setup)” on page 8.
Did you have trouble installing the software?
See “If software installation does not start after several minutes” on page 8.
• Install the Share Button App.
• Set up the Share Button App.
One-time setup on your computer:
• Take pictures/videos.
• Choose pictures/videos to share.
• Connect camera to computer—share!
Then, on your camera:
1
2

Installing, setting up software
www.kodak.com/go/support
8
If software installation does not start after several minutes
1 Verify that the computer is connected to the Internet.
2 Open My Computer.
3 Open the KODAK Setup App to start the installation.
If the installer still doesn’t start
1 Download it from www.kodak.com/go/camerasw.
2 After it’s downloaded, double-click to install it.
Setting up the Share Button App (one-time setup)
After you install the Share Button App on your computer and click Finish (see page 7),
the App automatically launches.* It prompts you through a one-time setup of your
email and social networking preferences. The addresses and sites that you choose
appear on your camera when you press the Share button.
If the Share Button App doesn’t launch
The camera may have timed out. Simply unplug the camera and turn it off. Plug it
back in and turn it on. When the App launches, perform the one-time setup, above.

9 www.kodak.com/go/support
Installing, setting up software
A helpful hint: adding new email addresses to your camera
For future reference, the easiest way to add email addresses
to your camera
is using
the Share Button App
on your computer
.
1 Turn on your camera.
2 Using the KODAK Camera USB Cable, connect the camera to a computer USB port.
The Share Button App starts.
3 Click Email List Setup.
4 Add email addresses.
The next time you connect the camera to the computer, the email addresses are added
to your camera.
After setting up the Share Button App
Congratulations—you’re ready to share!
■ Take some pictures/videos (see page 10).
■ Choose pictures/videos to share (see page 19).
■ Connect the camera to your computer (see page 7).
Each time you connect:
• Pictures/videos are transferred to your computer
• The Share Button App emails and/or shares your chosen pictures/videos on your social
networking sites.

www.kodak.com/go/support 10
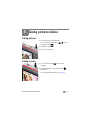
3 Taking pictures/videos
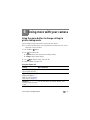
Taking pictures
1 The camera turns on in Auto mode.
(If it’s in a different mode, press until the
LCD displays
Auto .)
2 Compose the picture.
3 Press the Shutter button.
Taking a video
1 Press the Video Record button to start
recording.
2 To stop recording, press the Video Record
button again.
To review and work with videos, see page 22.

11 www.kodak.com/go/support
Taking pictures/videos
Reviewing the picture/video just taken
After you take a picture/video, the LCD briefly displays the picture or the first frame of
a video.
NOTE: The camera captures audio during recording, but audio
cannot
be heard during playback on the
camera. Audio
can
be heard when the video is played on a computer or when the camera is
connected to a TV (see page 28).
To review pictures/videos anytime, see page 22.
Delete the current picture/video
Play/pause a picture/video
While a picture/video appears on
your camera screen, you may:

Taking pictures/videos
www.kodak.com/go/support
12
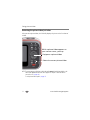
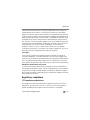
Understanding the picture-taking icons
Know when your batteries need attention
The battery level icon appears when the battery requires your attention.
Full
Three quarters
Half
One Quarter
Critical
Purchase extra batteries for your special event www.kodak.com/go/accessories
Battery level
Capture mode
Pictures/time remaining
Zoom indicator
Keyword tag
Self timer
Flash mode
Exposure compensation
Time/Date stamp
Video/time remaining

13 www.kodak.com/go/support
Taking pictures/videos
Using the digital zoom
1 Use the LCD to frame your subject.
2 To zoom in, press Telephoto (T).
To zoom out, press Wide Angle (W).
The zoom slider shows the zoom level on the LCD.
3 Take the picture.
NOTE: You may notice decreased image quality when using digital
zoom.
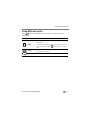
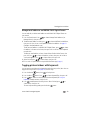
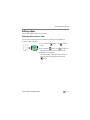
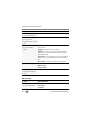
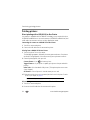
Using the flash
Press the Flash button repeatedly until the LCD displays the desired flash mode.
Flash modes Flash fires
Auto When the lighting conditions require it.
Fill (Flash On) Every time you take a picture, regardless of the lighting
conditions. Use when the subject is in shadow or is “backlit”
(when the light is behind the subject).
NOTE: Not available in Auto mode.
Red-eye
Reduction
Preflash A preflash fires, shrinking the eye pupil, before the picture is
taken.
Off Never
Flash button
Page is loading ...
Page is loading ...
Page is loading ...
Page is loading ...
Page is loading ...
Page is loading ...
Page is loading ...
Page is loading ...
Page is loading ...
Page is loading ...
Page is loading ...
Page is loading ...
Page is loading ...
Page is loading ...
Page is loading ...
Page is loading ...
Page is loading ...
Page is loading ...
Page is loading ...
Page is loading ...
Page is loading ...
Page is loading ...
Page is loading ...
Page is loading ...
Page is loading ...
Page is loading ...
Page is loading ...
Page is loading ...
Page is loading ...
Page is loading ...
Page is loading ...
Page is loading ...
Page is loading ...
Page is loading ...
Page is loading ...
Page is loading ...
Page is loading ...
Page is loading ...
Page is loading ...
Page is loading ...
Page is loading ...
Page is loading ...
Page is loading ...
Page is loading ...
Page is loading ...
Page is loading ...
Page is loading ...
Page is loading ...
Page is loading ...
Page is loading ...
Page is loading ...
-
 1
1
-
 2
2
-
 3
3
-
 4
4
-
 5
5
-
 6
6
-
 7
7
-
 8
8
-
 9
9
-
 10
10
-
 11
11
-
 12
12
-
 13
13
-
 14
14
-
 15
15
-
 16
16
-
 17
17
-
 18
18
-
 19
19
-
 20
20
-
 21
21
-
 22
22
-
 23
23
-
 24
24
-
 25
25
-
 26
26
-
 27
27
-
 28
28
-
 29
29
-
 30
30
-
 31
31
-
 32
32
-
 33
33
-
 34
34
-
 35
35
-
 36
36
-
 37
37
-
 38
38
-
 39
39
-
 40
40
-
 41
41
-
 42
42
-
 43
43
-
 44
44
-
 45
45
-
 46
46
-
 47
47
-
 48
48
-
 49
49
-
 50
50
-
 51
51
-
 52
52
-
 53
53
-
 54
54
-
 55
55
-
 56
56
-
 57
57
-
 58
58
-
 59
59
-
 60
60
-
 61
61
-
 62
62
-
 63
63
-
 64
64
-
 65
65
-
 66
66
-
 67
67
-
 68
68
-
 69
69
-
 70
70
-
 71
71


Kodak C135 User manual
- Category
- Action sports cameras
- Type
- User manual
- This manual is also suitable for
Ask a question and I''ll find the answer in the document
Finding information in a document is now easier with AI
Related papers
-
Kodak C123 User manual
-
-
-
-
-
-
-
-
-
Kodak M532 User manual