CDR-882
DUAL DRIVE CD RECORDER
HHB Communications Ltd
73-75 Scrubs Lane, London NW10 6QU, UK
T +44 (0)20 8962 5000 E [email protected] W www.hhb.co.uk
In the USA, Central & South America: Sennheiser Electronic Corporation
T 860 434 9190 E [email protected] W www.hhbusa.com
In Canada: HHB Communications Canada Ltd
T 416 867 9000 E [email protected] W www.hhbcanada.com
www.hhb.co.uk
Version 1.0 - December 2007
USER MANUAL
#23282 - CDR882 Ops Cover V2 29/2/08 14:56 Page 1

CDR-882
1
CDR-882 User Manual Version 1.0 www.hhb.co.uk
La versión en español del manual de operaciones la encontrará en la web de HHB: www.hhb.co.uk
La version française de ce manual d’utilisation est disponsible sur le site web de HHB: www.hhb.co.uk
Eine deutsch Version dieser Bedienungsangleitung ist im Internet unter der Adresse: www.hhb.co.uk erhältlich.

Statutory Notifications
2
CDR-882 User Manual Version 1.0www.hhb.co.uk
1 Read these instructions.
2 Keep these instructions.
3 Heed all warnings.
4 Follow all instructions.
5 Do not use this apparatus near water.
6 Clean only with dry cloth.
7 Do not block any ventilation openings. Install in accordance
with the manufacturer’s instructions.
8 Do not install near any heat sources such as radiators, heat
registers, stoves, or other apparatus (including amplifiers)
that produce heat.
9 Do not defeat the safety purpose of the polarized or
grounding-type plug. A polarized plug has two blades with
one wider than the other. A grounding type plug has two
blades and a third grounding prong. The wide blade or the
third prong are provided for your safety. If the provided
plug does not fit into your outlet, consult an electrician for
replacement of the obsolete outlet.
10 Protect the power cord from being walked on or pinched
particularly at plugs, convenience receptacles, and the point
where they exit from the apparatus.
11 Only use attachments/accessories specified by the
manufacturer.
12 Use only with the cart, stand, tripod, bracket, or table
specified by the manufacturer, or sold with the apparatus.
When a cart is used, use caution when moving the cart/
apparatus combination to avoid injury from tip-over.
13 Unplug this apparatus during lightning storms or when
unused for long periods of time.
14. Refer all servicing to qualified service personnel. Servicing is
required when the apparatus has been damaged in any way,
such as power-supply cord or plug is damaged, liquid has
been spilled or objects have fallen into the apparatus, the
apparatus has been exposed to rain or moisture, does not
operate normally, or has been dropped.
15. This apparatus is supplied with a remote control unit which
contains replaceable non-rechargeable batteries. The
remote control unit and the batteries must not be exposed
to excessive heat such as sunshine, fire or the like. The
disposal of used batteries should be in accordance with local
re-cycling and waste disposal regulations. Never dispose
of batteries in a fire because they may explode and cause
injury.
WARNING: To reduce the risk of fire or electric shock, do not
expose this apparatus to rain or moisture.
It is important that the apparatus shall not be exposed to
dripping or splashing and that no objects filled with liquids, such
as vases shall be placed on the apparatus.
Do not expose this apparatus to drips or splashes.
Do not place any objects filled with liquids, such as vases, on
the apparatus.
Do not install this apparatus in a confined space such as a
book case or similar unit.
Slots and openings in the cabinet are provided for ventilation
and to ensure reliable operation of the product and to protect
it from overheating. Please ensure adequate space around the
apparatus for sufficient ventilation. Ventilation should not be
impeded by covering the ventilation openings with items, such
as newspapers, tablecloths curtains etc.
The apparatus draws nominal non-operating power from the
AC outlet with its POWER switch in the off position.
The apparatus should be located close enough to the AC
outlet so that you can easily grasp the power cord plug at any
time.
An apparatus with Class I construction shall be connected to
an AC outlet with a protective grounding connection.
The MAINS plug or the appliance coupler is used as the
disconnect device. Either device shall remain readily operable
when the apparatus is installed for use.
No naked flames, such as lighted candles, should be placed on
the apparatus.
WARNING: excessive sound pressure levels from earphones
and headphones can cause hearing loss.
•
•
•
•
•
•
•
•
•
Important Safety Instructions

Statutory Notifications
3
CDR-882 User Manual Version 1.0 www.hhb.co.uk
Important Safety Precautions
CAUTION: TO REDUCE THE RISK OF ELECTRIC SHOCK, DO NOT
REMOVE COVER (OR BACK). NO USER-SERVICEABLE PARTS
INSIDE. REFER SERVICING TO QUALIFIED SERVICE PERSONNEL.
The lightning flash with arrowhead symbol, within equilateral
triangle, is intended to alert the user to the presence of
uninsulated “dangerous voltage” within the product’s enclosure
that may be of sufficient magnitude to constitute a risk of electric
shock to persons.
The exclamation point within an equilateral triangle is intended
to alert the user to the presence of important operating
and maintenance (servicing) instructions in the literature
accompanying the appliance.
This appliance has a serial number located on the rear panel.
Please record the model number and serial number and
retain them for your records.
Model Number: .............................................
Serial Number: .............................................
For U.S.A.
TO THE USER
This device complies with Part 15 of the FCC rules. Operation
is subject to the following two conditions: (1) This device may
not cause harmful interference . And (2) This device must
accept any interference received including interference that
may cause undesired operation.
CAUTION:
This product satisfies FCC regulations when shielded cables
and connectors are used to connect the unit to other
equipment. To prevent electromagnetic interference with
electric appliances such as radios and televisions, use
shielded cables and connectors for connections.
For Canada
TO THE USER
This Class B digital apparatus complies with Canadian ICES-
003
Cet appareil numerique de la Classe B est conforme a la
norme NMB-003 du Canada
WARNING: TO PREVENT FIRE OR SHOCK HAZARD, DO NOT EXPOSE
THIS APPLIANCE TO RAIN OR MOISTURE.
Safety Information
This product has been designed and manufactured according to
FDA regulations “title 21, CFR, chapter 1, subchapter J, based
on the Radiation Control for Health and Safety Act of 1968”, and
is classified as a class 1 laser product. There is no hazardous
invisible laser radiation during operation because invisible laser
radiation emitted inside of this product is completely confined in
the protective housings.
CAUTION
DO NOT REMOVE THE PROTECTIVE HOUSING USING A
SCREWDRIVER.
USE OF CONTROLS OR ADJUSTMENTS OR PERFORMANCE OF
PROCEDURES OTHER THAN THOSE SPECIFIED HEREIN MAY
RESULT IN HAZARDOUS RADIATION EXPOSURE.
IF THIS PRODUCT DEVELOPS TROUBLE, CONTACT YOUR
NEAREST QUALIFIED SERVICE PERSONNEL, AND DO NOT USE
THE PRODUCT IN ITS DAMAGED STATE.
•
•
•

4
CDR-882 User Manual Version 1.0www.hhb.co.uk
Contents
Contents
Important Safety Instructions ........................................ 2
Important Safety Precautions ........................................ 3
Safety Information ........................................................ 3
Contents...................................................................... 4
Introduction ................................................................. 6
What’s in the box ........................................................6
Unpacking ............................................................6
CDR-882 Primary Features ...........................................7
Cautions and guidance on installation ..............................7
Safety Guidelines ................................................... 7
Installation ............................................................7
Care & cleaning ....................................................8
Installing the remote control batteries ...................... 8
Using the RC-882 Remote Control handset ...............9
Compatible disc types ............................................9
Connectivity ............................................................... 10
Audio Inputs ..............................................................10
Audio Outputs ...........................................................10
Other Connectors ...................................................... 10
Connector Details ......................................................10
Front Panel Features .................................................. 12
Alphanumeric Display ................................................. 15
RC-882 Remote Control .............................................. 16
Direct Access keys .................................................... 16
Record keys ..............................................................16
Quick Start Guide ....................................................... 17
Recording a CD from an analogue source......................17
Recording a CD from a digital source............................17
Playing a CD ............................................................. 18
Playing one disc while recording another .......................18
Reference List of the CDR-882’s other main functions ....19
Basic Operation .......................................................... 20
Disc insertion and removal .......................................... 20
Drive selection ..........................................................20
Transport Controls ....................................................20
Play/Pause ........................................................20
Stop ..................................................................20
FFWD & FREW ...................................................20
Manual Record .........................................................21
Selecting a track (AMS) ..............................................21
Fader .......................................................................21
Selecting an input ...................................................... 22
Time displays ............................................................ 22
Monitoring ................................................................23
CDR-882 Monitoring system ....................................... 23
Main Outputs ...................................................... 23
Headphone Outputs ............................................. 23
Recording ................................................................. 24
Synchronised Recording ....................................... 24
Record one track ................................................ 24
Record multiple tracks ......................................... 24
Finalisation in Synchronised Recording ....................25
Time Interval track ID generation ........................... 25
Automatic and Manual track IDs .................................. 25
Finalising .................................................................. 25
Recording on CD-RWs ................................................ 26
Disc types ................................................................26
Digital Recording restrictions ....................................... 26
Menu System ............................................................. 27
Menu Navigation .......................................................27
Example ................................................................... 28
The Submenus .......................................................... 28
Audio Submenu .........................................................29
Digital Input Level ................................................29
Input Balance .....................................................29
Fade-out Time .....................................................29
Input Dither ........................................................ 30
Phones Mix ........................................................ 30
Output Mix .........................................................30
Clock Submenu ......................................................... 31
Clock Source ...................................................... 31
Display Submenu .......................................................31
Contrast ............................................................31
Invert ................................................................. 31
Edit Marker Submenu ................................................. 32
Direct Mark ........................................................ 32
Auto-Cue Threshold .............................................32
DiscSpan Submenu .................................................... 32
Multi-Machine ..................................................... 32
Master/Slave ..................................................... 32
Fade-in Time .......................................................32
Fade-out Time .....................................................33
Overlap Time.......................................................33
Record Submenu ....................................................... 33
Record Sync .......................................................33
S/PDIF-i/p REC Start Trigger ................................ 33
Auto Track ID Trigger ...........................................34
Audio Threshold .................................................. 34
Track Length ...................................................... 34
Auto Finalize .......................................................34
Digital Output Format ........................................... 35
SCMS ................................................................35
Copy Speed ........................................................ 35
Parallel Port .............................................................36
Preset ...............................................................36
Inputs 1 to 5 ......................................................36
Outputs 1 to 3 .................................................... 36
General Submenu ...................................................... 37
Timer ................................................................37
Eject Block .........................................................37
Firmware Submenu ....................................................37

Contents
5
CDR-882 User Manual Version 1.0 www.hhb.co.uk
Advanced Features & Operation ................................... 38
Internal & External Clocks ...........................................38
Clock Source display ............................................38
Recording Features....................................................39
Single CD ...........................................................39
Dual Disc Modes and functions ..............................39
DualBurn Record .................................................39
DiscSpan Mode ................................................... 39
Track IDs In DiscSpan Mode .................................40
Identing Discs In DiscSpan Mode ...........................40
Playback in DiscSpan Mode ...................................41
Disc Copy ...........................................................41
Multi-Machine Operation .............................................42
Multi-Machine + DualBurn Operation.......................42
Multi-Machine + DiscSpan Operation ......................43
Replay Of Discs Recorded In Multi-DiscSpan Mode ....43
Program Play ............................................................44
Program Copy ........................................................... 44
CD Text ....................................................................45
Displaying CD Text ...............................................45
Entering CD Text .................................................45
Cueing ..................................................................... 46
Manual Cueing ....................................................46
Editing Marker Points ........................................... 46
Auto-Cue ............................................................ 46
Auto-Pause .........................................................46
Pre-selecting a track before loading a disc .....................47
Disc End Review ........................................................ 47
Erasing and Unfinalising discs ...................................... 47
Erasing/Initialising a single CD-RW ............................... 48
Erasing/Initialising two CD-RWs ................................... 48
SCMS ......................................................................48
Remote Control .......................................................... 49
Parallel Remote Control Port ....................................... 49
Pinout ................................................................49
Electrical characteristics .......................................49
RS232 LINK INPUT ...................................................50
Pinout ................................................................50
Port parameters .................................................50
Abridged command set ........................................50
Appendix 1 - Connector Pinouts .................................... 51
Analogue Inputs (Balanced) (1) ....................................51
AES/EBU Input (3) .....................................................51
Analogue Outputs (Balanced) (6) ..................................51
AES/EBU Output (8) ..................................................51
Multi-Machine RS232 Link Input (male) (11) ..................51
Multi-Machine RS232 Link Output (female) (4) ...............51
Parallel Remote Input (female) (13) .............................. 51
PS/2 Keyboard (15) ..................................................51
Appendix 2 - Menu Flow Diagrams ................................ 52
Submenus ................................................................ 52
Audio .......................................................................53
Clock ....................................................................... 54
Display ..................................................................... 54
Edit Marker ..............................................................54
DiscSpan ..................................................................55
Record.....................................................................56
Parallel Port .............................................................57
General ....................................................................58
Appendix 3 - Firmware Updates .................................... 59
Appendix 4 - Factory Defaults ...................................... 60
Appendix 5 - Specifications .......................................... 61
Notes ........................................................................ 62

Introduction
6
CDR-882 User Manual Version 1.0www.hhb.co.uk
Introduction
Thank you for buying this HHB Professional product. The
CDR-882 DualBurn CD Recorder is designed to record and
replay audio CDs in a broadcast or other professional audio
environment, and incorporates a number of features and
facilities that may be unfamiliar to users. In particular, the CDR-
882 permits the recording of programme material of longer
duration than could normally be accommodated on one CD
by recording across two or more separate discs, with user-
programmable intelligent cross-fading between consecutive
discs. It also permits two discs to be burnt simultaneously with
the same programme.
We recommend that you read this instruction manual at least
as far as the Basic Operation section, to familiarise yourself with
the unit’s layout, controls and operating system before use. The
Advanced Operation covers the more specialised features of
the CDR-882 and can be referred to as required once you are
familiar with the unit’s basic functions.
Please keep this manual in a safe place once you are sufficiently
familiar with the CDR-882 to use it without referral. You may
need it in the future.
Important - Please register your CDR-882 with HHB
Communications at http://www.hhb.co.uk. Registering your
machine will help us in providing you with after-sales service
should the need arise, and may also be of assistance in the
event of the unit being stolen.
Environment - The CDR-882’s range of operating temperature
and relative humidity (RH) are as follows:
Temperature: +5
o
C to +35
o
C (41
o
F to 95
o
F)
RH: less than 85%
Altitude: 2000m (operational), 15000m (non-operational)
Do not use the CDR-882 in a location where:
its ventilation apertures are blocked
it is in direct sunlight or strong artificial light
•
•
What’s in the box
Unpacking
Unpack the CDR-882 and its accessories with care. It is always
a good idea to store all packaging (if practical), in case you ever
need to return the unit to your HHB dealer for any reason.
The shipping carton should contain the items listed below.
Please contact your HHB dealer immediately if any of them are
missing or damaged.
CDR-882 Dual-drive CD recorder
Instruction manual
IEC-to-UK/EU/US power cable, as appropriate
Infra-red remote control handset
2 x AA batteries
2 x HHB CDR80HS CD-R discs
•
•
•
•
•
•

Introduction
7
CDR-882 User Manual Version 1.0 www.hhb.co.uk
CDR-882 Primary Features
Two shock-mounted recordable disc drives
64x128 pixel backlit dot matrix LCD display
11-segment dual LED bargraph meters with PPM
characteristics
Separate LED indication of drive status and headphone
source
Balanced (+4dBu) and unbalanced (-10dBu) analogue
inputs and outputs
24-bit A/D conversion with dither on recording
S/PDIF digital input and output (coaxial and optical
TOSlink), with full DAT track ID and PQ-code recognition/
transmission, and SCMS defeat
AES/EBU digital input and output
Switchable dither on digital inputs
Word clock input
Built-in sample-rate conversion (32-96kHz) on inputs
DiscSpan mode - continuous recording across two or
more discs, with automatic fade-in/fade-out and definable
overlap period and track ID point on each disc
Manual change-over operation available with DiscSpan
DualBurn mode - simultaneous recording onto both drives
Multi-Machine modes for longer unattended recording time
and/or multiple disc (>2) recording
CD copy function with track editing option
Fast auto-finalise modes - one disc finalises while other
disc records
Parallel remote control port with user-defined functionality
2 x RS232 serial remote control ports (for master and
slave operation)
10 second RAM shock buffer
Accepts all blank CD-R media (HHB CDR80HS
recommended)
Analogue and digital input level controls
Front panel headphone output with level control
Comprehensive infra-red remote control handset (RC-882)
Full SCMS control on recordings
CD Text support
Front and rear PS/2 keyboard inputs (for text input)
2U 19” rack mount chassis
Universal power supply
•
•
•
•
•
•
•
•
•
•
•
•
•
•
•
•
•
•
•
•
•
•
•
•
•
•
•
•
•
Cautions and guidance on
installation
Safety Guidelines
Operate only on a secure and level surface or securely
fastened into a rack, noting the precautions below
This equipment must be earthed (grounded)
This equipment must be powered from a polarised AC
supply
Only suitably trained personnel should service this
equipment
Please read and take note of all warning and informative
labels
Before starting any servicing operation, this equipment
must be isolated from the AC supply (mains) by removing
the incoming IEC mains connector
Fuses should only be replaced with ones of the same type
and rating as that indicated
Operate only in a clean, dry and pollutant-free environment
Do not operate in an explosive atmosphere
Do not allow any liquid or solid objects to enter the
equipment. Should this accidentally occur then immediately
switch off the unit and contact your service agent
Installation
If the CDR-882 is being installed in a rack, care should be taken
not to block the ventilation slots on the rear, top and left-hand
side. Although the CDR-882 itself does not generate a significant
degree of heat, it should never be installed immediately above or
below another piece of equipment that does, such as a power
amplifier. It is good practice in any case to fit vent blanks of at
least 1U above and below such equipment in a rack (unless they
short-circuit that equipments’ own fan-cooling, in which case
plain blanks should be fitted).
Care with ventilation should similarly be taken if the unit is free-
standing; never stack it on top of or underneath another piece of
equipment which generates a significant amount of heat.
Take care when routing cables around the unit; never drape
cables across the front panel of the CDR-882 as they may
obstruct the disc tray eject mechanisms.
Do not install or use the CDR-882 in a position where it is in
direct sunlight or high-intensity artificial light. Never attempt to
move the unit while it is in operation.
•
•
•
•
•
•
•
•
•
•

Introduction
8
CDR-882 User Manual Version 1.0www.hhb.co.uk
Care & cleaning
Always switch off and disconnect the unit from the mains before
cleaning. The outside surfaces of the unit may be cleaned with
a soft dry cloth. For stubborn marks (such as from a liquid
spillage), a soft damp cloth may be used in conjunction with a
mild detergent solution (dilute a household detergent cleaner 5:1
with water). Wipe thoroughly dry with a dry cloth after. NEVER
use solvent cleaners of any kind.
Always switch the unit off and disconnect it from the AC supply
before moving it. NEVER move the unit while it is in use, as
this may permanently damage the disc(s) and/or the laser
mechanisms.
CDs should ALWAYS be handled with care. Hold discs only by
the edge or the centre hole. Never put discs “face down” on any
surface as they can scratch easily. Smudges and fingerprints
may be removed from a disc’s playing surface by wiping it gently
with a soft, lint-free cloth “across” the disc radius. Never rub
circumferentially. Stubborn marks can be removed by applying
a small amount of isopropyl alcohol (distilled water is often as
effective), again with a soft, lint-free cloth. Alternatively, use
a commercially available CD cleaning kit. NEVER use solvent
cleaners of any kind.
Installing the Remote Control batteries
To insert the batteries in the infra-red remote control handset:
Slide off the battery compartment lid on the rear of the
handset
Insert two AA batteries, taking care to orientate them
the correct way (refer to markings within the battery
compartment)
Slide battery compartment lid back on
Important! Please observe the following guidelines when
replacing batteries:
Always change both batteries at the same time
Always use two batteries of the same brand and type
Dispose of the old batteries in a responsible manner
– always observe local environmental guidelines
•
•
•
•
•
•

Introduction
9
CDR-882 User Manual Version 1.0 www.hhb.co.uk
Using the RC-882 Remote Control
handset
Make sure there are no obstacles between the handset
and the unit
The handset should work reliably within 7m of the unit, and
within 30° of the direct line between the handset and the
unit
Strong sunlight or fluorescent lighting may make remote
control operation less reliable
Remote control handsets for different equipment
sometimes interact. If the CDR-882 is installed adjacent
to other infra-red-controlled equipment, you should satisfy
yourself that the CDR-882’s handset is not affecting the
other equipment, or vice-versa. One or more items may
need to be moved if interaction is observed
A falling-off of the operating range of the handset will
generally indicate that it is time to change the batteries
Compatible disc types
The CDR-882 supports various CD types:
Red Book standard pressed audio CDs (play)
Red Book (CD-DA) audio on data or “audio” CD-R discs
(play and record), including unfinalised discs
Red Book (CD-DA) audio on data or “audio” CD-RW discs
(play and record), including unfinalised discs
NOTE: The CDR-882 does not play or record audio in the form
of data files (such as .wav or .mp3) on any disc format.
•
•
•
•
•
•
•
•

Connectivity
10
CDR-882 User Manual Version 1.0www.hhb.co.uk
All electrical connections to the CDR-882 (apart from
headphones and/or keyboard) are made via the rear panel.
Audio Inputs
Electronically-balanced analogue Left and Right in
(2 x XLR3F)
Unbalanced analogue Left and Right in ( 2 x phono/RCA)
AES/EBU input (XLR3F)
S/PDIF input (phono/RCA)
S/PDIF input (optical TOSlink connector)
Audio Outputs
Electronically-balanced Left and Right analogue out
(2 x XLR3M)
Unbalanced Left and Right analogue out ( 2 x phono/RCA)
AES/EBU output (XLR3M)
S/PDIF output (phono/RCA)
S/PDIF output (optical TOSlink connector)
Other Connectors
RS232 remote control port (D9M)
RS232 link connector (D9F)
Parallel remote control, function-programmable (D9F)
Word clock input (BNC)
QWERTY keyboard connector (PS/2)*
AC mains input (IEC)
*The keyboard connector is duplicated on the front panel.
Connector Details
Balanced L & R analogue inputs. These are electronically-
balanced on XLR3F connectors and can accept audio levels
of up to +24dBu without clipping. Nominal input sensitivity
is set at +4dBu for a digital level of -18dBFS. Nominal input
impedance is 10kΩ. The pinout for this (and all other inputs
and outputs) can be found at page 51.
Note that the CDR-882 has one set of audio inputs only;
internally, the input signals are routed to both disc drives.
Unbalanced L & R analogue inputs. Unbalanced analogue
inputs on phono connectors (RCA jacks) are also provided.
Nominal input sensitivity is -10dBu for a digital level of
-18dBFS. Maximum input level at these connectors is
+10dBu. Input impedance is 10kΩ.
AES/EBU digital input. Professional 2-channel digital audio
input conforming to AES3-1992 (r1997) amendment 4-
1999. Connector is an XLR3F, input impedance is 110Ω.
S/PDIF Coaxial digital input. Semi-pro/consumer 2-
channel digital audio input on a phono connector (RCA jack),
conforming to IEC60958-4. DAT track ID and PQ-code
recognition are enabled at this input and the SCMS flag is
under operator control. (See page 48).
S/PDIF Optical digital input. An S/PDIF digital audio input
can alternatively be applied via the optical TOSlink connector
using a suitable fibre-optic cable (less than 3m in length
recommended).
All digital inputs can accept data at a sample rate of between 32
& 96kHz. The signal is sample-rate converted internally to the
CD standard of 44.1kHz.
Note that recordings on the CDR-882 will only be made using
one of the input connectors (1) to (5) above at any one time.
The active input is set via the front panel I/P SELECT button.
(See page 13).
Balanced L & R analogue outputs. These are electronically-
balanced on XLR3M connectors, and will drive a maximum
audio level of +22dBu for 0dBFS. Nominal output level is
set at +4dBu for a digital level of -18dBFS. Nominal output
impedance is less than 100Ω.
Connectivity

Connectivity
11
CDR-882 User Manual Version 1.0 www.hhb.co.uk
Unbalanced L & R analogue outputs. These carry the
same audio signal as the main outputs (1) above, but in
unbalanced form on phono connectors (RCA jacks) at a
nominal level of -10dBu. Output level is calibrated internally
to be +8dBu from a maximum (digital clip) PCM signal level
of 0dBFS. Output impedance is 47Ω.
AES/EBU out. This provides a two-channel AES/EBU digital
output conforming to AES3-2003. The connector is an
XLR3M, output impedance 110Ω.
S/PDIF Coaxial digital output. A 2-channel “semi-pro”
digital output conforming to the IEC60958-4 is available at
this connector. Transmission of CD PQ codes and CD Text
data are enabled in the S/PDIF data stream; the signal
is otherwise the same as that available at the AES/EBU
connector (8).
Note that the channel status bits denoting whether the
digital outputs are “Pro” or “Consumer” may be set via the
menu system (Record > Digital Output Format), and that
this setting applies to both the AES/EBU and S/PDIF digital
outputs.
Also note that the S/PDIF output is used in Multi-Machine
modes to pass audio, clock and CD Text data between units.
S/PDIF Optical digital output. Standard TOSlink connector
carrying the same signal as (9) above, in optical form. Use a
standard optical TOSlink cable of not more than 3m. length.
RS232 Link Input connector. The CDR-882 can be fully
controlled remotely via RS232 serial commands. Pinout,
port parameters and an abridged command set can be
found at page 13. This port permits one or more (see
(12) below) CDR-882s to be controlled from a dedicated
computer with appropriate software, or by a proprietary
external control system (Crestron, AMX, etc.). A “crossed”
cable (i.e., one with transmit and receive pins cross-
connected) should be used when controlling the CDR-882
from an external control system. A D9M connector is used.
RS232 Link Output connector. This allows control
information to be passed from Master to Slave units in
Multi-Machine mode. It also allows multiple CDR-882s to be
controlled from a single RS232 controller.
The link connector is a D9F. The pinout is the same as the
RS232 input, except that the Data transmit and receive
pins (2 & 3) are reversed. Thus when “daisy-chaining”
CDR-882s, “straight” cables must be used, in which all
connections between machines are “pin-to-pin”. Note that
in multi-machine modes, the “master” CDR-882 generates
control data for the connected “slave” units.
Note that the RS232 link connector only passes control
data, not audio. In multi-machine modes, the audio signals
need to be distributed to multiple CDR-882s separately
using S/PDIF interconnections. See page 42 for full details
of Multi-Machine operation.
Parallel remote control connector. The CDR-882’s basic
transport commands can also be implemented by volt-free
contact closure at the pins of this connector (a D9F). Five
of the pins are designated as inputs, three as outputs
(tallies). The functions controlled by each of the inputs are
user-definable via the menu system. The source of the tally
outputs is similarly definable. Full information, including
pinout, is available at page 51. Assignment of inputs and
outputs is performed via the menu system; see page 36 for
full details.
Word Clock input. An input for an external 44.1kHz digital
audio word clock is provided on a BNC socket. The input
impedance is either 75Ω or high-impedance, set by the
termination switch adjacent to the connector.
Word clock selection and routing is done via the menu
system; see sections page 21 & page 31.
Keyboard input. A PS/2 connector is available on both
front and rear panels for the connection of a standard
QWERTY keyboard. The CDR-882 supports CD Text with
audio CDs in both record and replay modes, and connection
of a standard keyboard provides a rapid means of entering
textual data to be displayed on the front of suitably-equipped
CD players (including the CDR-882).
AC mains input. The CDR-882 is powered via a standard
IEC connector. The CDR-882’s design includes a universal
power supply and will accept all AC mains voltages from
100 to 240V, 50 to 60Hz.

Front Panel Features
12
CDR-882 User Manual Version 1.0www.hhb.co.uk
Front Panel Features
AC power switch.
Alphanumeric LED dot matrix display
Disc tray (Drive 1)
Disc tray (Drive 2)
EJECT button (Drive 1)
EJECT button (Drive 2)
Infra-red remote control sensor
PLAY/PAUSE button
STOP button
FFWD button
FREW button
RECORD button
SYNC RECORD button
AMS/Digital record level control, with ENTER/MARK push
function
Analogue record level control
MENU button
TEXT button
MONITOR button
I/P SELECT button
DISPLAY button
ID AUTO/MAN | AUTO-CUE button
ID WRITE | CUE button
DISC COPY button
PROGRAM button
MODE button
FINALIZE button
ERASE button
DRIVE SELECT button
PHONES SELECT button
FADER button
Keyboard socket
Headphone socket
Headphone level control
Drive select LEDs
Drive activity LEDs
Bargraph meter
All the CDR-882’s controls are on the front panel. Note that
many of the unit’s functions and setup options are controlled and
selected through the menu system, using the multi-character
LED matrix display, which is shown enlarged on page 15.

Front Panel Features
13
CDR-882 User Manual Version 1.0 www.hhb.co.uk
AC power switch. The large HHB logo at the left-hand of
the front-panel is the push-button on/off switch, and is
illuminated when the unit is on.
On power-up, the display shows the HHB and DualBurn
logos, followed by No Disc if there is no disc in a drive, or
Reading if there is. Note that for most CDR-882 functions,
the upper main line of the display shows the status of Drive
1, the lower that of Drive 2.
Alphanumeric display. The multi-character LED dot matrix
display is described in detail on page 15.
Disc tray (Drive 1). The disc drive accepts one disc at a
time. The drawer is motorised and can be manually opened
and closed with the EJECT button (5). When the drawer is
open, the display shows Open. (NOTE: If open with the unit
unpowered, the drawer closes automatically on power-up.)
Disc tray (Drive 2). As (3). The drawer can be operated
with the EJECT button (6).
EJECT button (Drive 1). Opens and closes Drive 1’s disc
tray. See page 20 for full details.
EJECT button (Drive 2). Operation as (5).
Remote control sensor. The infra-red sensor
receives commands from the remote control
handset. Keep the sensor unobstructed to ensure
correct functioning. The range of reliable operation
of the handset is shown in the diagram below.
NOTE: The CDR-882’s main transport controls (8) to (12)
normally only operate on one drive at a time, depending on the
drive selected with the DRIVE SELECT button (28).
PLAY/PAUSE button. Press from STOP to start playback.
If pressed during PLAY, playback will pause, and resume on
a further press. The display indicates PLAY mode with the H
symbol, or PAUSE mode with the B symbol. The green H B
in the button illuminates, steadily in PLAY mode and flashing
in PAUSE mode. See page 20 for more details.
STOP button. Pressing this button stops the disc from all
transport modes. The display shows the symbol A and the
yellow A symbol in the button illuminates.
FFWD button. Press and hold from PLAY to scan (search)
forward through the current track at increased speed, with
audio. Search speed increases the longer the button is
pressed. PLAY resumes when the button is released. See
page 20 for more details.
FREW button. This button has exactly the same function
as the FFWD button (10) above, except that the search
direction is reversed.
RECORD button. Press to prepare the drive for recording.
After checking disc type, etc., the drive enters RECORD
PAUSE mode. Recording is started by pressing the PLAY/
PAUSE button, which “releases” the paused state. See
page 21 for more details.
SYNC RECORD button. Press to start recording on
detection of a start trigger (e.g. a Track ID code or audio
level). SYNC RECORD also invokes Track ID marking. See
page 24 for full details.
AMS/Digital Rec Level control. Multi-purpose rotary
control with “press” function. As a rotary control, it
performs Automatic Music Search (AMS) to locate to a
particular track. It also provides the means of navigating the
menu system when in MENU mode.
The “press” function acts as an ENTER button in menu
navigation to select submenus and options. In PLAY mode,
it is used as a MARK button, to store the current play
position so it can be easily re-located to. See page 24
(AMS) and page 27 (Menu Navigation) for more details.
Analogue Rec Level control. This is a conventional record
level control for use when either of the analogue inputs are
selected as the input source. Record level is displayed on
the bargraph meters.
MENU button. Pressing this button puts the CDR-882
into MENU mode. A variety of unit parameters and settings
may be adjusted and selected via the menu system. These
include word clock source selection, setting of the various
multi-drive recording modes, parallel remote control port
setup, etc. See page 27.
TEXT button. Selecting TEXT mode allows CD Text data to
be entered, using a PS/2 QWERTY keyboard connected to
either of the keyboard sockets. The text data can be seen
on the LED display as it is entered.
CD Text can be entered during or after recording, but must
be done so prior to finalising the disc.
More information on using CD Text can be found at
page 45.
MONITOR button. Press to monitor the selected input
source. The adjacent LED illuminates when MONITOR is
enabled. See page 23.
I/P SELECT button. This determines which of the CDR-
882’s five sets of inputs is to be used as a recording source
(only one input at a time may be selected). The selected
source is indicated in the display. Pressing the I/P SELECT
button repeatedly scrolls through the options, which are (in
sequence):
See page 22 for more information about input selection.

Front Panel Features
14
CDR-882 User Manual Version 1.0www.hhb.co.uk
DISPLAY button. This button changes the time display
option for the selected drive. The options available will
depend on the drive’s current Status (e.g. STOP, PLAY,
etc.). See page 22 for full details.
ID AUTO/MAN | AUTO-CUE button. This button has
two distinct functions, depending whether a disc is being
recorded or not:
a) Auto/manual Track ID selection: Switches between
automatic and manual track numbering when recording a
disc. See page 13 for more information.
b) Auto-Cue mode selection: Allows selection of Auto-Cue
and Auto-Pause modes when not recording. See page 46
for more information.
ID WRITE | CUE button. This button also has two distinct
functions, depending whether a disc is being recorded or
not:
a) ID Write: Pressing this button during RECORD, when
TRACK ID MANUAL mode has been selected with
[21] above, writes a track ID to the CD in the selected
drive(s).
As an ID is written, ID Write illuminates briefly in the
bottom left-hand corner of the display, and the track
number in the time display increments by one.
b) Cue button: When the CDR-882 is not in RECORD
mode, the button acts as a CUE button. Pressing CUE
will immediately locate to a previously-stored MARK point
(see page 13), entering PLAY mode at the cue point.
If AUTO-CUE or AUTO-PAUSE mode is active, or if the
drive is already in PAUSE mode, the drive enters PAUSE
at the cue point. When a MARK point is stored, drive
number is included, thus CUE can be used to locate to a
point on the other drive if wished. See page 46 for more
information.
DISC COPY button. This selects the CDR-882’s DISC
COPY function, which allows the user to make a copy of an
existing CD, CD-R or CD-RW from one drive to the other at
high-speed (with certain restrictions). A full description of
the DISC COPY function can be found at page 41.
PROGRAM button. The PROGRAM function, activated by
pressing PROGRAM, is used for two different purposes:
a) PROGRAM PLAY mode - permits tracks to be replayed in
a non-sequential order
b) PROGRAM COPY mode - allows a copy to be made of a
CD, but with individually selected tracks, sequenced in
any order on the copy.
The PROGRAM functions are described in detail
at page 44 (PROGRAM PLAY mode) and page 44
(PROGRAM COPY mode).
MODE button. This button is used to define the basic
record/playback mode of the CDR-882 when both drives
are in use. Pressing MODE repeatedly scrolls through
the options; the display indicates the selected option. The
options are (in sequence):
MODE ACTION DISPLAY
Single CD Records or plays from one drive
only; select Drive 1 or 2 with
DRIVE SELECT button
Single CD1 or Single CD2
DualBurn Records an external input on
both drives simultaneously
DualBurn or DualBurn
CD1 CD2
DiscSpan Records to or plays from each
drive alternately (for as long as
appropriate CDs are loaded)
DiscSpan or DiscSpan
CD1 CD2
The various twin-disc modes are described in more detail in
section page 39.
FINALIZE button. Press to manually start disc finalisation
(to make the CD playable in a standard audio CD player).
Auto finalisation is set via the menu system, see page 34.
ERASE button. Press to erase the whole disc, a range of
tracks or to carry out a full initialisation of the disc. It is also
possible to do a full erase or initialisation of discs in both
drives simultaneously. Applicable to CD-RW discs only
Press the ENTER button [14] to start the process.
See section page 47 for more information about erasing
discs.
DRIVE SELECT button. This button is used to select which
drive is currently being controlled by the CDR-882’s main
transport buttons and other front panel controls.
The “active” drive is indicated by inverse video in the main
display area. Additional indication is provided in the top
right-hand corner of the display by CD1 or CD2, and the
blue Drive Select LEDs (34).
PHONES SELECT button. This button selects which drive
is to be the source for the headphone monitor output [32].
Pressing the button scrolls between the three available
options, which are: Drive 1, Drive 2, or a mix of audio from
both Drive 1 and Drive 2. In the case of the last option,
the precise nature of the mix heard is determined by the
Phones Mix settings in the Audio sub-menu. See page 30
for further details.
The two green LEDs immediately above the button indicate
the option selected.

Front Panel Features
15
CDR-882 User Manual Version 1.0 www.hhb.co.uk
FADER button. The CDR-882’s FADER function allows
playback or recording to start or end with a smooth fade-in
or fade-out as appropriate. The fade-in and fade-out times
used are set via the Audio sub-menu of the menu system.
See page 29 for more details.
The actual operation of the FADER function will depend on
the CDR-882’s status when the button is pressed.
STATUS ACTION ON PRESSING FADER
STOP mode Playback starts from track 1 with fade-in
PLAY mode Audio fades out, drive enters PAUSE mode
PAUSE mode Playback resumes, with fade-in
RECORD PAUSE
mode
Recording starts from paused location, record level
fades up
RECORD mode Record level fades down, unit enters RECORD PAUSE
mode
Fade-in and fade-out are confirmed on the display by the
flashing legend FADE-IN or FADE-OUT.
Keyboard socket. This PS/2 socket is a duplicate of that
on the unit’s rear and is for the connection of a QWERTY
keyboard for CD Text data entry.
Headphone socket. Connect a pair of stereo headphones
via the ¼” jack socket monitoring for private listening. The
stereo signal available at this connector is determined by
the setting of the MONITOR and PHONES SELECT buttons
[18] and [29] respectively, and also the Phones Mix option
in the Audio submenu. Headphones with a minimum
impedance of 32Ω should be used.
Headphone level control. This is a conventional analogue
volume control for the headphone output.
Drive select LEDs. Each drive has a blue SELECT LED (each
side of the main display).
One SELECT LED will always be illuminated, according to the
selection made with the DRIVE SELECT button (27). (Note
that if one drive already has a disc inserted at power-up, it
will be selected as the active drive automatically.)
Drive activity LEDs. Each drive has a tricolour ACTIVITY
LED (each side of the main display).
The LED indicates the current status of each drive.
LED INDICATION STATUS
Off No disc in drive
Amber Disc loaded, drive in STOP mode
Green (blinking) Drive in PLAY mode
Green (flashing) Drive in PAUSE mode
Green (steady) Drive is source in COPY mode
Red Drive in Record Mode
Bargraph meter. This 11-segment stereo bargraph meter
provides indication of record or playback level, depending on
the MONITOR button [18] and Output Mix settings in the
Audio submenu.
The meter has digital scaling, from -40dBFS to 0dBFS.
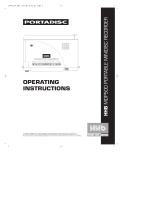
The front-panel transreflexive 128 x 64 pixel LCD gives disc
timing information and transport mode for each drive in
large text and symbols, plus additional textual information
such as currently selected input, media type in use,
operational mode, ‘active’ drive, etc. in a smaller font at the
top of the display.
Currently selected input -
Balanced, Unbal, AES/EBU, Coax, Optical
Word clock source -
Internal, DIG, WCLK
Track number and time display for Drive 1
Track number and time display for Drive 2
Media type in Drive 1 - CD, CD-R, CD-RW
Time display option for Drive 1 - TRACK, REMAIN, TOTAL,
TOTREM
Record/Playback mode - Single, DualBurn, DiscSpan
Currently ‘active’ drive - CD1 or CD2
Time display option for Drive 2 - TRACK, REMAIN, TOTAL,
TOTREM
Media type in Drive 2 - CD, CD-R, CD-RW
Peak signal level indication. *
* Provides a numeric indication, in dBs, of peak signal level
relative to clip. (Clip is taken as 0dB, thus all indications
are negative). Only displayed during RECORD, or when
input monitoring is selected.
Alphanumeric Display

RC-882 Remote Control
16
CDR-882 User Manual Version 1.0www.hhb.co.uk
The RC-882 Remote Control Unit (infra-red handset) supplied
with the CDR-882 duplicates many of the front panel buttons
in both function and operation. Some additional keys are
also provided: a set of 0-9 numeric keys for direct access to
individual CD tracks, dedicated NEXT and PREVIOUS keys and a
RECORD safety key.
Note: “see (*)” refers to associated front panel features.
Direct Access keys – see note below.
DISPLAY – see (20)
INPUT SELECT– see (19)
INPUT MONITOR – see (18)
TRACK ID AUTO/MAN and AUTO-CUE – see (21)
TRACK ID WRITE and CUE – see (22)
PROGRAM – see (24)
DISC COPY – see (23)
FINALIZE – see (26)
ERASE – see (27)
PHONES SELECT– see (29)
TEXT – see (17)
FADER – see (30)
MODE – see (25)
MENU ON/OFF – see (16)
ENTER/MARK – equivalent to “push” function of AMS
control (14)
“+” key – equivalent to rotating AMS control (14) clockwise
when in MENU mode
“-” key – equivalent to rotating AMS control (14)
anticlockwise when in MENU mode
DRIVE SELECT – see (28)
STOP – see (9)
PLAY/PAUSE – see (8)
FREW – see (11)
FFWD – see (10)
NEXT – equivalent to rotating AMS control (14) clockwise
when not in MENU mode
PREVIOUS – equivalent to rotating AMS control (14)
anticlockwise when not in MENU mode
SYNC RECORD – see (13)
RECORD (two buttons) - see (12 and note below)
Direct Access keys
These operate in the following way:
To start playback at tracks 1 to 9, press the
corresponding 1 to 9 key
To start playback at track 10, press the 10/0 key
To start playback at a track numbered 11 or higher, press
the >10 key, followed by the separate digits of the track
number. Thus to select track 15, press >10, 1 and 5 in
order
Record keys
Two red record keys are provided on the handset; to activate the
CDR-882’s Record mode, press both buttons simultaneously.
•
•
•
RC-882 Remote Control

Quick Start Guide
17
CDR-882 User Manual Version 1.0 www.hhb.co.uk
Quick Start Guide
This section is intended to get you going quickly with the CDR-
882’s most basic functions when you use it for the first time.
It also tells you where to look in the manual to get additional
information about many aspects of the CDR-882’s operation.
NOTE: The numbers following the various controls and
connectors in the instructions below refer to the front and rear
diagrams on page 12 and page 10 respectively.
Recording a CD from an analogue
source
This describes the simplest method of recording a CD in Drive 1
from an analogue source, entering track markers manually.
1. Connect the analogue audio source to either the balanced
inputs (XLRs [1]) or unbalanced inputs (phonos [2]).
2. Open Drive 1’s disc tray with the EJECT button [5], insert a
blank CD-R, and close the tray.
3. Press the I/P SELECT button [19] until the display shows
Balanced or Unbal, depending which inputs you connected
to in Step 1.
4. Connect a suitable pair of headphones to the front panel
headphones socket [32], and press the PHONES SELECT
button [29] so that the 1 LED above is illuminated.
5. Press the RECORD button [12]; the display will show
Record Setup and then enter RECORD PAUSE mode
(indicated by a steady red symbol in the RECORD button
and a flashing green symbol in the PLAY/PAUSE button
[8]). The green MONITOR LED (adjacent to [18]) will also be
illuminated.
6. Play a sample of the source programme, and adjust
the ANALOG REC LEVEL control [15] to obtain a meter
indication that only causes the amber segments to
illuminate on the loudest sections of the programme. If
necessary, adjust the output level of the source device as
well. Use the headphones to ensure that the sound is not
clipping or otherwise distorting.
7. Stop the source and re-locate the programme to its start.
Press the PLAY/PAUSE button [8] to start the recording,
and play the source programme. Track 1 is now being
recorded.
8. To create a new track (at a suitable point in the
programme), press the ID WRITE | CUE button [22]. The
track number will increment to 02.
9. The recording can be stopped by pressing the STOP button
[9]. Further tracks may be added by repeating the above
from Step 5.
10. When you have recorded all the tracks needed, press the
FINALIZE button [26], and then press the ENTER button
[14] in answer to the question Finalize? to complete the
record process. The disc may now be removed from the
drive by pressing the EJECT button [5].
Recording a CD from a digital
source
This describes the simplest method of recording a CD in Drive 1
from an digital source, entering track markers manually.
1. Connect the digital audio source to the AES/EBU (XLR [3])
or S/PDIF input (phono [4] or TOSlink [5]).
2. Open Drive 1’s disc tray with the EJECT button [5], insert a
blank CD-R, and close the tray.
3. Press the I/P SELECT button [19] until the display shows
AES/EBU, Coax or Optical, depending which input you
connected to in Step 1.
4. Connect a suitable pair of headphones to the front panel
headphones socket [32], and press the PHONES SELECT
button [29] so that the 1 LED above is illuminated.
5. Press the RECORD button [12]; the display will show Record
Setup and then enter RECORD PAUSE mode (indicated by
a steady red symbol in the RECORD button and a flashing
green symbol in the PLAY/PAUSE button [8]). The green
MONITOR LED (adjacent to [18]) will also be illuminated.
6. Play a sample of the source programme, and check the
meter indication. It should only cause the amber segments
to illuminate on the loudest sections of the programme.
If the level appears satisfactory, proceed to Step 8;
if adjustment is required, go to Step 7 first. Use the
headphones to ensure that the sound is not clipping or
otherwise distorting.
7. The digital recording level may be adjusted by pressing the
MENU button [16], selecting the Audio submenu (the first)
with the AMS control [14], then selecting the Dig Input
Level option (the first) in the submenu – press the ENTER
button [14] to select at each menu level. The recording level
can then be adjusted with the AMS control. Exit the menu
system by pressing the MENU button three times.
8. Stop the source and re-locate the programme to its start.
Press the PLAY/PAUSE button [8] to start the recording,
and play the source programme. Track 1 is now being
recorded.
9. To create a new track (at a suitable point in the
programme), press the ID WRITE | CUE button [22]. The
track number will increment to 02.
10. The recording can be stopped by pressing the STOP button
[9]. Further tracks may be added by repeating the above
from Step 5.
11. When you have recorded all the tracks needed, press the
FINALIZE button [26], and then press the ENTER button
[14] in answer to the question Finalize? to complete the
record process. The disc may now be removed from the
drive by pressing the EJECT button [5].

Quick Start Guide
18
CDR-882 User Manual Version 1.0www.hhb.co.uk
Playing a CD
1. Connect a stereo audio amplifier (and speakers) to either
the balanced outputs [XLRs [6] ) or unbalanced outputs
(phonos [7] ).
2. Open Drive 1’s disc tray with the EJECT button [5], insert
the CD to be played, and close the tray.
3. When the disc’s TOC has been read, the number of tracks
and the disc’s total playing time is displayed. To start
playback at Track 1, press the PLAY/PAUSE button [8].
The display confirms the track number (01), and the time
changes from Total to Track.*
4. To start playback from any other track, rotate the AMS
control [14] clockwise until the number of the required track
is shown, then press either ENTER or PLAY/PAUSE.
5. Playback may be paused at any time by pressing PLAY/
PAUSE, and resumed by pressing PLAY/PAUSE again.
Playback may be stopped by pressing the STOP button [9].
*If the CD contains CD Text, the CD Title will be displayed
instead when it is loaded. Press TEXT [17] to display the Artist
Name. After PLAY/PAUSE is pressed, the display shows
the Track Title. DISPLAY [20] may be pressed at any time to
resume the track number/elapsed time display.
Playing one disc while recording
another
The dual drive capability of the CDR-882 allows one CD to be
played while another is recorded, in the same machine. This
feature will be useful when seminars, conferences or Houses of
Worship services, etc., are being recorded, with the intention
of providing attendees with CDs of the event very soon after it
finishes.
Assume that we wish to record on Drive 2 while playing another
CD in Drive 1.
1. Connect a stereo audio amplifier (and speakers) to either
the balanced outputs [XLRs [6]) or unbalanced outputs
(phonos [7]).
2. Connect the source to be recorded to the appropriate set of
inputs – analogue [1] or [2] or digital [3], [4] or [5].
3. Open Drive 1’s disc tray with the EJECT button [5] and
insert the CD to be played; open Drive 2’s disc tray with the
EJECT button [6] and insert a blank CD-R. Close both trays.
4. When the discs have been read, and the display is showing
the contents of the disc in Drive 1, select Drive 2 by
pressing the DRIVE SELECT button [28]. Drive 2’s track
information (zero if the disc was blank) will be in reverse
video.
5. Press the I/P SELECT button [19] until the display shows
the name of the input being used (the inputs you connected (the inputs you connected
to in Step 2).
6. Press the MENU button [16], with the AMS control/
ENTER button [14], navigate to the Phones Mix option in
the Audio submenu. Set this to Priority CD1.
7. So that the rear output connectors carry the playback audio
from Drive 1, navigate to the Output Mix option in the
Audio Submenu and set it to Priority CD1; exit the menu
system by pressing MENU again until the normal display
appears.
8. If recording from an analogue source, perform Steps 5 and
6 of “Recording a CD from an Analogue Source” above. If
recording from a digital source, perform Steps 5 and 6 (and
7 if necessary) of “Recording a CD from a Digital Source”
above. In either case, the source programme can be
monitored via the speakers instead of the headphones.
9. Recording may now be started in Drive 2 by pressing the
PLAY/PAUSE button [8].
10. Press the DRIVE SELECT button [28] to select Drive 1.
11. The green LED adjacent to the MONITOR button [18] will
now flash.
12. The disc in Drive 1 may now be played by pressing
the PLAY/PAUSE button [8]. Playback will be heard,
commencing with Track 1; the AMS control [14] may be
used to select a different track (see Step 4 of “Playing a CD”
above).
13. The audio output may be monitored in the headphones and
switched between Drive 1 (playback) and Drive 2 (signal
being recorded) with the PHONES SELECT button [29].
(The “Mix” setting - with both LEDs on - will select Drive 1’s
playback because Priority CD1 was selected in Step 6.)
14. The transport controls may be switched – by pressing
DRIVE SELECT – between the disc being played in Drive
1 and the disc being recorded in Drive 2, to suit the
operator’s needs. The disc being recorded will need to be
finalised as normal when recording is complete.

Quick Start Guide
19
CDR-882 User Manual Version 1.0 www.hhb.co.uk
Reference List of the CDR-882’s
other main functions
TO DO THIS REFER TO SECTION ON PAGE
Start and end a CD recording automatically
from DAT/MD subcodes or audio level
detection
Synchronised
Recording
page 24
Search through a disc at high speed FFWD & FREW page 20
Fade-in and/or fade-out of a track, in either
playback or record
Fader page 21
Change the disc time information being
displayed
Time Displays page 22
Insert Track IDs automatically while
recording
Tracks IDs page 25
Finalise a disc automatically when recording
has finished.
Finalising page 25
Override automatic Word Clock selection Internal & External
Clocks
page 38
Store and locate to a marker point Manual Cueing page 46
Record two discs at once DualBurn Record page 39
Make a recording spanning two or more
discs
DiscSpan Mode page 39
Make a high-speed copy of a disc Disc Copy page 41
Make simultaneous or sequential
recordings on multiple CDR-882s.
Multi-Machine
Operation
page 42
Play a sequence of specific tracks on a disc Program Play page 44
Copy selected tracks from one disc to
another
Program Copy page 44
Use CD Text CD Text page 45
Cue up to a track accurately Auto-Cue page 46
Erase some or all tracks from a disc Erasing Discs page 47
Control the copy-protection setting on a
disc
SCMS Considerations page 48
Control the CDR-882 remotely Remote Control page 49
Page is loading ...
Page is loading ...
Page is loading ...
Page is loading ...
Page is loading ...
Page is loading ...
Page is loading ...
Page is loading ...
Page is loading ...
Page is loading ...
Page is loading ...
Page is loading ...
Page is loading ...
Page is loading ...
Page is loading ...
Page is loading ...
Page is loading ...
Page is loading ...
Page is loading ...
Page is loading ...
Page is loading ...
Page is loading ...
Page is loading ...
Page is loading ...
Page is loading ...
Page is loading ...
Page is loading ...
Page is loading ...
Page is loading ...
Page is loading ...
Page is loading ...
Page is loading ...
Page is loading ...
Page is loading ...
Page is loading ...
Page is loading ...
Page is loading ...
Page is loading ...
Page is loading ...
Page is loading ...
Page is loading ...
Page is loading ...
Page is loading ...
Page is loading ...
Page is loading ...
Page is loading ...
/