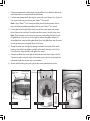
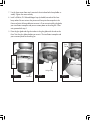
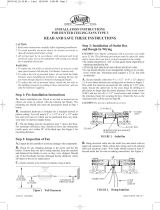
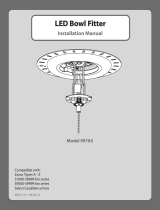
Hunter Fan 28120 light kit can be installed on Hunter TribecaTM fans, models 28120, 28121 and 28122. Before installing the kit, turn off the circuit breakers to the outlet box and to its associated wall switch location. Push the light button on the remote transmitter to ensure it is working. Make sure that the bulbs are installed properly and are not blown. The kit comes with three GU-10 halogen bulbs, each with 50 Watts of power. If you want to use the light kit without the globe, remove the three globe fitter screws and the globe fitter.
Hunter Fan 28120 light kit can be installed on Hunter TribecaTM fans, models 28120, 28121 and 28122. Before installing the kit, turn off the circuit breakers to the outlet box and to its associated wall switch location. Push the light button on the remote transmitter to ensure it is working. Make sure that the bulbs are installed properly and are not blown. The kit comes with three GU-10 halogen bulbs, each with 50 Watts of power. If you want to use the light kit without the globe, remove the three globe fitter screws and the globe fitter.


-
 1
1
-
 2
2
-
 3
3
-
 4
4
-
 5
5
-
 6
6


Hunter Fan 28120 light kit can be installed on Hunter TribecaTM fans, models 28120, 28121 and 28122. Before installing the kit, turn off the circuit breakers to the outlet box and to its associated wall switch location. Push the light button on the remote transmitter to ensure it is working. Make sure that the bulbs are installed properly and are not blown. The kit comes with three GU-10 halogen bulbs, each with 50 Watts of power. If you want to use the light kit without the globe, remove the three globe fitter screws and the globe fitter.
Ask a question and I''ll find the answer in the document
Finding information in a document is now easier with AI
Related papers
-
 Hunter Fan Tribeca Light Kit Tribeca Light Kit Owner's manual
-
 Hunter Fan 21888 User manual
-
 Hunter Fan 21885 Owner's manual
-
 Hunter Fan 21872 Owner's manual
-
 Hunter Fan 41597-01 User manual
-
 Hunter Fan 25521 User manual
-
 Hunter Fan 21620 User manual
-
Hunter Fan 28550 User manual
-
 Hunter Fan 23537 Owner's manual
-
 Hunter Fan 79240 Owner's manual


Other documents
-
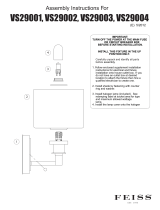 Generation Lighting VS29003-BS Installation guide
-
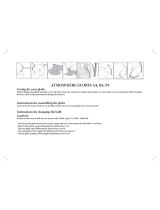 atmosphere B4 User manual
-
RAB Lighting LL322B Operating instructions
-
-
Hunter 20175 Datasheet
-
Hunter 99172 Operating instructions
-
Emerson LK40 Owner's manual
-
 Casablanca Fan Company 99183 User manual
-
Sahara Fans 10059 Operating instructions
-


