Page is loading ...

D
2
Inhaltsverzeichnis
D Betriebsanleitung...................................................................................................... 6
EN Operating instructions.............................................................................................29
NL Betriebsanleitung.................................................................................................... 50
FR Manuel d’utilisation.................................................................................................72
ES Manual de instrucciones........................................................................................ 95
PT Manual de instruções...........................................................................................117
IT Istruzioni per l'uso................................................................................................ 139
SL Navodila za uporabo............................................................................................ 161
HR Upute za uporabu.................................................................................................181
PL Instrukcja obsługi..................................................................................................202
CS Návod k provozu.................................................................................................. 224
SK Betriebsanleitung.................................................................................................. 246
HU Használati utasítás............................................................................................... 269
SR О овом приручнику.............................................................................................291
DA Original brugsanvisning........................................................................................314
SV Bruksanvisning..................................................................................................... 335
NO Bruksanvisning..................................................................................................... 356
FI Käyttöohje.............................................................................................................377
ET Kasutusjuhend...................................................................................................... 398
LT Eksploatavimo instrukcija..................................................................................... 418
LV Ekspluatācijas rokasgrāmata................................................................................439
RU Руководство по эксплуатации........................................................................... 460
UK Довідник з експлуатації...................................................................................... 484
BG Инструкция за експлоатация............................................................................. 507
RO Instrucţiuni de utilizare......................................................................................... 532
EL Οδηγίες λειτουργίας..............................................................................................554
TR Kullanma kılavuzu................................................................................................ 577
MK Упатство за работа.............................................................................................598
© 2015
AL-KO KOBER GROUP Kötz, Germany
This documentation or excerpts therefrom may not be reproduced or disclosed to third parties without
the express permission of the AL-KO KOBER GROUP.
Page is loading ...
Page is loading ...
Page is loading ...
Page is loading ...
Page is loading ...
Page is loading ...
Page is loading ...
Page is loading ...
Page is loading ...
Page is loading ...
Page is loading ...
Page is loading ...
Page is loading ...
Page is loading ...
Page is loading ...
Page is loading ...
Page is loading ...
Page is loading ...
Page is loading ...
Page is loading ...
Page is loading ...
Page is loading ...
Page is loading ...
Page is loading ...
Page is loading ...
Page is loading ...

Translation of the original operating instructions
469601_a 29
TRANSLATION OF THE ORIGINAL
OPERATING INSTRUCTIONS
Contents
1. IDENTIFICATION OF MAIN
COMPONENTS......................................29
2. SYMBOLS....................................................31
3. SAFETY REQUIREMENTS......................... 32
4. MACHINE ASSEMBLY................................ 36
5. PREPARING TO WORK..............................36
6. HOW TO START – USE – STOP THE
ENGINE..................................................38
7. USING THE MACHINE................................40
8. MAINTENANCE AND STORAGE................42
9. TROUBLESHOOTING................................. 48
10. ACCESSORIES......................................... 49
Dear Customer,
thank you for choosing one of our products. We
hope that you will be completely satisfied with this
machine and that it fully meets your expectations.
This manual has been compiled in order to pro-
vide you with all the information you need to get
acquainted with the machine and use it safely and
efficiently. Don’t forget that it is an integral part of
the machine, so keep it handy so that it can be
consulted when necessary, and pass it on to a fur-
ther user if you resell or loan the machine.
Your new machine has been designed and ma-
nufactured in pursuance with current regulations,
and is safe and reliable if used in compliance with
the instructions provided in this manual (proper
use). Using the machine in any other way, or non-
compliance with the safety specifications relative
to use, maintenance and repair is considered "im-
proper use" which will invalidate the warranty, re-
lieve the manufacturer from all liabilities, and the
user will consequently be liable for all and any da-
mage or injury to himself or others.
Since improvements are periodically made to our
products, you may find slight differences between
your machine and the descriptions contained in
this manual. Certain modifications can be made
to the machine without prior warning and without
the obligation to update the manual, although the
essential safety and function characteristics will
remain unaltered. In case of any doubts, please
contact your dealer. And now enjoy your work!
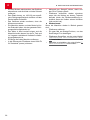
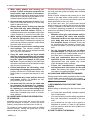
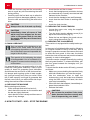
1. IDENTIFICATION OF MAIN COMPONENTS
MAIN COMPONENTS
1.
Power unit
2.
Spiked bumper
3.
Front hand guard
4.
Front handgrip
5.
Rear handgrip
6.
Chain catcher
6a.
Chain catcher (only for mod. 46/52)
7.
Bar
8.
Chain
9.
Bar cover
10.
Identification plate
8
2
3
4
5
6
9
10
16
1
15
7
6a
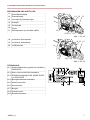
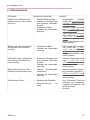
CONTROLS AND FILLING POINTS

en
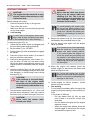
1. IDENTIFICATION OF MAIN COMPONENTS
30 469601_a
11.
Engine stop switch
12.
Throttle trigger
13.
Throttle trigger lockout
14.
Starter
15.
Choke
16.
Primer
17.
Decompression valve (only for mod. 46/52)
19
18
11 12
14
20 13
Fig. 1: 36 - 43
18.
Fuel tank cap
19.
Chain oil tank cap
20.
Air cleaner cover
19
18
11
12
14
20
13
17
Fig. 2: 46 - 52
IDENTIFICATION PLATE
10.1)
Conformity marking in accordance with Di-
rective 2006/42/EC
10.2)
Name and address of the manufacturer
10.3)
Acoustic output level LWA in accordance
with directive 2000/14/EC
10.4)
Manufacturer’s model of reference
10.5)
Machine model
10.6)
Serial number
10.7)
Year of manufacture
10.8)
Article code
10.9)
Emission number
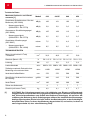
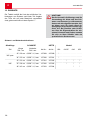
Technical data
Maximum noise and vibration le-
vels [1]
Model 636 643 IP 646 652
Operator ear noise pressure level
(ISO 22868)
dB(A) 100 101 102 102
– Measurement uncertainty
(2006/42/EC - EN 27574)
dB(A) 3.0 3.0 3.0 3.0

2. SYMBOLS
469601_a 31
Measured acoustic output level
(ISO 22868)
dB(A) 105 108 113 113
– Measurement uncertainty
(2006/42/EC - EN 27574)
dB(A) 2.5 2.5 2.5 2.5
Vibration level (ISO 22867) m/sec
2
7.5 7.5 4.9 5.7
– Measurement uncertainty
(2006/42/EC - EN 12096)
m/sec
2
0.5 0.5 0.5 0.5
TECHNICAL SPECIFICATIONS
Engine (2-stroke single cylinder)
– displacement
cm
3
36.3 40.2 45 51.8
Fuel (petrol/oil) % 50:1 = 2 % 50:1 = 2 % 50:1 = 2 % 50:1 = 2 %
Power kW 1.5 2.0 2.2 2.4
Idle RPM
1
/min 2800 ± 150 2800 ± 150 2800 ± 150 2800 ± 150
Maximum admissible rpm without
load with chain installed
1
/min 11300 12000 12500 12500
Fuel tank capacity cm
3
370 370 500 500
Maximum power specific consump-
tion
g/kWh 490 410 510 500
Oil tank capacity cm
3
190 190 300 300
Chain pinion teeth 6 7 7 7
Weight (with empty tank) kg 4.2 4.1 4.7 4.7
[1] WARNING! The vibration value may vary according to the usage of the machine and
its fitted equipment, and be higher than the one indicated. Safety measures must be
established to protect the user and must be based on the load estimate generated by
the vibrations in real usage conditions. In this regard, all the operational cycle phases
must be taken into consideration, such as switching off or idle running.
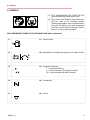
2. SYMBOLS
1 2
1)
Read the instruction manual before using
the machine.
2)
If you are using the machine every day in
normal conditions, you can be exposed to
a noise level of 85 dB (A) or higher. Wear a
protective helmet, ear plugs and goggles.
EXPLANATORY SYMBOLS ON THE MACHINE (if present)

en
2. SYMBOLS
32 469601_a
11 11) Fuel tank
12 12) Chain oil tank and oil flow adjuster (only for mod. 46/52)
13 13) Carburettor adjustments
T = idle speed adjuster
(L) = low speed mixture adjuster
(H) = high speed mixture adjuster
14 14) Choke
15 15) Primer
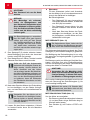
3. SAFETY REQUIREMENTS
A) TRAINING
1) Read the instructions carefully. Become ac-
quainted with the controls and the proper use
of the machine. Learn how to stop the engine
quickly.
2) Only use the machine for the purpose for which
it was designed, that is for “felling, bucking and
delimbing trees with dimensions suitable for
the length of the bar” or wooden objects with
the same characteristics. Any other use may be
dangerous and damage the machine.
Examples of improper use may include, but are
not limited to:
– trimming hedges;
– intaglio carving;
– sectioning pallets, crates and various packing
materials;
– sectioning furniture or other materials with
nails, screws or other metal components;
– butchering meat;
– using the machine to lift, move or split ob-
jects;
– using the machine while fastened to fixed
supports.
3) Never allow children or persons unfamiliar with
these instructions to use the machine. Local regu-
lations may restrict the age of the operator.
4) The machine must never be used by more than
one person.
5) Never use the machine:
– when people, especially children or pets are
in the vicinity;
– if the user is tired or unwell, or has taken
medicine, drugs, alcohol or any substances
which may slow his reflexes and compromise
his judgement;
– if the user is not capable of holding the ma-
chine firmly with two hands and/or remaining
standing on the ground whilst working.
6) Remember that the operator or user is respon-
sible for accidents or hazards occurring to other
people or their property.

3. SAFETY REQUIREMENTS
469601_a 33
B) PREPARATION
1) Always wear adequate clothing which does
not hamper movements when using the ma-
chine.
– Always wear slim-fitting protective clothing,
fitted with shear-proof protection devices.
– Always wear a helmet, protective gloves,
eye-goggles, a half-mask respirator and
safety anti-shear boots with non-slip soles.
– Always wear ear and hearing protection de-
vices.
– Never wear scarves, shirts, necklaces, or
any hanging or flapping accessory that could
catch in the machine or in any objects or ma-
terials in the work area.
– Tie your hair back if it is long.
2) WARNING: DANGER! Fuel is highly flamma-
ble:
– keep the fuel in containers which have been
specifically manufactured and homologated
for such use;
– never smoke when handling fuel;
– slowly open the fuel tank to allow the pres-
sure inside to decrease gradually;
– top up the tank with fuel in the open air, using
a funnel;
– add fuel before starting the engine. Never re-
move the fuel tank cap or add fuel while
the engine is running or when the engine
is hot;
– if you have spilt some fuel, do not attempt to
start the engine but move the machine away
from the area of spillage and avoid creating
any source of ignition until the fuel has eva-
porated and fuel vapours have dissipated;
– immediately clean up all traces of fuel spilt on
the machine or on the ground;
– never start the machine in the same place
you refilled it with fuel;
– make sure your clothing does not come into
contact with the fuel. If it does, change your
clothes before starting the engine;
– always put the tank and fuel container caps
back on and tighten well.
3) Replace faulty or damaged silencers.
4) Before using the machine, check its general
condition and in particular:
– the throttle trigger and the safety lever must
move freely, they must not need forcing and
should return automatically and rapidly back
to the neutral position;
– the throttle trigger must remain locked until
the safety lever is pressed;
– the engine stop switch must easily move from
one position to the other;
– the electric cables and in particular the spark
plug cable must be in perfect condition to
avoid the generation of any sparks, and the
cap must be correctly fitted on the spark plug;
– the machine handgrips and protection de-
vices must be clean and dry and well faste-
ned to the machine;
– the chain brake must be in perfect working
order;
– the bar and the chain must be fitted correctly;
– the chain must be tensioned correctly.
5) Before starting your work, make sure that all
the protection devices are correctly fitted.
C) OPERATION
1) Do not operate the engine in a confined space
where dangerous carbon monoxide fumes can
collect. Make sure air circulates when working in
pits, holes or similar.
2) Work only in daylight or good artificial light.
3) Assume a firm and well-balanced position:
– where possible, avoid working on wet, slip-
pery ground or in any case on uneven or
steep ground that does not guarantee stabi-
lity for the operator;
– avoid using unstable ladders or platforms;
– do not work with the machine above your
shoulders;
– never run, but walk carefully paying attention
to the lay of the land and any potential obst-
acles.
– avoid working alone or in an isolated place, in
case you have to find help after an accident.
4) Make sure the machine is securely locked
when you start the engine:
– start the motor in an area at least 3 metres
from where you refuelled;
– check that there are no persons in the vicinity
of the machine;

en
3. SAFETY REQUIREMENTS
34 469601_a
– do not direct the silencer and therefore the
exhaust fumes towards inflammable materi-
als.
– watch out for flying debris caused by the mo-
vement of the chain, especially when it hits
obstacles or foreign objects.
5) Do not change the engine tuning and do not
rev the engine excessively at maximum speed.
6) Do not strain the machine too much and do not
use a small chain-saw for heavy-duty sawing. If
you use the right machine, you will reduce the risk
of hazards and improve the quality of your work.
7) Check that when the machine is running idle,
there is no movement of the chain and, after pres-
sing the throttle trigger, the engine quickly returns
to minimum speed.
8) Take care not to hit the bar hard against foreign
objects or flying debris caused by the movement
of the chain.
9) Stop the engine:
– whenever you leave the machine unatten-
ded;
– before refuelling.
10) Stop the engine and disconnect the spark
plug cable:
– before cleaning, checking or working on the
machine;
– after striking a foreign object. Inspect the ma-
chine for any damage and make repairs be-
fore restarting it again;
– if the machine begins to vibrate abnormally
(Immediately look for the cause of the vibrati-
ons and take to a specialised centre for che-
cking).
– when the machine is not in use.
11) Avoid exposure to dust and sawdust produced
by the chain when cutting.
D) MAINTENANCE AND STORAGE
1) Keep all nuts, bolts and screws tightly faste-
ned to be sure the equipment is in safe working
condition. Routine maintenance is essential for
safety and for maintaining a high performance
level.
2) Do not store the machine with fuel in the tank
in an area where the fuel vapours could reach an
open flame, a spark or a strong heat source.
3) Allow the engine to cool before storing in any
enclosure.
4) To reduce fire hazards, keep the engine, ex-
haust silencer and fuel storage area free from
sawdust, branches, leaves, or excessive grease;
never leave containers with the cut debris inside
the storage area.
5) If the fuel tank has to be emptied, this
should be done outdoors once the engine has
cooled down.
6) Wear gloves whenever working with the cutting
equipment.
7) Make sure the chain is well sharpened. Any
work on the chain and bar requires specific expe-
rience and special tools. For safety purposes, we
recommend you contact your dealer to ensure tha
the work is done correctly.
8) For safety reasons, never use the machine
with worn or damaged parts. Damaged must
be bereplaced and never repaired. Only use
original spare parts. Parts that are not of the
same quality can seriously damage the equip-
ment and compromise safety.
9) Before putting the machine away, check you
have removed wrenches or tools used for main-
tenance.
10) Store the machine out of the reach of children!
E) TRANSPORTATION AND HANDLING
1) Whenever the machine is to be handled or
transported you must:
– turn off the engine, wait for the chain to stop
and disconnect the spark plug cap;
– mount the bar cover;
– only hold the machine using the handgrips
and position the bar in the opposite direction
to that used during operation.
2) When using a vehicle to transport the machine,
position it so that it can cause no danger to per-
sons and fasten it firmly in place to avoid it from
tipping over, which may cause damage or fuel
spillage.
F) CHAIN SAW SAFETY WARNINGS:
Keep all parts of the body away from the
sawchain when the chain saw is opera-
ting. Before you start the chain saw, make
sure the saw chain is not contacting any-
thing. A moment of inattention while opera-
ting chain saws may cause entanglement of
your clothing or body with the saw chain.
Always hold the chain saw with your right
hand on the rear handle and your left hand
on the front handle. Holding the chain saw
with a reversed hand configuration increases
the risk of personal injury and should never
be done.

3. SAFETY REQUIREMENTS
469601_a 35
Wear safety glasses and hearing pro-
tection. Further protective equipment for
head, hands, legs and feet is recommen-
ded. Adequate protective clothing will reduce
personal injury caused by flying debris or ac-
cidental contact with the saw chain.
Do not operate a chain saw in a tree. Ope-
ration of a chain saw while up in a tree may
result in personal injury.
Always keep proper footing and operate
the chain saw only when standing on fi-
xed, secure and level surface. Slippery or
unstable surfaces such as ladders may cause
a loss of balance or control of the chain saw.
When cutting a limb that is under tension
be alert for spring back. When the tension
in the wood fibres is released the spring loa-
ded limb may strike the operator and/or throw
the chain saw out of control.
Use extreme caution when cutting brush
and saplings. The slender material may
catch the saw chain and be whipped toward
you or pull you off balance.
Carry the chain saw by the front handle
with the chain saw switched off and away
from your body.When transporting or sto-
ring the chain saw always fit the guide
bar cover. Proper handling of the chain saw
will reduce the likelihood of accidental contact
with the moving saw chain.
Follow instructions for lubricating, chain
tensioning and changing accessories. Im-
properly tensioned or lubricated chains may
either break or increase the chance of kick-
back.
Keep handles dry, clean, and free from oil
and grease. Greasy, oily handles are slip-
pery, causing loss of control.
Cut wood only. Do not use the chain saw
for purposes not intended. For example:
do not use the chain saw for cutting plas-
tic, masonry or non-wood building mate-
rials. Use of the chain saw for operations dif-
ferent than intended could result in a hazar-
dous situation.
G) CAUSES AND OPERATOR PREVENTION
OF KICKBACK:
Kickback may occur when the nose or tip of the
guide bar touches an object, or when the wood
closes in and pinches the saw chain in the cut.
Tip contact in some cases may cause a sudden
reverse reaction, kicking the guide bar up and
back towards the operator.
Pinching the saw chain along the top of the guide
bar may push the guide bar rapidly back towards
the operator.
Either of these reactions may cause you to lose
control of the saw which could result in serious
personal injury. Do not rely exclusively upon the
safety devices built into your saw.
As a chain saw user, you should take several
steps to keep your cutting jobs free from accident
or injury. Kickback is the result of tool misuse and/
or incorrect operating procedures or conditions
and can be avoided by taking proper precautions
as given below:
Maintain a firm grip, with thumbs and fin-
gers encirding the chain saw handles,
with both hands on the saw and position
your body and arm to allow you to re-
sist kickback forces. Kickback forces can
be controlled by the operator if proper pre-
cautions are taken. Do not let go of the chain
saw.
Do not overreach and do not cut above
shoulder height. This helps prevent uninten-
ded tip contact and enables better control of
the chain saw in unexpected situations.
Only use replacement bars and chains
specified by the manufacturer. Incorrect
replacement bars and chains may cause
chain breakage and/or kickback.
Follow the manufacturer's sharpening
and maintenance instructions for the saw
chain. Decreasing the depth gauge height
can lead to increased kickback.
H) CHAIN SAW OPERATING TECHNIQUES
Always observe the safety regulations and use the
most suitable sawing techniques (see chapter 7.
USING THE MACHINE for instructions and exam-
ples).
J) RECOMMENDATION FOR FIRST-TIME
USERS
Before felling or delimbing for the first time, make
sure:
– you have been specifically trained to use this
type of equipment;
– you have carefully read the safety regulations
and user instructions contained in this ma-
nual;
– you practise first on logs on the ground or
attached to trestles, in order to get familiar
with the machine and the most suitable cut-
ting techniques.
K) HOW TO READ THE MANUAL

en
3. SAFETY REQUIREMENTS
36 469601_a
Certain paragraphs in the manual contain particu-
larly significant information and are marked with
various levels of highlighting with the following
meaning:
ADVICE
These give details or further information
on what has already been indicated, and
aim to prevent both damage to the ma-
chine, and the machine from causing da-
mage.
CAUTION!
Non-observance will result in the risk
of injury to oneself or others.
DANGER!
Non-observance will result in the risk
of serious injury or death to oneself or
others.
4. MACHINE ASSEMBLY
ADVICE
The machine is supplied with the bar and
chain dismantled and the oil and fuel
tanks empty.
CAUTION!
Unpacking and completing the as-
sembly should be done on a flat and
stable surface, with enough space
for machine handling and its packa-
ging, always making use of suitable
equipment. Disposal of the packaging
should be done in accordance with
the local regulations in force.
CAUTION!
Always wear heavy-duty gloves when
handling the bar and chain. Mount the
bar and chain very carefully so as not
to impair the safety and efficiency of
the machine. If in doubt, contact your
dealer.
Before fitting the bar, make sure the chain brake is
not engaged; this is done by pulling the front hand
guard right back towards the body of the machine.
CAUTION!
Perform all operations with the engine
off.
1. SPIKED BUMPER ASSEMBLY (if not
already factory assembled)
– Unscrew the nuts (1) and remove the clutch
cover (2).
– Secure the spiked bumper (3) to the machine
frame using the two supplied screws (4) (Fig.
1).
2. BAR AND CHAIN MOUNTING
– Unscrew the nuts and remove the clutch co-
ver to get to the drive sprocket and point
where the bar is to be fitted (Fig. 2).
– Remove the two cardboard spacers, (3);
these spacers must be used exclusively
when transporting the machine in its packa-
ging and must not be used at any other time
(Fig. 2).
– Mount the bar (4) by inserting the stud bolts
in the groove and push it towards the back of
the machine body (Fig. 2).
– Mount the chain in the right direction around
the drive sprocket and along the bar rail (Fig.
3). If the tip of the bar has a nose sprocket,
make sure the drive links fit correctly in the
sprocket rims.
– Check that the chain tension adjuster pin (5)
is fitted properly in the hole on the bar; if it
isn’t, turn the chain tension adjuster screw (6)
using a screwdriver until the pin is completely
inserted (Fig. 4).
– Fit the guard back on without tightening the
nuts.
– Turn the chain tension adjuster screw (6) to
adjust the chain tension (Fig. 5).
– Raise the bar and tighten the guard nuts se-
curely using the wrench (Fig. 6).
– Check the chain tension. The tension is cor-
rect when the drive links do not slip out of
the chain guides if you hold the chain in the
middle of the bar (Fig. 7).
– Using a screwdriver, make the chain run
along the guides to check it moves smoothly
without resistance.
5. PREPARING TO WORK

5. PREPARING TO WORK
469601_a 37
1. PREPARING THE FUEL
This machine is fitted with a two-stroke engine
which requires a mixture of petrol and lubricating
oil.
ADVICE
Using petrol alone will damage the en-
gine and will cause for invalidation of the
warranty.
ADVICE
Only use quality fuels and oils to main-
tain high performance and guarantee the
service life of the mechanical parts over
time.
Petrol characteristics
Only use unleaded petrol with a fuel grade of at
least 90 N.O.
ADVICE
Unleaded petrol tends to create depo-
sits in the container if preserved for more
than 2 months. Always use fresh petrol!
Oil characteristics
Only use top quality synthetic oil specifically for
two-stroke engines.
Your dealer can provide you with oils which have
been specifically developed for this type of en-
gine, and which are capable of guaranteeing a
high level of protection.
The use of these oils makes it possible to prepare
a 2% mixture, consisting of 1 part oil to 50 parts
petrol.
Preparation and preservation of the fuel
mixture
DANGER!
Petrol and the fuel mixture are highly
flammable!
– Keep the petrol and fuel mixture
in homologated fuel containers,
in a safe place, away from any fla-
mes or heat sources.
– Never leave the containers within
the reach of children.
– Never smoke whilst preparing the
mixture and avoid inhaling the pe-
trol fumes.
The chart indicates the amount of petrol and oil to
use to prepare the fuel mixture according to the
type of oil used.
Petrol Synthetic oil 2-stroke
Litres Litres cm
3
1 0.02 20
2 0.04 40
3 0.06 60
5 0.10 100
10 0.20 200
To prepare the fuel mixture:
– Place about half the amount of petrol in a ho-
mologated tank.
– Add all the oil, according to the chart.
– Add the rest of the petrol.
– Close the top and shake well.
ADVICE
The fuel mixture tends to age. Do not
prepare excessive amounts of the fuel
mixture to avoid deposits from forming.
ADVICE
Keep the petrol and fuel mixture contai-
ners separate and easily identifiable to
avoid the mistake of using one in place
of the other.
ADVICE
Periodically clean the petroland fuelmix-
ture containers to remove any eventual-
deposits.
2. REFUELLING
DANGER!
Never smoke whilst refuellingand
avoid inhaling the petrol fumes.
DANGER!
Add fuel before startingthe engine.
Never remove the fuel tank cap oradd
fuel while the engine is running or
whenthe engine is hot.
CAUTION!
Carefully open the tanktop as pres-
sure could have formed inside.
Before refuelling:
– Shake the fuel mixture container well.
– Place the machine on a flat stable surface,
with the fuel tank cap facing upwards.

en
5. PREPARING TO WORK
38 469601_a
– Clean the fuel tank cap and the surrounding
area to avoid any dirt fromentering the tank
during refilling.
– Carefully open the fuel tank cap to allow the
pressure inside to decrease gradually. Use a
funnel to refill and avoid filling the tank to the
brim.
CAUTION!
Always close the fuel tank cap firmly.
CAUTION!
Immediately clean all traces of fuel
which may have dripped on the ma-
chine or the ground and do not start
the engine until the petrol fumes have
dissipated.
3. CHAIN LUBRICANT
ADVICE
Only use special oil for chainsaws or ad-
hesive oil for chain saws. Do not use
oilcontaining impurities so as not to block
the oil filter and to prevent irreparable da-
mage to the oil pump.
ADVICE
The special oil for lubricating the chain
is biodegradable. Use of a mineral oil or
engine oil causes serious damage to the
environment.
It is essential that you use good quality oil to lub-
ricate the cutting parts effectively. Used or poor
quality oil does not guarantee good lubrication
and reduces the service life of the chain and bar.
It is always worth topping up the oil tank comple-
tely (using a funnel) every time you refuel. Since
the oil tank capacity is enough to guarantee that
the fuel runs out first, you will avoid the risk of ope-
rating the machine without lubricant.
4. CHECKING THE MACHINE
Before starting work please:
– fill the relevant tanks with fuel and oil;
– check that all the screws on the machine and
the bar are tightly fastened;
– check that the chain is sharp and there are no
signs of any damage;
– check that the air filter is clean;
– check that handgrips and protection devices
are clean and dry, correctly mounted and well
fastened to the machine;
– check that the handgrips are well fastened;
– check that the chain brake is working effici-
ently;
– check the chain tension.
5. CHECKING THE CHAIN TENSION
– Loosen the cover nuts, using the supplied
wrench (Fig. 6).
– Turn the chain tension adjuster screw (6) to
adjust the chain tension (Fig. 5).
– Raise the bar and tighten the guard nuts se-
curely using the wrench (Fig. 6).
6. CHECKING THE CHAIN BRAKE
This machine is equipped with a safety brake sys-
tem.
In the event of a kickback while working following
an irregular contact of the tip of the bar, with a
brusque upward movement that causes the hand
to strike the front guard. In this case, the brake
blocks the chain movement and must be released
manually in order to disengage it.
This brake can be operated manually by pushing
the front guard forward. To release the brake, pull
the front guard towards the handgrip until you
hear a click.
To check that the brake works efficiently, proceed
as follows:
– Make sure you are holding the machine firmly
with both hands when you start the engine.
– Use the accelerator lever to keep the
chainmoving, push the brake lever forwards
using the back of your left hand; the chain
must stop immediately.
– When the chain has stopped, immediately re-
lease the accelerator lever.
– Release the brake.
CAUTION!
Do not use the machine if the chain
brake does not function correctly and
have it inspected by your dealer.
6. HOW TO START – USE – STOP THE ENGINE

6. HOW TO START – USE – STOP THE ENGINE
469601_a 39
STARTING THE ENGINE
CAUTION!
The engine must be started in an area
at least 3 metres from where you refil-
led the fuel tank.
Before starting the engine:
– Place the machine firmly on the ground.
– Take off the bar cover.
– Make sure the bar is not touching the ground
or any other object.
Cold starting
ADVICE
A “cold” start of the engine means star-
ting it after at least 5 minutes from when
it was switched off or after refuelling.
To start the engine (Fig. 8):
1. Check that the chain brake is engaged (with
the front hand guard pushed forward).
2. Set the switch (1) to «START».
3. Pull the choke (2) as far as possible to engage
the starter.
4. Press the primer device button (3) at least 5
times to prime the carburettor.
5. Press the decompression valve button (4 –
only for Mod. 46 and 52); the device turns
off and the button automatically returns to its
original position immediately after the engine
starts.
6. Hold the machine firmly on the ground, with
your hand on the handgrip and your foot in the
rear handgrip, to avoid losing control during
starting (Fig. 9).
CAUTION!
If the machine is not held firmly,
the force of the engine could
cause the user to lose his balance
or direct the bar towards him or an
obstacle.
7. Pull the starter rope slowly for 10 - 15 cm until
you feel some resistance, then tug it hard a
few times until you hear the engine turn over.
CAUTION!
Never wind the starter cable
around your hand.
DANGER!
Never start the chain saw by hol-
ding on to the starter cable and
allowing it to fall. This is an ex-
tremely dangerous method as you
lose complete control over the
machine and the chain.
ADVICE
To avoid breaking the starter rope,
do not pull the whole length of it or
let it slide along the edge of the cable
guide hole. Release the starter gra-
dually, to avoid letting it fly back un-
controllably.
8. Retract the starter knob (2); this condition is
indicated by the protruding red pin (2a).
9. Pull the starter rope again until the engine
starts as normal.
ADVICE
If the starter rope is pulled repeatedly
with the choke on, it may flood the
engine and make starting difficult.
If you have flooded the engine, re-
move the spark plug and gently pull
the handle on the starter rope to eli-
minate any excess fuel; then dry the
spark plug electrodes and replace it
on the engine.
10. When the engine has started, press the
throttle trigger to disconnect the starter and
allow the engine to idle.
ADVICE
Do not let the engine run at high
power with the chain brake engaged,
as this could cause overheating and
damage to the clutch.
11. Let the engine run idle for at least 1 minute
before using the machine.
Hot starting
For hot start (immediately after turning off the
engine) pulling the starting cord normally suf-
fices.
In the event of difficulty:
– Pull the starter knob (2) fully out and
push it back in so that the red pin (2a)
protrudes.
– Pull the starter cord grip until the engine
starts as normal.
– When the engine has started, press the
throttle trigger to disconnect the starter
and allow the engine to idle.

en
6. HOW TO START – USE – STOP THE ENGINE
40 469601_a
USE OF THE ENGINE (Fig. 10)
ADVICE
Always disengage the chainbrake, pul-
ling the lever towards you before using
the accelerator.
The chain speed is regulated by the throttle trigger
(1) on the rear handgrip (2).
The throttle trigger only works if the lockout (3) is
pressed at the same time.
The movement is transmitted from the engine
to the chain by a centrifugal mass clutch that
prevents the chain from moving when the engine
is running at minimum speed.
CAUTION!
Do not use the machine if the chain
moves when the engine is running
idle; in this case, contact your dealer.
The correct running speed will be achieved by
pressing the throttle trigger (1) as far as possible.
ADVICE
Avoid using the engine at full power for
the first 6-8 working hours.
STOPPING THE ENGINE (Fig. 10)
To stop the engine:
– Release the throttle trigger (1) and allow the
engine to run idle for a few seconds.
– Set the switch (4) to “STOP”.
CAUTION!
When you have reduced speed to a
minimum, it may take a few seconds
for the chain to stop.
ADVICE
If the machine does not turn off, pull the
starter to flood and stop the engine and
immediately contact the dealer to find the
cause of the problem and request ne-
cessary repairs.
7. USING THE MACHINE
ADVICE
Always remember that an incorrectly
used chain saw may disturb others and
have a serious impact on the environ-
ment.
To respect people and the environment:
– Avoid using the machine in environ-
ments or at times of the day when it
may disturb others.
– Scrupulously comply with local re-
gulations and provisions for the
disposal of waste materials after
sawing.
– Scrupulously comply with local re-
gulations and provisions for the dis-
posal of oils, damaged parts or any
elements which have a strong im-
pact on the environment.
– A certain amount of chain lubrica-
ting oil is released into the environ-
ment when the machine is running,
so only use biodegradable oils made
specifically for this use.
– To avoid the risk of fire, do not leave
the machine with the engine hot on
leaves or dry grass.
CAUTION!
Always wear suitable clothing when
using the machine. Your dealer can
provide you with all the informa-
tion on the most suitable accident
prevention devices to guarantee your
safety. Wear anti-vibration gloves. All
the above-mentioned precautions do
not however guarantee the preven-
tion of certain risks – i.e. Raynaud’s
phenomenon or carpal tunnel syn-
drome. For operators who use this
machine for prolonged periods, it is-
therefore recommended to have peri-
odic check-ups of the hands and fin-
gers.
If any of the above-mentioned sym-
ptoms should appear, please contact
a physician immediately.

7. USING THE MACHINE
469601_a 41
DANGER!
This machine’s starter unit
generates an average sized
electromagneticfield, but it is not pos-
sible to exclude the possibility of
interference on any active or pas-
sive medical devices that operators
may be wearing; this could be risky
for their health conditions. All those
using medical devices should always
consult their GP, or the device manu-
facturer, before using this machine.
CAUTION!
It takes specific training to use the
machine for felling and delimbing.
1. CHECKS DURING WORK
Checking the chain tension
The chain tends to stretch gradually as you work,
so you need to check its tension frequently.
ADVICE
During the first period of use (or after re-
placing the chain), it must be checked
more frequently due to settling of the
chain.
CAUTION!
Never work with the chain loose, as
it can be hazardous if the chain slips
out of its guides.
To adjust the chain tension, follow the instructions
in Chapter 5. CHECKING THE CHAIN TENSION.
Checking the oil delivery
ADVICE
Never use the machine without lubrica-
tion! The oil tank may get almost empty
every time the fuel runs out. Make sure
you top up the oil tank every time you re-
fuel the chain saw.
CAUTION!
Make sure the bar and the chain are in
place when you check the oil delivery.
Start the engine, keep it running at medium power
and check if the chain oil is delivered as shown in
the figure (Fig. 12).
Only for mod. 46 and 52
You can adjust the chain oil flow using a screwd-
river on the adjuster screw (1) of the oiler, which
is on the bottom of the machine (Fig. 12).
2. DIRECTIONS FOR USE AND CUTTING
TECHNIQUES
Before felling or delimbing for the first time, prac-
tise sawing logs on the ground or on trestles, so
that you can get familiar with the machine and the
most suitable sawing techniques.
CAUTION!
When running, the machine must al-
ways be firmly held in both hands,
with the right hand on the front hand
grip and the left hand on the rear hand
grip,even if the operator is left-han-
ded.
CAUTION!
Stop the engine immediately if the
chain stops during sawing. Beware
of kickback, which can occur if the
barcontacts an obstacle.
Delimbing (Fig. 13)
CAUTION!
Make sure there is nothing or nobody
in the area where the branches will fall
1. Stand opposite the branch you want to cut.
2. Start cutting lower branches followed by the
higher ones.
3. Cut downwards to prevent the bar from get-
ting jammed.
Felling (Fig. 14)
CAUTION!
When felling on slopes, always stand
uphill from the tree and check that the
felled trunk cannot cause damage if it
rolls down the hill.
1. Decide where the tree should fall – you should
consider the wind, the natural lean of the tree,
the position of the heaviest branches and how
easy the work is after felling, etc.
2. Clear the area around the tree and find a sta-
ble place to stand.
3. Plan obstacle-free escape routes at a 45°
angle back and away from the direction of
fall. These routes must allow you reach a
safe area at a distance of about 2.5 times the
length of the tree to be felled.
4. On the side of the fall, mark a felling notch
around a third of the trunk’s diameter.

en
7. USING THE MACHINE
42 469601_a
5. Cut the tree on the other side, slightly above
the bottom of the notch, leaving the uncut
wood to act as a “hinge” (1) of approx. 5-10
cm.
6. Reduce the thickness of this hinge without
pulling out the bar, until the tree falls.
7. In difficult or unstable conditions, you can
complete felling by inserting wedges (2) on
the opposite side of the fall, and hitting them
with a hammer until the tree falls.
Bucking (Fig. 15)
CAUTION!
Be aware of where the branches are
lying of the ground, the risk of them
being under tension, the direction the
branch may go during cutting and the
risk of the tree being unstable after
the branch has been cut.
1. Check the direction in which the branch is at-
tached to the tree.
2. First cut on the side where the branch bends
and then finish cutting on the opposite side.
Sawing logs (Fig. 16)
It is easier to saw a log using the spiked bumper.
1. Dig the spiked bumper into the log and use it
as a pivot. Cut with an arched motion to make
the bar penetrate the wood.
2. Repeat several times if necessary, changing
the point where you plant the spiked bumper.
Sawing a log on the ground (Fig. 17)
Cut up to half the diameter, roll the log over and
finishing sawing on the other side.
Sawing a raised log (Fig. 18)
1. If you are sawing the overhanging end of a
supported log (A), first cut a third of the diame-
ter from the bottom upwards, then finish from
the top.
2. If you are sawing between two supports (B),
cut a third of the diameter from the top down-
wards, then finish from the bottom.
3. END OF OPERATIONS
When you have finished your work:
– Switch off the engine as indicated above
(Chap. 6. HOW TO START – USE – STOP
THE ENGINE).
– Wait for the chain to stop and allow the ma-
chine to cool.
– Loosen the rod fastening nuts to reduce chain
tension
– Remove any traces of sawdust or oil deposits
from the chain.
– If there is excessive dirt or resin build-up, di-
sassemble the chain and place it in a contai-
ner with a specialist cleanser. Then rinse it
with clean water and treat it with a suitable
anticorrosive spray, before reassembling on
the machine.
– Fit the bar cover before reassembling the ma-
chine.
CAUTION!
Allow the engine to coolbefore sto-
ring in any enclosure.To reduce
fire hazards, clean the machinetho-
roughly to get rid of any sawdust,
branches,leaves or excess grease,
never leavecontainers with the cut de-
bris inside the storagearea.
8. MAINTENANCE AND STORAGE

8. MAINTENANCE AND STORAGE
469601_a 43
CAUTION!
For your safety and that of others:
– Correct maintenance is essential
for maintain the original effici-
ency and safety of the machine
over time.
– Keep all nuts, bolts and screws
tight to be sure the equipment is
in a safe working condition.
– Never use the machine with
worn or damaged parts. Damaged
parts must be replaced and never
repaired.
– Only use original spare parts.
Parts that are not of the same
quality can seriously damage
the equipment and compromise
safety.
CAUTION!
During maintenance operations:
– Remove the spark plug cap.
– Wait until the engine is suffici-
ently cold.
– Use protective gloves when
handling the bar and chain.
– Keep the bar protection devices
on, except when intervening di-
rectly on the bar or the chain.
– Never dispose of oils, fuel or
other polluting materials in un-
authorised places.
CYLINDER AND SILENCER (Fig. 19)
To reduce fire risks, periodically clean the cylin-
der flaps with compressed air and clear the silen-
cer area to get rid of sawdust, branches, leaves
or other debris.
STARTING SYSTEM
To avoid overheating and damage to the engine,
always keep the cooling air vents clean and free
of sawdust and debris.
The starter rope must be replaced as soon as it
shows signs of wear.
CLUTCH UNIT (Fig. 20)
Keep the clutch bell free of sawdust and de-
bris, remove the casing (as illustrated in Chap. 1.
SPIKED BUMPER ASSEMBLY (if not already fac-
tory assembled)) and replace it correctly when the
operation has been completed. Have your dealer
check the greasing of the internal bearing every
30 hours (approx.).
CHAIN BRAKE
Regularly check the efficiency of the chain brake
and the condition of the metal band around the
clutch bell, remove the casing (as illustrated in
Chap. 1. SPIKED BUMPER ASSEMBLY (if not al-
ready factory assembled)) and replace it correctly
when the operation has been completed.
CHAIN SPROCKET
Regularly check the condition of the sprocket with
your local dealer and replace it when wear ex-
ceeds the accepted limits.
Do not mount a new chain with a worn sprocket
or vice-versa.
LUBRICATION HOLE (Fig. 21)
Periodically remove the casing (as illustrated in
Chap. 1. SPIKED BUMPER ASSEMBLY (if not al-
ready factory assembled)), remove the bar and
check that neither the machine lubrication holes
(1) nor the bar (2) are clogged.
CHAIN CATCHER
This is an important safety device that restrains
the chain if it breaks or degrooves.
Regularly check the condition of the pin and re-
place it if damaged.
NUTS AND SCREWS
Periodically check that all the nuts and screws are
securely tightened and the handgrips are tightly
fastened.
CLEANING THE AIR FILTER
ADVICE
Cleaning the air filter is essential for gua-
ranteering the efficiency and service life
of the machine. Do not work with a dama-
ged filter or without a filter, as this could
permanently damage the engine.
It must be cleaned after every 8-10 working hours.
Models 36 and 43
To clean the filter (Fig. 22):
– Move the front hand guard forward.
– Unscrew the screw (1) and remove the cover
(2).
– Remove the sponge pre-filter (3a) and filter
element (3).
– Gently knock the filtering element (3) to re-
move dirt.

en
8. MAINTENANCE AND STORAGE
44 469601_a
– If necessary, clean the sponge pre-filter (3a)
and filtering element (3) with hot soapy water
or detergent or clean with a jet of compressed
air.
– Eliminate all sawdust and dirt residue in the
filter housing (4) being careful it does not pe-
netrate into the suction duct (5).
– Reassemble the filtering element (3) and
sponge pre-filter (3a) only when thoroughly
dry.
– Remount the cover (2).
Models 46 and 52
To clean the filter (Fig. 23):
– Move the front hand guard forward.
– Using a screwdriver, remove the three side
springs (1) and the cover (2).
– Extract the starter knob (3) and, using pliers,
extract the two side stops (4).
– Remove the filter element (5) and tap it gently
to remove any dirt and, if necessary, clean it
with hot soapy water or detergent. If you are
using compressed air, aim the jet so that it
blows from the inside towards the outside.
– Eliminate all sawdust and dirt residue in the
filter housing (6) being careful it does not pe-
netrate into the suction duct (7).
– Reassemble the filter element (5) only when
thoroughly dry, being careful to perfectly line
up the two side protrusions (8) with the filter
housing protrusions.
– Reassemble the two side stops (4).
– Reassemble the cover (2) and hook the three
springs (1).
CHECKING THE SPARK PLUG (Fig. 24)
The spark plug can be accessed by removing the
air filter cover.
Periodically remove and clean the spark plug
using a metal brush to get rid of any deposits.
Check and reset the correct distance between the
electrodes.
Replace the spark plug and fasten it firmly using
the supplied wrench.
The spark plug must be replaced with one with
the same characteristics whenever the electrodes
have burnt or the insulation has worn, and in any
case every 100 working hours.
TUNING THE CARBURETTOR
The carburettor is tuned by the manufacturer to
achieve maximum performance in all situations,
with a minimum emission of toxic gas in compli-
ance with the regulations in force.
When performance is poor, first check that the
chain runs smoothly and the bar rails are not dis-
torted, then contact your dealer to check the car-
burettor and the engine.
Tuning minimum speed
CAUTION!
The chain must not move when the
engine is running idle. If the chain mo-
ves when the engine is running idle,
contact your dealer to correctly regu-
late the engine.
SHARPENING THE CHAIN
CAUTION!
To ensure that the chain saw works
safely and efficiently, it is essential
that the cutting components are well
sharpened.
Sharpening is necessary when:
The sawdust looks like dust.
Cutting becomes more difficult.
The cut is not straight.
Vibrations increase.
Fuel consumption increases.
CAUTION!
If the chain is not sufficiently sharpe-
ned, the risk of kick-back increases.
A specialist centre will sharpen the chain using the
right tools to ensure minimum removal of material
and even sharpness on all the cutting edges.
If you sharpen the chain yourself, use special
round-section files with the right diameter depen-
ding on the type of chain (see Chain maintenance
table). You need a certain amount of skill and ex-
perience to avoid damaging the cutting edges.
Sharpen the chain as follows (Fig. 25):
– Switch off the engine, release the chain brake
and secure the bar with the chain in a vice so
that the chain can run smoothly.
– Tighten the chain if it is loose.
– Mount the file in the guide and then insert it in
the tooth at a constant angle from the cutting
edge.
– Sharpen in a forward motion a few times and
repeat this on all the cutting edges facing the
same way (right or left).
– Turn the bar over in the vice and repeat on all
the other cutting edges.

8. MAINTENANCE AND STORAGE
469601_a 45
– Check that the limiter tooth does not stick out
further than the inspection instrument and file
any projecting parts with a flat file, rounding
off the edge.
– After sharpening, remove all traces of filing
and dust and lubricate the chain in an oil bath.
Replace the chain whenever:
– The length of the cutting edges reduces to 5
mm or less;
– There is too much play between the links and
the rivets.

en
8. MAINTENANCE AND STORAGE
46 469601_a
Chain maintenance table
CAUTION!
The specifications of the chain and the bar homologated for this machine are shown in
the “EC Conformity Statement” provided. Do not use other types of chains or bars for
safety reasons.The table gives the sharpening data for different types of chains, but this
does not mean you can use different chains from the homologated one.
Chain pitch Limiter tooth level (a) File diameter (d)
a
d
inches mm inches mm inches mm
3/8 spec 9.32 0.018 0.45 5/32 4.0
0.325 8.25 0.026 0.65 3/16 4.8
3/8 9.32 0.026 0.65 13/64 5.2
0.404 10.26 0.031 0.80 7/32 5.6
BAR MAINTENANCE (Fig. 26)
To avoid asymmetrical wear on the bar, make
sure it is turned over periodically.
To keep the bar in perfect working order, proceed
as follows:
– grease the bearings on the nose sprocket (if
present) with the syringe;
– clean the bar groove with the scraper (not in-
cluded);
– clean the lubrication holes;
– with a flat file, remove burr from the edges
and level off the guides.
Replace the bar whenever:
– the groove is not as deep as the height of the
drive links (which must never touch the bot-
tom);
– the inside of the guide is worn enough to
make the chain lean to one side.
EXTRAORDINARY MAINTENANCE
All maintenance operations not foreseen in this
manual must be performed exclusively by your
dealer.
All and any operations performed in unauthorised
centres or by unqualified persons will totally inva-
lidate the warranty.
STORAGE
After every period of work, clean the machine tho-
roughly to remove all dust and debris, and repair
or replace any faulty parts.
The machine must be stored in a dry place away
from the elements and with the bar cover correctly
fitted.
LONG PERIODS OF DISUSE
ADVICE
If you are not going to use the machine
for a period of more than 2-3 months,we
recommend you do a few things before
putting it away. This will make it easier
when you want to use the machine again
and will also prevent permanent damage
to the engine.
Storage
Before putting the machine away:
– Unscrew the two nuts, remove the guard and
remove the chain and rod.
– Empty the oil tank, fill with about 100-120 cc
of specialist liquid detergent and plug the cap.
– Fit the guard back on without tightening the
nuts.
– Start the engine and keep it running until all
detergent is used.

8. MAINTENANCE AND STORAGE
469601_a 47
– Start the engine and run it idle until it uses
up all the fuel that is left in the tank and the
carburettor.
– Remove the spark plug after the engine
cools.
– Pour a teaspoon of (new) 2-stroke engine oil
into the spark plug slot.
– Pull the starter grip several times to deliver oil
to the cylinder.
– Replace the spark plug with the piston in
the dead end upper position (visible from the
spark plug slot when the piston is at maxi-
mum stroke).
Restarting work
When you wish to start using the machine again:
– Remove the spark plug.
– Pull the starter rope a few times to eliminate
excess oil.
– Check the spark plug as described in chapter
CHECKING THE SPARK PLUG (Fig. 24).
– Prepare the machine as indicated in the pa-
ragraph entitled 7. USING THE MACHINE.
Page is loading ...
Page is loading ...
Page is loading ...
Page is loading ...
Page is loading ...
Page is loading ...
Page is loading ...
Page is loading ...
Page is loading ...
Page is loading ...
Page is loading ...
Page is loading ...
Page is loading ...
Page is loading ...
Page is loading ...
Page is loading ...
Page is loading ...
Page is loading ...
Page is loading ...
Page is loading ...
Page is loading ...
Page is loading ...
Page is loading ...
Page is loading ...
Page is loading ...
Page is loading ...
Page is loading ...
Page is loading ...
Page is loading ...
Page is loading ...
Page is loading ...
Page is loading ...
Page is loading ...
Page is loading ...
Page is loading ...
Page is loading ...
Page is loading ...
Page is loading ...
Page is loading ...
Page is loading ...
Page is loading ...
Page is loading ...
Page is loading ...
Page is loading ...
Page is loading ...
Page is loading ...
Page is loading ...
Page is loading ...
Page is loading ...
Page is loading ...
Page is loading ...
Page is loading ...
Page is loading ...
Page is loading ...
Page is loading ...
Page is loading ...
Page is loading ...
Page is loading ...
Page is loading ...
Page is loading ...
Page is loading ...
Page is loading ...
Page is loading ...
Page is loading ...
Page is loading ...
Page is loading ...
Page is loading ...
Page is loading ...
Page is loading ...
Page is loading ...
Page is loading ...
Page is loading ...
Page is loading ...
Page is loading ...
Page is loading ...
Page is loading ...
Page is loading ...
Page is loading ...
Page is loading ...
Page is loading ...
Page is loading ...
Page is loading ...
Page is loading ...
Page is loading ...
Page is loading ...
Page is loading ...
Page is loading ...
Page is loading ...
Page is loading ...
Page is loading ...
Page is loading ...
Page is loading ...
Page is loading ...
Page is loading ...
Page is loading ...
Page is loading ...
Page is loading ...
Page is loading ...
Page is loading ...
Page is loading ...
Page is loading ...
Page is loading ...
Page is loading ...
Page is loading ...
Page is loading ...
Page is loading ...
Page is loading ...
Page is loading ...
Page is loading ...
Page is loading ...
Page is loading ...
Page is loading ...
Page is loading ...
Page is loading ...
Page is loading ...
Page is loading ...
Page is loading ...
Page is loading ...
Page is loading ...
Page is loading ...
Page is loading ...
Page is loading ...
Page is loading ...
Page is loading ...
Page is loading ...
Page is loading ...
Page is loading ...
Page is loading ...
Page is loading ...
Page is loading ...
Page is loading ...
Page is loading ...
Page is loading ...
Page is loading ...
Page is loading ...
Page is loading ...
Page is loading ...
Page is loading ...
Page is loading ...
Page is loading ...
Page is loading ...
Page is loading ...
Page is loading ...
Page is loading ...
Page is loading ...
Page is loading ...
Page is loading ...
Page is loading ...
Page is loading ...
Page is loading ...
Page is loading ...
Page is loading ...
Page is loading ...
Page is loading ...
Page is loading ...
Page is loading ...
Page is loading ...
Page is loading ...
Page is loading ...
Page is loading ...
Page is loading ...
Page is loading ...
Page is loading ...
Page is loading ...
Page is loading ...
Page is loading ...
Page is loading ...
Page is loading ...
Page is loading ...
Page is loading ...
Page is loading ...
Page is loading ...
Page is loading ...
Page is loading ...
Page is loading ...
Page is loading ...
Page is loading ...
Page is loading ...
Page is loading ...
Page is loading ...
Page is loading ...
Page is loading ...
Page is loading ...
Page is loading ...
Page is loading ...
Page is loading ...
Page is loading ...
Page is loading ...
Page is loading ...
Page is loading ...
Page is loading ...
Page is loading ...
Page is loading ...
Page is loading ...
Page is loading ...
Page is loading ...
Page is loading ...
Page is loading ...
Page is loading ...
Page is loading ...
Page is loading ...
Page is loading ...
Page is loading ...
Page is loading ...
Page is loading ...
Page is loading ...
Page is loading ...
Page is loading ...
Page is loading ...
Page is loading ...
Page is loading ...
Page is loading ...
Page is loading ...
Page is loading ...
Page is loading ...
Page is loading ...
Page is loading ...
Page is loading ...
Page is loading ...
Page is loading ...
Page is loading ...
Page is loading ...
Page is loading ...
Page is loading ...
Page is loading ...
Page is loading ...
Page is loading ...
Page is loading ...
Page is loading ...
Page is loading ...
Page is loading ...
Page is loading ...
Page is loading ...
Page is loading ...
Page is loading ...
Page is loading ...
Page is loading ...
Page is loading ...
Page is loading ...
Page is loading ...
Page is loading ...
Page is loading ...
Page is loading ...
Page is loading ...
Page is loading ...
Page is loading ...
Page is loading ...
Page is loading ...
Page is loading ...
Page is loading ...
Page is loading ...
Page is loading ...
Page is loading ...
Page is loading ...
Page is loading ...
Page is loading ...
Page is loading ...
Page is loading ...
Page is loading ...
Page is loading ...
Page is loading ...
Page is loading ...
Page is loading ...
Page is loading ...
Page is loading ...
Page is loading ...
Page is loading ...
Page is loading ...
Page is loading ...
Page is loading ...
Page is loading ...
Page is loading ...
Page is loading ...
Page is loading ...
Page is loading ...
Page is loading ...
Page is loading ...
Page is loading ...
Page is loading ...
Page is loading ...
Page is loading ...
Page is loading ...
Page is loading ...
Page is loading ...
Page is loading ...
Page is loading ...
Page is loading ...
Page is loading ...
Page is loading ...
Page is loading ...
Page is loading ...
Page is loading ...
Page is loading ...
Page is loading ...
Page is loading ...
Page is loading ...
Page is loading ...
Page is loading ...
Page is loading ...
Page is loading ...
Page is loading ...
Page is loading ...
Page is loading ...
Page is loading ...
Page is loading ...
Page is loading ...
Page is loading ...
Page is loading ...
Page is loading ...
Page is loading ...
Page is loading ...
Page is loading ...
Page is loading ...
Page is loading ...
Page is loading ...
Page is loading ...
Page is loading ...
Page is loading ...
Page is loading ...
Page is loading ...
Page is loading ...
Page is loading ...
Page is loading ...
Page is loading ...
Page is loading ...
Page is loading ...
Page is loading ...
Page is loading ...
Page is loading ...
Page is loading ...
Page is loading ...
Page is loading ...
Page is loading ...
Page is loading ...
Page is loading ...
Page is loading ...
Page is loading ...
Page is loading ...
Page is loading ...
Page is loading ...
Page is loading ...
Page is loading ...
Page is loading ...
Page is loading ...
Page is loading ...
Page is loading ...
Page is loading ...
Page is loading ...
Page is loading ...
Page is loading ...
Page is loading ...
Page is loading ...
Page is loading ...
Page is loading ...
Page is loading ...
Page is loading ...
Page is loading ...
Page is loading ...
Page is loading ...
Page is loading ...
Page is loading ...
Page is loading ...
Page is loading ...
Page is loading ...
Page is loading ...
Page is loading ...
Page is loading ...
Page is loading ...
Page is loading ...
Page is loading ...
Page is loading ...
Page is loading ...
Page is loading ...
Page is loading ...
Page is loading ...
Page is loading ...
Page is loading ...
Page is loading ...
Page is loading ...
Page is loading ...
Page is loading ...
Page is loading ...
Page is loading ...
Page is loading ...
Page is loading ...
Page is loading ...
Page is loading ...
Page is loading ...
Page is loading ...
Page is loading ...
Page is loading ...
Page is loading ...
Page is loading ...
Page is loading ...
Page is loading ...
Page is loading ...
Page is loading ...
Page is loading ...
Page is loading ...
Page is loading ...
Page is loading ...
Page is loading ...
Page is loading ...
Page is loading ...
Page is loading ...
Page is loading ...
Page is loading ...
Page is loading ...
Page is loading ...
Page is loading ...
Page is loading ...
Page is loading ...
Page is loading ...
Page is loading ...
Page is loading ...
Page is loading ...
Page is loading ...
Page is loading ...
Page is loading ...
Page is loading ...
Page is loading ...
Page is loading ...
Page is loading ...
Page is loading ...
Page is loading ...
Page is loading ...
Page is loading ...
Page is loading ...
Page is loading ...
Page is loading ...
Page is loading ...
Page is loading ...
Page is loading ...
Page is loading ...
Page is loading ...
Page is loading ...
Page is loading ...
Page is loading ...
Page is loading ...
Page is loading ...
Page is loading ...
Page is loading ...
Page is loading ...
Page is loading ...
Page is loading ...
Page is loading ...
Page is loading ...
Page is loading ...
Page is loading ...
Page is loading ...
Page is loading ...
Page is loading ...
Page is loading ...
Page is loading ...
Page is loading ...
Page is loading ...
Page is loading ...
Page is loading ...
Page is loading ...
Page is loading ...
Page is loading ...
Page is loading ...
Page is loading ...
Page is loading ...
Page is loading ...
Page is loading ...
Page is loading ...
Page is loading ...
Page is loading ...
Page is loading ...
Page is loading ...
Page is loading ...
Page is loading ...
Page is loading ...
Page is loading ...
Page is loading ...
Page is loading ...
Page is loading ...
Page is loading ...
Page is loading ...
Page is loading ...
Page is loading ...
Page is loading ...
Page is loading ...
Page is loading ...
Page is loading ...
Page is loading ...
Page is loading ...
Page is loading ...
Page is loading ...
Page is loading ...
Page is loading ...
Page is loading ...
Page is loading ...
Page is loading ...
Page is loading ...
Page is loading ...
Page is loading ...
Page is loading ...
Page is loading ...
Page is loading ...
Page is loading ...
Page is loading ...
Page is loading ...
Page is loading ...
Page is loading ...
Page is loading ...
Page is loading ...
Page is loading ...
Page is loading ...
Page is loading ...
Page is loading ...
Page is loading ...
Page is loading ...
Page is loading ...
Page is loading ...
Page is loading ...
Page is loading ...
Page is loading ...
Page is loading ...
Page is loading ...
Page is loading ...
Page is loading ...
Page is loading ...
Page is loading ...
Page is loading ...
Page is loading ...
Page is loading ...
Page is loading ...
Page is loading ...
Page is loading ...
Page is loading ...
Page is loading ...
Page is loading ...
Page is loading ...
Page is loading ...
Page is loading ...
Page is loading ...
Page is loading ...
Page is loading ...
Page is loading ...
Page is loading ...
Page is loading ...
Page is loading ...
Page is loading ...
Page is loading ...
Page is loading ...
Page is loading ...
Page is loading ...
Page is loading ...
Page is loading ...
Page is loading ...
Page is loading ...
Page is loading ...
Page is loading ...
Page is loading ...
Page is loading ...
Page is loading ...
Page is loading ...
Page is loading ...
Page is loading ...
Page is loading ...
Page is loading ...
Page is loading ...
Page is loading ...
Page is loading ...
Page is loading ...
Page is loading ...
Page is loading ...
Page is loading ...
Page is loading ...
Page is loading ...
Page is loading ...
Page is loading ...
Page is loading ...
-
 1
1
-
 2
2
-
 3
3
-
 4
4
-
 5
5
-
 6
6
-
 7
7
-
 8
8
-
 9
9
-
 10
10
-
 11
11
-
 12
12
-
 13
13
-
 14
14
-
 15
15
-
 16
16
-
 17
17
-
 18
18
-
 19
19
-
 20
20
-
 21
21
-
 22
22
-
 23
23
-
 24
24
-
 25
25
-
 26
26
-
 27
27
-
 28
28
-
 29
29
-
 30
30
-
 31
31
-
 32
32
-
 33
33
-
 34
34
-
 35
35
-
 36
36
-
 37
37
-
 38
38
-
 39
39
-
 40
40
-
 41
41
-
 42
42
-
 43
43
-
 44
44
-
 45
45
-
 46
46
-
 47
47
-
 48
48
-
 49
49
-
 50
50
-
 51
51
-
 52
52
-
 53
53
-
 54
54
-
 55
55
-
 56
56
-
 57
57
-
 58
58
-
 59
59
-
 60
60
-
 61
61
-
 62
62
-
 63
63
-
 64
64
-
 65
65
-
 66
66
-
 67
67
-
 68
68
-
 69
69
-
 70
70
-
 71
71
-
 72
72
-
 73
73
-
 74
74
-
 75
75
-
 76
76
-
 77
77
-
 78
78
-
 79
79
-
 80
80
-
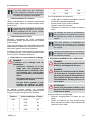 81
81
-
 82
82
-
 83
83
-
 84
84
-
 85
85
-
 86
86
-
 87
87
-
 88
88
-
 89
89
-
 90
90
-
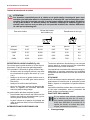 91
91
-
 92
92
-
 93
93
-
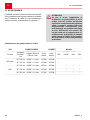 94
94
-
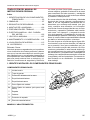 95
95
-
 96
96
-
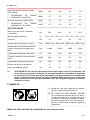 97
97
-
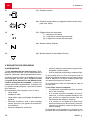 98
98
-
 99
99
-
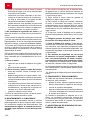 100
100
-
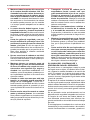 101
101
-
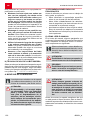 102
102
-
 103
103
-
 104
104
-
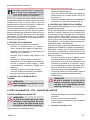 105
105
-
 106
106
-
 107
107
-
 108
108
-
 109
109
-
 110
110
-
 111
111
-
 112
112
-
 113
113
-
 114
114
-
 115
115
-
 116
116
-
 117
117
-
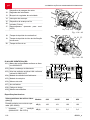 118
118
-
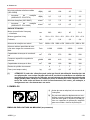 119
119
-
 120
120
-
 121
121
-
 122
122
-
 123
123
-
 124
124
-
 125
125
-
 126
126
-
 127
127
-
 128
128
-
 129
129
-
 130
130
-
 131
131
-
 132
132
-
 133
133
-
 134
134
-
 135
135
-
 136
136
-
 137
137
-
 138
138
-
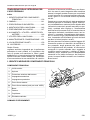 139
139
-
 140
140
-
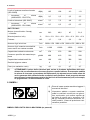 141
141
-
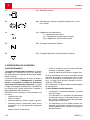 142
142
-
 143
143
-
 144
144
-
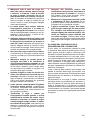 145
145
-
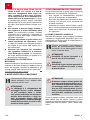 146
146
-
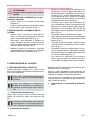 147
147
-
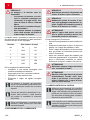 148
148
-
 149
149
-
 150
150
-
 151
151
-
 152
152
-
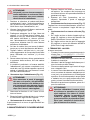 153
153
-
 154
154
-
 155
155
-
 156
156
-
 157
157
-
 158
158
-
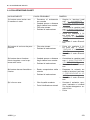 159
159
-
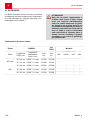 160
160
-
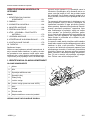 161
161
-
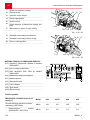 162
162
-
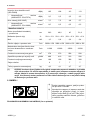 163
163
-
 164
164
-
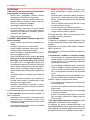 165
165
-
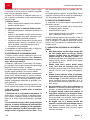 166
166
-
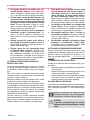 167
167
-
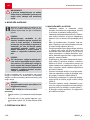 168
168
-
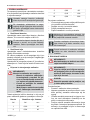 169
169
-
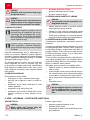 170
170
-
 171
171
-
 172
172
-
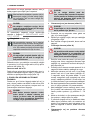 173
173
-
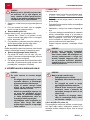 174
174
-
 175
175
-
 176
176
-
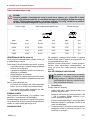 177
177
-
 178
178
-
 179
179
-
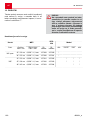 180
180
-
 181
181
-
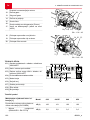 182
182
-
 183
183
-
 184
184
-
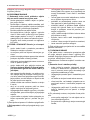 185
185
-
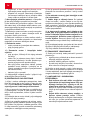 186
186
-
 187
187
-
 188
188
-
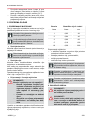 189
189
-
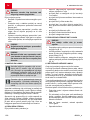 190
190
-
 191
191
-
 192
192
-
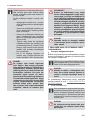 193
193
-
 194
194
-
 195
195
-
 196
196
-
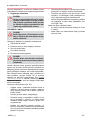 197
197
-
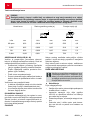 198
198
-
 199
199
-
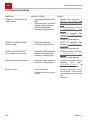 200
200
-
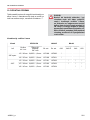 201
201
-
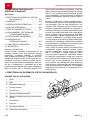 202
202
-
 203
203
-
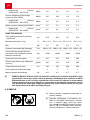 204
204
-
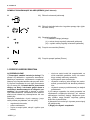 205
205
-
 206
206
-
 207
207
-
 208
208
-
 209
209
-
 210
210
-
 211
211
-
 212
212
-
 213
213
-
 214
214
-
 215
215
-
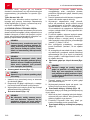 216
216
-
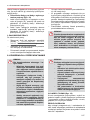 217
217
-
 218
218
-
 219
219
-
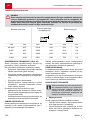 220
220
-
 221
221
-
 222
222
-
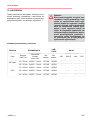 223
223
-
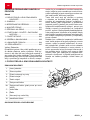 224
224
-
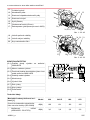 225
225
-
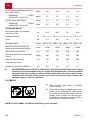 226
226
-
 227
227
-
 228
228
-
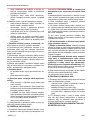 229
229
-
 230
230
-
 231
231
-
 232
232
-
 233
233
-
 234
234
-
 235
235
-
 236
236
-
 237
237
-
 238
238
-
 239
239
-
 240
240
-
 241
241
-
 242
242
-
 243
243
-
 244
244
-
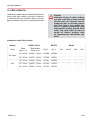 245
245
-
 246
246
-
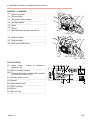 247
247
-
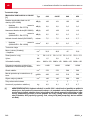 248
248
-
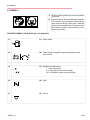 249
249
-
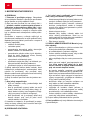 250
250
-
 251
251
-
 252
252
-
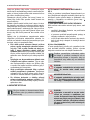 253
253
-
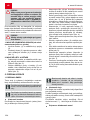 254
254
-
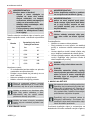 255
255
-
 256
256
-
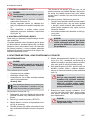 257
257
-
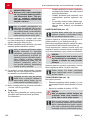 258
258
-
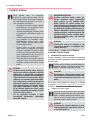 259
259
-
 260
260
-
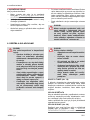 261
261
-
 262
262
-
 263
263
-
 264
264
-
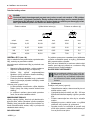 265
265
-
 266
266
-
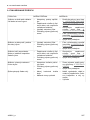 267
267
-
 268
268
-
 269
269
-
 270
270
-
 271
271
-
 272
272
-
 273
273
-
 274
274
-
 275
275
-
 276
276
-
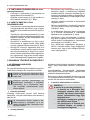 277
277
-
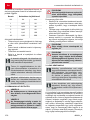 278
278
-
 279
279
-
 280
280
-
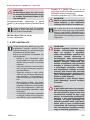 281
281
-
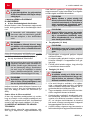 282
282
-
 283
283
-
 284
284
-
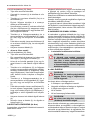 285
285
-
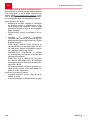 286
286
-
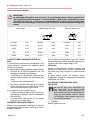 287
287
-
 288
288
-
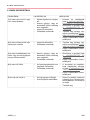 289
289
-
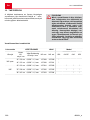 290
290
-
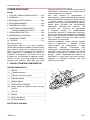 291
291
-
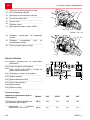 292
292
-
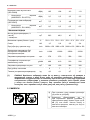 293
293
-
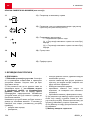 294
294
-
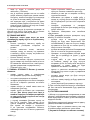 295
295
-
 296
296
-
 297
297
-
 298
298
-
 299
299
-
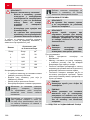 300
300
-
 301
301
-
 302
302
-
 303
303
-
 304
304
-
 305
305
-
 306
306
-
 307
307
-
 308
308
-
 309
309
-
 310
310
-
 311
311
-
 312
312
-
 313
313
-
 314
314
-
 315
315
-
 316
316
-
 317
317
-
 318
318
-
 319
319
-
 320
320
-
 321
321
-
 322
322
-
 323
323
-
 324
324
-
 325
325
-
 326
326
-
 327
327
-
 328
328
-
 329
329
-
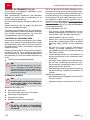 330
330
-
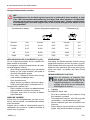 331
331
-
 332
332
-
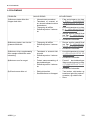 333
333
-
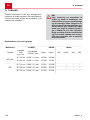 334
334
-
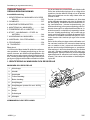 335
335
-
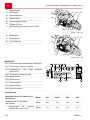 336
336
-
 337
337
-
 338
338
-
 339
339
-
 340
340
-
 341
341
-
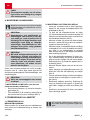 342
342
-
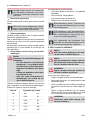 343
343
-
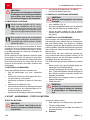 344
344
-
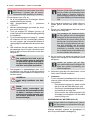 345
345
-
 346
346
-
 347
347
-
 348
348
-
 349
349
-
 350
350
-
 351
351
-
 352
352
-
 353
353
-
 354
354
-
 355
355
-
 356
356
-
 357
357
-
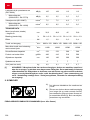 358
358
-
 359
359
-
 360
360
-
 361
361
-
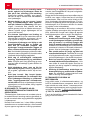 362
362
-
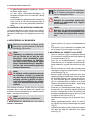 363
363
-
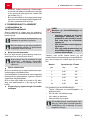 364
364
-
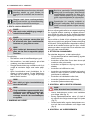 365
365
-
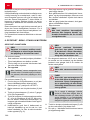 366
366
-
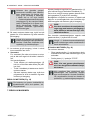 367
367
-
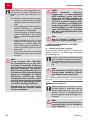 368
368
-
 369
369
-
 370
370
-
 371
371
-
 372
372
-
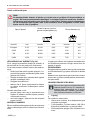 373
373
-
 374
374
-
 375
375
-
 376
376
-
 377
377
-
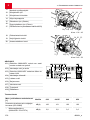 378
378
-
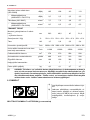 379
379
-
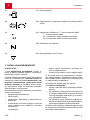 380
380
-
 381
381
-
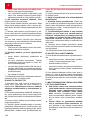 382
382
-
 383
383
-
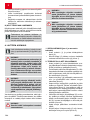 384
384
-
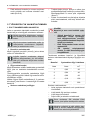 385
385
-
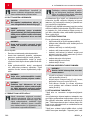 386
386
-
 387
387
-
 388
388
-
 389
389
-
 390
390
-
 391
391
-
 392
392
-
 393
393
-
 394
394
-
 395
395
-
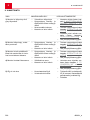 396
396
-
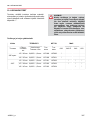 397
397
-
 398
398
-
 399
399
-
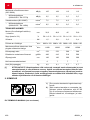 400
400
-
 401
401
-
 402
402
-
 403
403
-
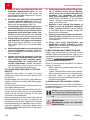 404
404
-
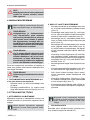 405
405
-
 406
406
-
 407
407
-
 408
408
-
 409
409
-
 410
410
-
 411
411
-
 412
412
-
 413
413
-
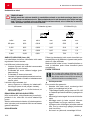 414
414
-
 415
415
-
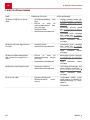 416
416
-
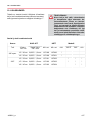 417
417
-
 418
418
-
 419
419
-
 420
420
-
 421
421
-
 422
422
-
 423
423
-
 424
424
-
 425
425
-
 426
426
-
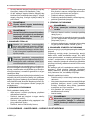 427
427
-
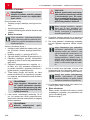 428
428
-
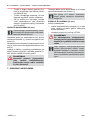 429
429
-
 430
430
-
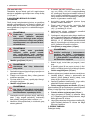 431
431
-
 432
432
-
 433
433
-
 434
434
-
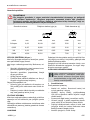 435
435
-
 436
436
-
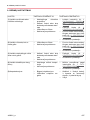 437
437
-
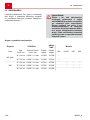 438
438
-
 439
439
-
 440
440
-
 441
441
-
 442
442
-
 443
443
-
 444
444
-
 445
445
-
 446
446
-
 447
447
-
 448
448
-
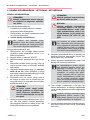 449
449
-
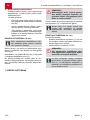 450
450
-
 451
451
-
 452
452
-
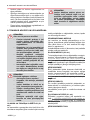 453
453
-
 454
454
-
 455
455
-
 456
456
-
 457
457
-
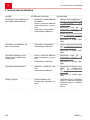 458
458
-
 459
459
-
 460
460
-
 461
461
-
 462
462
-
 463
463
-
 464
464
-
 465
465
-
 466
466
-
 467
467
-
 468
468
-
 469
469
-
 470
470
-
 471
471
-
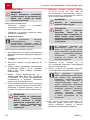 472
472
-
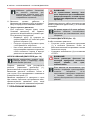 473
473
-
 474
474
-
 475
475
-
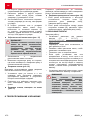 476
476
-
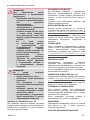 477
477
-
 478
478
-
 479
479
-
 480
480
-
 481
481
-
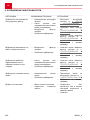 482
482
-
 483
483
-
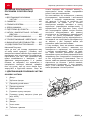 484
484
-
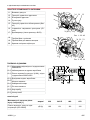 485
485
-
 486
486
-
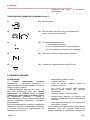 487
487
-
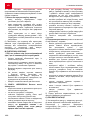 488
488
-
 489
489
-
 490
490
-
 491
491
-
 492
492
-
 493
493
-
 494
494
-
 495
495
-
 496
496
-
 497
497
-
 498
498
-
 499
499
-
 500
500
-
 501
501
-
 502
502
-
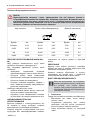 503
503
-
 504
504
-
 505
505
-
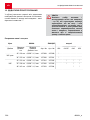 506
506
-
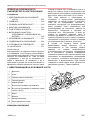 507
507
-
 508
508
-
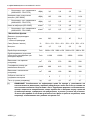 509
509
-
 510
510
-
 511
511
-
 512
512
-
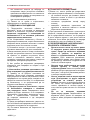 513
513
-
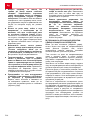 514
514
-
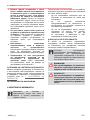 515
515
-
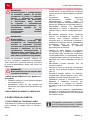 516
516
-
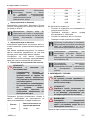 517
517
-
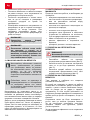 518
518
-
 519
519
-
 520
520
-
 521
521
-
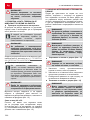 522
522
-
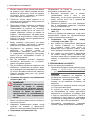 523
523
-
 524
524
-
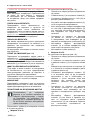 525
525
-
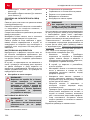 526
526
-
 527
527
-
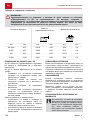 528
528
-
 529
529
-
 530
530
-
 531
531
-
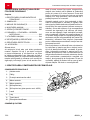 532
532
-
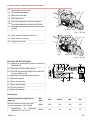 533
533
-
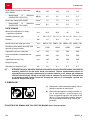 534
534
-
 535
535
-
 536
536
-
 537
537
-
 538
538
-
 539
539
-
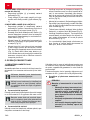 540
540
-
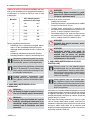 541
541
-
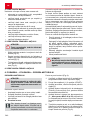 542
542
-
 543
543
-
 544
544
-
 545
545
-
 546
546
-
 547
547
-
 548
548
-
 549
549
-
 550
550
-
 551
551
-
 552
552
-
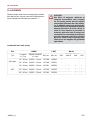 553
553
-
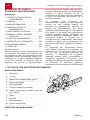 554
554
-
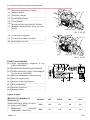 555
555
-
 556
556
-
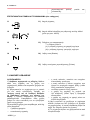 557
557
-
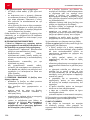 558
558
-
 559
559
-
 560
560
-
 561
561
-
 562
562
-
 563
563
-
 564
564
-
 565
565
-
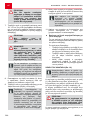 566
566
-
 567
567
-
 568
568
-
 569
569
-
 570
570
-
 571
571
-
 572
572
-
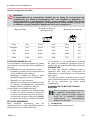 573
573
-
 574
574
-
 575
575
-
 576
576
-
 577
577
-
 578
578
-
 579
579
-
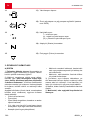 580
580
-
 581
581
-
 582
582
-
 583
583
-
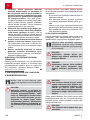 584
584
-
 585
585
-
 586
586
-
 587
587
-
 588
588
-
 589
589
-
 590
590
-
 591
591
-
 592
592
-
 593
593
-
 594
594
-
 595
595
-
 596
596
-
 597
597
-
 598
598
-
 599
599
-
 600
600
-
 601
601
-
 602
602
-
 603
603
-
 604
604
-
 605
605
-
 606
606
-
 607
607
-
 608
608
-
 609
609
-
 610
610
-
 611
611
-
 612
612
-
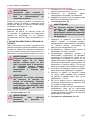 613
613
-
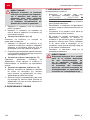 614
614
-
 615
615
-
 616
616
-
 617
617
-
 618
618
-
 619
619
-
 620
620
-
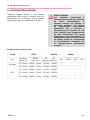 621
621
-
 622
622


Ask a question and I''ll find the answer in the document
Finding information in a document is now easier with AI
in other languages
- italiano: AL-KO 646 Manuale utente
- français: AL-KO 646 Manuel utilisateur
- español: AL-KO 646 Manual de usuario
- Deutsch: AL-KO 646 Benutzerhandbuch
- русский: AL-KO 646 Руководство пользователя
- Nederlands: AL-KO 646 Handleiding
- português: AL-KO 646 Manual do usuário
- slovenčina: AL-KO 646 Používateľská príručka
- dansk: AL-KO 646 Brugermanual
- polski: AL-KO 646 Instrukcja obsługi
- čeština: AL-KO 646 Uživatelský manuál
- Türkçe: AL-KO 646 Kullanım kılavuzu
- eesti: AL-KO 646 Kasutusjuhend
- svenska: AL-KO 646 Användarmanual
- suomi: AL-KO 646 Ohjekirja
- română: AL-KO 646 Manual de utilizare
Related papers
Other documents
-
Shindaiwa MTA-PP/S User manual
-
Efco MT1800 Owner's manual
-
-
Oleo-Mac GS 200 E Owner's manual
-
Scheppach ZGONIC Yellow Garden Line NEW GENERATION MFH3300-4P User manual
-
Bertolini 195 S Owner's manual
-
Bosch Ake 40-19 S Operating instructions
-
Texas TSE2010 Owner's manual
-
-
Oleo-Mac GS 220 Li-Ion Owner's manual