Honeywell CO25AE User guide

Category
Mobile air conditioners
Type
User guide

Honeywell CO25AE is a portable evaporative air cooler with a honeycomb cooling media that cools and humidifies the air through natural evaporation. It features adjustable fan speeds, a swing function for wide-angle air distribution, and a remote control for convenient operation. The cooler has a large water tank with a water level indicator, and an ice compartment for added cooling. It's ideal for indoor and outdoor use, and can be used to cool small to medium-sized rooms.

Honeywell CO25AE is a portable evaporative air cooler with a honeycomb cooling media that cools and humidifies the air through natural evaporation. It features adjustable fan speeds, a swing function for wide-angle air distribution, and a remote control for convenient operation. The cooler has a large water tank with a water level indicator, and an ice compartment for added cooling. It's ideal for indoor and outdoor use, and can be used to cool small to medium-sized rooms.

OWNER’S MANUAL
Read and save these instructions before use
Model: CO25AE
Modelo: CO25AE
Power rating: 235 Watts
Voltage rating: 120 Volt AC, 60Hz
Potencia: 235 Watt
Voltage: 120 Volt AC, 60Hz
For product inquiries or support, visit www.honeywellaircoolers.com
Para consultas sobre productos o soporte técnico visite: www.honeywellaircoolers.com
MANUAL DEL USUARIO
Lea y guarde estas instrucciones antes de usar
Portable Evaporative Air Cooler
for Outdoor & Indoor Use
Enfriador de aire portátil por evaporación
Para uso en el interior y en el exterior
Customer Support : 1-800-474-2147
Centro de servicios al cliente: 1-800-474-2147
Made in P.R.C.
Fabricado en China
This page is intentionally left blank
SECTION
PAGE
1. THANK YOU .........................................................................................................
2. USER TIPS ...........................................................................................................
3. SAFETY ............ ...................................................................................................
4. PARTS DESCRIPTION .........................................................................................
5. USE & OPERATION .............................................................................................
Control Panel ....................................................................................................
Function Buttons ...............................................................................................
6. CLEANING & MAINTENANCE .............................................................................
7. TROUBLESHOOTING GUIDE .............................................................................
8. TECHNICAL SPECIFICATIONS ...........................................................................
9. ELECTRICAL WIRING DIAGRAM ........................................................................
2
3
5
7
9
9
10
Remote Control .................................................................................................
12
Fill Water ..........................................................................................................
14
15
17
19
19
10. SERVICE AND WARRANTY ................................................................................
20
1
Read all instructions carefully before setting up and operating the cooler, and
please keep this instruction manual for future reference. This manual is designed to
provide you with important information needed to setup, operate, maintain, and
troubleshoot your cooler. Failure to follow these instructions may damage and/or
impair its operation and void the warranty.
INDEX ENG
2
ENG
THANK YOU
Congratulations on your purchase of this versatile Honeywell Evaporative Air Cooler. For
optimum cooling from your cooler, fill the water tank to maximum level and load ice inside
the ice compartment before you turn on your air cooler.
Cooler Location (Important - Please Read!)
Place the cooler in front of an open door or window. Ensure that there is adequate cross -
ventilation in the room by leaving a door or window open opposite the cooler.
Following these guideline will ensure your cooler will work as effectively as possible.
Not an Air Conditioner (Important - Please Read!)
The evaporative air cooler is not an air conditioner as it does not use a compressor or refrig-
erant gas. It should not be expected to cool as efficiently as a refrigerated air conditioner.
Pump
Water
Honeycomb Cooling Media
Evaporative Air Cooling Mechanism
Warm and
dry air
Cool and
humid air
Energy Efficient, No Compressor
3
USER TIPS ENG
Honeywell Evaporative Air Coolers are built to maximize energy efficiency and keep costs low.
Warm air is drawn into the cooler and enters the Honeycomb Cooling Media. Water pumped
from the tank pours over the honeycomb media. As the warm air passes through the media,
the water absorbs the heat, naturally cooling and humidifying the air. A fan propels the cooled
air out into the room. This no-compressor system cools naturally, efficiently and inexpensively.
4
ENG USER TIPS
NOTE (Important - Please Read!)
When the product is used for the first time the Honeycomb Cooling Media will have an odor
which will dissipate in a few hours or so of initial use.
The recommended maximum relative humidity level is 60% or
less, which allows a noticeable temperature decrease. The
temperature decrease will be greater in drier climates
because higher evaporation occurs when the humidity is low.
The evaporative air cooler should not be used in enclosed
spaces. It must be kept level and there must be water in the
water tank. The room should have doors and windows
opened to allow free air flow. The evaporative air cooler works
best when placed near an open window, so that outside air is
drawn into the evaporative air cooler, the air circulates in the
room, then exits via the door. The maximum cooling effect is
felt when a person is in the flow of air coming out of the
evaporative air cooler.
The evaporative air cooler can also be used to humidify dry
air during cool weather. To be used for humidification the
windows and doors should be closed to allow the humidified
air to accumulate.
Indoor Use
Room with open windows & door
(RECOMMENDED)
Room with closed windows & door
(NOT-RECOMMENDED)
Your cooler runs on 120 Volt AC, 60 Hz current. Check the
household voltage to ensure it matches the appliance's rate
specification.
Before operating the product remove it from its packaging
and check that it is in good condition.
DO NOT operate any product with a damaged cord or plug.
DO NOT run power cord under carpeting, or cover it with
rugs or runners. Keep the cord away from areas where it may
be tripped over.
Always unplug the product before refilling the water tank.
Always unplug the appliance from the power source before
cleaning, servicing or relocating the unit.
Remove the power cord from the electrical receptacle by
grasping and pulling on the power cord plug-end only, never
pull the cord.
DO NOT use the product in areas where gasoline, paint or
other flammable goods and objects are stored.
When using the ''COOL'' setting, check the water tank to
ensure that it is full. Operation of this cooler on the ''COOL''
setting with an empty tank may result in damage to the water
pump.
Read And Save These Instructions:
When using electrical appliances, basic safety precautions should always be followed:
5
SAFETY ENG
120V - 60 Hz
Shock Hazard
Water Level Indicator
DO NOT attempt to repair or adjust any electrical or mechan-
ical functions of the cooler, as this may void the warranty.
DO NOT cover the air inlet or outlet on the appliance as this
may cause motor damage.
DO NOT insert or allow objects to enter any ventilation or
exhaust opening as this may damage the product and could
cause an electrical shock or fire.
DO NOT operate with the Honeycomb media removed as this
will overload and damage the motor.
DO NOT leave the operating appliance unattended for any
extended period of time.
DO NOT let children play with this appliance, packaging or
plastic bags.
If the unit is damaged or if it malfunctions, do not continue to
use it. Refer to the Troubleshooting Guide (page 17) and
contact the service center.
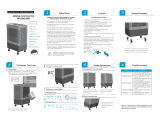
Place the unit on a level floor.
This product is not intended for use in wet or damp locations.
DO NOT use in bathrooms. Never locate the product where
it may fall into a bathtub or other water container.
Store in a dry area when not in use.
This appliance is not intended for use by persons (including
children or elderly) with reduced physical, sensory or mental
capabilities, or lack of experience and knowledge, unless
they have been given supervision or instruction concerning
use of the appliance by a person responsible for their safety.
Always grip the side handles to move the cooler.
6
ENG
SAFETY
Floor Level
ENGSAFETY
7
Use Only on GFCI Protected Receptacles.
Power cords have to be contained. If they must run along the ground, make sure every inch
of them is secured so they will not be tripped over.
The wiring and connections must be waterproof. Be sure the connections (to the air cooler)
never get wet. Your unit is waterproof, but everything attached to it must be waterproof, too.
Set up your unit so it cannot be tripped over or wobble loose. It must rest on a solid
support.
Warning: To reduce the risk of fire or electric shock, do not use this appliance with any solid-
state speed control device.
1 Control Panel
2 Side Handle
3 Horizontal Louvers
(Manual Adjustment)
4 Left Side Panel
5 Power Cord & Plug
6 Casters
7 Ice Compartment Lid
8 Vertical Louvers
(Automatic Movement with SWING)
9 Front Panel
10 Water Level Indicator
11 Remote Control
12 Remote Control Holder
13 Water Tank
14 Water Fill Door
15 Drain Plug
16 Rear Grill Removal Screws
17 Honeycomb Cooling Media
1
11
12
3
2
4
8
9
10
7
6
15
14
5
13
16
PARTS DESCRIPTION
ACCESSORIES:
Remote Control ( Batteries not included)
8
ENG
17
Function Buttons
Power
Press the POWER button to turn the unit on. The cooler will
start automatically at medium speed. After a few seconds the
speed will switch to low. To turn the unit off, press the button
again.
Speed
Press the 'SPEED' button repeatedly and the speed will
change. The indicator light will show the selected speed. High
(Hi), Medium(Med), Low(Lo) & Natural Breeze. In Natural
Breeze mode the unit operates in a random cycle of a
combination of OFF, LOW, MEDIUM and HIGH to simulate a
natural breeze.
Mode
Press the ‘MODE’ button to switch the air cooler between
FAN and COOL modes.
Cool Mode: To begin cooling the desired area, press the
MODE button. The indicator light on COOL will come on and
the water pump will operate. You will feel the cooler air after
the honeycomb media is completely wet.
Fan Mode: To switch on the FAN only mode, press the MODE
button again and the indicator light on FAN will come on.
USE & OPERATION
POWER
SPEED
Natural
Breeze
Lo
Med
Hi
MODE
Fan
Cool
TIMER
0.5hr
1hr
2hr
4hr
Timer
Press the ''TIMER'' button until the indicator light comes on to
your desired time. Once the set time has passed, the unit will
automatically shut off. The Timer function allows you to
program the unit for up to 7.5 hours of use.
10
ENG
SWING
Tank Empty
Swing
Press the ''SWING '' button. The indicator light will come
on and the louvers will begin to move from right to left
automatically.
Manually adjust the horizontal louvers to change vertical
airflow.
Low Water Alarm (Will activate in COOL Only mode)
The unit is equipped with a low water sensor. When water in
the tank is below the minimum level, you will hear 10 beeps
and the TANK EMPTY LED indicator will flash continuously. At
the same time, the power to the pump inside the unit will be cut
off to protect the life of the pump.
To disengage the alarm function, turn off the unit from the power
outlet. Fill the tank with water above the minimum level and turn
on the unit.
To turn off the alarm function and continue to use it in FAN
mode, turn off the unit and turn the unit on. If COOL button is
pressed again without filling the tank with water, low water
alarm will activate again.
USE & OPERATION
11
ENG
Remote Control
Power : On/ Off
Speed : Low / Medium / High / Natural Breeze
Mode : Controls cooling or fan option
Swing : Controls the motion of the vertical louvers
Timer : Controls timer function for automatic shut off
NOTE
2 x AAA Batteries not included
POWER
SPEED SWING
TIMERMODE
Always point the remote control signal transmitter towards the unit when operating.
Make sure that the signal path is not obstructed.
Remove the batteries if the unit is not going to be used for an extended period of time.
Do not drop the remote control.
Non-rechargeable batteries are not to be recharged.
Do not mix different types of batteries such as alkaline, carbon-zinc, or rechargeable batteries.
Do not mix old and new batteries.
Exhausted batteries are to be removed from the product.
Open the battery compartment at the back of the remote control and insert two new
AAA dry cell batteries. Care must be taken to insert the batteries according to the
correct polarity (+ / –) markings shown inside the battery compartment.
12
ENG USE & OPERATION
13
ENG
Water Regulator
MIN
MAX
Room Cooling And Humidifying
When the Water Regulator is set to ''MIN'', the water pump
distributes minimal amount of water to the Honeycomb
Media. This results in less water evaporation and reduces
cooling effect.
When the Water Regulator is set to ''MAX'', the water pump
distributes the maximum amount of water to the Honeycomb
Media. This results in maximum water evaporation and the
cooling performance improves.
USE & OPERATION
Filling With Water
Unplug from power when refilling.
Water Fill Door
Unplug the air cooler from power supply.
Check water level indicator located on the front of the unit to
determine the level of water inside the water tank. The water
tank of this cooler holds up to 6.6 gallons of water. Be sure
water in the tank is always above the minimum water level mark.
To refill the water tank, open the Water Fill Door located below
the left side panel and fill water to the Max Level, as indicated
on the Water Level Indicator. Do not fill water above the Max
water level mark.
For better cooling performance, it is recommended to put ice
cubes inside the ice compartment located on the top of the
cooler.
After refilling the water tank and loading ice, close the water fill
door, connect the power supply and turn on.
Note :
Running the unit with inadequate water may cause pump
failure.
Top Ice Loading Compartment
CAUTION
USE & OPERATION
14
ENG
Important
WARNING
Before cleaning the unit, switch it to the ''off'' position and unplug from the power socket.
To clean the outside, use a damp cloth to remove dirt and dust.
Never use corrosive elements or any chemicals to clean this product.
When the product is not in use, store the unit in a dry place out of direct sunlight.
The cooler is supplied with Honeycomb Cooling Media.
The cleaning frequency for the Honeycomb Media depends on local air and water
conditions. In areas where the mineral content of water is high, mineral deposits may build up
on the Honeycomb Cooling Media and restrict air flow. Draining the water reservoir and refilling
with fresh water at least once a week will help reduce mineral deposits. If mineral deposits
remain on the Honeycomb Media, the Media should be removed and washed under fresh water.
The Media should be cleaned every two months or sooner, depending on your needs.
Do not run the unit in COOL mode with stale water in the tank. Empty the tank and refill it with
fresh water if the water has been standing in the tank for an extended period of time.
For best results, allow the Honeycomb Cooling Media to dry after each use by turning off the
cool function 15 minutes before turning the unit off.
CLEANING & MAINTENANCE
15
ENG
CLEANING & MAINTENANCE
Cleaning The Honeycomb Cooling Media
Draning and Cleaning The Water Tank
4 Rear Grill Removal Screws
The air cooler is now ready to be used. This cleaning process should be repeated monthly to
maintain the integrity of the unit and to remove particles filtered from the air.
Turn the power “off” and disconnect the air cooler from the power supply.
Move the unit to a location where it can be drained.
Remove the drain plug and allow the tank to empty(#15 on Page 8).
Refill the water tank up to the maximum level with clean water and drain
it completely.
Fill water tank and rinse at least 2-3 times before use.
After cleaning ensure that the drain plug is back in place.
Plug into the power supply and turn on unit.
Turn off the unit, and unplug the power cord from wall
outlet.
Rotate the unit facing the back panel, and locate the Rear
Grill Removal Screws (#16 on Page 8). Remove the 4
screws with a screw driver.
Pull the rear grill panel, until it is completely removed.
Plug into the power supply and turn on unit.
The Honeycomb cooling media can now be seen. Clean
honeycomb with clean cloth to remove all the dust &
dirt particles.
Once cleaning is finished, reassemble the unit.
Water Drain
Plug
16
ENG
No discharge of air Cord is not plugged in.
Make sure power cord is
plugged in and the supply
switch is on.
Power is not on. Turn the unit ON by pressing
button on the control panel.
Not Cooling / Unit is
making noise
Pump is not turned ON.
On Control Panel, turn COOL
FUNCTION to “ON”.
Low or no water in tank,
when COOL is selected.
Refill water tank.
Odors When the Cooler is new.
When the unit is used for the
first time, the Honeycomb
Cooling Media will have an
odor, which will dissipate
within a few hours of initial use.
If the Cooler has been used. There may be an algae issue.
Replace the Honeycomb Cooling
Media.
Damaged Pump or Calcium
deposits on blower.
Contact service center.
PROBLEM POSSIBLE CAUSE SOLUTION
Customer Support: 1-800-474-2147
17
ENGTROUBLESHOOTING GUIDE
18
ENG TROUBLESHOOTING GUIDE
The unit does not respond
to remote control
Remote control batteries. Check batteries. Replace if
needed. Try to operate using
the control panel.
Damaged PCB. Try with remote control. If the
unit responds, PCB board
fasteners may be loose.
Contact service center.
If neither remote control nor
control panel works, PCB
board may be damaged.
Contact service center.
PROBLEM POSSIBLE CAUSE SOLUTION
Customer Support: 1-800-474-2147
MODEL NO. CO25AE
Voltage
Frequency
Ampere
Wattage
Water Tank Capacity
Cooling Media
Product Dimension (inches)
Net Weight
Electrical Wiring Diagram
120 V
60 Hz
2.1A
235 Watts
6.6 Gallons
Honeycomb
18.9 (W) x 14.6 (D) x 33.4 (H)
25.8 lbs
120 V
60 Hz
TECHNICAL SPECIFICATIONS
19
ENG
  • Page 1 1
  • Page 2 2
  • Page 3 3
  • Page 4 4
  • Page 5 5
  • Page 6 6
  • Page 7 7
  • Page 8 8
  • Page 9 9
  • Page 10 10
  • Page 11 11
  • Page 12 12
  • Page 13 13
  • Page 14 14
  • Page 15 15
  • Page 16 16
  • Page 17 17
  • Page 18 18
  • Page 19 19
  • Page 20 20
  • Page 21 21
  • Page 22 22
  • Page 23 23
  • Page 24 24
  • Page 25 25
  • Page 26 26
  • Page 27 27
  • Page 28 28
  • Page 29 29
  • Page 30 30
  • Page 31 31
  • Page 32 32
  • Page 33 33
  • Page 34 34
  • Page 35 35
  • Page 36 36
  • Page 37 37
  • Page 38 38
  • Page 39 39
  • Page 40 40
  • Page 41 41
  • Page 42 42
  • Page 43 43
  • Page 44 44
  • Page 45 45
  • Page 46 46

Honeywell CO25AE User guide

Category
Mobile air conditioners
Type
User guide

Honeywell CO25AE is a portable evaporative air cooler with a honeycomb cooling media that cools and humidifies the air through natural evaporation. It features adjustable fan speeds, a swing function for wide-angle air distribution, and a remote control for convenient operation. The cooler has a large water tank with a water level indicator, and an ice compartment for added cooling. It's ideal for indoor and outdoor use, and can be used to cool small to medium-sized rooms.

Ask a question and I''ll find the answer in the document

Finding information in a document is now easier with AI

in other languages