Page is loading ...

R
AUDIO VIDEO
AM/FM LED ALARM CLOCK RADIO WITH
1.2” BLUE DISPLAY, CALENDAR AND
TEMPERATURE.
Instruction manual
Bedienungsanleitung
Manuel d’instructions
Manuale d’istruzioni
Manual de instrucciones
Manual de instruções
CLR-2619
R
AUDIO VIDEO
is a registered Trademark of Roadstar S.A. - Switzerland All rights reserved

English Page 1
Deutsch Seite 11
Français Page 21
Italiano Pagina 31
Español Página 41
Portuguès Pagina 51
Fig.
Fig.
CLR-2619
INDEX
• Your new unit was manufactured and assembled
under strict ROADSTAR quality control.
Thank-you for purchasing our product for your music
enjoyment.
Before operating the unit, please read this instruc-
tion manual carefully. Keep it also handy for further
future references.
• Votre nouvel appareil a été fabriqué et monté en
étant soumis aux nombreaux tests ROADSTAR. Nous
espérons que cet appareil vous donnera entière sat-
isfaction.
Avant de vous adonner à ces activités, veuillez lire
attentivement ce manuel d’instructions. Conservezle
à portée de main à fin de référence ultérieure.
• Vuestro nuevo sistema ha sido construido según las
normas estrictas de control de calidad ROADSTAR.
Le felicitamos y le damos las gracias por su elección
de este aparado. Por favor leer el manual antes de
poner en funcionamiento el equipo y guardar esta
documentación en case de que se necesite
nuevamente.
• Ihr neues Gerät wurde unter Beachtung der strengen
ROADSTAR-Qualitätsvorschriften gefertigt.
Wir danken Ihnen für den Kauf unseres Produktes
und wünschen Ihnen optimalen Hörgenuss. Bitte
lesen Sie diese Bedienungsanleitung durch, und
heben Sie sie auf, um jederzeit darin nachschlagen
zu können.
• Il vostro nuovo apparecchio é stato prodotto ed
assemblato sotto lo stretto controllo di qualità
ROADSTAR.
Vi ringraziamo di aver acquistato un nostro prodotto
per il vostro piacere d’ascolto.
Prima di procedere all'utilizzo dell'apparecchio,
leggete attentamente il manuale d’istruzioni e
tenetelo sempre a portata di mano per futuri
riferimenti.
• Seu novo aparelho foi construido e montado sob o
estrito controle de qualidade da ROADSTAR.
Agradecemos por ter comprado nosso produto para
a sua diversão.
Antes de usar esta unidade é necessário ler com
atençâo este manual de instruções pare que possa
ser usada apropriadamente; mantenha o manual
ao seu alcance para outras informações.
201819
1217
6
13
24
5/7
3
41
11
9
22
2
10
815
14
16
23
21

EnglishEnglish
12
WARNINGS
The exclamation point within the triangle is a warning sign alerting the
user of important instructions accompanying the product.
The lightening flash with arrowhead symbol within the triangle is a warning
sign alerting the user of “dangerous voltage” inside the unit.
To reduce the risk of electric shock, do not remove the cover. No user
serviceable parts inside the unit. Refer all servicing to
qualified personnel.
This unit operates on 230V ~ 50Hz. If the unit is not used for a long period
of time, remove the plug from the AC mains.
This unit must not be exposed to moisture or rain.
Ensure all connections are properly made before operating the unit.
This unit should be positioned so that it is properly ventilated. Avoid placing
it, for example, close to curtains, on the carpet or in a built-in installation
such as a bookcase.
Do not expose this unit to direct sunlight or heat radiating sources.
Make sure all batteries are inserted according to the proper polarity. Do
not mix old batteries with new ones.
If the unit is not used for a long period of time (more than 1 month), remove
all batteries from their compartment to avoid possible leaking.
CAUTION
RISK OF ELECTRIC
SHOCK
DO NOT OPEN
230v~
- +
- +
CLR-2619
AM/FM LED ALARM CLOCK RADIO WITH 1.2” BLUE LED DISPLAY,
CALENDAR AND TEMPERATURE FUNCTION.
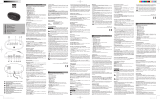
LOCATION OF CONTROLS
1. MODE SET BUTTON
2. ALARM SET BUTTON
3. ALARM 1 BUZZER / RADIO SELECT BUTTON
4. ALARM 2 BUZZER / RADIO SELECT BUTTON
5. C° / F° BUTTON
6. INFRARED SENSOR
7. << SET BUTTON
8. >> SET BUTTON
9. POWER ON/OFF RADIO (ALARM OFF) BUTTON
10. SNOOZE / SLEEP BUTTON
11. LED DISPLAY
12. DIMMER FUNCTION
13. AUDIO IN JACK
14. VOLUME CONTROL
15. WAVE BAND
16. TUNING CONTROL
17. RESET BUTTON
18. TEMPERATURE SENSOR (IN DOOR)
19. AC POWER CORD
20. FM ANTENNA WIRE
21. BLUE NIGHT ILLUMINATION
22. BATTERY COMPARTMENT
23. SPEAKER
24. ON / OFF NIGHT ILLUMINATION

EnglishEnglish
34
POWER SUPPLY
This unit operates from a main supply of 230V ~ 50Hz. Connect the AC power cord to the AC
household main outlet. Ensure that the voltage is as indicated on the rating plate on the rear
of the unit.
Battery Back-up Power Failure Protection
This radio has a battery back up circuit that will keep the correct time and alarm settings in
the event of a temporary power interruption.
Install 1 x 3-volt CR2032 Flat Lithium battery, not included, into the battery compartment
located on the bottom of the unit, making certain that the positive and negative (+ and -) battery
terminals are attached to the corresponding terminals on the plate in the battery compartment.
If power is temporarily interrupted the display will blink and the radio will not play. However,
the battery back-up circuit will continue to maintain the clock and alarm settings. When power
is restored the clock will display the correct time and alarm settings, and no adjustment is
necessary.
GETTING STARTED
Press the Reset button (17) located on the back of the unit after pluging in the AC cord.
- The unit will display full segment for 2 seconds, then it will enter the normal mode.
- The Display will light up.
1. TIME AND CALENDAR SETTING
A. Setting Time and Calendar - Press Mode Set button (1) in normal mode and keep pressed
over 2 seconds to enter Time Set mode. After entering the setting mode, press Mode Set
button (1) to change the mode cycle as follows :
Normal > Year > Month > Day > 12/24H > RTC Hour > RTC Min > Normal
Action (during data adjustment) :
- Press >> button (7) to adjust data forward
- Press << button (8) to adjust data backward
- Keep pressed << or >> button for 2 seconds to enable auto forward or backward
a. Year Set Mode
Initial Value : 2009
Year Range : 2000 to 2099
Display showing Year Set Mode
b. Month Set Mode
Display showing Month Set Mode
c. Day Set Mode
Display showing Day Set Mode
Remark : Weekday will recalculate when year, month or day is adjusted
d. 12/24H Set Mode
Display showing 12/24H Set Mode (Select 12H)
Display showing 12/24H Set Mode (Select 24H)
e. RTC Hour Set Mode
Display showing Hour Set Mode
f. RTC Min Set Mode
Display showing Min Set Mode
Remark : Second will reset for every minute adjustment
M
D
M
D

EnglishEnglish
B. Setting Alarm 1 and Alarm 2 - Press Alarm set button (2) during normal mode and keep
pressed over 2 seconds to enter alarm set mode, after enter the setting mode, press Alarm
set button (2) to change the mode cycle as follows :
Normal > AL1 Hour > AL1 Min > AL1 Weekend Alarm > AL2 Hour > AL2 Min >
AL2 Weekend Alarm > Normal
Action (during data adjustment) :
- Press >> button (8) to adjust data forward
- Press << button (7) to adjust data backward
- Keep pressed << or >> button for 2 seconds to enable auto forward
2. SETTING ALARM OUTPUT AND ALARM ON/OFF
A. Change the alarm Output
Press AL1 (3) / AL2 (4) button to Music position to select wake up by Radio, set to Buzzer
position to select wake up by Buzzer, set to Alarm Off position to disable all alarm.
B. Buzzer Pattern
1st 8 seconds output 1 beep, 2nd second output 2 beep, 3rd 8 second output 4 beep, after
that continue output beep tone, the same pattern repeat at next minute again.
56
Display showing Setting Alarm 1 Hour
Display showing Setting Alarm 1 Min
Display showing Setting Alarm 1
Weekend Alarm - Mon to Fri
Display showing Setting Alarm 1
Weekend Alarm - Mon to Sat
Display showing Setting Alarm 2 Hour
Display showing Setting Alarm 2 Min
Display showing Setting Alarm 2
Weekend Alarm - Mon to Fri
Display showing Setting Alarm 2
Weekend Alarm - Mon to Sat
Display showing Setting Alarm 2
Weekend Alarm - Mon to Sun
Display showing Alarm 1
wake up by Buzzer
Display showing Alarm 1
wake up by Radio
Display showing Alarm 2
wake up by Buzzer
Display showing Alarm 2
wake up by Radio
1
1
1
1
1
1
1
1
2
2
2
2
2
2
2
2
2
2
1
1
2
2

EnglishEnglish
3. ALARM DURATION AND SNOOZE FUNCTION
Alarm Duration - Buzzer Alarm or Radio Alarm will continue output for 30 minutes if no key
is pressed, then it will stop automatically and wait for same alarm time on the next day.
Action for Snooze :
- During alarming, press SNOOZE button (10) to enable snooze function, Buzzer Alarm
or Radio Alarm will stop.
- Snooze Interval is 9 minutse (not included second offset)
- Snooze will continue unless Power On/Off (Alarm Off) button(9) is pressed to Alarm Off
or Buzzer Alarm or Radio Alarm stop automatically after 30 minutes
4. CHANGE DISPLAY CONTENT
Press >> button (8) during normal function to switch to display Year, after 5 seconds timeout
and return back to display date and month.
Display showing Year
5. CHANGE DISPLAY CONTENT
Press << button (7) two times during normal function to switch to display Month and day,
after 5 seconds timeout and return back to display time.
Display showing Month and Day
6. SLEEP FUNCTION
During Radio On mode, press Snooze/Sleep button (10) to turn on Sleep mode, the Sleep
time will keep flashing by 5 seconds, within 5 second and press Sleep button to change the
duration from 90 min - 10 min. Press Power button (9) to cancel sleep function.
Display showing Setting Sleep Duration
NIGHT ILLUMINATION
Press the ON / OFF Light button (24) to switch the night illumination ON or OFF.
7. THERMOMETER FUNCTION
Press Temp Button (
Remark : Temperature Range for Indoor : 0 to + 50°C or 32 to 122°F.
RADIO
RADIO OPERATION
- Press the Power On/Off button (9) to turn the radio on.
- Select AM or FM band using the wave band switch (15).
- Select the Station using the tuning control (16).
- Turn the volume control (14) to adjust volume as required.
- Press the power On/Off button (9) to turn the radio off.
Note :
- The AM band uses an internal directional aerial. Rotate the radio for best reception.
- Ensure that the FM cord antenna (20) is completely unrolled and extended for best FM
reception.
RESET
- The Reset button (17) is located on the back of unit. Use a ballpoint pen to press it
whenever you change the batteries, or if the unit is not performing as expected.
This will return all settings to default value, and you will lose any stored data (alarm and
clock settings).
CAUTION
- No naked flame sources, such as lighted candles, should be placed on the apparatus.
- The unit should not be exposed to direct sunlight, very high or low temperature, moisture,
vibrations or placed in a dusty environment.
78
M
D
sleep
fm MHz

EnglishEnglish
- Do not use abrasive, benzene, thinner or other solvents to clean the surfaces of the unit.
To clean, wipe it will mild non-abrasive detergent solution and clean soft cloth.
- Never attempt to insert wires, pins or other such objects into the vents or opening of the
unit.
- Do not place the unit near the light on table lamp. The light will affect the reception of the
infrared sensor function.
WARNINGS
NOTE : Do not connect FM antenna to external antenna.
Dripping warning : The product shall not be exposed to dripping or splashing and that no
objects filled with liquids, such as vases, shall be placed on the product.
Ventilation warning : The normal ventilation of the product shall not be impeded for intended
use.
Disconnect device warning : Main plug is used as the connection, so is should always 3.
The alarm on mode, use the infrared sensor to turn Snooze function onremain ready operate.
INFRARED SENSOR FUNCTION
1. When the radio is in Off mode, the infrared display time or temperature.
2. When the radio is in On mode, use the infrared sensor to turn Sleep function on
- Hand on top of sensor (6) within 2 seconds to turn the sleep on, the word “Slp” showing
on the LED display
. Sleep time from 10-90 minutes. (Refer to “Sleep function” for sleep
time adjustment). Press (9) to cancel Sleep function.
9
10
- Hand on top of sensor (6) within 1 second for Snooze off for 9 mintues.
AUDIO IN FUNCTION
Sound will come out automatically if an external audio device is plugged in the AUDIO IN
jack.
SPECIFICATIONS
Frequency Range : AM 540 - 1611 kHz
FM 87.5 - 108 MHz
Output Power : 350 mW
Speaker Impedance : 8 ohm
Battery Backup : 3V (1 x 3V CR3032 Flat Lithium battery) (for clock)
Power Source : AC230V ~ 50 Hz, 5 Watts
Specifications subject to change without notice.
Correct Disposal of This Product
(Waste Electrical & Electronic Equipment)
This marking shown on the product or its literature, indicates that it
should not be disposed with other household wastes at the end of its
working life. To prevent possible harm to the environment or human
health from uncontrolled waste disposal, please separate this from
other types of wastes and recycle it responsibly to promote the
sustainable reuse of material resources.
Household users should contact either the retailer where they
purchased this product, or their local government office, for details of
where and how they can take this item for environmentally safe recycling.
Business users should contact their supplier and check the terms and
conditions of the purchase contract. This product should not be mixed
with other commercial wastes for disposal.

Português Português
- Não utilize abrasivos, benzeno, diluente ou outros solventes para limpar as superfícies
do aparelho. Para limpar, use uma solução detergente suave e não abrasiva e um pano
limpo e macio.
- Nunca tente inserir fios, alfinetes ou outros objectos nas aberturas de ventilação do
aparelho.
- Não coloque o aparelho perto da lâmpada do candeeiro de secretária. A luz afectará a
recepção do sensor de infravermelhos.
ADVERTÊNCIAS
NOTA: Não ligue a antena de FM a uma antena externa.
Cuidado com os pingos: O aparelho não deve ser exposto a pingos ou salpicos e não deve
ser colocado sobre o aparelho qualquer objecto com líquido, como sejam vasos.
Ventilação: Não deve ser impedida a ventilação normal do aparelho.
Alimentação principal: A ficha de ligação à corrente é a alimentação principal, pelo que estar
sempre ligada.
SENSOR DE INFRAVERMELHOS
2. Quando o rádio está ligado, uso o sensor de infravermelhos pata activar a função
Sleep (sono).
Pressione o topo do sensor (6) por 2 segundos para activar a função Sleep,
aparecendo no LED a sigla "Slp". Tempo de Sono de 10-90 minutos. (Consulte o
parágrafo "Função Sleep" para regulação das horas). Prima (9) para cancelar a função
Sleep.
59
60
3. No modo de Despertador, use o sensor de infravermelhos pata activar a função
Snooze (dormitar)
- Pressione o topo do sensor (6) por 1 segundo para Dormitar por 9 minutos.
FUNÇÃO AUDIO IN
O som sairá automaticamente se um dispositivo auditivo externo é ligado no ingreso
AUDIO IN.
ESPECIFICAÇÕES
Gama de frequência : AM 540 - 1611 kHz
FM 87.5 - 108 MHz
Potência de saída : 350 mW
Speaker Impedance : 8 ohm
Battery Backup : 3V (1 x 3V CR3032 Bateria plana de lítio (para o relógio))
Power Source : AC230V ~ 50 Hz, 5 Watts
As especificacões e o desenho podem ser alterados sem pré-aviso.
Correct Disposal of This Product
(Waste Electrical & Electronic Equipment)
This marking shown on the product or its literature, indicates that it
should not be disposed with other household wastes at the end of its
working life. To prevent possible harm to the environment or human
health from uncontrolled waste disposal, please separate this from
other types of wastes and recycle it responsibly to promote the
sustainable reuse of material resources.
Household users should contact either the retailer where they
purchased this product, or their local government office, for details of
where and how they can take this item for environmentally safe recycling.
Business users should contact their supplier and check the terms and
conditions of the purchase contract. This product should not be mixed
with other commercial wastes for disposal.
/