Page is loading ...

©2008 HeathCo LLC 598-1316-03
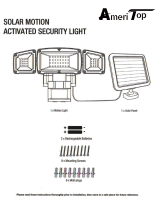
FEATURES
• Automatically comes on when motion is de-
tected.
• Automatically turns light off.
• Photocell keeps the light off during daylight
hours.
UNPACKING
Be sure to remove all contents from packaging and
verify all items are present before assembling this
light fixture. is package includes the following
items:
REQUIREMENTS
• When installing, do not turn the light on before
the battery is charged. Charge the battery by
keeping the switch in the OFF position and the
solar collector pointed directly at the noon sun
for 2 sunny days. If not charged, the light will
not work.
• When FULLY charged, the solar light will operate
a maximum of 15 days without sunlight. Actual
operating time will vary depending upon how
frequently the light is triggered.
Solar Powered
Motion Sensor Light
Model SL-7210
Light
Sensor
Mounting Screws (2 sizes)
Solar Light FixtureSolar Panel with
15 ft. (4.5 m) Cord
Tapered
Screw (3)
Round Head
Screw (2)
Ni-Cd Rechargeable
AA Batteries (3)
Battery
Compartment
WARNING: When replacing batteries, use
only Nickel Cadmium (Ni-Cd) or Nickel Metal
Hydride (Ni-MH) rechargeable batteries. Do
NOT mix battery types (Ni-Cd and Ni-MH).
WARNING: To prevent possible SERIOUS
INJURY or DEATH:
• NEVER allow small children near batteries.
• If battery is swallowed, immediately no
-
tify doctor.

2
598-1316-03
2. Mounting light on a solid, vertical surface
(wall) using two round-head screws.
• Determine mounting location. IMPORTANT:
Mount fixture with the light above the sen-
sor.
• Open battery com-
partment door and
remove batteries and
tab. Note: Discard
plastic tab.
• Drill one 1/16" pi-
lot hole for keyhole
mounting screw and
insert screw. Note:
Leave approximately
1/8" (3 mm) of the
screw threads ex-
posed.
• Using the keyhole
on the back of the
light, temporarily
hang light fixture on
screw.
Rear of Light Fixture
Keyhole Slot
Mounting Hole
Eave Mounted Light
3. Mounting light on a solid, horizontal surface
(eave) using two round-head screws.
• Determine mounting location. IMPORTANT:
Mount fixture with the sensor facing the
detection zone.
• Follow the directions for vertical surface
mounting to complete installation. Note:
e light fixture will not need to be leveled
for horizontal mounting.
INSTALLATION
For best performance, mount the fixture about 8
feet (2.4 m) above the ground.
Note: Mounting fixture higher than 8 ft. (2.4 m)
will reduce coverage distance.
1. Mount solar panel base on a solid surface using
three tapered screws. Adjust the panel to point
directly at the noon sun. Avoid obstructions
such as trees or buildings that may block sun
light. Allow for enough wire to reach the case.
Keep ball joint at bottom.
Note: You will want to re-aim the solar panel as
the seasons change to keep it pointed directly
at the noon sun.
Three Mounting Holes for Solar Panel Base
Mounting Holes (3)
• Level light fixture.
• From inside the battery compartment, mark
location of second screw in the mounting
hole.
• Remove light and drill one 1/16" pilot hole
in second location.
• Hang light on keyhole screw and insert sec-
ond screw through mounting hole. Tighten
securely.
Detection Zone
Wall Mounted Light
Detection Zone
Battery
Compartment
Door
Battery
Compartment
Door

3
598-1316-03
4. Plug the solar panel cable into the side of the
sensor housing. Note: Allow extra cable to hang
below the sensor housing for water to drip off
cable (drip loop).
IMPORTANT: Allow the batteries to charge
with two days of sunshine before testing.
RECHARGEABLE
ONLY
AA SIZE
AA SIZE
AA SIZE
RANGE
ON-TIME
MIN MAX
OFF
TEST
1 MIN
5 MIN
Drip Loop
Forming a Drip Loop in the Solar Panel Cable
Wall Mount Eave Mount
5. Install 3 Ni-Cd rechargeable AA batteries
(included) into battery compartment according
to markings.
Note: Rechargeable batteries will
eventually lose their ability to hold a charge.
When this happens, replace with Ni-Cd or
Ni-MH rechargeable AA batteries available
at most stores.
Install Batteries in Battery Compartment
TEST AND ADJUSTMENT
Note: Sensor has a 30 second warm up period
before it will detect motion. When switching
modes wait 30 seconds.
1. Slide the sensor switch to the TEST position.
2. Place the RANGE adjustment in the medium
position (halfway between MIN and MAX
position).
RECHARGEABLE
ONLY
AA SIZE
AA SIZE
AA SIZE
RANGE
ON-TIME
MIN MAX
OFF
TEST
1 MIN
5 MIN
Controls in Battery Compartment
6. To adjust light direction, loosen lock nut and
rotate light to desired position. Tighten lock
nut.
Turning Lock Nut
Lock Nut
NOTICE: When replacing rechargeable batter-
ies, recycle used batteries or dispose of them
in accordance with local regulations.
RECHARGEABLE
ONLY
AA SIZE
AA SIZE
AA SIZE
RANGE
ON-TIME
MIN MAX
OFF
TEST
1 MIN
5 MIN

4
598-1316-03
Least Sensitive Most Sensitive
Sensor
Motion
Adjustment of Coverage Area
e sensor detects “motion” by the movement of
heat (body heat) across the coverage area. However,
following are examples of objects that also produce
heat and can cause the sensor to false trigger:
• Pools of Water • Air Conditioners
• Dryer Vents • Fenced-In Animals
• Heating Vents • Automobile Traffic
If you suspect that a heat source of this type is falsely
triggering the sensor, try reducing the RANGE
or aiming the sensor away from the heat source
in question.
Note: e detector is less sensitive to motion directly
towards it and more sensitive to across motion.
OPERATION
Place the sensor switch in the 1 or 5 minute mode
for normal operation. If the light is not needed, put
the switch in the OFF position.
Mode: On-Time Works: Day Night
Test 5 Seconds x x
Auto 1 or 5 Minutes x
THINGS TO REMEMBER
• Periodically clean the solar panel with a soft cloth
and warm water. Do not hose spray. Keep the col-
lector clear of snow and leaves. Make sure trees
and other objects do not block sunlight from the
panel.
• If not to be used for several weeks, turn the unit
OFF. Store it with the panel connected and where
the panel can gather sunlight.
• Solar collection is only effective in direct sunlight.
Every hour the light is on requires a minimum of
8 hours of sunlight charging.
• Several days of use with overcast skies may dis-
charge the batteries. e light will not work until
the batteries are recharged.
Motion
SPECIFICATIONS
Range ........................Up to 70 ft. (21 m); [varies
with surrounding tempera-
ture]
Sensing Angle
............Up to 180°
Battery Type ..............Ni-Cd or Ni-MH Recharge
-
able AA Batteries (3)
On Time ....................Test, 1, or 5 minutes, re-trig
-
gerable
Full Charge on Time .Up to 2 hours
HeathCo LLC reserves the right to discontinue
products and to change specifications at any time
without incurring any obligation to incorporate new
features in products previously sold.
70 ft.
(21 m)
8 ft.
(2.4 m)
Maximum Range Maximum
Coverage Angle
180°
3. Walk through the coverage area noting when
the lights turn on. Increase RANGE only as
needed. A larger RANGE setting may cause false
triggering and reduce battery life.
Note: Wait 5
to 10 seconds after light turns off to retest.
4. Replace battery compartment door.
5. After dark, adjust the light to cover desired
area.

5
598-1316-03
TROUBLESHOOTING GUIDE
SYMPTOM POSSIBLE CAUSE SOLUTION
Light will not come on. 1. Plastic battery tab has not been removed
from battery compartment.
2. Batteries are dead.
3. Sensor is turned OFF.
4. Daylight turn-off is in effect.
1. Remove plastic tab from battery compart
-
ment.
2. Switch the sensor OFF and let the battery
charge for two or more sunny days before
using again.
3. Turn sensor ON.
4. Recheck after dark.
Light comes on in day
-
light.
1. Light may be installed in a relatively
dark location.
2. Light control is in TEST.
1. Relocate light to an area that receives more
light.
2. Set control switch to 1 or 5 minute posi-
tion.
Light comes on for no
apparent reason.
1. Light control may be sensing small
animals or automobile traffic.
2. Range is set too high.
1. Reduce RANGE.
2. Reduce RANGE.
Light stays on continu
-
ously.
1. Light control is detecting a heat source
like an air vent, dryer vent, or brightly-
colored heat-reflective surface.
2. Light control is in TEST.
1. Relocate light or reduce RANGE.
2. Set control switch to 1 or 5 minute posi-
tion.
Light flashes on and off. 1. Heat being reflected from other objects
may be affecting the sensor.
2. Light control is in the TEST mode and
warming up.
3. Batteries are almost dead.
1. Reduce RANGE.
2. Flashing is normal under these condi
-
tions.
3. Reduce RANGE. If flashing continues,
switch the sensor OFF and let the battery
charge for two or more sunny days before
using again.
TECHNICAL SERVICE
Please call 1-800-858-8501 (English speaking only) for assistance before returning
product to store.
If you experience a problem, follow this guide. You may also want to visit our Web site at: www.hzsupport.
com. If the problem persists, call* for assistance at 1-800-858-8501 (English speaking only), 7:30 AM to
4:30 PM CST (M-F). You may also write* to:
HeathCo LLC
P.O. Box 90045, Bowling Green, KY 42102-9045
ATTN: Technical Service
* If contacting Technical Service, please have the following information available: Model Number, Date
of Purchase, and Place of Purchase.
No Service Parts Available for this Product
Please keep your dated sales receipt, it is required for all warranty requests.

6
598-1316-03
FIVE YEAR LIMITED WARRANTY
is is a “Limited Warranty” which gives you specific legal rights. You may also have other rights
which vary from state to state or province to province.
For a period of five years from the date of purchase, any malfunction caused by factory defective
parts or workmanship will be corrected at no charge to you.
Not Covered - Repair service, adjustment and calibration due to misuse, abuse or negligence, light
bulbs, batteries, and other expendable items are not covered by this warranty. Unauthorized service
or modification of the product or of any furnished component will void this warranty in its entirety.
is warranty does not include reimbursement for inconvenience, installation, setup time, loss of
use, unauthorized service, or return shipping charges.
is warranty covers only HeathCo LLC assembled products and is not extended to other equipment
and components that a customer uses in conjunction with our products.
THIS WARRANTY IS EXPRESSLY IN LIEU OF ALL OTHER WARRANTIES, EXPRESS
OR IMPLIED, INCLUDING ANY WARRANTY, REPRESENTATION OR CONDITION
OF MERCHANT ABILITY OR THAT THE PRODUCTS ARE FIT FOR ANY PARTICU
-
LAR PURPOSE OR USE, AND SPECIFICALLY IN LIEU OF ALL SPECIAL, INDIRECT,
INCIDENTAL, OR CONSEQUENTIAL DAMAGES.
REPAIR OR REPLACEMENT SHALL BE THE SOLE REMEDY OF THE CUSTOMER
AND THERE SHALL BE NO LIABILITY ON THE PART OF HEATHCO LLC FOR ANY
SPECIAL, INDIRECT, INCIDENTAL, OR CONSEQUENTIAL DAMAGES, INCLUDING
BUT NOT LIMITED TO ANY LOSS OF BUSINESS OR PROFITS, WHETHER OR NOT
FORESEEABLE. Some states or provinces do not allow the exclusion or limitation of incidental or
consequential damages, so the above limitation or exclusion may not apply to you.
Please keep your dated sales receipt, it is required for all warranty requests.
/