Page is loading ...

PLEASE READ AND SAVE THIS USE AND CARE BOOK.
POR FAVOR LEA ESTE INSTRUCTIVO ANTES DE USAR EL PRODUCTO.
VEUILLEZ LIRE ET CONSERVER CE GUIDE D’ENTRETIEN ET D’UTILISATION.
Toast-R-Oven
™
Broiler
Asador
Rôtissoire
Models
Modelos
Modèles
❑
TRO910W
❑
TRO910B
USA/Canada 1-800-231-9786
Mexico 01-800-714-2503
www.blackanddecker.com
Accessories/Parts
(USA/Canada) 1-800-738-0245
Accesorios/Partes
(EE.UU/Canadá)
Accessoires/Pièces (É.-U./Canada)
TRO910WPub1000002744R1 3/14/06 9:25 AM Page 1

2
1
When using electrical appliances, basic safety precautions should always be
followed, including the following:
❑ Read all instructions.
❑ Do not touch hot surfaces. Use handles or knobs.
❑ To protect against risk of electrical shock, do not immerse cord, plug, or any
non-removable parts of this oven in water or other liquid.
❑ Close supervision is necessary when any appliance is used by or near
children.
❑ Unplug from outlet when not in use and before cleaning. Allow to cool
before putting on or taking off parts.
❑ Do not operate any appliance with a damaged cord or plug or after the
appliance malfunctions or is dropped or damaged in any manner. Return
the appliance to the nearest authorized service facility for examination,
repair, or electrical or mechanical adjustment. Or, call the appropriate toll-
free number listed on the cover of this manual.
❑ The use of accessory attachments not recommended by the appliance
manufacturer may cause injuries.
❑ Do not use outdoors.
❑ Do not let cord hang over edge of table or counter, or touch hot surfaces.
❑ Do not place on or near a hot gas or electrical burner, or in a heated oven.
❑ Extreme caution must be used when moving an appliance containing hot oil
or other hot liquid.
❑ Turn all controls to OFF before inserting or removing plug from wall outlet.
❑ Do not use appliance for other than intended use.
❑ Oversize foods or metal utensils must not be inserted in this appliance, as
they may create a fire or risk of electric shock.
❑ A fire may occur if the toaster oven is covered or touching flammable
material including curtains, draperies, walls and the like, when in operation.
Do not store any item on top of unit when in operation.
❑ Do not clean with metal scouring pads. Pieces can break off the pad and
touch electrical parts resulting in a risk of electric shock.
❑ Do not store any material, other than manufacturer's recommended
accessories, in this oven when not in use.
❑ Extreme caution should be used when using containers constructed of other
than metal or glass.
IMPORTANT SAFEGUARDS
SAVE THESE INSTRUCTIONS.
GROUNDED PLUG
As a safety feature, this product is equipped with a grounded plug, which will only fit
into a three-prong outlet. Do not attempt to defeat this safety feature. Improper
connection of the grounding conductor may result in the risk of electric shock.
Consult a qualified electrician if you are in doubt as to whether the outlet is properly
grounded.
ELECTRICAL CORD
a) A short power-supply cord (or detachable power-supply cord) is to be
provided to reduce the risk resulting from becoming entangled in or tripping
over a longer cord.
b) Longer detachable power-supply cords or extension cords are available and
may be used if care is exercised in their use.
c) If a long detachable power-supply cord or extension cord is used,
1) The marked electrical rating of the detachable power-supply cord or extension
cord should be at least as great as the electrical rating of the appliance,
2) If the appliance is of the grounded type, the extension cord should be a
grounding-type 3-wire cord, and
3) The longer cord should be arranged so that it will not drape over the
countertop or tabletop where it can be pulled on by children or tripped over.
TAMPER-RESISTANT SCREW
Warning : This appliance is equipped with a tamper-resistant screw to prevent
removal of the outer cover. To reduce the risk of fire or electric shock, do not
attempt to remove the outer cover. There are no user-serviceable parts inside. Repair
should be done only by authorized service personnel.
Note: If the power supply cord is damaged, it should be replaced by qualified
personnel or in Latin America by an authorized service center.
❑ Do not place any of the following materials in the oven: paper, cardboard,
plastic wrap, and the like.
❑ Do not cover crumb tray or any parts of the oven with metal foil. This will
cause overheating of the oven.
❑ Use extreme caution when removing tray or disposing of hot grease.
TRO910WPub1000002744R1 3/14/06 9:25 AM Page 2

4
3
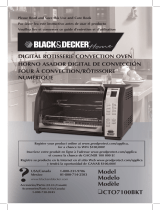
Product may vary slightly from what is illustrated.
How to Use
This product is for household use only.
Before first use, remove the slide rack, broil rack and bake pan from oven. Wash in sudsy water,
rinse and dry with dishtowel or paper towel. Replace slide rack in oven. Apply the same method
to the easy-grip bake pan and grill handling.
For Toasting:
1. Position the slide rack in the rack-slot with the rack rail up. It is not
necessary to preheat the oven for toasting.
2. Set the toast color dial as desired (A). For best results, select the
medium setting for your first cycle, then adjust lighter or darker to suit
your taste.
3. The on indicator light will come on and stay on during the toasting
cycle. When the toasting cycle is done, the signal bell will sound,
the oven will automatically shut off and the on indicator light will
go out.
4. If you want to discontinue toasting, turn the toast color dial to the off position.
For Baking:
1. Consult the baking/broiling charts below for the type of food you want to cook and position the
slide rack in the oven as shown in.
2. Turn the bake/broil temperature control dial to the desired
temperature setting (B).
3. If using the bake timer, turn the dial to the desired number of
minutes (C).
NOTE: For best results, when baking or cooking, always preheat the
oven for 5 minutes.
4. The upper and lower heating elements will cycle on and off to
maintain temperature.
5. When finished baking, turn the bake/broil temperature control dial to
the off position.
6. If using the bake timer, the signal bell will sound after the designated
amount of time. When finished baking, using easy-grip bake pan and
grill handle (D), oven mitt or pot holder, remove slide rack with bake
pan, and turn the temperature control dial to OFF.
For Broiling:
1. Turn the temperature control dial to broil. The oven does not need to be preheated for broiling.
2. Position the slide rack in the rack slot with the rack rail down. Insert the broil rack on top of the
bake pan and place both on the slide rack. Bake timer can also be used to control broiling time.
Only upper heaters turn on during broiling.
D
1. "On" Indicator Light
†2. Bake/broil temperature control dial
White (Part # TRO910W-18), Black (Part # TRO910B- 18)
†3. Bake timer
White (Part # TRO910W-19), Black (Part # TRO910B-19)
†4. Toast color dial
White (Part # TRO910W-20), Black (Part # TRO910B-20)
†5. Slide rack
White (Part # TRO910W-46), Black (Part # TRO910B-46)
†6. Slide-out crumb tray (Part # TRO910W-43)
†7. Bake pan
White (Part # TRO910W-47), Black (Part # TRO910B-47)
†8. Broil rack
White (Part # TRO910W-45), Black (Part # TRO910B-45)
†9. Easy-grip bake pan and grill handle
White (Part # TRO910W-06), Black (Part # TRO910B-06)
† Consumer replaceable/removable parts
C
B
A
TRO910WPub1000002744R1 3/14/06 9:25 AM Page 4

6
5
FOOD AMOUNT TIME PROCEDURE
Chicken pieces 1-6 pieces 35-45 Arrange pieces skin-side
minutes down; turn after 20-25
minutes. Continue broiling
until 170°F on meat
thermometer, or juices
run clear.
Frankfurters 1-8 frankfurters 15-18 For uniform browning,
minutes turn frequently.
Hamburgers 1-6 (1/4 lb. each) 25-35 Turn after 15 minutes;
minutes continue broiling until
145°F on meat
thermometer, or done
as desired
Beef steaks 1-2 (3/4-inch thick) 25-35 Turn after 15 minutes;
minutes continue broiling until
145°F on meat
thermometer, or done
as desired
Pork chops 1-6 (3/4-inch thick) 30-40 Turn after 20 minutes;
minutes continue broiling until
160°F on meat
thermometer.
Fish steaks 1-6 (1-inch thick) 25 minutes Turn after 10 minutes;
continue broiling until fish
flakes easily with a fork.
Open-faced 1-4 slices 7-10 For crispier sandwich,
cheese sandwich minutes toast bread first. Top bread
with sliced cheese, and
tomato if desired.
Broil until cheese is melted.
Use bake pan without
broil rack.
BROILING GUIDE
NOTE: When BROILING foods, place the broil rack in the bake pan. Turn bake/broil
temperature dial to BROIL. Do not preheat. Broiling times are approximate. Do not
undercook ground beef, fish or poultry. Check for desired doneness on steaks. In all
instances, you can use the easy-grip bake pan and grill handle to check on the status
of your food.
FOOD AMOUNT
TEMPERATURE/
PROCEDURE
TIME
Chicken pieces to fit bake pan 400
°F for
40-50 Arrange in bake
(1-6 pieces) minutes pan and place
on top of slide
rack, rack rail
up. Bake until
chicken registers
170
°F
on meat
thermometer.
Ham, Lamb to fit bake pan 350
°F
or Arrange in bake
or pork chops, (1-4 chops follow favorite pan and place
fish fillet or steak or steaks) recipe on top of slide
rack, rack rail up.
Bake until done
as desired.
Cookies 6-8 cookies follow package or Arrange in bake pan
(recipe or recipe directions and place on top of
refrigerated slide rack, rack rail
slice & bake, down.
drop or pre-cut) Bake until done and
browned as desired.
Biscuits, to fit bake pan follow package or Arrange in bake pan
dinner rolls recipe directions and place on top of
(recipe or slide rack, rack rail
refrigerated) down.
Bake until done and
browned as desired.
White or 1-6 medium 400
°F
for Wash and pierce
sweet potatoes potatoes 1- 1-1/4 hours potatoes. Place
directly on slide
rack, rack rail up.
Frozen French single layer 400
°F
follow Arrange in bake pan
fries, onion to fit package and place on top of
rings, other bake pan directions for slide rack, rack rail
frozen initial timing. up.
(breaded and Turn once during
fried) foods baking. Check
frequently to prevent
over browning.
BAKING GUIDE
NOTE: When BAKING foods, use lowest rack position and place bake pan on top of slide
rack. Preheat oven for 5 minutes before placing food in oven. Recommended times as a
guide. In all instances, you can use the easy-grip bake pan and grill handle to check on
the status of your food.
FOOD AMOUNT
TEMPERATURE/
PROCEDURE
TIME
Individual 400
°F
follow Place pizza
frozen pizza package directions directly on Slide
for initial timing. rack, rack rail up.
Check frequently to
prevent over
browning.
3. Use the chart below as a guide to cooking times. Check food for doneness at minimum cooking
time. You can also use the easy-grip bake pan and grill handle to check on the readiness of
your food.
4. When finished broiling, using easy-grip bake pan and grill handle, oven mitt or pot holder,
remove slide rack with broil pan, and turn the temperature control dial to OFF.
TRO910WPub1000002744R1 3/14/06 9:25 AM Page 6

8
7
MEDIDAS IMPORTANTES
DE SEGURIDAD
Cuando se utilizan aparatos eléctricos, se debe respetar ciertas medidas de
seguridad, incluyendo las siguientes:
❑
Por favor lea todas las instrucciones.
❑
No toque las superficies calientes. Utilice las asas o las perillas.
❑
A fin de protegerse contra un choque eléctrico, no sumerja el cable, el
enchufe ni ninguna pieza no removible del aparato.
❑
Se debe tomar mucha precaución cuando el producto se utilice por o en la
presencia de menores de edad.
❑
Desconecte el aparato de la toma de corriente cuando no esté en uso y antes
de limpiarlo. Espere que el aparato se enfríe antes de instalar o retirar los
accesorios.
❑
No se debe utilizar ningún aparato eléctrico que tenga el cable o el
enchufe averiado, que presente un problema de funcionamiento o que
esté dañado. Devuelva el aparato al centro de servicio autorizado más
cercano para que lo examinen, reparen o ajusten. También puede
llamar gratis al número apropiado que aparece en la cubierta de este
manual.
❑
El uso de accesorios no recomendados por el fabricante del producto
presenta el riesgo de lesiones personales.
❑
No utilice el aparato a la intemperie.
❑
No permita que el cable cuelgue del borde de la mesa o del mostrador ni que
entre en contacto con superficies calientes.
❑
No coloque el tostador sobre ni cerca de una hornilla de gas o eléctrica, ni
cerca de un horno caliente.
❑
Se debe tener extrema precaución cuando se mueve un aparato que contiene
aceite caliente o cualquier otro líquido caliente.
❑
Ajuste todos los controles a la posición de apagado (OFF) antes de enchufar o
desconectar el aparato.
❑
Utilice el aparato solamente con el fin previsto.
❑
A fin de evitar el riesgo de incendio o choque eléctrico, nunca introduzca
alimentos demasiado grandes ni utensilios de metal en el aparato.
❑
Existe el riesgo de incendio si el aparato permanece cubierto mientras está en
funcionamiento o si entra en contacto con cualquier material inflamable
incluyendo las cortinas y las paredes. Asegúrese de no colocar nada sobre el
aparato mientras está en uso.
❑
No utilice almohadillas de fibras metálicas para limpiar el aparato. Las fibras
metálicas podrían entrar en contacto con los componentes eléctricos del
aparato produciendo el riesgo de un choque eléctrico.
Care and Cleaning
This product contains no user serviceable parts. Refer service to qualified service
personnel.
Cleaning Your Oven
IMPORTANT: Before cleaning any part, be sure the oven is off, unplugged, and cool. Always dry
parts thoroughly before using oven after cleaning.
1. Clean the glass door with a nylon pad and sudsy water. Do not use a spray glass cleaner.
2. To remove the slide rack, open the door, pull the rack forward and out. Wash the slide rack in
sudsy water or in a dishwasher. To remove stubborn spots, use a polyester or nylon pad. To
replace the slide rack, open the door completely and slide the rack into the rack support
grooves. Be sure the slide rack is seated properly.
3. Wash the bake pan and broil rack in sudsy water or in dishwasher. To minimize scratching, use
a polyester or nylon pad. Use the same cleaning procedure for the easy grip bake pan and grill
handle.
4. If food melts onto heaters, do not turn oven off. Allow cycle to finish, so food passes onto
crumb tray.
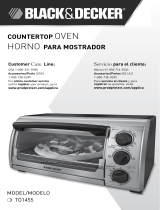
Crumb Tray
To remove the crumb tray, unplug the oven. Slide out the crumb tray
and discard crumbs (E). Wipe tray with a dampened cloth or paper towel
and dry. Close and secure tray.
Exterior Surfaces
Be sure the oven has cooled completely before wiping the top and
exterior walls with a damp cloth or sponge. Dry afterward.
Cooking Containers
1. The inside dimensions of this oven are 12" x 11" x 4.5" (30.5cm x 28cm x 11.43cm). This size
allows for many different types of baking containers. Keep the inside dimensions of the oven in
mind when purchasing baking containers.
2. Metal, ovenproof glass without lids, or ceramic bakeware may be used in your oven. Follow
manufacturer’s instructions. Be sure the top edge of the container is at least 1” (2.54 cm) away
from the upper heating elements.
3. Some frozen foods are packaged in containers suitable for microwave or regular ovens.
Check package instructions. If there are any questions regarding the use of a specific container,
contact the food manufacturer.
4. Some items which should never be used in your Toaster Oven:
• Glass lids on glass or metal bakeware. (If a cover is needed, use aluminum foil and
be careful that it does not touch the heating elements.)
• Air-tight packages such as sealed pouches or cans.
• Plastic wrapping or paperboard covers.
• Containers larger than those recommended.
• Containers with warnings against use in range-type or toaster ovens.
E
TRO910WPub1000002744R1 3/14/06 9:25 AM Page 8

NEED HELP?
For service, repair or any questions regarding your appliance, call the appropriate "800"
number on the cover of this book. Do not return the product to the place of purchase.
Do not mail the product back to the manufacturer nor bring it to a service center. You may
also want to consult the website listed on the cover of this manual.
One-Year Limited Warranty
(Applies only in the United States and Canada)
What does it cover?
• Any defect in material or workmanship; provided; however, Applica’s liability will not
exceed the purchase price of the product.
For how long?
• One year after the date of original purchase.
What will we do to help you?
• Provide you with a reasonably similar replacement product that is either new or factory
refurbished.
How do you get service?
• Save your receipt as proof of the date of sale.
• Check our on-line service site at www.prodprotect.com/applica, or call our toll-free
number, 1-800-231-9786, for general warranty service.
• If you need parts or accessories, please call 1-800-738-0245.
What does your warranty not cover?
• Damage from commercial use
• Damage from misuse, abuse or neglect
• Products that have been modified in any way
• Products used or serviced outside the country of purchase
• Glass parts and other accessory items that are packed with the unit
• Shipping and handling costs associated with the replacement of the unit
• Consequential or incidental damages (Please note, however, that some states do not
allow the exclusion or limitation of consequential or incidental damages, so this
limitation may not apply to you.)
How does state law relate to this warranty?
• This warranty gives you specific legal rights, and you may also have other rights that vary
from state to state or province to province.
¿NECESITA AYUDA?
Para servicio, reparaciones o preguntas relacionadas al producto, por favor llame al
número del centro de servicio en el país donde usted compró su producto. NO devuelva
el producto al fabricante. Llame o lleve el producto a un centro de servicio autorizado.
DOS AÑOS DE GARANTÍA LIMITADA
(No aplica en México, Estados Unidos o Canadá)
¿Qué cubre la garantía?
• La garantía cubre cualquier defecto de materiales o de mano de obra. Applica no se
responsabiliza por ningún costo que exceda el valor de compra del producto.
¿Por cuánto tiempo es válida la garantía?
• Por dos años a partir de la fecha original de compra.
¿Cómo se puede obtener servicio?
• Conserve el recibo original de compra.
• Por favor llame al número del centro de servicio autorizado.
Esta garantía no
cubre:
• Los productos que han sido utilizados en condiciones distintas a las normales
• Los daños ocasionados por el mal uso, el abuso o negligencia.
• Los productos que han sido alterados de alguna manera
• Los daños ocasionados por el uso comercial del producto
• Los productos utilizados o reparados fuera del país original de compra
24
23
Entretien et nettoyage
L’utilisateur ne peut entretenir aucune composante du produit. En confier l’entretien à du
personnel qualifié.
Nettoyage du four
IMPORTANT : Avant de procéder au nettoyage, s’assurer que le four est éteint, débranché et
froid. Toujours bien essuyer les pièces avant d’utiliser l’appareil après nettoyage.
1. Nettoyer la porte en verre avec un tampon en nylon et de l’eau savonneuse. Ne pas utiliser
de nettoyant à vitres en vaporisateur.
2. Pour enlever la grille coulissante, ouvrir la porte, tirer la grille et la sortir. Laver la grille dans
de l’eau chaude savonneuse ou au lave-vaisselle. Pour enlever les taches tenaces, utiliser un
tampon en nylon ou en polyester. Pour remettre la grille en place, ouvrir complètement la
porte et faire glisser la grille dans les rainures de soutien de la grille. S’assurer de la bonne
position de la grille.
3. Laver le plat de cuisson et la lèchefrite dans de l’eau chaude savonneuse ou au lave-
vaisselle. Utiliser un tampon en nylon ou en polyester pour minimiser les égratignures. Faire
de même pour la poignée à prise facile pour le plat de cuisson et la grille.
4. Lorsqu'un aliment fond sur les éléments, ne pas fermer le four. Attendre la fin du cycle de
manière à ce que l'aliment tombe dans le plateau à miette.
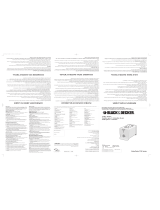
Plateau à miettes
Débrancher l'appareil pour retirer le plateau à miettes (E). Glisser
le plateau hors de l'appareil et en jeter les miettes. Essuyer le plateau
avec un chiffon ou un essuie-tout humide et assécher. Remettre et bien
fixer le plateau en place.
Surfaces extérieures
S’assurer que le four est complètement refroidi avant d’essuyer
le dessus et les parois extérieures avec un chiffon ou une éponge
humide. Sécher par la suite.
Récipients pour la cuisson
1. L’intérieur de l’appareil mesure 30,5 cm sur 28 cm sur 11,43 cm (12 po x 11 po x 4,5 po).
Ces dimensions permettent l’utilisation des différents récipients pour la cuisson. Avant
d’acheter un récipient, en vérifier les dimensions.
2. On peut utiliser des récipients en métal, en verre résistant à la chaleur (sans couvercle) ou en
céramique. Respecter les consignes du fabricant. Il doit y avoir un espace minimal de
2,54 cm (1 po) entre le haut du récipient et les éléments du dessus.
3. Certains aliments congelés sont emballés dans des récipients allant au four à micro-ondes ou
au four conventionnel. Vérifier si l’emballage va au four conventionnel. En cas de doute,
communiquer avec le fabricant de l’aliment.
4. Certains articles ne devraient jamais être utilisés dans l’appareil.
• Des couvercles en verre sur des plats en verre ou en métal. (Lorsqu'il faut couvrir, utiliser
du papier d'aluminium et s'assurer que ce dernier ne touche pas aux éléments chauffants.)
• Des emballages scellés sous vide (comme des sacs sous vide ou des boîtes de conserve).
• De la pellicule de plastique ou des couvercles en carton.
• Des récipients de dimensions supérieures à celles recommandées.
• Des récipients portant des mises en garde contre l’utilisation dans des cuisinières ou des
grille-pain fours.
E
TRO910WPub1000002744R1 3/14/06 9:25 AM Page 24

is a trademark of The Black & Decker Corporation, Towson, Maryland, USA
Marca registrada de The Black & Decker Corporation, Towson, Maryland, E.U.
Marque de commerce déposée de la société The Black & Decker Corporation, Towson, Maryland, É.-U.
Copyright © 2005 - 2006 Applica Consumer Products, Inc.
Pub. No. 1000002744-00-RV01
Fabricado en la República Popular de China
Impreso en la República Popular de China
Importado por:
Applica de México S. de R.L. de C.V.
Blvd. Manuel Avila Camacho 2900-902, Fracc Los Pirules
Tlalnepantla, Edo. de México. C.P. 54040
Teléfono: (55) 1106-1400
Del interior marque sin costo
01 (800) 714 2503
Made in People’s Republic of China
Printed in People’s Republic of China
R12005/9-29-52E/S/F
1500 W 120 V 60Hz
Comercializado por:
Applica de México, S. de R. L. de C.V.
Blvd. Manuel Avila Camacho 2900-902,
Fracc Los Pirules
Tlalnepantla, Edo. de México. C.P. 54040.
R. F. C. AME-001026- PE3.
Servicio y Reparación
Art. 123 y José Ma. Marroquí # 28 D
Col. Centro, Mexico D. F., CP 06050
Servicio al Consumidor,
Venta de Refacciones y Accesorios
01 800 714 2503
Sello del Distribuidor:
Fecha de compra:
Modelo:
TRO910WPub1000002744R1 3/14/06 9:25 AM Page 28
/