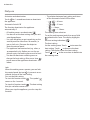
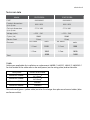
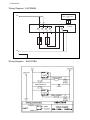
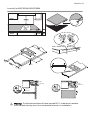
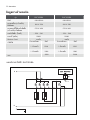
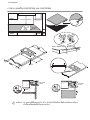
Electrolux EHC325BA ceramic glass hob offers two cooking zones with a maximum power of 1800W and 1200W respectively. It features intuitive touch controls with a heat setting display for each zone, allowing you to precisely adjust the temperature. The hob also includes a residual heat indicator, which helps prevent burns by warning you when the cooking zones are still hot.
Electrolux EHC325BA ceramic glass hob offers two cooking zones with a maximum power of 1800W and 1200W respectively. It features intuitive touch controls with a heat setting display for each zone, allowing you to precisely adjust the temperature. The hob also includes a residual heat indicator, which helps prevent burns by warning you when the cooking zones are still hot.


-
 1
1
-
 2
2
-
 3
3
-
 4
4
-
 5
5
-
 6
6
-
 7
7
-
 8
8
-
 9
9
-
 10
10
-
 11
11
-
 12
12
-
 13
13
-
 14
14
-
 15
15
-
 16
16
-
 17
17
-
 18
18
-
 19
19
-
 20
20
-
 21
21
-
 22
22
-
 23
23
-
 24
24
-
 25
25
-
 26
26
-
 27
27
-
 28
28
-
 29
29
-
 30
30
-
 31
31
-
 32
32


Electrolux EHC325BA ceramic glass hob offers two cooking zones with a maximum power of 1800W and 1200W respectively. It features intuitive touch controls with a heat setting display for each zone, allowing you to precisely adjust the temperature. The hob also includes a residual heat indicator, which helps prevent burns by warning you when the cooking zones are still hot.
Ask a question and I''ll find the answer in the document
Finding information in a document is now easier with AI
Related papers
-
Electrolux EHC724BA User manual
-
-
Electrolux EHC325BA User manual
-
-
-
-
-
-
-
Other documents
-
Westinghouse WHI943BC User manual
-
-
Chef CHC645BA User manual
-
Westinghouse WHI745BA User manual
-
Westinghouse WHI324BA User manual
-
AEG HC452020EB User manual
-
Westinghouse WHI323BC User manual
-
Aeg-Electrolux HC451500EB User manual
-
Westinghouse WHI955BB User manual
-
Westinghouse WHI634BB User manual