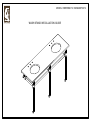
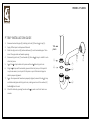
Water Creation EMPIRE60 72 Installation guide
- Type
- Installation guide
Water Creation EMPIRE60 72 is a versatile washstand that can be used in various settings. It features a durable construction with a marble top, providing a luxurious look and a sturdy surface. The stand can be customized with different combinations of support bars, side bars, and joints, allowing for a variety of configurations to fit your specific needs. It comes with all the necessary hardware for easy installation, including screws, anchors, and foot flanges for stability.
Water Creation EMPIRE60 72 is a versatile washstand that can be used in various settings. It features a durable construction with a marble top, providing a luxurious look and a sturdy surface. The stand can be customized with different combinations of support bars, side bars, and joints, allowing for a variety of configurations to fit your specific needs. It comes with all the necessary hardware for easy installation, including screws, anchors, and foot flanges for stability.


-
 1
1
-
 2
2
-
 3
3
-
 4
4
-
 5
5
-
 6
6
-
 7
7


Water Creation EMPIRE60 72 Installation guide
- Type
- Installation guide
Water Creation EMPIRE60 72 is a versatile washstand that can be used in various settings. It features a durable construction with a marble top, providing a luxurious look and a sturdy surface. The stand can be customized with different combinations of support bars, side bars, and joints, allowing for a variety of configurations to fit your specific needs. It comes with all the necessary hardware for easy installation, including screws, anchors, and foot flanges for stability.
Ask a question and I''ll find the answer in the document
Finding information in a document is now easier with AI
Related papers

Other documents
-
 Barclay Products TKADTR60-WCP2 Installation guide
-
 Barclay Products TKATS67-WBN4 Installation guide
-
 Barclay Products TKADTR60-WCP1 Installation guide
-
 Barclay Products TKCTR60-CP2 Installation guide
-
 Barclay Products TKCTR67-SN1 Installation guide
-
Barclay Products TKCTR7H67-SN4 Installation guide
-
Barclay Products TKATR60-WORB2 Installation guide
-
 Barclay Products TKADTR67-WORB1 Installation guide
-
 Barclay Products TKCTR67-CP1 Installation guide
-
Power Soak PS-225 Installation guide


