Costway EP25063US User manual

Category
Ice cube makers
Type
User manual

Costway EP25063US is a countertop ice maker that produces two sizes of ice cubes: small and large. It features a simple control panel with easy-to-use buttons for selecting ice cube size and turning the unit on or off. The ice maker has a transparent window on the top cover, allowing you to see the ice-making process. It also has an ice-full sensor that automatically stops the ice-making cycle when the ice basket is full. The ice maker operates quietly and does not require any plumbing installation. It's perfect for homes, offices, or any place where you need a convenient supply of fresh ice.

Costway EP25063US is a countertop ice maker that produces two sizes of ice cubes: small and large. It features a simple control panel with easy-to-use buttons for selecting ice cube size and turning the unit on or off. The ice maker has a transparent window on the top cover, allowing you to see the ice-making process. It also has an ice-full sensor that automatically stops the ice-making cycle when the ice basket is full. The ice maker operates quietly and does not require any plumbing installation. It's perfect for homes, offices, or any place where you need a convenient supply of fresh ice.

THIS INSTRUCTION BOOKLET CONTAINS IMPORTANT SAFETY INFORMATION. PLEASE READ AND KEEP FOR FUTURE REFERENCE.
Follow Costway
Please give us a chance to make it right and do better
Contact our friendly customer service department for help first.
Replacements for missing or damaged parts will be shipped ASAP!
USER’S MANUAL
EN
Ice Maker
EP25063US
2
IMPORTANT SAFETY INSTRUCTIONS………………………………………………. ….4
PREPARING YOUR ICE MAKER FOR USE
IMPORTANT SAFETY TIPS………………………………………………………………………5
GETTING TO KNOW YOUR UNIT…………………………………………………………
………………………………………………………….
.6
OPERATING PROCEDURES & MAINTENANCE
UNPACKING
UNPACKING YOUR
YOUR ICE
ICE MAKER
MAKER…………………
………………….
.……………………………………………
…………………………………………….
..
.8
CONNECTING
CONNECTING YOUR
YOUR ICE
ICE MAKER
MAKER……………
……………….
.………
……….
.……………………………………
…………………………………..
..8
CLEANING
CLEANING AND
AND MAINTAINING
MAINTAINING YOUR
YOUR ICE
ICE MAKER
MAKER
.
.…………………………………………
………………………………………….
.8
USING YOUR ICE MAKER……………….……..…………………………………………..9
TROUBLESHOOTING
TROUBLESHOOTING……………………………
…………………………….
.……………………………………………
……………………………………………..
.. 9
TECHNICAL PARAMETERS & CIRCUIT DIAGRAM……………………..….………....10
EXPLOSIVE DRAWINGS……………………………………………………………………11
TABLE OF CONTENTS
TABLE OF CONTENTS
3
Contact Us!
Do NOT return this item.
Contact our friendly customer service department for help first.
E-mail
US: cs.us@costway.com
UK: cs.uk@costway.com
Before You StartBefore You Start
Please read all instructions carefully.
Retain instructions for future reference.
Seperate and count all parts and hardware.
Read through each step carefully and follow the proper order.
We recommend that, where possible, all items are assembled near to the
area in which they will be placed in use, to avoid moving the product
unnecessarily once assembled.
Always place the product on a flat, steady and stable surface.
Keep all small parts and packaging materials for this product away from
babies and children as they potentially pose a serious choking hazard.
4
DANGER
WARNING
Your safety and the safety of others are very important.
We have provided many important safety messages manual and your appliance.
Always read and obey all safety messages.
This is the safety alert symbol:
!
All safety messages will follow the safety alert symbol and the word “DANGER or “WARNING”.
These words mean:
You can be killed or seriously injured if you don’t immediate follow instructions.
All safety messages will tell you what the potential hazard is, tell you how to reduce the chance
of injury, and tell you what can happen if the instructions are not followed.
When using electrical appliances, basic safety precautions should be followed to reduce the
risk of fire, electric shock, and injury to persons or property. Read all instructions before using
any appliance.
Do not operate thisor any other appliance with a damaged cord.
If the supply cord is damaged, it must be replaced by the manufacturer or its service agent
or a similarly qualified person in order to avoid a hazard.
This ice-maker must be positioned so that the plug is accessible .
Connect to properly polarized outlets only. No other appliance should be plugged into the
same outlet. Be sure that the plug is fully inserted into the receptacle.
Do not run the power cord over carpeting or other heat insulators. Do not cover the cord.
Keep cord away from traffic areas, and do not submerge in water.
We do not recommend the use of an extension cord, as it may overheat and become a risk
of fire. If you must use an extension cord, use No.14AWG minimum size and rated no less
than 1875 watts.
Unplug the ice maker before cleaning or making any repairs or servicing.
Exercise caution and use reasonable supervision when appliance is used near children.
Do not use your ice-maker outdoors. Place the ice-maker away from direct sunlight and
IMPORTANT SAFETY INSTRUCTIONSPREPARING YOUR ICE MAKER FOR USE
5
make sure that there is at least 4 inches of space between the back of your unit and wall.
Keep a minimum distance of 4 inches on each side of your unit free.
Do not use other liquid to make the ice-cube other than water.
Do not clean your ice maker with flammable fluids. The fumes can create a fire hazard or
explosion.
Do not tip over.
If the ice maker is brought in from outside in wintertime, give it a few hours to warm up to
room temperature before plugging it in.
WARNING: This appliance must be earthed.
DANGER – Risk Of Fire or Explosion. Flammable Refrigerant Used. Do Not Use
Mechanical Devices To Defrost Ice Maker. Do Not Puncture Refrigerant Tubing.
DANGER – Risk Of Fire Or Explosion. Flammable Refrigerant Used. To
Be Repaired Only By Trained Service Personnel. Do Not Puncture Refrigerant Tubing.
CAUTION – Risk Of Fire Or Explosion. Flammable Refrigerant Used. Consult Repair
Manual/Owner’s Guide Before Attempting To Install or Service This Product. All Safety
Precautions Must be Followed.
CAUTION – Risk Of Fire Or Explosion. Dispose Of Property In Accordance With Federal
Or Local Regulations. Flammable Refrigerant Used .
CAUTION-Risk Of Fire Or Explosion Due To Puncture Of Refrigerant Tubing;Follow
Handling Instructions Carefully. Flammable Refrigerant Used.
The ice maker should be installed in accordance with the safety standard for Refrigeration
Systems, ASHRAE15. The ice maker shall not be installed in corridors or hallways of
public buildings.
If the unit is with problem need to be maintained, that replacing with like components and
that servicing shall be done by factory authorized service personnel, so as to minimize the
risk of possible ignition due to incorrect parts or improper service.
IMPORTANT:
The wires in this mains lead are colored in accordance with the following code:
Green or Green with a strip yellow: Grounding
White: Neutral
Black: Live
To avoid a hazard due to instability of the appliance, it must be placed at an even or flat
surface.
6
General instrucion
1. Ice scoop.
2. Ice full sensor
3. Ice basket
4. Top cover with transparent window
5. Air outlet
6. Water drain cap: at front bottom side of the unit.
7. MAXIMUM WATER LEVEL:
Remove the ice basket, you can see the water level mark.
GETTING TO KNOW YOUR UNIT
7
Postion of control panel & function
Control Panel: Easy to use, visible functions touch display setting.
A. Selected ice size displaying: Small and Large.
B. Power indicator
C. Ice-Full indicator
D .Water shortage indicator
E. Button to turn on/off the unit.
F. Button to select ice cube size.
OPERATING PROCEDURES & MAINTENANCE
Control Panel
8
DANGER
UNPACKING YOUR ICE MAKER
1. Remove the exterior and interior packaging. Check if ice basket and ice scoop inside. If any
parts are missing, please contact our customer service.
2. Remove the tapes for fixing ice shovel, ice basket & ice scoop. Clean the tank & ice basket.
3. Put the ice maker on a level & flat counter top without direct sunlight and other sources of
heat (i.e.: stove, furnace, radiator). Maker sure that there is at least 4 inches gap between
the back & LH/RH sides with the wall.
4. Allow one hour for the refrigerant fluid to settle before plugging the ice maker in.
5. The appliance must be positioned so that the plug is accessible.
WARNING: fill with potable water only. Only use drinking water.
CONNECTING YOUR ICE MAKER
* Improper use of the grounded plug can result in the risk of electrical shock. If the
power cord is damaged please call our customer service.
1. This unit should be properly grounded for your safety. The power cord of this appliance is
equipped with a three-prong plug which mates with standard three prong wall outlets to
minimize the possibility of electric shock.
2. Plug your appliance into an exclusive, properly installed, grounded wall outlet. Do not under
any circumstances, cut or remove the third (ground) prong from the power cord. Any
questions concerning power and/or grounding should be directed toward a certified
electrician.
3. This appliance requires a standard 110-120volt, 60Hz electrical outlet with three-prong
ground.
CLEANING
CLEANING AND
AND MAINTAINING
MAINTAINING YOUR
YOUR ICE
ICE MAKER
MAKER
Before using your ice maker, it is strongly recommended to clean it thoroughly.
1. Take out the ice basket.
2. Clean the interior with diluted detergent, warm water and a soft cloth.
3. Then use the water to rinse the inside parts, and drain out the water by unplugging the
drain cap on front bottom side.
4. The outside of the ice maker should be cleaned regularly with a mild detergent solution and
warm water.
5. Dry the interior and exterior with a clean soft cloth.
6. When the machine is not to be used for a long time, drain water completely & dry the
interior.
9
1. Open the cover, remove the ice basket and pour water into tank.
Keep water level below the water level mark.
2. Press “Power” button on the control panel to begin the ice making cycle.
3. Select the ice cube size by pressing the “Select” button. If the room temperature is lower
than 60, it is recommended to select small ice cube in order to avoid ice sticking together.
4. The ice making cycle lasts approx. 6 to 13 minutes, depending on seletion of ice cube size
and the room temperature. The recommended room temperature is 50to 105 .
5. If water pump can’t inject water, the ice maker will stop automatically, and the “Add Water”
indicator will be on.Press “Power” button, fill water up to the max. water level mark and
press “Power” button again to turn on the unit again.Allow the refrigerant liquid inside the
compressor at least 3 minutes to settle before restarting.
6. The ice maker stops when the ice basket is full and the “Ice” indicator will be on.
Warning:
Direct sunlight or sunlight reflection may cause infared sensor malfunction. If the
unit doesn’t stop even ice cubes obstruct sensor, move the unit where no sunlight.
7. Change water in the water reservoir every 24 hours to ensure a reasonable hygiene level.
If unit isn’t to be used, drain all the water and dry the tank.
USING YOUR ICE MAKER
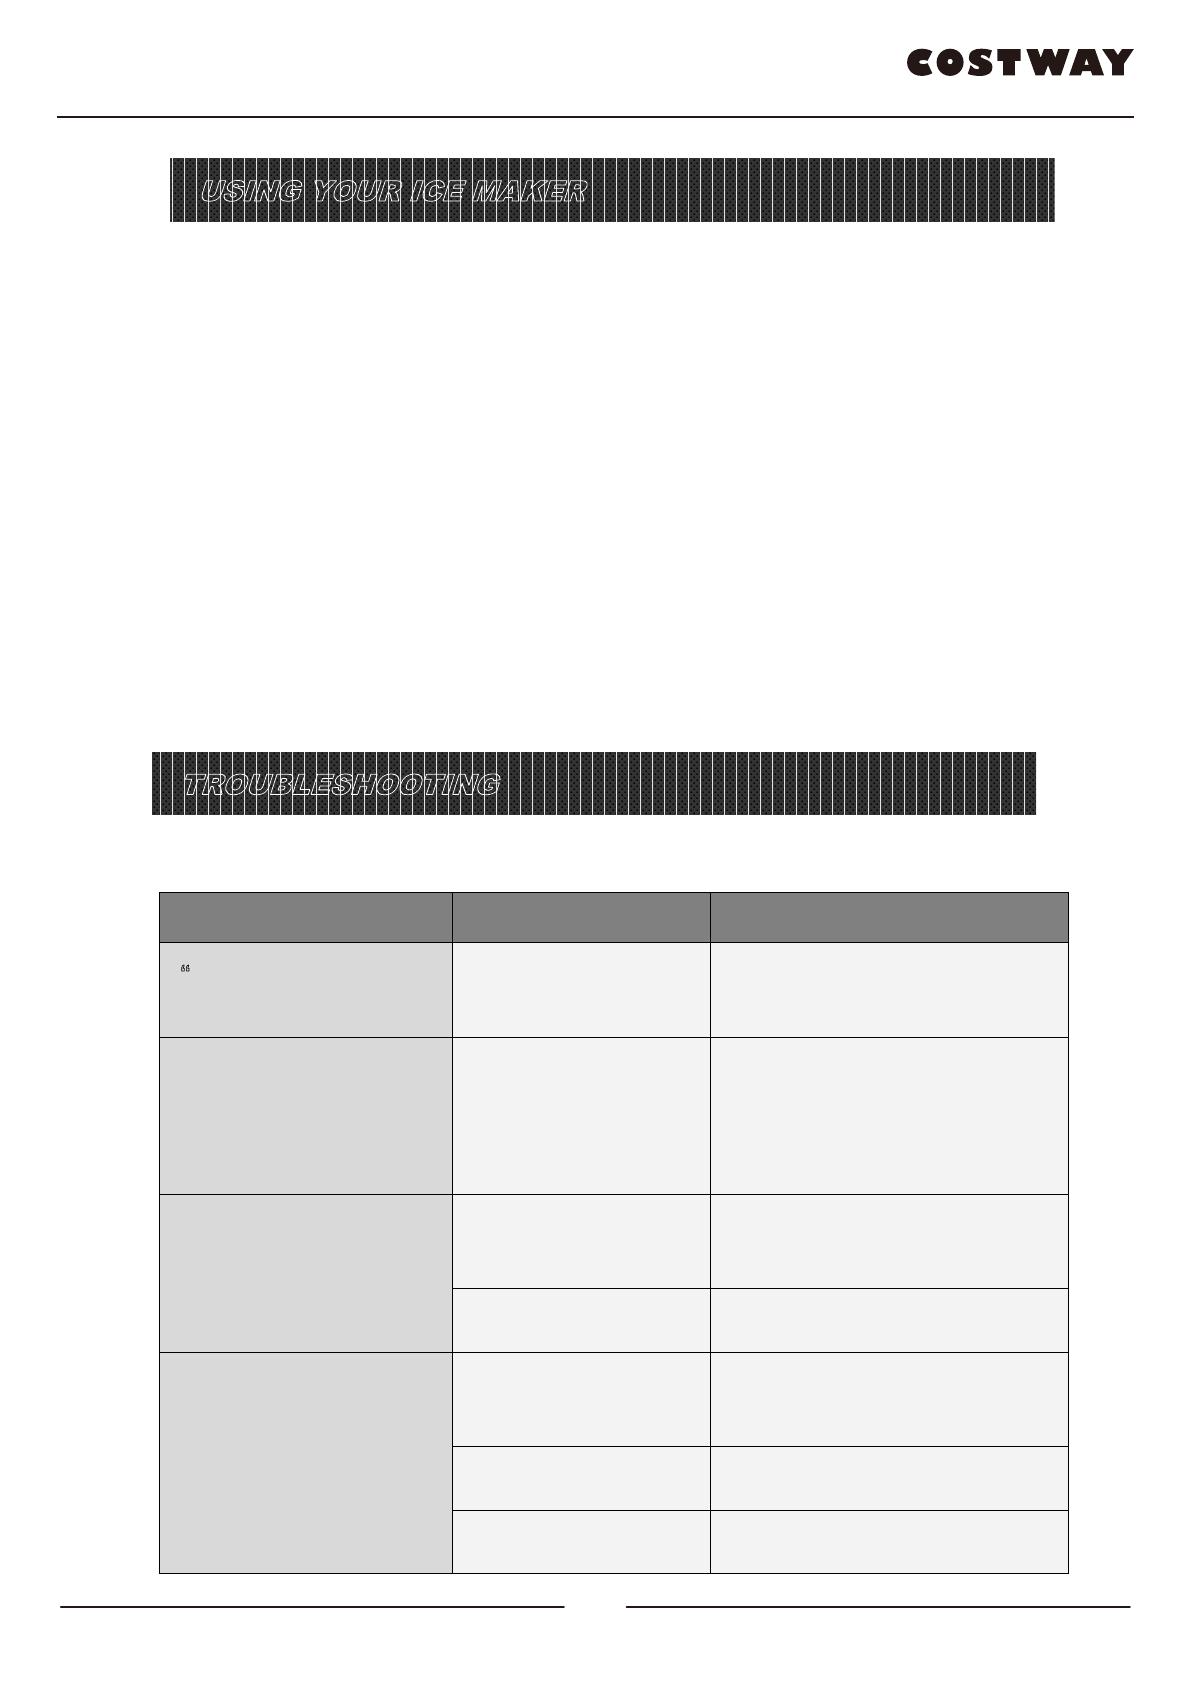
PROBLEM POSSIBLE CAUSE SOLUTION
Add Water” indicator is
on. Lack of Water.
Stop the ice maker, fill water, and
press “Power” button again to
restart the unit.
“Ice” indicator is on. Ice is full in basket.
Remove ice from ice basket.
Continuous press “Select” button
5 seconds, the unit could make
ice 10 cycles even “Ice” indicator
is on.
Ice cubes stick together.
The ice making cycle is
too long.
Stop the ice maker, and restart it
when the ice blocks melt. Select the
small size ice cube selection.
Water temperature in
inner tank is too low.
Replace the water. Temperature of
water recommended at 45
-90
Ice making cycle is normal
but no ice formed.
Room temperature or
water temperature in
inner tank is too high.
The room temperature should be 50
-105, water temperature should
be 45-90
Refrigerant in cooling
system leaks.
Verify by a qualified technician.
Pipe in the cooling
system is blocked. Verify by a qualified technician.
TROUBLESHOOTING
10
TECHNINCAL PARAMETERS & CIRCUIT DIAGRAM
Model
Model
EP25063US
Protection
Protection Type
Type
I
I
Power
Power
115
115V/
V/6
60Hz
0Hz
Ice
Ice Making
Making Current
Current
1.7
1.7
A
A
Ice
Ice
Harvest
Harvest
Current
Current 2.0
2.0A
A
Refrigerant
Refrigerant
R
R
600
600
a
a
0.81Oz
0.81Oz
/
/
23
23
g
g
Design
Design
Pressure
Pressure
High
High Side
Side 290Psig
290Psig
Low
Low Side
Side 88Psig
88Psig
Vesicant
Vesicant
C
C5
5
H
H10
10
Net
Net
Weight
Weight 7.7
7.7Kg
Kg
Enclosure
Enclosure Plastic
Plastic
1
EXPLOSIVE DRAWINGS
11
1. Power cord 2. Back panel 3. Plate inforce
4. Magnetism valve 5. Evaporator 6. Control box cover
7. Main PCB 8. Control box 9. Ice making box
10. Micro switch 11. Inner tank bracket, LH 12. Cam
13. Ice scoop link 14. Ice scoop 15. Back window
16. Back top panel 17.Displaying PCB 18.Touch pad
19. Front top panel 20. Ice basket 21. Foaming asm
22. Water filter 23. Inner tank brackt, RH 24 .Sychronuous motor
25. Stainless wire 26. Condenser 27. DC Fan motor
28. Filter dryer 29. Copper tube filter 30. Silicon plug drain
31. Nylon plug drain 32. Silicon sealing pump 33. DC water pump
34. Compressor 35. Plate bottom 36. Rubber foot
37. Air grille
12
Welcome to visit our website and purchase our quality products!
this product and giving us valuable feedbacks.
With your inspiring rating, COSTWAY will be more consistent to offer you
EASY SHOPPING EXPERIENCE, GOOD PRODUCTS and EFFICIENT SERVICE!
US office: Fontana, California
UK office: Ipswich
Reward Points
Exclusive Customer Service
Permanent Shopping Cart
Order History
  • Page 1 1
  • Page 2 2
  • Page 3 3
  • Page 4 4
  • Page 5 5
  • Page 6 6
  • Page 7 7
  • Page 8 8
  • Page 9 9
  • Page 10 10
  • Page 11 11
  • Page 12 12
  • Page 13 13
  • Page 14 14
  • Page 15 15
  • Page 16 16

Costway EP25063US User manual

Category
Ice cube makers
Type
User manual

Costway EP25063US is a countertop ice maker that produces two sizes of ice cubes: small and large. It features a simple control panel with easy-to-use buttons for selecting ice cube size and turning the unit on or off. The ice maker has a transparent window on the top cover, allowing you to see the ice-making process. It also has an ice-full sensor that automatically stops the ice-making cycle when the ice basket is full. The ice maker operates quietly and does not require any plumbing installation. It's perfect for homes, offices, or any place where you need a convenient supply of fresh ice.

Ask a question and I''ll find the answer in the document

Finding information in a document is now easier with AI