Audiovox RMP-97-CRM User manual
- Category
- Network antennas
- Type
- User manual
This manual is also suitable for

INSTALLATION GUIDE FOR:
1997 FULL SIZE PICK-UP,
TAHOE and SUBURBAN
Printed in U.S.A. Form No. 128-5104
PARTS LIST:
Item
1
2
3
4
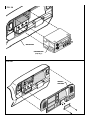
RADIO INSTALLATION: (Fig. 2)
1. Complete all radio wiring connections including attachment
of the antenna adaptor.
2. Place radio assembly into dash opening by sliding onto rails
and pushing back until plastic retainer clips lock.
3. Perform a functional test on the radio to assure proper op-
eration.
4. Re-assemble the dash.
Description
Left Radio Mounting Bracket
Right Radio Mounting Bracket
Plastic Push Pin
#8 x 3/8" Sheet Metal Screw
Qty.
1
1
2
4
DASH DISASSEMBLY:
1. With the gear selector in low, firmly pull away the trim panel
from the dash.
2. Disconnect all dash switch wiring from panel and remove
panel.
RADIO PREPARATION: (Fig. 1)
1. Attach left bracket (Item #1) to the left side of the radio
using (1) plastic push pin (Item #3) at the rear mounting
hole and (2) screws (Item #4) at the front mounting holes.
2. Attach right bracket (Item #2) to the right side of the radio
using (1) plastic push pins (Item #3) at the top mounting
holes and (2) screws (Item #4) at the front mounting holes.
RMP-97-CRM
FIG. 1
GM-SERIESRADIO
OR
GC-SERIESRADIO
PLASTIC PUSH PIN
(ITEM#3)
PLASTIC PUSH PIN
(ITEM#3)
SHEETMETALSCREWS
(ITEM#4)
LEFTRADIOMOUNTING
BRACKETASSEMBLY
(ITEM#1)
RIGHTRADIOMOUNTING
BRACKETASSEMBLY
(ITEM#2)
SHEETMETALSCREWS
(ITEM#4)

FIG. 2B
REINSTALL
DASHPANEL
FIG. 2A
EXISTINGDASH
PREPAREDRADIO
(as per Fig. 1)
-
 1
1
-
 2
2


Audiovox RMP-97-CRM User manual
- Category
- Network antennas
- Type
- User manual
- This manual is also suitable for
Ask a question and I''ll find the answer in the document
Finding information in a document is now easier with AI
Related papers
Other documents
-
Craftsman 917270811 Owner's manual
-
-
Char-Broil 463720109 Owner's manual
-
-
Porsche 911 CARRERA - 2001 Technical Manual
-
-
Craftsman 917.270723 Owner's manual
-
-
-