CALI 7516000400 Installation guide

Type
Installation guide
TruOrganics
Installation Guide
(888) 788-2254
www.CaliBamboo.com
Questions? (888) 788-2254
www.CaliBamboo.com
TruOrganics Installation Guide
The Collection
Decking Systems
Decking Accessories
Available Colors
TRUORGANICS 3G
5-7/16” Wide
Plank Dims: 192”L x 5-7/16”W x 7/8”H
3G END CAP 3G WIDE END CAP
SEDONA GLACIER DENALI MOJAVEYOSEMITE CARIBOU
TRUORGANICS 3G WIDE
8-1/4 Wide
Plank Dims: 96”L x 8-1/4”W x 7/8”H
TRUORGANICS SQUARE EDGE
5-7/16” Wide
Plank Dims: 192”L x 5-7/16”W x 7/8”H
UNIVERSAL HIDDEN
FASTENERS
UNIVERSAL BUTT
SEAM CLIPS
STARTER CLIPS
Questions? (888) 788-2254
www.CaliBamboo.com
TruOrganics Installation Guide
Pre-Installation
3/16”
1/4”
TIME
EXPANSION
SPACE
Measure your joist spacing to ensure it is 16”
on center for residential applications and 12"
on center for commercial applications.
Expansion space is required! Decking
boards should always have 3/16”
expansion space between boards and
1/4” expansion space on all butt ends.
TI M
MEASURE
YOUR JOIST
Take time to read the local
building codes for any special
requirements or restrictions.
T I
INSTALL
VENTILATION
Install 4 inches of continuous net free area
under the decking surface for adequate
ventilation.
T IME
TAKE TIME
TO READ
ME
E
BUILDING CODES
GROUND
Before you begin installation, remember to take your T.I.M.E. with the checklist below.
Full installation instructions and maintenance guidelines can also be found online at
www.CaliBamboo.com
Questions? (888) 788-2254
www.CaliBamboo.com
TruOrganics Installation Guide
Pre-Installation
IMPORTANT: Pre-Installation Guidelines
Note: Decking not used for its intended purpose will not be covered under warranty. For the most up-to-
date information, please visit our website at CaliBamboo.com
Prior to installing any composite decking it is recommended that you check with local building codes for any
special requirements or restrictions. The diagrams and instructions outlined in this guide are for illustration
purposes only and are not meant or implied to replace a licensed professional. Any construction or use of
TruOrganics must be in accordance with all local zoning and/or building codes. The consumer assumes all
risks and liability associated with the construction and use of this product.
Safety
When dealing with any type of construction project it is necessary to wear appropriate safety equipment to
avoid any risk of injuries. Cali Bamboo recommends the following safety equipment when handling, cutting,
and installing Cali Bamboo decking: gloves, respiratory protection, long sleeves, pants, and safety glasses.
Tools Needed
Standard woodworking tools may be used. It is recommended that all blades have a carbide tip. Standard
stainless steel or acceptable coated deck screws and nails are recommended.
Typical tools needed include but are not limited to:
Hammer
Circular Saw (Carbide Tipped Blade)
Level
Tape Measure
Screw Gun
Chalk Line
Rasp
Miter Saw
Note: Any time the decking boards need to be marked use white chalk, straight boards, or string lines
as templates for straight lines. NEVER USE COLORED CHALK. Colored chalk will permanently stain
TruOrganics products and is not recommended.
Storage
A clean, smooth, flat, and strong frame is needed to install TruOrganics products correctly. TruOrganics
products need to be stored on a flat and even surface at all times. Surfaces such as dirt and grass are not
recommended as they can move over time and potentially cause warping or distortion. Always remember to
keep TruOrganics boards dry until you are able to start installation.
Planning
Plan a layout for your decking before starting to ensure the best possible look for your project. Building
codes and zoning ordinances generally apply to permanent structures, meaning anything that is anchored
to the ground or attached to the house. Therefore, nearly every kind of decking requires permits and
inspections from a local building department.
Questions? (888) 788-2254
www.CaliBamboo.com
TruOrganics Installation Guide
Pre-Installation
Construction
TruOrganics decking is NOT intended for use as columns, support posts, beams, joist stringers or other
primary load-bearing members. TruOrganics must be supported by a code-compliant substructure. While
TruOrganics products are great for retrofits, they should not be installed on existing decking boards.
Static
Static build-up is a natural occurring phenomenon that can occur with many plastic products. Dry and
windy environments may make this more apparent and varies depending on the climate and age of the
decking.
Ventilation
TruOrganics products CANNOT be directly installed on a flat surface. They must be installed on a
substructure so there is adequate and unobstructed air flow under the decking to prevent excessive water
absorption. A minimum of 4 inches of continuous net free area under the decking surface is required for
adequate ventilation. This will ensure air can circulate between adjacent members to promote drainage and
drying.
Heat and Fire
Excessive heat on the surface of TruOrganics products from external sources such as fire or reflection of
sunlight from energy efficient window products can cause passive heat gain within a structure. This can
lead to unusual heat build-up on exterior surfaces. This extreme elevation of surface temperatures can
make TruOrganics products susceptible to melting, sagging, warping, discoloration, increased expansion/
contraction, and accelerated weathering.
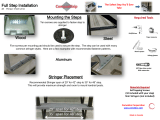
Framing
A clean, smooth, flat, and strong frame is needed to install TruOrganics products. Determine the joist
spacing of the frame and ensure that it is completely level before installing any boards. Adequate spacing
between the joists is required to keep the deck boards from bending. Please review the chart below to see
what spacing is required for your profile.
Maximum Decking Spans on Center-to-Center
Profile Dimensions Residential Span Commercial Span
TruOrganics, Solid Board 5.5” x 0.9” 16” 12”
TruOrganics, 3G Board 5.5” x 0.9” 16” 12”
Joist Spanning on Center-to-Center with Angled Decking Installations
Degree of Angle Dimensions Spacing
90 5.5” x 0.9” Refer to table above
60 5.5” x 0.9” 2” less than the span stated in the above table
45 5.5” x 0.9” 4” less than the span stated in the above table
30 5.5” x 0.9” 1/2 the distance stated in the table above
Questions? (888) 788-2254
www.CaliBamboo.com
TruOrganics Installation Guide
Installation
Face Fasteners
When fastening TruOrganics products all screws that are face fastened must
be driven in at a 90 degree angle to the decking surface. See Diagram 1. An
extra (sister) joist should be added if a 90 degree angle cannot be driven
into the board. Never toe/edge screw the deck boards.
All screws that are face fastened must be stainless steel.
To ensure structural integrity of the boards maximum overhang should be
5/8” as shown in Diagram 1. Always use screws designated for use with
composite decking material. Test the screws on a scrap piece of board to
ensure the screws do not cause the surface of the decking mushroom or
bulge around the head of the screw. If it does cause this issue, change to a
different brand of screw. Cali Bamboo recommends using 2-1/2” TrapEase
3 Ultimate composite decking screws.
TrapEase 3 Color Match to Cali Decking TruOrganics
TruOrganics Color TrapEase 3 Color Match
Caribou Woodland Brown
Denali Vintage Lantern
Glacier n/a
Mohave Rope Swing
Sedona Tiki Torch
Yosemite Island Mist
Decking Installation
When installing the deck boards, you have the option of using starter
clips on your first row. Every other board will use the hidden fastener for
installation.
Starting Accessory Installation
1. After calculating the decking span and making the frame of your deck the
first board is ready to be installed.
2. First pre-drill into the joist then fix the starting accessory into the joist as
shown in Diagram 3.
3. Then take your first board and push it into the starting accessory as
shown in Diagram 4.
Tip: When face fastening it
is a best practice to line the
screw up with one of the
holes in the 3G decking.
90 angle
Joist
TruOrganics Board
5/8”
Diagram 1
1-1/2
Diagram 2
Diagram 3
Diagram 4
Questions? (888) 788-2254
www.CaliBamboo.com
TruOrganics Installation Guide
TruOrganics Universal Hidden Fastener Installation
1. Installing First Row
Fasten one edge of the first board at each
framing support using a quality 2-1/2” (64mm)
deck screw. It is important that this board is
straight and well secured.
Repeat steps 2 thru 4 until deck is complete.
3. Installing First Fasteners
While standing on deck board, install
provided screw at 45° angle through fastener
and into joist, while applying pressure on
fastener. Install one fastener and screw at
each support joist.
Make sure fastener body is vertical to deck
board and the screw is holding fastener down
tight to support joist. adjust torque setting
on screw gun to prevent spin out of the
screw head.
2. Position Fasteners
Fully insert Universal Hidden Fastener into
grooved edge of deck board. Screw hole
should line up with the center of support joist.
4. Completing Installation of Boards
Place next deck board into position against
fasteners. Slightly raise outer edge of board
being installed and slide board onto fastener
until board contacts spacer tabs.
Check gap between boards for consistency.
Apply force to ensure board is fully installed.
JOIST
HOUSE
Installation
Questions? (888) 788-2254
www.CaliBamboo.com
TruOrganics Installation Guide
Installation
Universal Butt Seam Clip Installation
1. Determine Location of Seam
Determine upon which joist your next row of
boards will have a seam. If this is not known
ahead of time it may be necessary to adjust
clip when butt seam location is determined.
Be sure to install a Universal Hidden Fastener
and Butt Seam Clip at the joist where the next
seam will land. If this is not known ahead of
time it may be necessary to adjust clip when
butt seam location is determined.
2. Position Boards
Install a Universal Hidden Fastener and Butt
Seam Clip into the groove of the deck board.
Position the fasteners towards the center of
the joist, leaving about a 1⁄4” gap between the
fasteners. Install screws provided at 45º angle
into joist.
3. Install Universal Hidden Fasteners and
Butt Seam Clip
When installing the next row. Make sure the
seam of the two boards is centered over the
joist. Install a Universal Hidden Fastener and
Butt Seam Clip on like shown in step 2.
4. Install Next Board
Install next board and continue with Universal
Hidden Fastener installation following
Universal Hidden Fastener instructions.
Please Note: TruOrganics boards should always have 3/16” expansion space between boards and 1/4”
expansion space on all butt ends.
Universal
Hidden
Fastener
Butt Seam
Clip
Joist Joist
1/4
gap
1/4
gap
Joist
1/4
gap
Questions? (888) 788-2254
www.CaliBamboo.com
TruOrganics Installation Guide
End Joint Installation without Universal Butt Seam Clips
All fasteners should be on their own independent joists. When two board ends meet each other, there must
be a sister joist. The end of each board must sit on its own joist as shown in Diagram 5.
All end joints need a minimum of 1/4” expansion gap from board to board.
Additional Installation Information
Metal Framing
Cali Bamboo considers metal framing to be a custom installation. It is an acceptable installation but please
note that it is up to the installer to provide the correct screws for the hidden fasteners as the screws that are
provided are for wooden joists only.
Number 7 or 8 self tapping screws are usually recommended. Contact the screw manufacturer to ensure
proper application.
Diagram 5
Installation
Sister Joist
Questions? (888) 788-2254
www.CaliBamboo.com
TruOrganics Installation Guide
End Cap Installation - Installing the End Caps
1. Place the end cap in front of the TruOrganics 3G boards holes and push in as shown in Diagram 5. If
additional pressure is needed to install the end caps a rubber mallet should be used.
2. Silicone (shown in Diagram 5) is recommended to be used on the end cap or inside the holes of the
board in order to secure the end caps and seal the end of the deck board.
3. When finished, the ends of the boards should look like Diagram 6 below.
Installation
Diagram 5 Diagram 6
Silicone
Additional Installation Information
Routing
Solid boards can be routed for hidden fasteners to be
placed in them as shown in Diagram 7. Please note that
boards should not be routed the entire length of the
deck.
Expansion Space in Extreme Climates: Manual
Equation
In extreme climates additional expansion space
between the boards may be necessary. Please
reference the formula below to calculate your
expansion space.
What you will need to know:
Coefficient of Linear Expansion (CLE): 0.04 mm/m (°C) / 20.2 x 10E-6 inch/inch/ (°F)
Installation Temperature (°C or °F)
Max or Minimum Temperature in your region (°C or °F)
A. When installing at a low temperature always use the maximum temperature in your region to calculate
B. When installing at a high temperature always use the minimum temperature in your region to calculate
Length of the Board (mm / inches)
Expansion space = Coefficient of Linear Expansion (CLE, °C or °F) x Length of the Board (mm / inches) x
(Max. or Min. Temp. in your region - Installation Temp., (°C or °F).
Diagram 7
Questions? (888) 788-2254
www.CaliBamboo.com
TruOrganics Installation Guide
Installation
Breaker Board Installation
When a length of more than two boards is needed to install the deck, we recommend adding a breaker
board as shown in Diagram 9. This will help minimize the appearance of normal expansion and contraction.
Diagram 8 and 9 show the framework and installation of the breaker board respectively.
Diagram 8 framework uses a ladder joist installation where the user is building a frame perpendicular to the
board that will be running down it.
Ladder Joist
Breaker Board
Hidden Fastener
Ladder Joist
Diagram 8
Diagram 9
Diagram 10
View from above of completed breaker
board with Universal Hidden Fastener cut
in half.
Note: The Universal Hidden Fastener
can be used as a breaker board clip
by cutting the square notch side of the
clip off. A blade rated for metal will be
needed for this.
Otherwise the breaker board should be
face screwed on both side every 16” for
the length of the board.
Questions? (888) 788-2254
www.CaliBamboo.com
TruOrganics Installation Guide
Installation
Sleeper System Installation
Make sure to fix any water run-off or pooling problems that may exist on the patio
The system must be solid, no floating systems allowed
Predrill holes for concrete screws
Sleepers need to be at least 1-1/2” in both width and height
Do not install sleepers on any lose substance such as dirt, concrete pavers or sand
Solid surface must be flat and level
Spacers are permitted (highly recommended) between sleeper system and concrete to improve drainage
Make sure to use code approved, weather and rot resistant material for your sleeper system
It is always recommended to use joist tape on your sleeper system to help protect against any possible
moisture
When installed, the screws holding the sleepers down should penetrate the concrete at least 1
Always install sleepers parallel to the water run off
Follow same joist spacing as regular deck install. Residential 16” on center, Commercial 12” on center
Always review all local building code before starting your project
Diagram 11
3/16 gap
1/4 gap
Minimum 1-1/2” height
Questions? (888) 788-2254
www.CaliBamboo.com
TruOrganics Installation Guide
Installation
Stair Tread Installation
Stair treads built with TruOrganics must meet
requirements set forth by major national building
codes. Consult your local municipality for
specific requirements.
Review Diagram 12 and reference the table
below with the maximum spacing from center to
center for stair tread installation.
A minimum of four (4) stringers are required.
Overhang on a stair tread should not exceed
more than 5/8”.
Remember to pre-drill before face fixing into the
board. Face fixing must happen at a 90-degree
angle and must be at least 1-1/2” by 1-1/2” from
the ends and width of the board.
Note: Stair treads should only be installed
using solid profiles. Using any type of hollow
board for stair treads will not be warrantied.
Maximum Spacing Center-to-Center on Stair
Stringers and Decking
Profile Dimensions Spacing
TruOrganics, Solid Board 5.5” x 0.9” 12”
Diagram 12
11” minimum
Stair Tread
Stringer
Minimum 3/16” gaping
36” Minimum width with 4
stringers required
  • Page 1 1
  • Page 2 2
  • Page 3 3
  • Page 4 4
  • Page 5 5
  • Page 6 6
  • Page 7 7
  • Page 8 8
  • Page 9 9
  • Page 10 10
  • Page 11 11
  • Page 12 12
  • Page 13 13

CALI 7516000400 Installation guide

Type
Installation guide

Ask a question and I''ll find the answer in the document

Finding information in a document is now easier with AI