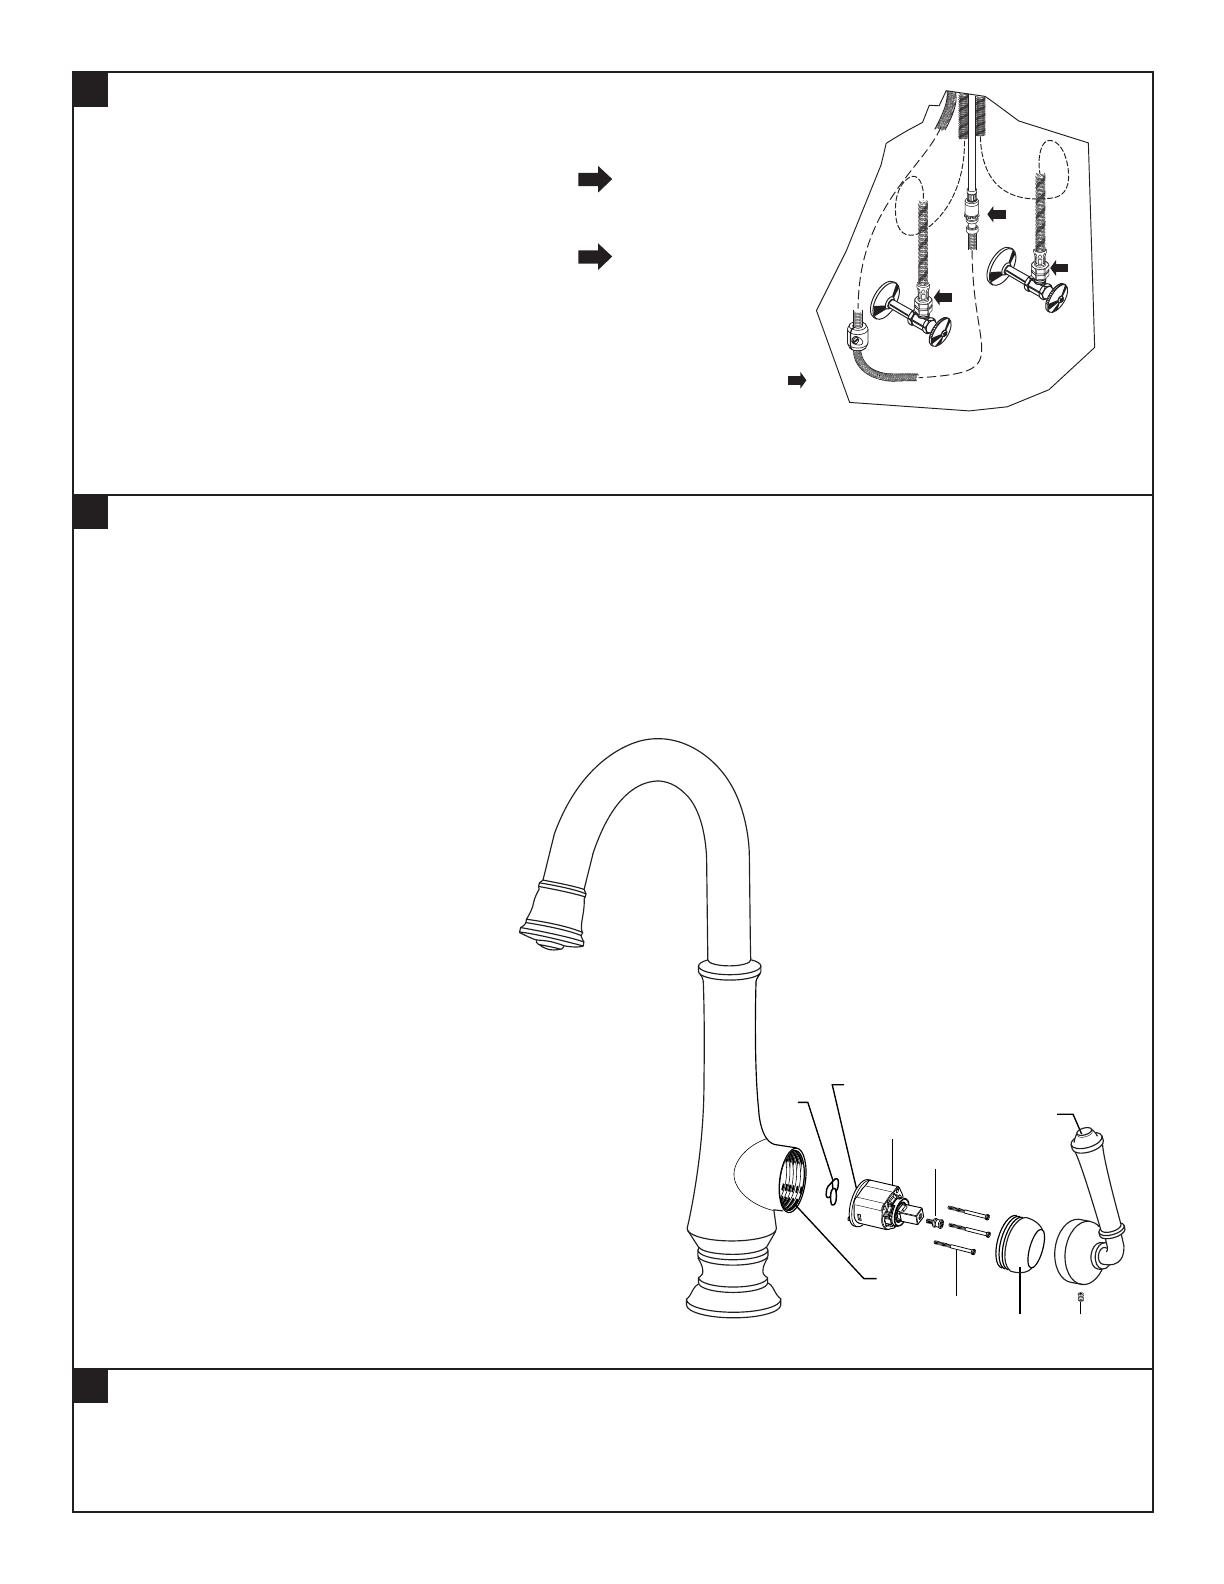
American Standard 4279410.002 Installation guide

Category
Sanitary ware
Type
Installation guide

This manual is also suitable for

- 1 -
Product names listed herein are trademarks of AS America, Inc.
© AS America, Inc. 2016
Thank you for selecting American Standard...
the benchmark of fine quality for over 100 years.
To ensure that your installation proceeds smoothly-please read
these instructions carefully before you begin.
RECOMMENDED TOOLS
1
M965788 (1/17)
INSTALL FAUCET WITH OR WITHOUT DECK ESCUTCHEON
DELANCEY
Pull-Down Bar Kitchen Faucet
Plumbers' Putty or CaulkingAdjustable WrenchPhillips ScrewdriverFlat Blade Screwdriver
Certied to comply with ANSI A112.18.1M
CAUTION
Turn off hot and cold water
supplies before beginning.
INSTALLATION
INSTRUCTIONS
4279.410
Certied to comply with ANSI A112.18.1M
SPOUT BASE
SINK OR
MOUNTING
SURFACE
8
2
1
3
4
7
6
5
Make certain the SEAL (8) is properly seated in recess of faucet body. Insert supply HOSES (1), SPRAY HOSE (6) and
SHANK (2) through mounting hole and seat SPOUT BASE onto sink or mounting surface. Do not use putty.
Insert HOSES (1) through RUBBER WASHER (3),
BRASS WASHER (4), and threaded LOCKNUT (5).
Assemble RUBBER WASHER (3), BRASS WASHER (4),
and threaded LOCKNUT (5) onto SHANK (2) from
underside of sink or mounting surface. Hand tighten
LOCKNUT (5).
Use a screwdriver to tighten SCREWS (7) on LOCKNUT (5).
Work your way around LOCKNUT (5), tightening the screws
slightly each time until all are snug to ensure even pressure.
- 2 -
2
M965788 (1/17)
• Turn off hot and cold water supplies before beginning.
Connect FLEXIBLE SUPPLY HOSES (1, 2) directly to wall
supplies. Connection on tting supplies are 3/8"
compression. Connect left supply hose (Red Stripe) to Hot
wall supply. Connect right supply hose (Blue Stripe) to Cold
wall supply. Use adjustable wrench to tighten connections.
Do not over tighten.
*
Faucet supplies are 32 " long from faucet base.
Note: If additional supply length is required, installer
must purchase additional parts separately.
Important: If SUPPLY HOSES (1, 2) are too long,
loop as illustrated to avoid kinking.
MAKE WATER SUPPLY CONNECTIONS
RED
STRIPE
BLUE
STRIPE
1
2
COLD
HOT
3
CONNECT SPRAY HOSE AND INSTALL WEIGHTS
Push the SPRAY HOSE END (1) into the HOSE
CONNECTOR (2) and slide down the LOCKING
COLLAR (3) until it snaps into place.
With HAND SPRAY (4) seated in SPOUT (5), install
WEIGHT (6) at labeled area on HOSE (7), secure
with SCREW (8).
4
TEST INSTALLED FAUCET
Turn ON water at main supply.
With HANDLE (1) in “off” position,
unthread SPRAY (3) from HOSE (2).
Operate handle back to front,
in COLD and HOT positions,
to ush water lines thoroughly.
Replace SPRAY (3) onto
HOSE (2).
7
6
8
2
1
3
4
5
2
3
1
REMOVE
COLD
ON
OFF
HOT
- 3 -
6
SERVICE
5
M965788 (1/17)
• Move HANDLE (1) into “off” position.
Turn on water supplies and check connections for leaks.
Operate HANDLE (2) up and down, left and right to ush
water lines thoroughly.
• Operate HAND SPRAY and check connections for leaks.
CHECK CONNECTIONS FOR LEAKS
CHECK CONNECTIONS
FOR LEAKS
If Faucet Drips, Proceed As Follows:
• Turn VALVE to OFF position.
Operate HANDLE several times from OFF to ON position. Do not apply excessive force.
Reduced Flow:
• Clean out spray head screen.
Clean out cartridge.
Clogged CARTRIDGE outlets or inlets may
cause reduced flow.
To clean, rst turn off water supply then:
Loosen HANDLE SCREW (1) and remove
HANDLE (2).
Unthread ESCUTCHEON CAP (3) and
ADAPTER (8). Unthread three
MOUNTING SCREWS (4).
Lift CARTRIDGE (5) off MANIFOLD (6) and
remove CARTRIDGE SEALS (7).
Clean MANIFOLD (6), CARTRIDGE (5)
ports and SEALS (7).
Place SEALS (7) into CARTRIDGE
PORTS (5a).
Place CARTRIDGE (5) onto
MANIFOLD (6) tighten ADAPTER (8)
and tighten MOUNTING SCREWS (5)
alternately.
Replace ESCUTCHEON CAP (4),
HANDLE (2), tighten HANDLE
SCREW (1).
3
4
5
5a
2
1
8
6
7
7
DO: CLEAN WITH CLEAR WATER. DRY WITH A SOFT COTTON FLANNEL CLOTH.
DO NOT: DO NOT CLEAN THE PRODUCT WITH SOAPS, ACID, POLISH, ABRASIVES, HARSH CLEANERS, OR A
CLOTH WITH A COARSE SURFACE.
CARE INSTRUCTIONS:
- 4 -
HOT LINE FOR HELP
For toll-free information and answers to your questions, call:
1 (800) 442-1902
Mon. - Fri. 8:00 a.m. to 8:00 p.m. EST
Saturday 10:00 a.m. to 4:00 p.m. EST
IN CANADA 1-800-387-0369
(TORONTO 1-905-306-1093)
Weekdays 8:00 a.m. to 7:00 p.m. EST
IN MEXICO 01-800-839-1200
DELANCEY
Pull-Down Bar
Kitchen Faucet
MODEL NUMBER
4279.410
M965788 (1/17)
8
Hose doesn’t retract
Hose doesn’t fully dock to spout
PROBLEM
Make sure the hose is not tangled up under the sink. Try to correct it by spinning the
spout 360˚.
Move up weight from one to three inches above the attached hose labels.
SOLUTION
M911793-0070A
Seal
M962146-0070A
Mounting Kit
M951483-0070A
Cartridge
M918511-0070A
Cartridge Screws
M907315-YYY0A
Escutcheon Cap
M970240-YYY0A
Spray Assembly
M970249-0070A
Weight
M970238-YYY0A
Handle Kit
M970223-0070A
Set Screw
M964766-0020A
Hand Spray Hose
M922909-0070A
Aerator
Replace the “YYY” with
appropriate finish code
POLISHED CHROME 002
POLISHED NICKEL 013
LEGACY BRONZE 278
STAINLESS STEEL 075
  • Page 1 1
  • Page 2 2
  • Page 3 3
  • Page 4 4

American Standard 4279410.002 Installation guide

Category
Sanitary ware
Type
Installation guide
This manual is also suitable for

Ask a question and I''ll find the answer in the document

Finding information in a document is now easier with AI