Page is loading ...

ANCHOR AUDIO CUSTOMER SERVICE
888-444-6077
CONTENTS
GETTING STARTED & SYSTEM ACCESSORIES ......................................................................................................... 2
CONNECTING ANTENNAS & POWER SUPPLY ........................................................................................................ 3
CHARGING RECHARGEABLE BATTERIES ................................................................................................................ 4
BASIC SYSTEM OPERATION ................................................................................................................................. 4/5
OPERATING THE WIRELESS RECEIVER ................................................................................................................... 6
OPERATING THE WIRELESS MICROPHONE / TRANSMITTER ................................................................................. 7
HAVING TROUBLE W/ YOUR WIRELESS SYSTEM? .................................................................................................. 8
UHF-6400 TECHNICAL SPECIFICATIONS ................................................................................................................ 8
HAVING TROUBLE W/ YOUR WIRELESS SYSTEM?
CONDITION POSSIBLE CAUSE
No Sound • check the power supply of the microphone and receiver
• check that the transmitter and receiver are tuned to the same frequency
• check whether the hi-fi appliance is switched on and the receiver output is connected to the
audio mixer or amplifier input
• check whether transmitter is too far away from receiver or SQUELCH control set too high
• check whether receiver is located too near metal object or there are obstructions between
the transmitter and receiver
Sound Interference • check the antenna location
• when using 2 or more microphone sets simultaneously, make sure that the chosen frequen-
cies do not interfered
• check whether the interference comes from other wireless microphones, TV, radio and etc.
Distortion • check the receiver volume level is set too high or too low
• check whether the interference comes from other wireless microphones, TV, radio and etc.
Anchor Audio, Inc.
Portable Sound Systems • Torrance, California
100-0133-000/B - 1/07
OWNER’S MANUAL
64 CHANNEL UHF
ANCHOR WIRELESS UHF SYSTEM
UHF-6400 TECHNICAL SPECIFICATIONS
WR-6400 – UHF Receiver
Receiving System PLL Synthesized, 64 CH
Frequency Stability ± 0.005%
S/N Ratio > 94 dB, 48KHz deviation &
60 dBμV antenna input
Image & Spurious Rejection 80 dB minimum
Sensitivity 6 dBμV
Selectivity > 50 dB
AF Response 50 Hz – 15 KHz
(± 3 dB)
T.H.D. < 1%
(@ 1 KHz)
Modulation Mode FM
IF Frequency 1st 56 MHz / 2nd 10.7 MHz
Dynamic Range > 96 dB
Tone Signal 32.768 KHz
Audio Output Balanced & unbalanced
Power Supply 12V DC
Frequency Stability ± 0.005%
Dimensions
(HWD)
1.77x16.54x7.1” / 45x420x180 mm
(Specifications subject to change without notice)
WH-6400 / WB-6400 – UHF Transmitters
RF Power Output 10mW
Oscillation Mode PLL synthesized
Frequency Stability ± 0.005%
Max. Deviation ± 48 KHz
Spurious Emission > 60 dB below carrier freq.
Microphone Capsule
Handheld Uni-directional dynamic or
electret condenser
Lavaliere Uni-directional electret condenser
Sensitivity 6 dBμV
T.H.D. < 1% @ 1 KHz
Tone Key 32.768 KHz
Operating Voltage 2 x DC 1.5V “AA” batteries
Consumption 65 mA ± 10 mA
Operating Time 20 hours
Dims Handheld 2.17 dia x 10.50” / 55 dia x 267 mm
Dims Body Pack 3.86x2.60x1.02” / 98x66x26 mm

72
A MESSAGE FROM THE OWNER
Thank you for choosing an Anchor Audio portable sound system. Our products incorporate state-of-the-art design and the finest
quality of materials and workmanship. We’re proud of our products and appreciate the confidence which you have shown by se-
lecting an Anchor system.
I hope you’ll take a few minutes to review this manual. We’ve incorporated several unique features into our products, and your
knowledge of how to use them will enhance the performance and your enjoyment of the system.
David Jacobs, President
on behalf of all Anchor Employees
GETTING STARTED
Please check your new unit carefully for any damage which may have occurred during shipment. Each Anchor product is carefully
inspected at the factory and packed in specially designed boxes for safe transport.
Notify the freight carrier immediately of any damage to the shipping box or product. Repack the unit in the original box and wait
for inspection by the carrier’s claim agent. Notify your dealer of the pending freight claim.
NOTE: All damage claims must be made with freight carrier!
RETURNING SYSTEMS FOR SERVICE OR REPAIR
For service or repair, please contact the dealer you purchased your system from or Anchor Audio Customer Service at (888) 444-6077
to obtain a RA
(Return Authorization)
number. All shipments to Anchor Audio must include an RA number and must be shipped
prepaid. C.O.D. shipments will be refused and returned at your expense.
IMPORTANT: Save the shipping box & packing materials,
they were specially designed to ship your unit!
WARRANTY REGISTRATION
Visit our website at www.anchoraudio.com and select “Warranty Registration”. Complete the online form to activate the six-year
limited warranty on your Liberty sound system and two-year limited warranty for the CD player and microphones.
ANCHOR WIRELESS 64 CHANNEL UHF SYSTEMS & ACCESSORIES
UHF-6400US/HH 64 CHANNEL RECEIVER & HANDHELD MICROPHONE/TRANSMITTER
UHF-6400US/BP 64 CHANNEL RECEIVER & BODY-PACK TRANSMITTER W/ HANDS FREE MICROPHONE
WIRELESS ACCESSORIES
WH-6400 64 channel wireless handheld microphone/transmitter
WB-6400 64 channel wireless body-pack transmitter for hands free microphone
(microphone not included - see below)
CM-60 Lightweight, low-profile collar microphone - works w/ the WB-6400 transmitter
EM-60T UltraLite “Over-the-Ear” hands free microphone - works w/ the WB-6400 transmitter
HBM-60 Ultra-lightweight headband microphone - works w/ the WB-6400 transmitter
LM-60 Lightweight, clip-on lapel microphone - works w/ the WB-6400 transmitter
USING YOUR WIRELESS MICROPHONES
After you have set the transmitter channel
(see above)
you are ready to use your wireless microphone:
CAUTION: Harmful feedback may occur when walking in front of a sound system or
speaker with a wireless microphone. Always point microphone away from speakers!
1. Body-pack transmitter users must insert the mic
plug into the transmitter jack marked MIC
2. Turn the transmitter power switch to ON
(The red LED will flash when the mic is turned on.
If the red LED stays on, the battery is low)
3. Turn the receiver power switch to ON
4. The RX & AF indicators will light when the wireless
signal is being transmitted and received
OPERATING THE WIRELESS MICROPHONE / TRANSMITTER
CHANNEL SELECTION - HANDHELD TRANSMITTER
1. Unscrew battery cover on bottom of microphone
2. Set the CHANNEL & GROUP SELECTOR dials to
match the setting of your receiver
3. Replace battery cover and tighten firmly
CHANNEL SELECTION - BODY-PACK TRANSMITTER
1. The selection dials are located on the
side of the transmitter
2. Set the CHANNEL & GROUP SELECTOR dials to
match the setting of your receiver
NOTE: When using dual wireless, each microphone must be set to a different channel!
REPLACE BATTERY - HANDHELD TRANSMITTER
1. Unscrew battery cover on bottom of microphone
2. Replace old batteries with 2 fresh size ‘AA’
alkaline batteries
3. Replace battery cover and tighten firmly
REPLACE BATTERY - BODY-PACK TRANSMITTER
1. Slide open battery cover on front of transmitter
2. Replace old batteries with 2 fresh size ‘AA’
alkaline batteries
3. Replace battery cover by sliding firmly into place
NOTE: Transmitter power must be OFF when changing batteries!

DIVERSITY WIRELESS BY ANCHOR AUDIO
Anchor Audio UHF wireless is a 64 channel, diversity wireless system that receives signals with two independent antennae.
With diversity wireless the receiver processes the stronger signal, effectively minimizing dropouts and interference from other
transmitting sources. The antennae are mounted internally so there are no obstructions or risk of damage.
CHANNEL SELECTION - BASE STATION RECEIVER
Before you can use your UHF wireless system, you will need to select a wireless frequency, set the receiver, and microphone
transmitter, to that channel.
1. Choose from any of the 64 available wireless channels
2. Set the receiver “GROUP“ & “CHANNEL” selector knobs to the channel/frequency you have chosen
If you are using more than one wireless receiver repeat above for the each receiver. Remember each receiver/transmitter pair
must be set to different channels for proper operation.
NOTE: Ongoing wireless interference? The frequency you selected may be in use by
other systems in the area! Change channels until you find a clear frequency!
3
FCC STATEMENT
This device complies with part 15 of the FCC rules. Operation is subject to the following two conditions:
(1) This device may not cause harmful interference and
(2) This device must accept any interference received, including interference that may cause undesired operation.
NOTICE: The changes or modifications not expressly approved by the party responsible for compliance could void
the user’s authority to operate the equipment.
IMPORTANT NOTE: To comply with the FCC RF exposure compliance requirements, no change to the antenna or the
device is permitted. Any change to the antenna or the device could result in the device exceeding the RF exposure
requirements and void user’s authority to operate the device.
SAFETY
• Do not spill liquid on the unit and do not drop it on a hard concrete floor.
• Do not place the unit near heat sources such as radiators, amplifier, or etc.
• Do not expose to direct sunlight, extreme dust, excessive moisture, or vibration.
• Remove batteries from transmitter if the unit will not be used for a long period
to avoid the damage resulting from a leaking or otherwise defective battery.
ENVIRONMENT
• Do not throw used batteries into a fire or garbage bin with domestic rubbish. Be sure to dispose of used
batteries in accordance with local waste disposal rules.
• When disposing of the equipment, remove the batteries, separate the case, circuit boards and cables, and
dispose of all components in accordance with local waste disposal rules.
CONNECTING ANTENNAS & POWER SUPPLY
Connect both antennas to the receiver back panel for proper operation.
1. Screw antennas onto TNC connectors on receiver back panel
2. Position antennas pointing upward and slightly to the sides
Connecting the AC adapter to the receiver back panel.
1. Insert AC adapter into the DC IN connector
on receiver back panel
2. Plug AC adapter into electrical outlet
3. Push receiver Power knob on front panel
CONNECT RECEIVER TO AUDIO MIXER OR AMPLIFIER
Connect the receiver output to the audio mixer or amplifier input, using a standard audio cable with 3-pin XLR connectors
or “M”
(6.3mm)
phone plugs.
To assure sound quality and avoid distortion, please adjust receiver volume level according to the following instructions.
When using a standard audio cable with 3-pin XLR connectors or “M”
(6.3mm)
phone plugs to connect into:
MIC IN on audio mixer or amplifier, turn the Volume control
to the 1 o’clock position, the output level for balanced and
unbalanced output is about 77mV.
LINE IN on the audio mixer, turn the Volume control to the
MAX position, the output level for balanced and unbalanced
output is about 770mV.
6
ANTENNA A
ANTENNA B
ANTENNA INPUT CONNECTORS
DC IN JACK

BASIC SYSTEM OPERATION
NOTE: Fully Charge Batteries Before First Use!
1. Set all Input Level Controls to minimum & Tones Controls to flat
or the middle setting before turning your system on
2. Plug a wired microphone into the MIC 1 or MIC 2 jacks and/or
plug an audio source into the LINE-IN jack
3. Switch POWER to ON, the red BATTERY LED will light
4. Slowly increase the Level Control for the input jacks used to the
desired volume
5. Set SPEECH PROJECTION to ON for speech applications or
OFF for standard applications
(music & indoor use)
6. Adjust BASS & TREBLE controls to desired sound quality
5
4
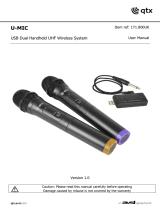
UHF-6400 RECEIVER FRONT & BACK PANELS
MODEL SHOWN: WR-6400
NOTE: Setting squelch too high will reduce the usable range of the system.
ANTENNA A:
INPUT CONNECTOR
BALANCED OUTPUT
3-pin XLR connector
provides balanced
low-impedance output
UNBALANCED OUTPUT
“M”
(6.3mm)
phone jack
provides unbalanced
low-impedance output
DC IN
Input connector
for AC adapter
ANTENNA B:
INPUT CONNECTOR
TNC-type connector provides
connection to supplied antennas
or coaxial cable used w/
antenna divider, antenna
boosters or remote antennas
SQUELCH
Adjusts output level to
suppress noise
(Set to minimum before
turning receiver on)
HEADPHONE INPUT
CONNECTOR
Plug headphone into this
“M”
(6.3mm)
connector to
monitor receiver audio
AF LEVEL INDICATORS
Five LEDs light to indicate audio signal strength
Green = Normal Operation
RED = Approaching Overload Condition
CHANNEL SELECTOR
Rotate knob to choose
channel number.
RF LEVEL INDICATORS
Five LEDs per RF antenna channel
glow to indicate RF signal strength
NOTE: If no LEDs are lit no signal
is being received
GROUP SELECTOR
Rotate knob to choose
group number.
LED DISPLAY:
CHANNEL NUMBER
LED DISPLAY:
GROUP NUMBER
CHARGER INPUT
Connect the supplied DC 1.5mm cable
to the receiver and the microphone,
and it takes around 10 hours to re-
charge and the LED of transmitter is
flashing all the time.
LEVEL CONTROL
Rotate to adjust the receiver output
level to match the input sensitivity
of an audio mixer or amplifier.
POWER
Push to turn the
receiver on & off
HEADPHONE MONITOR
VOLUME CONTROL
Turn knob to control
headphone volume level
NOTE: Never use the balanced & unbalanced
audio outputs the same time!
Signal loss or increased noise may occur.
CHARGING RECHARGEABLE BATTERIES
IMPORTANT: Only use for rechargeable batteries.
Attempting to recharge normal batteries will cause damage to the unit.
1. Connect the supplied DC 1.5 cable to DC OUT on the receiver
front panel.
2. Connect the other end of the cable to the charging input on
the bottom of the microphone/transmitter.
3. Charging takes approximately 10 hours to complete.
NOTE: Transmitter LED will flash during charging.
/