Digi Serial Servers Application Note
Simple Serial Bridge / Tunnel and Loopback Test
Jun 2011 v.1 Digi International 1 of 5
1. Configure Digi PortServer TS for Serial Bridge and TCP Socket
loopback test.
Objective: Configure a Serial tunnel or bridge between 2 devices or between a computer and a
serial device (Cable Replacement) and show how to test / troubleshoot communication with a
Loopback connector.
1.1 Software Requirements
- Digi Device Discovery
- PuTTy or any Terminal application
- Loopback connector
1.2 Hardware Requirements
- 2 Digi Serial Server device
Scenario 1
In this scenario we will build a cable replacement between a computer and a serial device or a computer /
terminal using 2 Digi Portserver TS configured in TCP Socket mode.
TS1
TCP Server
TS2
TCP Client
SERIAL
Network
Serial Device or
Computer / Terminal
SERIAL
Scenario 2
In this scenario we will proceed with a loopback test between the computer and a Digi Portserver TS
configured in Realport mode.
SERIAL
Loopback
Connector
Digi Serial Servers Application Note
Simple Serial Bridge / Tunnel and Loopback Test
Jun 2011 v.1 Digi International 2 of 5
2. Serial Tunneling between 2 Serial servers.
a) Connect your computer serial ports to the port 1 of the PortServer TS and your serial device or
computer/terminal to the Port 1 of the second PortServer TS.
b) Using Digi Device Discovery, locate your device on the network. Double click on the unit that is
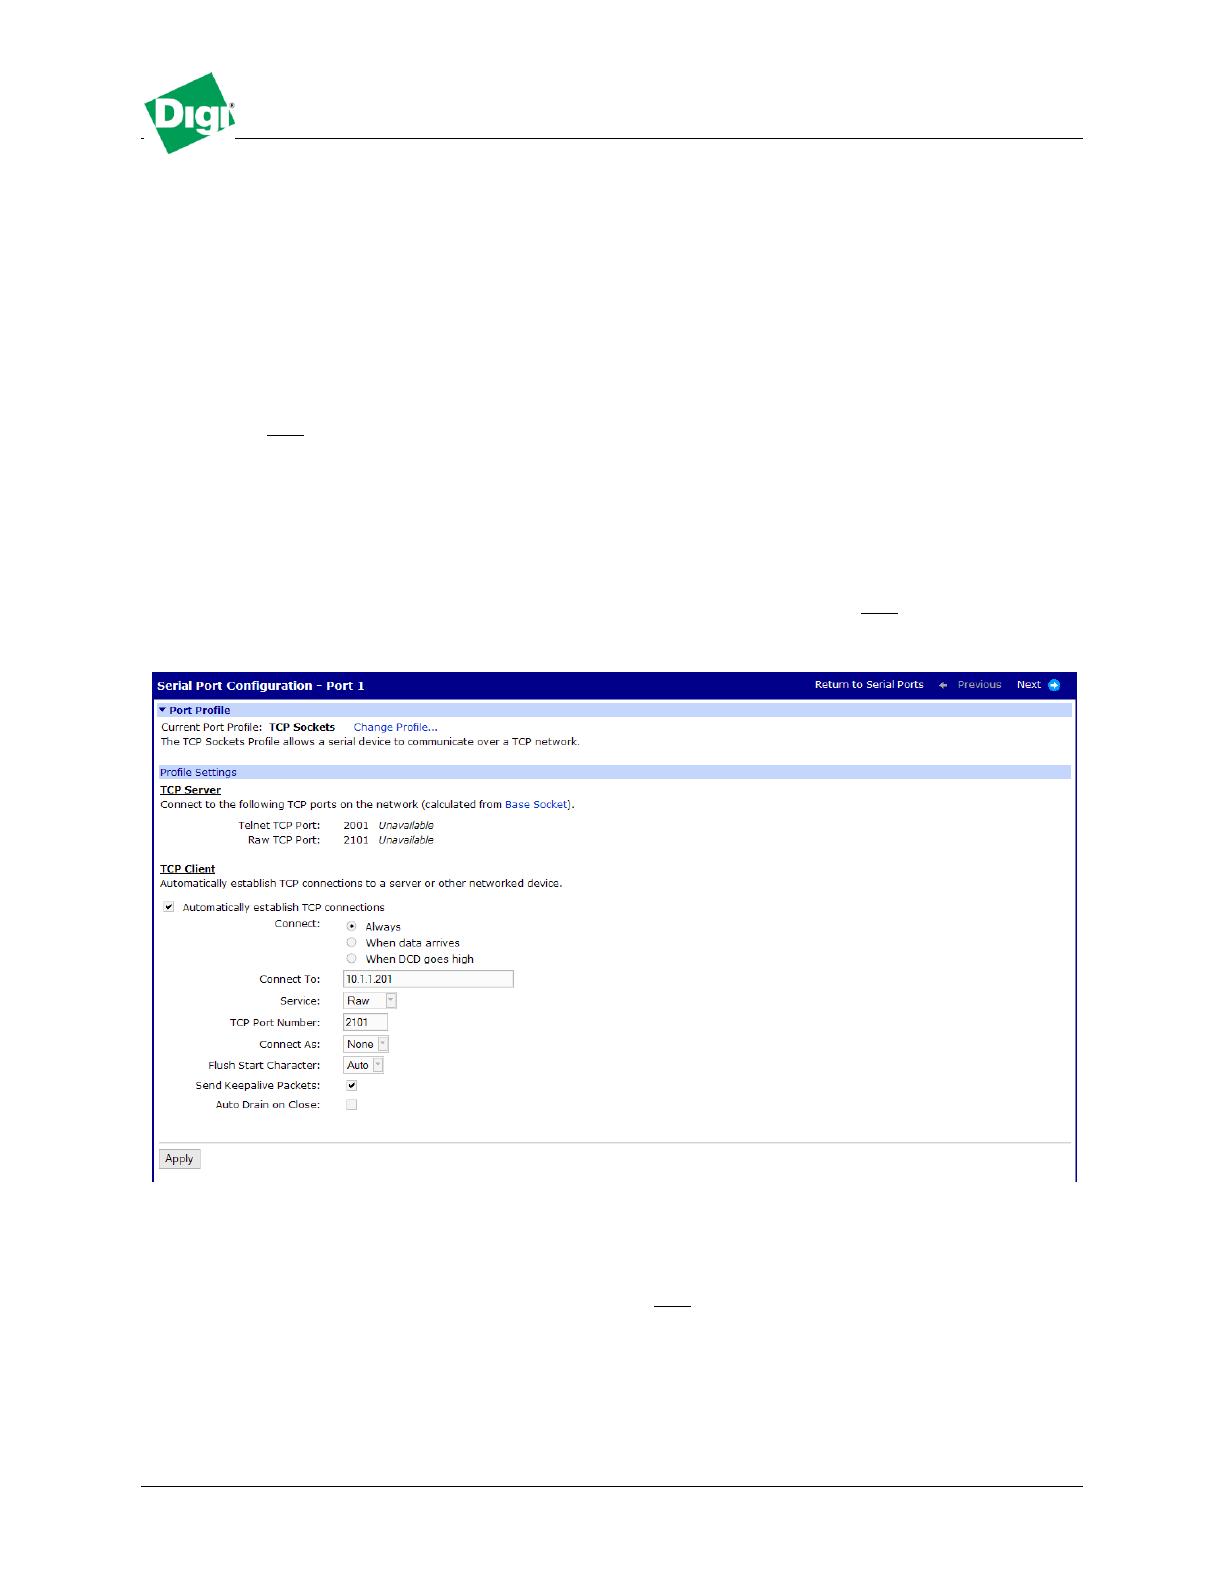
designated as TS2 in our example which will be the TCP Client.
c) In the web interface, navigate to Configuration > Serial Port , select Port 1 and click Change
Profile or if the port was in an “Unassigned” state, you will be prompted to chose a profile, select TCP
Socket and click Apply.
d) In the TCP Client section, check the “Automatically establish TCP Connections” box, select
Connect type as Always, and in the Connect To box, enter the IP address of the TS1 device. Click
Apply.
e) Navigate to Basic Serial Settings and select the desired serial ports speed and settings for your
application.
f) Go back to Digi Device Discovery, double click on the TS1 unit, on the web interface repeat the above
steps except for the Client part, as this unit will be the TCP Server. Click Apply.
Digi Serial Servers Application Note
Simple Serial Bridge / Tunnel and Loopback Test
Jun 2011 v.1 Digi International 3 of 5
e) Depending on your setup, if you have a serial device, open the application needed to connect to it, data
will be transferred from your computer COM ports, through the 2 PortServer and sent to your device. If
you have another computer/terminal, open your Terminal application such as PuTTY, select your
computer COM port and the serial port settings defined previously on the web interface.
Data sent from your terminal should appear on the other computer/terminal like shown here :
Local PC connected to TS2 sending “Digi test” :
Remote computer connected to TS1 receiving “Digi test” :
Digi Serial Servers Application Note
Simple Serial Bridge / Tunnel and Loopback Test
Jun 2011 v.1 Digi International 4 of 5
3. Testing Serial communication with Loopback test through TCP
Socket.
In some situations, where communication to an end device is not working, it is essential to proceed with
basic tests, such as verifying that connectivity from your computer to the Digi and then the serial
communication itself works fine, therefore the loopback test will provide you with a confirmation that
unit is communicating fine.
a) Using Digi Device Discovery, locate your device on the network and double click on it. Navigate to
Configuration > Serial Ports and select the TCP Socket profile. Click Apply
b) Apply this to every serial ports by going to Configuration > Serial Ports click on the “Copy” link
next to Port 1 in the Action column, in the next window select all the ports of the device and click Apply
c) Connect the loopback connector provided in the package of your Portserver to the 1
st
serial port.
d) Open your terminal application such as PuTTY, select RAW as connection type, enter the IP Address
of the PortServer in the Hostname field and Port : 2101 click OK/Open
Digi Serial Servers Application Note
Simple Serial Bridge / Tunnel and Loopback Test
Jun 2011 v.1 Digi International 5 of 5
e) Send any characters from the Window, this should provide with an Echo of what is being send (or press
ENTER after typing characters) meaning that the data is going through the network in the loopback and
back to your terminal application, and confirms communication is working as intended.
Repeat those steps for each serial ports.
Line 1 is data sent, line 2 is received data.
  • Page 1 1
  • Page 2 2
  • Page 3 3
  • Page 4 4
  • Page 5 5

Ask a question and I''ll find the answer in the document

Finding information in a document is now easier with AI