Page is loading ...

Client: PIL (Wal*Mart)
Project: 169209
Language: EN
Date: 13.07.2009
Version: 17
Page: 1 (of 18 pages)
12 CUP DIGITAL
Coffee mAker
Model Number:
169209
UPC: 681131692090
Customer Assistance
1 877 207 0923 (US)
1 877 556 0973 (Canada)
Thank you for purchasing this GE appliance.
In keeping with the GE ecomagination initiative, please consider the option to recycle
the packaging material and donate any appliance you are no longer using.
To read more about GE's ecomagination commitment, visit:
ge.ecomagination.com
CM-169209-17 (EN).indd 1 7/13/2009 5:09:05 PM

Client: PIL (Wal*Mart)
Project: 169209
Language: EN
Date: 13.07.2009
Version: 17
Page: 2 (of 18 pages)
IMPORTANT SAFEGUARDS
When using electrical appliances, basic safety precautions should always be followed to
prevent the risk of fire, electric shock, burns, or other injuries or damages.
• Read all instructions before use.
• Do not touch hot surfaces. Use handles or knobs.
• To protect against fire, electrical shock and injury to persons do not immerse cord,
plugs, or the appliance
in water or other liquids.
• Close supervision is necessary when any appliance is used by or near children.
• Unplug from outlet when not in use and before cleaning. Allow it to cool before
putting on or taking off parts and before cleaning the appliance.
• Do not operate appliance with a damaged cord or plug, or after the appliance
malfunctions or has been dropped or damaged in any manner. Call our toll-free
customer assistance number for information on examination, repair, or adjustment.
• The use of accessory attachments not recommended by the appliance
manufacturer
may result in fire, electric shock or injuries to persons.
• Do not use outdoors or in a damp area.
• Do not let cord hang over
edge of table or counter, or touch hot surfaces.
• Do not place on or near a hot gas or electric burner, or in a heated oven.
• To disconnect the appliance, turn control to “off”, then remove plug from the wall
outlet.
• Do not use this appliance for anything other than its intended use.
• Do not touch the keep warm plate
(11) when the coffee maker is on.
• Scalding may occur if the coffee-filling lid
(2) is opened during the brewing cycles.
• Never leave the empty carafe
(13) on the keep warm plate (11) when the coffee
maker is on. Otherwise the carafe
(13) is liable to crack.
• Do not set a hot carafe on a cold surface.
• Do not use a cracked carafe or a carafe having a loose or weakened handle.
• Do not clean carafe with cleansers, steel wool pads, or other abrasive material.
• To reduce the risk of fire or electric shock, do not remove the bottom cover on the
appliance. No user serviceable parts inside. Call our toll-free customer assistance
number for repair.
• The carafe is designed for use with this appliance. It must never be used on a range
top.
SAVE THESE INSTRUCTIONS!
2
CM-169209-17 (EN).indd 2 7/13/2009 5:09:05 PM

Client: PIL (Wal*Mart)
Project: 169209
Language: EN
Date: 13.07.2009
Version: 17
Page: 3 (of 18 pages)
ADDITIONAL SAFEGUARDS
This appliance is for HOUSEHOLD USE ONLY.
DO NOT OPERATE APPLIANCE IF THE LINE CORD SHOWS ANY DAMAGE OR IF
APPLIANCE WORKS INTERMITTENTLY OR STOPS WORKING ENTIRELY.
EXTENSION CORDS
A short power-supply cord is to be provided to reduce the risk resulting from becoming
entangled in or tripping over a longer cord. Longer detachable power-supply cords or
extension cords are available and may be used if care is exercised in their use. If a longer
detachable power-supply cord or extension cord is used,
1) The marked electrical rating of the cord set or extension cord should be at least as
great as the electrical rating of the appliance, and
2) The longer cord should be arranged so that it will not drape over the countertop or
tabletop where it can be tripped over, snagged, or pulled on unintentionally
(especially by children).
POLARIZED PLUG
This appliance has a polarized plug (one blade is wider than the other). To reduce the risk
of electric shock, this plug is intended to fit into a polarized outlet only one way. If plug
does not fit fully into the outlet, reverse the plug. If it still does not fit, contact a qualified
electrician. Do not attempt to modify the plug in any way.
3
CM-169209-17 (EN).indd 3 7/13/2009 5:09:05 PM

Client: PIL (Wal*Mart)
Project: 169209
Language: EN
Date: 13.07.2009
Version: 17
Page: 4 (of 18 pages)
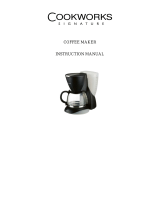
PARTS
1. Measuring scoop
small scoop: brewing standard coffee
large scoop: brewing Gourmet coffee
2. Coffee-filling lid
3. Drip head
4. Water tank lid
5. Condensation control
6. Splash guard
7. Control panel
8. Water-level indicator
12 cup scale: brewing
standard coffee
8 cup scale: brewing
Gourmet coffee
9. Water tank
10. Cord storage
11. Keep warm plate
12. Power cord with plug
13. Carafe
14. Grip handle
15. Carafe lid
16. Charcoal filter
17. Charcoal filter holder
18. Filter basket (with drip stop valve)
19. Permanent filter
4
13
12
14
15
19
17
18
1
2
3
5
6
4
8
10
7
11
9
16
standard
gourmet
standard
gourmet
CM-169209-17 (EN).indd 4 7/13/2009 5:09:05 PM

Client: PIL (Wal*Mart)
Project: 169209
Language: EN
Date: 13.07.2009
Version: 17
Page: 5 (of 18 pages)
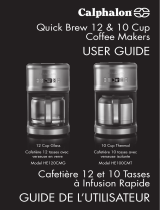
PARTS
20
28
30
21
22
23252627
29
24
Name Function
20 auto button
Starts programmed operation
21
clean indicator / button
Clean cycle due indicator
Starts clean cycle
22 TSB button
To show time since brewing completed (counts up)
23 min button
Sets minutes (time/program)
24 prog button
Sets and saves program
25
off button
Sets the keep warm duration
26 hr button
Sets hours (time/program)
27
button
Adjusts warming plate temperature
28
gourmet button
Gourmet brewing option
29
button
On/Off,
starts manual brewing cycle
30
LCD display Shows time/program time/TSB time/error message
5
CM-169209-17 (EN).indd 5 7/13/2009 5:09:05 PM

Client: PIL (Wal*Mart)
Project: 169209
Language: EN
Date: 13.07.2009
Version: 17
Page: 6 (of 18 pages)
6
j
k
ca
b
g
i
h
l
ILLUSTRATIONS
d
e
f
b
CM-169209-17 (EN).indd 6 7/13/2009 5:09:16 PM

Client: PIL (Wal*Mart)
Project: 169209
Language: EN
Date: 13.07.2009
Version: 17
Page: 7 (of 18 pages)
OPERATION
Before first use
• Remove packaging materials, labels and stickers from coffee maker.
• Clean coffee maker thoroughly before using for the first time (
Cleaning).
• Insert the charcoal filter
(16) into the charcoal filter holder (17). The use of the
charcoal filter is optional. Use only if needed.
NOTE: To clear the coffee maker of residue fill the water reservoir to the maximum level
mark with fresh water and run brew cycle. Repeat procedure at least once.
Extra features
• The drip stop valve (18) function allows you to remove carafe (13) during the brewing
cycle to serve a cup of coffee (replace carafe
(13) within 30 seconds) (ill.
h
).
• Condensation control
(5) allows water that has accumulated under the coffee-filling
lid
(2) to flow into the filter area when the lid (2) is raised.
• Charcoal filter holder
(17) with charcoal filter (16) (use is optional).
• Cord storage
(10) for easy storing of the power cord (12) (ill.
f
).
• Extra-large brew basket
(18/19).
• The specially designed spout on the carafe allows for faster pours with no dribbles.
• The oversized drip head saturates and soaks all the grounds for richer coffee flavor.
• While using the Auto Program Function, coffee will finish brewing at the programmed
time.
Setting time
• Setting the coffee maker to the current time is required in order to use the timer
function.
• Each press of the
hr button (26) will advance the clock by one hour (ill.
g
). Press
and hold to rapidly progress through the numbers.
NOTE: The coffee machine has a 12-hour display (am/pm).
• Each press of the
min button (23) will advance the clock by one minute. Press and
hold to rapidly progress through the numbers.
NOTE: If the time has been set previously, hr/min (26/23) need to be pressed for
2 seconds respectively to be activated.
NOTE: The time setting will be deleted if you unplug the coffee maker from the outlet and
do not plug back in within 15 seconds.
will flash on LCD display (30).
7
CM-169209-17 (EN).indd 7 7/13/2009 5:09:17 PM

Client: PIL (Wal*Mart)
Project: 169209
Language: EN
Date: 13.07.2009
Version: 17
Page: 8 (of 18 pages)
8
OPERATION
keep warm function
This coffee maker includes an adjustable keep warm plate (11) to control coffee
temperature after brewing. The settings of this function can be adjusted whenever the
coffee maker is connected to power.
• Press and hold
(27) for 3 seconds. The default setting 2 will be shown in the display (30).
Press
again to toggle between the three keep warm settings:
Keep warm setting/
Display
Temperature Power
1
Low 200W
2 (default)
Medium 400W
3
High
600W
Automatic switch-off
The coffee maker will automatically turn off at your predetermined time. The settings of
this function can be adjusted whenever the coffee maker is connected to power.
• Press and hold
off (25) for 3 seconds. The default setting 60 will be shown in
the display
(30). Press off (25) again to toggle between the four keep warm time
settings:
Display Automatic switch-off after...
30
30 minutes
60 (default)
60 minutes
90
90 minutes
120
120 minutes
• After 3 seconds the LCD display
(30) goes back to time view (default view) and the
new setting is saved.
• When the set time has elapsed, the coffee machine will beep five times and shut off.
All lighted buttons also go off.
CM-169209-17 (EN).indd 8 7/13/2009 5:09:17 PM

Client: PIL (Wal*Mart)
Project: 169209
Language: EN
Date: 13.07.2009
Version: 17
Page: 9 (of 18 pages)
9
OPERATION
Preparing the coffee maker
NOTE: The coffee maker is only for brewing coffee.
• Open coffee-filling lid
(2). Place filter basket (18) into coffee maker so that the arrow
markers on filter basket
(18) line up with arrow on coffee maker (ill.
a
).
• Insert the permanent filter
(19) into the filter basket (18) (ill.
b
). Do not use the permanent
filter with a paper filter as water will not flow through the filter basket correctly.
• Follow instructions in the manual for Brewing Standard Coffee or Brewing Gourmet
Coffee. The Brewing Gourmet Coffee setting is dedicated to those who prefer a
stronger and richer coffee taste. The Brewing Standard Coffee setting is for those
who prefer a milder taste.
Brewing Standard Coffee
• Following the chart below, use the small measuring scoop (1) to add ground coffee
into the permanent filter
(19). Amounts can be adjusted according to taste (ill.
c
).
Press the front of the coffee-filling lid
(2) down until it locks in place (ill.
j
).
To Brew Ground Coffee
12 cups 12 small scoops
10 cups 10 small scoops
8 cups 8 small scoops
6 cups 6 small scoops
4 cups 4 small scoops
• Open water tank lid
(4). Fill carafe (13) with desired amount of water. Check the
left water level indicator
(8) on the coffee maker. Pour water into the water tank (9)
(ill.
d
). Close water tank lid (4). Place carafe (13) on keep warm plate (11) (ill.
e
).
NOTE: The keep warm temperature is adjustable, 3 is the hottest setting with 1 being
the coolest. 2 will keep your coffee at approximately the same temperature as then you
finished brewing and is the default setting.
CAUTION: Do not run the coffee maker without water in the water tank (9). This may lead
to malfunction of the coffee maker.
CM-169209-17 (EN).indd 9 7/13/2009 5:09:17 PM

Client: PIL (Wal*Mart)
Project: 169209
Language: EN
Date: 13.07.2009
Version: 17
Page: 10 (of 18 pages)
10
OPERATION
NOTE: The splash guard (6) allows you to fill the water tank (9) without spills and drips
(ill.
d
).
• Insert power plug
(12) into a standard 120 V AC wall outlet (ill.
f
).
flashes
on the LCD display
(30).
NOTE: The (:) is always flashing, when the power plug (12) is connected.
• Press
(29) once to start the manual brewing cycle. (29) lights up and brewing begins.
NOTE: To interrupt brewing, press (29).
• When buzzer sounds twice, the brewing cycle is complete and the keep warm cycle
starts. Remove carafe
(13) to serve coffee (ill.
h
). Always return the carafe to the
keep warm plate
(11).
CAUTION: Do not touch keep warm plate (11) or open the coffee-filling lid (2) during
brewing! Risk of burn injury.
• The coffee maker will shut off automatically after the keep warm time is reached
(Automatic switch-off).
CAUTION: After the brew cycle is complete, wait a minimum of 5 minutes before opening
the coffee-filling lid
(2). Steam builds up under the coffee-filling lid (2). There is a risk of
injury from hot steam.
Brewing Gourmet Coffee
A refined brewing process is one of the keys for achieving superior coffee taste. Use the
gourmet coffee function to brew an outstanding cup of coffee.
• According to the chart below, use the large measuring scoop
(1) to add ground gourmet
coffee into the permanent filter
(19). Amounts can be adjusted according to taste (ill.
c
).
Press the front of the coffee-filling lid
(2) down until it locks in place (ill.
j
).
To Brew Ground Coffee
8 cups 8 large scoops
6 cups 6 large scoops
4 cups 4 large scoops
2 cups 2 large scoops
CM-169209-17 (EN).indd 10 7/13/2009 5:09:17 PM

Client: PIL (Wal*Mart)
Project: 169209
Language: EN
Date: 13.07.2009
Version: 17
Page: 11 (of 18 pages)
11
OPERATION
• Open the water tank lid (4). Fill the carafe (13) with desired amount of water. Check the
right water level indicator
(8) - marked with - on the coffee maker. Pour water into
the water tank
(9) (ill.
d
) and close water tank lid (4). Place the carafe (13) on keep
warm plate
(11) (ill.
e
).
NOTE: When using the Gourmet function, do not brew more than 8 cups.
CAUTION: Do not run the coffee maker without water in the water tank (9). This may lead
to malfunction of the coffee maker.
NOTE: The splash guard (6) allows you to fill the water tank (9) without spills and drips
(ill.
d
).
• Insert power plug
(12) into a standard 120 V AC wall outlet (ill.
f
).
• Press
(29) and gourmet button (28) to start the manual brewing cycle. (29)
and
light up and brewing begins.
NOTE: To interrupt brewing, press (29).
• When buzzer sounds twice, the brewing cycle is complete and the keep warm cycle
starts. Remove carafe
(13) to serve coffee (ill.
h
). Always return carafe to the keep
warm plate
(11).
CAUTION: Do not touch keep warm plate (11) or open the coffee-filling lid (2) during
brewing! Risk of burn injury.
HINT: We recommend drinking your coffee soon after brewing has finished to enjoy its
fresh taste.
CM-169209-17 (EN).indd 11 7/13/2009 5:09:17 PM

Client: PIL (Wal*Mart)
Project: 169209
Language: EN
Date: 13.07.2009
Version: 17
Page: 12 (of 18 pages)
12
OPERATION
TSB button (Time Since Brew)
This function indicates the time that has passed since the coffee has finished brewing.
After brewing is complete and buzzer sounds twice, press TSB (22) to see elapsed time
(in minutes). After 3 seconds the LCD display (30) returns to default view.
Setting and activating the Auto Program Function
Set the Auto Program Function to have fresh brewed coffee completed at the time you
set.
NOTE: Program setting is only possible when clock time is set.
• Preparation: Add the desired amount of water and coffee
(Brewing Gourmet/ Standard Coffee).
• Press
prog button (24) once to operate hr (26) and min (23) buttons (Setting time)
and set the program complete time. Press
gourmet button (28) if you have
chosen to brew gourmet coffee.
•
Press prog (24) to save settings, then press auto (20) to start automatic brewing.
NOTE: The program will be stored automatically if no button is operated for 3 seconds
and the clock time is displayed.
• Press the
prog button (24) once to view program settings. Press and hold the prog
button
(24) three seconds to change the setting. The program completion time
appears on the LCD display
(30). Press hr (26) and min (23) to modify the program
(Setting time).
• Press
auto button (20) to activate the program. auto button (20) lights up and the
LCD display
(30) shows the program completion time for 2 seconds. Brewing will be
complete at the programmed time.
NOTE: Program activation is possible if (29) is turned off.
NOTE: When program function is running, the auto button (20) light will go out. You can
deactivate the program before it starts by pressing
auto (20) again.
NOTE: Program function will be deleted if you unplug the coffee maker from the outlet
for more than 15 seconds.
CM-169209-17 (EN).indd 12 7/13/2009 5:09:18 PM

Client: PIL (Wal*Mart)
Project: 169209
Language: EN
Date: 13.07.2009
Version: 17
Page: 13 (of 18 pages)
13
CLEANING
Proper maintenance will ensure years of service from your appliance. Clean the
appliance after every use. This appliance contains no user serviceable parts and
requires little maintenance. Leave servicing or repairs to qualified personnel.
WARNING: Unplug the appliance and allow to cool before cleaning.
CAUTION: Do not immerse the coffee maker, or the power cord with plug (12) into water
or any liquids (ill.
i
).
• Clean the housing and keep warm plate
(11) with a clean, damp cloth. Do not use
abrasive pads or alcohol.
• The carafe (13) is dishwasher-safe. Wash carafe (13), carafe lid (15), filter basket (18)
and permanent filter (19) in hot, soapy water. Rinse and dry.
• Remove the carafe (13), permanent filter (19) and the filter basket (18) from the
coffee maker.
• Use baking soda or mild cleaning agent to remove stains on the carafe (13). If stains
are hard to remove, fill carafe (13) with hot water and add 2 tablespoons of dishwasher
detergent. Wash and rinse after leaving water with detergent in carafe (13) overnight.
• Ensure all parts are completely dry after washing and before use.
NOTE: Do not dry the inside of the water tank (9) with a cloth, as lint may remain.
• After cleaning, reassemble the coffee maker.
CM-169209-17 (EN).indd 13 7/13/2009 5:09:18 PM

Client: PIL (Wal*Mart)
Project: 169209
Language: EN
Date: 13.07.2009
Version: 17
Page: 14 (of 18 pages)
CLEANING
Automatic clean function
The coffee maker is equipped with an automatic clean function. After 60 brewing cycles,
the clean indicator/button (21) lights up. This indicates that the coffee maker should
be cleaned using the automatic clean function and the charcoal filter (16) should be
replaced.
NOTE: The coffee maker can continue to be used, when clean indicator/button (21)
is on.
• To begin the cleaning cycle, remove the charcoal filter (16) from the water tank (9). Fill the
tank with a vinegar and water mixture (½ vinegar and ½ water) or a descaling product.
• Press and hold
clean button (21) for 2 seconds to start program. The coffee
maker beeps once before cleaning starts. The clean button (21) flashes while the
program is running.
• Press and hold the clean button (21) for 3 seconds to stop program once it has
started.
• Press button (29) anytime during clean cycle to stop program and allow the unit
to start to brew.
• After completion of cleaning program or if power is lost during clean cycle, the
counter is reset, and the
clean button light (21) will go out.
Cleaning process:
• Continuous cycles of 7 seconds brewing and 21 seconds off until tank is empty.
• After cleaning process is complete the
clean indicator/button (21) goes off.
Fill water tank
(9) with clean water and run one brewing cycle to rinse the coffee
maker.
• Change the charcoal filter (16) (ill.
k
). Reinsert the charcoal filter into the coffee
maker (ill.
l
).
NOTE: You can use the cleaning function before reaching 60 cycles by following the
steps above (especially if the water hardness in your area is above normal).
NOTE: Replacement water charcoal filters and carafes are available at WAL-MART stores.
14
CM-169209-17 (EN).indd 14 7/13/2009 5:09:18 PM

Client: PIL (Wal*Mart)
Project: 169209
Language: EN
Date: 13.07.2009
Version: 17
Page: 15 (of 18 pages)
TROUBLESHOOTING
PROBLEM CAUSE SOLUTION
Coffee leaks around filter
basket
(18) /drip stop valve
(18) overflows.
Filter basket
(18) is not
mounted correctly.
There are coffee grounds
on the edge of filter.
Coffee ground is too fine.
This will clog the filter.
When using drip stop
valve function, hot water
continues to flow into
filter basket
(18) and may
overflow if carafe (13)
is not returned to keep
warm plate
(11) within 30
seconds.
Insert filter basket (18)
correctly.
Clean around the filter.
Clean the filter. Use
another type of coffee.
Make sure carafe (13)
is fully seated on keep
warm plate (11) or
returned to keep warm
plate (11) within 30
seconds when using drip
stop valve function.
Coffee maker does not
brew or heat.
Power cord
(12) is not
firmly plugged into a power
outlet.
Insert power plug (12)
into power outlet.
Water does not run
through.
No water in the water tank
(9).
Water intake under water
filter holder (17) clogged.
The filter is blocked or
coffee grounds are too fine
or tamped down too hard.
Fill the water tank
(9).
Clean the water intake.
Clean the filter and try
coarser coffee.
Water runs through
too quickly.
Coffee grounds too coarse. Try finer coffee.
TROUBLESHOOTING
15
CM-169209-17 (EN).indd 15 7/13/2009 5:09:18 PM

Client: PIL (Wal*Mart)
Project: 169209
Language: EN
Date: 13.07.2009
Version: 17
Page: 16 (of 18 pages)
PROBLEM CAUSE SOLUTION
3 quick beeps are emitted Chosen function not
available.
Choose another function.
Coffee maker does not
finish brewing at set time.
Total brewing time is approx.
8 minutes. When the current
time and the programmed
time are less than 8 minutes,
the coffee maker will start
the brewing process at the
programmed time.
Set the Auto Program
Function more than 8
minute in advance.
Error message in
display (30): Er1
Error message in
display (30): Er2
Error message in
display (30): Er3
Error message in
display (30): Er4
Error message in
display (30): Er5
Program function cannot
be used as long as time
has not been set.
Press auto button (20)
before setting program.
Press TSB button (22)
before the brew cycle is
completed.
Unplug the coffee machine
for 30 second to reset
the unit. Should the error
message still appear the
coffee machine might be
damaged.
During keep warm cycle,
brewing is started.
Set time first.
Set program first
, then
prog button (24).
Wait for the coffee to
finish brewing.
Please contact your
Wal-Mart store.
Press (29) to restart.
If additional assistance is needed, please contact our Customer Assistance at
1.877.207.0923 (U.S.) or 1.877.556.0973 (Canada).
TECHNICAL DATA
Rated voltage: AC 120V ~60Hz
Rated current: 10.8A
Rated power input: 1300W
16
CM-169209-17 (EN).indd 16 7/13/2009 5:09:18 PM

Client: PIL (Wal*Mart)
Project: 169209
Language: EN
Date: 13.07.2009
Version: 17
Page: 17 (of 18 pages)
CUSTOMER ASSISTANCE
If you have a claim under this warranty, please call our Customer Assistance Number. For faster
service, please have the model number and product name ready for the operator to assist you. This
number can be found on the bottom of your appliance and on the front page of this manual.
Model Number: __________________ Product Name: __________________
Customer Assistance Number 1.877.207.0923 (U.S.) or 1.877.556.0973 (Canada).
Keep these numbers for future reference!
For more information, please visit us at WWW.GEHOUSEWARES.COM
Two-year limited warranty
What does your warranty cover?
• Any defect in material or workmanship.
For how long after the original purchase?
• Two years.
What will we do?
• Provide you with a new one.
• For those items still under warranty but
no longer available, WAL-MART reserves
the right to replace with a similar GE
branded product of equal or greater
value.
How do you make a warranty claim?
• Save your receipt.
• Properly pack your unit. We recommend
using the original carton and packing
materials.
• Return the product to your nearest
WAL-MART store or call Customer
Assistance at 1-877-207-0923 (U.S.)
or 1-877-556-0973 (Canada).
What does your warranty not cover?
• Parts subject to wear, including, without
limitation, glass parts, glass containers,
cutter/strainer, blades, seals, gaskets,
clutches, motor brushes, and/or agitators,
etc.
• Commercial use or any other use not
found in printed directions.
• Damage from misuse, abuse, or
neglect, including failure to clean
product regularly in accordance with
manufacturer's instructions.
How does state law relate to this warranty?
• This warranty gives you specific legal
rights, and you may also have other rights
which vary from state to state or province
to province.
• This warranty is in lieu of any other
warranty or condition, whether express or
implied, written or oral, including, without
limitation, any statutory warranty or
condition of merchantability or fitness for
a particular purpose.
• WAL-MART, GE and the product
manufacturer expressly disclaim all
responsibility for special, incidental, and
consequential damages or losses caused
by use of this appliance. Any liability is
expressly limited to an amount equal to
the purchase price paid whether a claim,
however instituted, is based on contract,
indemnity, warranty, tort (including
negligence), strict liability, or otherwise.
Some states or provinces do not allow
this exclusion or limitation of incidental
or consequential losses, so the foregoing
disclaimer may not apply to you.
What if you encounter a problem with this
product while using it outside the country of
purchase?
• The warranty is valid only in the country of
purchase and if you follow the
warranty
claim procedure as noted.
is a trademark of General Electric
Company and is used under the
license by Wal-Mart Stores Inc.,
Bentonville, AR 72716
Imported by/Importé par
Walmart Canada
1940 Argentia Road
Mississauga, Ontario L5N 1P9
CM-169209-17 (EN).indd 17 7/13/2009 5:09:18 PM
/