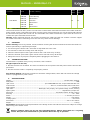
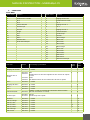
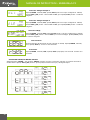
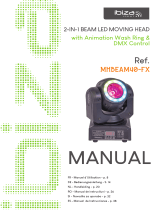
Ibiza Light MHBEAM60-FX Owner's manual
- Category
- Stroboscopes & disco lights
- Type
- Owner's manual

DUAL 2-IN-1 WASH & BEAM LED
MOVING HEAD
with DMX Control
MANUAL
Ref.
MHBEAM60-FX
FR - Manuel d'Utilisation - p. 8
DE - Bedienungsanleitung - S. 14
NL - Handleiding - p. 20
ES - Manual de Uso - p. 26
RO - Manual de instructiuni - p. 32
SI - Navodila za uporabo - p. 38

MANUAL - MHBEAM60-FX
2
DUAL 2-IN-1 WASH & BEAM LED MOVING HEAD
WITH DMX CONTROL
INSTRUCTION MANUAL
1. SAFETY PRECAUTIONS
For Your Own Personal Safety, Please Read and Understand This Manual Completely Before You
Attempt To Install Or Operate This Unit!
⬢ To reduce the risk of electrical shock or re, do not expose this unit rain or moisture
⬢ Do not spill water or other liquids into or on to your unit.
⬢ Do not attempt to operate this unit if the power cord has been frayed or broken.
⬢ Do not attempt to remove or break o the ground prong from the electrical cord. This prong is used to reduce
the risk of electrical shock and re in case of an internal short.
⬢ Disconnect from main power before making any type of connection.
⬢ Do not remove the cover under any conditions. There are no user serviceable parts inside.
⬢ Never operate this unit when the cover is removed.
⬢ Only mount this unit in an area that will allow proper ventilation. Allow about 15cm between this device and
a wall.
⬢ Do not attempt to operate this unit, if it is damaged.
⬢ This unit is intended for indoor use only, use of this product outdoors voids all warranties.
⬢ Always mount this unit in safe and stable way.
⬢ Power cords should be routed so that they are not likely to be walked on or pinched by items placed upon or
against them, paying particular attention to cords at plugs, convenience receptacles, and the point where
they exit from the appliance.
⬢ Cleaning -The xture should be cleaned only as recommended by the manufacturer.
⬢ Heat -This xture should be situated away from heat sources such as radiators, heat registers, stoves, or
other appliances (including ampliers) that produce heat.
⬢ The xture should be serviced by qualied service personnel when:
A. Objects have fallen, or liquid has been spilled into the appliance.
B. The appliance has been exposed to rain or water.
C. The appliance does not appear to operate normally or exhibits a marked change in performance.
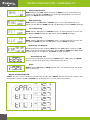
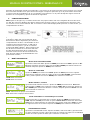
2. MOUNTING
When installing the unit, the trussing or area of installation must be able to hold 10 times the weight without
any deformation. When installing the unit must be secured with a secondary safety attachment, e.g. and appro-
priate safety cable. Never stand directly below the unit when mounting, removing, or servicing the unit.
Overhead mounting requires extensive experience, including calculating working load limits, installation ma-
terial being used, and periodic safety inspection of all installation material and unit. If you lack these qualica-
tions, do not attempt the installation yourself.
The installation should be checked by a skilled person once a year
The xture is fully operational in three dierent mounting positions: hanging upside-down from a ceiling, set on
a at level surface, or on its side attached to trussing. Be sure this xture is kept at least 0.5m away from any
ammable materials (decoration etc.). Always use and install the supplied safety cable as a safety measure to
prevent accidental damage and/or injury in the event the clamp fails
NOTICE: The suitable environmental temperature for this lighting xture is between -25˚ C to 45˚ C. Do not
place this lighting xture in an environment where the temperatures are under or above the temperatures
stated above. This will allow the xture to run at its best and help prolong the xture life.
Screw one clamp via a M12 screw and nut to the included bracket. Attach the bracket using the included
screws to the bottom of the xture. Attach the eyehole screw to the bottom of the base and pull the safety-
cable through the screw and over the trussing system or a safe xation spot. Insert the end in the carabine and
tighten the safety screw.
EN

MANUAL - MHBEAM60-FX
3
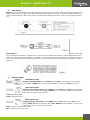
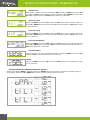
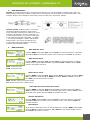
3. DMX SET UP
Notice: Be sure to follow gures two and three when making your own cables. Do not use the ground lug on the
XLR connector. Do not connect the cable’s shield conductor to the ground lug or allow the shield conductor to
come in contact with the XLR’s outer casing. Grounding the shield could cause a short circuit and erratic beha-
vior.
Special Note: Line Termination. When longer cable runs are used, you may need to use a terminator on the last
unit to avoid erratic behavior. A terminator is a 110-120 ohm 1/4W resistor which is connected between pins 2
and 3 of a male XLR connector (DATA + and DATA -). This unit is inserted in the female XLR connector of the last
unit in your daisy chain to terminate the line. Using a cable terminator will decrease the possibilities of erratic
behavior.
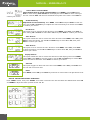
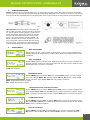
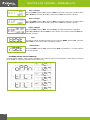
4. DISPLAY MENU:
DMX Address Mode
Setting of the DMX address: Press MENU to select Addr, press Enter to start setting.
Use the UP or DOWN keys to set the desired Address. Then press Enter to conrm.
DMX Channel Mode
Selection of the channel mode: Press MENU to select Chnd. Press Enter to start setting
Select the channel mode via the UP or DOWN keys: successively 13CH and 21CH. Press
Enter again to conrm your selection.
13CH: 13Channel mode
21CH: 21Channel mode
Master/Slave Mode
Setting the Master-slave mode: Press MENU to select SLnd. Then press Enter to start
setting. MAST, SL1 will be displayed. Press UP or DOWN to choose Master or slave, then
press Enter again to conrm your selection.
MAST: Choose the device as master
SL1: Choose the device as slave

MANUAL - MHBEAM60-FX
4
Auto or Music-controlled Mode
Select between Auto Or Sound-controlled Mode: Press MENU to select ShNd. Press
Enter to start setting. Auto & SoUn will be displayed. Choose Auto for auto running of
the unit. Choose SoUn and the unit will follow the rhythm of the music. Press Enter to
conrm your choice.
Sound Sensitivity
Adjustment of sound sensitivity: Press MENU, select SEns and press Enter to start set-
ting. Use the UP and Down keys to adjust the sound sensitivity from 0-100. Press Enter
to conrm your choice.
Pan Reverse
This option is set to reverse the Pan direction. Press MENU, select Pan, press Enter to
start setting, UP and Down to select no or Yes, then press Enter to conrm your choose
Tilt 1 Reverse
This option allows the user to reverse the Tilt 1 direction: Press MENU, select 1tiL, press
Enter to start the setting. Use the UP and Down keys to select no or Yes, then press
Enter to conrm your choice.
Tilt 2 Reverse
This option is set to reverse the Tilt 2 direction. Press MENU, select 2tiL, press Enter
to start the setting. Use the UP and Down keys to select no or Yes, then press Enter to
conrm your choice.
Display Reverse
This option allows the user to reverse the direction of the display panel. Press MENU,
select dISP. press Enter to start the setting. Use the UP and Down keys to select dSIP
and it will reverse directions. Press Enter to conrm your choice.
Auto Test
This option triggers an Auto test of the unit. Press MENU, select test, press Enter and
the unit will run an auto-test.
Reset
Press MENU, select rSEt, press Enter key and wait for 1-3seconds. The light will be reset
USE OF THE MOTOR OFFSET FUNCTION :
Press “MENU” button, then press “ENTER” for at least 5 seconds. The unit will switch into Oset Mode. Press UP
and DOWN to adjust the motor position of Pan and Tilt.

MANUAL - MHBEAM60-FX
5
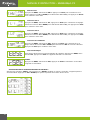
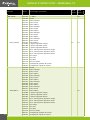
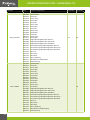
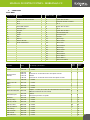
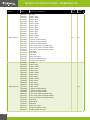
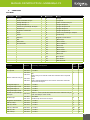
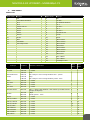
5. DMX CHANNEL
DMX mode
Mode 1(13) Function Mode 2(21) Function
1 Pan 1 Pan
2 Pan Endless Rotation 2 Pan Fine
3 Tilt 1 3 Pan Endless Rotation
4 Tilt 2 4 Tilt 1
5 Pan/Tilt Speed 5 Tilt 1 Fine
6 Strobe 6 Tilt 2
7 Dimmer 7 Tilt 2 Fine
8 Red 8 Pan/Tilt Speed
9 Green 9 Strobe
10 Blue 10 Dimmer
11 White 11 LED 1 Red
12 Halo Eect 12 LED 1 Green
13 Auto Mode 13 LED 1 Blue
14 LED 1 White
15 LED 2 Red
16 LED 2 Green
17 LED 2 Blue
18 LED 2 White
19 Halo 1 Eect
20 Halo 2 Eect
21 Auto Mode
Function Value Percent / Setting
Mode
13CH
Mode
21CH
Pan 000-255 0~100% 1 1
Pan Fine 000-255 0~100% 2
Pan Endless
Rotation
000-015
016-125
125-145
146-255
No
Pan Clockwise rotation from fast to slow
Stop
Pan Counter-clockwise rotation from slow to fast
2 3
Tilt 1 000-255 0~100% 3 4
Tilt 1 Fine 000-255 0~100% 5
Tilt 2 000-255 0~100% 4 6
Tilt 2 Fine 000-255 0~100% 7
Pan/Tilt Speed 000-255
Fast -> Slow (Pan Endless rotation speed control is invalid
in this Channel)
5 8
Strobe
000-000
001-255
Open
Strobe from Slow to Fast
6 9
Dimmer 000-255 0~100% 7 10
LED (1) Red 000-255 0~100% 8 11
LED (1) Green 000-255 0~100% 9 12
LED (1) Blue 000-255 0~100% 10 13
LED (1) White 000-255 0~100% 11 14
LED 2 Red 000-255 0~100% 15
LED 2 Green 000-255 0~100% 16
LED 2 Blue 000-255 0~100% 17

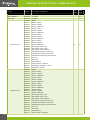
MANUAL - MHBEAM60-FX
6
Function Value Percent / Setting
Mode
13CH
Mode
21CH
LED 2 White 000-255 0~100% 18
Halo (1) Eect
000-005
006-011
012-017
018-023
024-029
030-035
036-041
042-047
048-053
054-059
060-065
066-071
072-077
078-083
084-089
090-095
096-101
102-107
108-113
114-119
120-125
126-131
132-179
180-217
218-255
Closed
Part 1 Red
Part 1 Green
Part 1 Blue
Part 2 Red
Part 2 Green
Part 2 Blue
Part 3 Red
Part 3 Green
Part 3 Blue
Part 4 Red
Part 4 Green
Part 4 Blue
Opposite Two Part Red
Opposite Two Part Green
Opposite Two Part Blue
The other Opposite Two Part Red
The other Opposite Two Part Green
The other Opposite Two Part Blue
All Red
All Green
All Blue
All Full color
Color Gradual Change
Color Jump Change
12 19
Halo 2 Eect
000-005
006-011
012-017
018-023
024-029
030-035
036-041
042-047
048-053
054-059
060-065
066-071
072-077
078-083
084-089
090-095
096-101
102-107
108-113
114-119
120-125
126-131
132-179
180-217
218-255
Closed
Part 1 Red
Part 1 Green
Part 1 Blue
Part 2 Red
Part 2 Green
Part 2 Blue
Part 3 Red
Part 3 Green
Part 3 Blue
Part 4 Red
Part 4 Green
Part 4 Blue
Opposite Two Part Red
Opposite Two Part Green
Opposite Two Part Blue
The other Opposite Two Part Red
The other Opposite Two Part Green
The other Opposite Two Part Blue
All Red
All Green
All Blue
All Full color
Color Gradual Change
Color Jump Change
20

MANUAL - MHBEAM60-FX
7
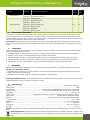
Function Value Percent / Setting
Mode
13CH
Mode
21CH
Auto Mode
000-027
028-082
083-112
113-168
169-199
200-239
240-255
No Function
Sound Activity
No Function
Auto Run
No Function
Reset
No Function
13 21
6. FUSE REPLACEMENT
Locate and remove the unit’s power cord. Once the cord has been removed located the fuse holder inside the
power socket. Insert a at-head screw driver into the power socket and gently pry out the fuse holder. Remove
the bad fuse and replace with a new one. The fuse holder has a built-in socket for a spare fuse. Be sure not to
confuse the spare fuse with the active fuse.
Warning: If after replacing the fuse you continue to blow fuses, STOP using the unit. Contact customer support
for further instructions. Continuing to use the unit may cause serious damage.
7. CLEANING
Fixture Cleaning: Due to fog residue, smoke, and dust cleaning the internal and external lenses should be car-
ried out periodically to optimize light output.
1. Use normal glass cleaner and a soft cloth to wipe down the outer case.
2. Use a brush to clean the cooling vents and fan grill.
3. Clean the external optics with a glass cleaner and a soft cloth every 20 days.
4. Clean the internal optics with a glass cleaner and a soft cloth every 30-60 days.
5. Always be sure to dry all parts completely before plugging the unit back in.
8. TROUBLE SHOOTING
Listed below is a problem that you may encounter, with a solution.
No light output from the unit;
1. Be sure the fuse has not blown. The fuse is located on the rear panel inside the power socket. See Fuse Re-
placement.
2. Be sure the fuse holder is completely and properly seated.
Auto Sensing Voltage: This xture contains an automatic voltage switch, which will auto sense the voltage
when it is plugged into a power source.
9. SPECIFICATIONS:
Voltage: ....................................................................................................................................... AC100V-240V, 50/60 Hz
Total power:................................................................................................................................................................ 80W
Light source: .............................................................................2pcs 30W RGBW 4in1 LED, 2*12pcs 5050 RGB 3in1 LED
Control mode: ...........................................................................................Auto run, sound activated, DMX, master-slave
DMX Channel: .................................................................................................................................................13CH/21CH
Light eect: ................................................................Wash light, color jumping, color gradual change, strobe, dimming
Optics system: .......................................................................................................................High eciency 8°optic lens
Movement: ............................................................................................................ Pan Innite rotation, Tilt 185° rotation
Dimming: .........................................................................................................................................................0% - 100%
Strobe: ...........................................................................................................................................1-20 times per second
Display: .......................................................................................................................................................... LED Display
Cooling system ................................................................................................................................................. Fan cooled
Dimensions: ......................................................................................................................................270 x 170 x 310mm
Weight: .................................................................................................................................................................. 3.59 kg
Please Note: Specications and improvements in the design of this unit and this manual are subject to change
without any prior written notice.
Electric products must not be put into household waste. Please bring them to a recycling
centre. Ask your local authorities or your dealer about the way to proceed.
Page is loading ...
Page is loading ...
Page is loading ...
Page is loading ...
Page is loading ...
Page is loading ...
Page is loading ...
Page is loading ...
Page is loading ...
Page is loading ...
Page is loading ...
Page is loading ...
Page is loading ...
Page is loading ...
Page is loading ...
Page is loading ...
Page is loading ...
Page is loading ...
Page is loading ...
Page is loading ...
Page is loading ...
Page is loading ...
Page is loading ...
Page is loading ...
Page is loading ...
Page is loading ...
Page is loading ...
Page is loading ...
Page is loading ...
Page is loading ...
Page is loading ...
Page is loading ...
Page is loading ...

NAVODILA ZA UPORABO - MHBEAM60-FX
41
5. DMX KANALI
DMX mode
Način 1(13) Funkcija Način 2(21) Funkcija
1 Pan 1 Pan
2 Pan Endless Rotation 2 Fini Pan
3 Tilt 1 3 Pan Endless Rotation
4 Tilt 2 4 Tilt 1
5 Pan/Tilt hitrost 5 Fini Tilt 1
6 Strobo 6 Tilt 2
7 Dimer 7 Fini Tilt 2
8 Rdeča 8 Pan/Tilt hitrost
9 Zelena 9 Strobo
10 Modra 10 Dimer
11 Bela 11 LED 1 Rdeča
12 Halo Efekt 12 LED 1 Zelena
13 Samodejni način 13 LED 1 Modra
14 LED 1 Bela
15 LED 2 Rdeča
16 LED 2 Zelena
17 LED 2 Modra
18 LED 2 Bela
19 Halo 1 Efekt
20 Halo 2 Efekt
21 Samodejni način
Funkcija Vrednost Odstotek / Nastavitev
Način
13CH
Način
21CH
Pan Način 0~100% 1 1
Fini Pan 000-255 0~100% 2
Pan Endless Ro-
tation
000-015
016-125
125-145
146-255
Brez
Pan vrtenje v smeri urnega kazalca hitro - počasi
Stop
Pan vrtenje v smeri urnega kazalca počasi - hitro
2 3
Tilt 1 000-255 0~100% 3 4
Fini Tilt 1 000-255 0~100% 5
Tilt 2 000-255 0~100% 4 6
Fini Tilt 2 000-255 0~100% 7
Pan/Tilt hitrost 000-255
Hitro -> Počasi (Pan Endless v tem kanalu je nadzor hitrosti
vrtenja neveljaven)
5 8
Strobo
000-000
001-255
Odprt
Strobo počasi - hitro
6 9
Dimer 000-255 0~100% 7 10
LED (1) Rdeča 000-255 0~100% 8 11
LED (1) Zelena 000-255 0~100% 9 12
LED (1) Modra 000-255 0~100% 10 13
LED (1) Bela 000-255 0~100% 11 14
LED 2 Rdeča 000-255 0~100% 15
LED 2 Zelena 000-255 0~100% 16
LED 2 Modra 000-255 0~100% 17
LED 2 Bela 000-255 0~100% 18
Page is loading ...
Page is loading ...

MANUAL - MHBEAM60-FX
44
Imported from China by LOTRONIC S.A.
Avenue Zénobe Gramme 9
B-1480 Saintes
-
 1
1
-
 2
2
-
 3
3
-
 4
4
-
 5
5
-
 6
6
-
 7
7
-
 8
8
-
 9
9
-
 10
10
-
 11
11
-
 12
12
-
 13
13
-
 14
14
-
 15
15
-
 16
16
-
 17
17
-
 18
18
-
 19
19
-
 20
20
-
 21
21
-
 22
22
-
 23
23
-
 24
24
-
 25
25
-
 26
26
-
 27
27
-
 28
28
-
 29
29
-
 30
30
-
 31
31
-
 32
32
-
 33
33
-
 34
34
-
 35
35
-
 36
36
-
 37
37
-
 38
38
-
 39
39
-
 40
40
-
 41
41
-
 42
42
-
 43
43
-
 44
44


Ibiza Light MHBEAM60-FX Owner's manual
- Category
- Stroboscopes & disco lights
- Type
- Owner's manual
Ask a question and I''ll find the answer in the document
Finding information in a document is now easier with AI
in other languages
Related papers
-
 Ibiza Light MHSPOT30-FX Owner's manual
-
 Ibiza Light MHBEAM40-FX Owner's manual
-
 Ibiza Light QUAD8-FX User manual
-
Ibiza Light LED8-MINI Spider Light User manual
-
 Ibiza Light LMH410Z Owner's manual
-
Ibiza Light PLUTON10-LZR Owner's manual
-
 Ibiza Light COMBI-FX1 Owner's manual
-
 Ibiza Light LMH250-RC User manual
-
 Ibiza Light PARLED318-FX2 Owner's manual
-
 Ibiza Light LMH350LED Owner's manual


Other documents
-
 afx light 16-2764 User manual
-
Cameo AURO® SPOT 200 User manual
-
 afx light SPOT120LED User manual
-
 afx light SPOT60LED User manual
-
 Audibax Oregon 60 User manual
-
 afx light 15-1938 User manual
-
Briteq BEAM WIZARD5x5 Owner's manual
-
-
 afx light BEAM1R-MKII Owner's manual
-


