
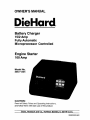
OWNER'S MANUAL
DieHard,.
Battery Charger
1512Amp
Fully Automatic
Microprocessor Controlled
Engine Starter
100 Amp
Model No.
200.71224
CAUTION:
Read all Safety Rules and Operating Instructions,
and follow them with each use of this product.
Sears, Roebuck and Co._ Hoffman Estates, IL 60179 U.S.A.
0099000303-602

WARRANTY .............................................................................................................. 2
IMPORTANT SAFETY INSTRUCTIONS .................................................................. 3
PERSONAL SAFETY PRECAUTIONS .................................................................... 4
BEFORE USING YOUR BATTERY CHARGER ....................................................... 5
Assembling your charger ................................................................................... 5
Plugging it in ....................................................................................................... 5
Using an extension cord ..................................................................................... 5
PREPARING YOUR BATTERY TO BE CHARGED ................................................. 6
CHARGING TIPS ...................................................................................................... 6
USING YOUR BATTERY CHARGER ....................................................................... 7
CONTROL PANEL .................................................................................................... 9
CHARGING YOUR BATTERY ._.............................................................................. 10
Inside vehicle .................................................................................................... 10
Outside vehicle ................................................................................................. 11
Using Engine Start ............................................................................................ 11
ESTIMATING CHARGE TIME ................................................................................ 12
MAINTENANCE AND CARE .................................................................................. 13
TROUBLESHOOTING ............................................................................................ 14
PARTS ..................................................................................................................... 15
WIRING DIAGRAM ................................................................................................. 16
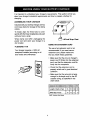
Please read this Owner's Manual before using your Battery Charger
The DieHard model 71224, Fully Automatic Battery Charger/Engine Starter, offers
features to accommodate the needs for home or light commercial use. This manual
will show you how to use your charger safely and effectively. Please read and follow
these instructions and precautions carefully.
For information about troubleshooting, call toll-free from anywhere in the U.S.A. 7 am
to 4:30 pm CT Monday through Friday.
1-800-SEARS-64 (1-800-732-7764).
FULL THREE YEAR WARRANTY
If, within three years from the date of purchase this battery charger fails due to a
defect in material or workmanship, simply return the charger to the place of purchase
and it will be replaced free of charge.
This warranty gives you specific legal rights, and you may also have other rights
which vary from state to state.
Sears, Roebuck and Co., Dept. 817WA, Hoffman Estates, IL 60179

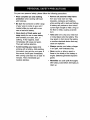
WARNING:To reducetheriskof
explosion,explosive gases, or injury
while using your battery charger, follow
the precautions listed below:
• Read all instructions and cautions
printed on the battery charger,
battery, and vehicle or equipment
using battery.
• Use charger only on lead-acid type
rechargeable batteries, such as those
used in cars, trucks, tractors, air-
planes, vans, RV's, trolling motors,
etc. This charger is not intended to
supply power to a low voltage
electrical system.
• Use only attachments recommended
or sold by Sears. The use of attach-
ments not recommended by Sears
may result in fire, electric shock, or
injury.
• Do not disassemble charger. Take it
to a qualified service professional if
service or repair is required. Incorrect
assembly may result in fire or
electrical shock.
• To reduce risk of electrical shock,
unplug the charger from the outlet
before attempting any maintenance
or cleaning.
• Always charge battery in a well-
ventilated area.
• Battery chargers get hot during
operation and must have proper
ventilation. Air needs to flow around
entire charger.
• Do not set charger on flammable
materials like carpeting, upholstery,
paper, cardboard, etc. Charger may
damage leather and melt plastic and
rubber.
HELP US HELP YOU --
Remembe_
• Place charger as far away from the
battery being charged as the charger
cables will permit.
• Do not expose charger to rain or
snow.
• Never charge a frozen battery. If
battery fluid (electrolyte) becomes
frozen, bring battery into a warm area
to thaw before you begin charging.
• Never allow battery acid to drip on
charger when reading specific gravity
or filling battery.
• Never set a battery on top of the
charger.
• Never place charger directly above
battery being charged. The gases
from the battery will corrode and
damage the charger.
• Never use charger for charging dry-
cell batteries that are commonly used
with home appliances like radios,
stereos, remote controls, etc. These
batteries may burst and cause
personal injury.
• Never touch the battery clamps
together when the charger is on. You
could cause a spark.
• Never operate charger if it has
received a hard blow, been dropped,
or otherwise damaged. Take it to a
qualified professional for inspection
and repair.
• Be sure to position the charger power
cord to prevent it from being stepped
on, tripped over, or damaged.
• Never pull out the plug by the cord
when unplugging the charger. Pulling
on the cord may cause damage to the
cord or the plug.
• Do not operate the charger if it has a
damaged power cord or plug. Have
the cord replaced.

Foryour ownpersonalsafety,pleasefollowthe followingprecautions:
• Wear complete eye and clothing
protection when working with lead-
acid batteries.
• Be sure that someone is within range
of your voice to come to your aid if
needed while you work with or are
near a lead-acid battery.
• Have plenty of fresh water and
soap nearby for use in case battery
acid contacts your eyes, skin, or
clothing. If this happens, wash
immediately with soap and water.
Then get medical attention.
• Avoid touching your eyes while
working with a battery. Acid particles
(corrosion) may get into your eyes. If
this occurs, flush eyes immediately
with running cold water for at least 10
minutes. Then immediately get
medical attention.
Remove all personal metal items
from your body such as rings,
bracelets, necklaces and watches,
while working with a lead-acid battery.
A battery can produce a short circuit
current high enough to weld a ring (or
the like) to metal, causing a severe
burn.
• Take care not to drop any metal tool
or metal object onto the battery. This
may spark or short circuit the battery
or another electrical device that may
cause an explosion.
• Always operate your battery charger
in an open, well-ventilated area.
• Never smoke or allow a spark or
flame in the vicinity of the battery or
engine. Batteries generate explosive
gases.
• Neutralize any acid spills thoroughly
with baking soda before attempting to
clean up.
4

It is important to understand your charger's requirements. This section will tell you
about your charger's electrical requirements and how to prepare a battery for
charging.
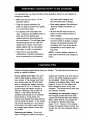
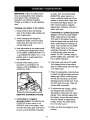
ASSEMBLING YOUR CHARGER
Included with your battery charger are two
cord wrap cleats for storage of the clamp
cables.
To install, align the three tabs to corre-
spond with the three receptacles and push
until you hear a snap.
Wrap clamp cord after unplugging the
power cord and store your charger in a
dry location.
PLUGGING IT IN
Your charger requires a 120V AC
receptacle installed according to all
local codes and ordinances.
[_) ('-Cord Wrap Cleat
USING AN EXTENSION CORD
The use of an extension cord is not
recommended. If you must use an
extension cord, please make sure
that you follow these guidelines:
• Make sure that the pins on charger's
power cord fit firmly into the extension
cord, and that the extension cord fits
firmly into the receptacle.
• Check that the extension cord is
properly wired and in good electrical
condition.
Make sure that the wire size is large
enough for its length and for the AC
ampere rating, as specified in the
chart below.
......... !ii!i!!i iii ....... ii ¸ ! iiiiiil
Length of Cord, inFeet 25 50 100 150
AWG* Size of Cord 18 16 12 10
*AWG-AmericanWireGauge
5

It is important that you read and follow these guidelines while you are preparing to
charge your battery.
• Make sure that you have a 12 volt
lead-acid battery.
• Clean the battery terminals. Be
careful to keep corrosion from getting
in or around your eyes.
• For batteries with removable vent
caps, if required, add distilled water to
each cell until the battery acid
reaches the level recommended by
the manufacturer. This will help purge
excessive gases from the cells. Be
careful not to overfill. If you have a
sealed battery with non-removable
vent caps, no action is necessary.
• Take time to read all battery
manufacturer's specific precautions,
such as removing or not removing
vent caps while charging, and
recommended rates of charge.
• Wear safety glasses. See additional
"Personal Safety Precautions" on
page 4.
• Be sure that the area around the
battery is well ventilated while it is
being charged.
• If it is necessary to remove the battery
from the vehicle to charge it, always
remove the grounded terminal from
the battery first. Turn off all vehicle
accessories to avoid sparks from
occurring.
NOTE: A marine battery installed in a
boat must be removed and charged on
shore.
Read the following pages before using your charger. The tips below serve only as a
guide for specific situations.
If your vehicle won't start: You don't
need to fully charge a battery to start
your vehicle. If the charger won't start
your vehicle using the 100 Amp Start
rate, try charging the battery using the
15 Amp rate for 10 or 15 minutes. That
should charge the battery enough to
allow the 100A Start rate to start the
vehicle. If the vehicle will then be
operated continuously for an extended
period (such as a long drive), the
vehicle could charge the battery back to
normal during that pedod. If the vehicle
will only be operated for a short period
(short drive), the battery might need to
be charged again before it could start
the vehicle.
Reviving your battery: If you only
wish to charge your battery enough to
operate your vehicle, you dQn't need to
wait for the entire charging process to
be completed. When the charger
displays three Battery Status LEDs (see
pages 8, 9, and 12), the battery has
been charged as much as by most
chargers. The vehicle should then start
and operate normally.
Completing an interrupted charge: If
the charging process has been inter-
rupted and restarted after three Battery
Status LEDs were lit, the charger will
go straight to Maintain Mode (see
pages 7 & 9). However, if the original
charge was started using 15 Amps, the
charge can often be completed using 2
Amps.
6

Forbestresultsfromyourbatterycharger,learntouseit properly.Thissectiontellshow
to setthecontrolsand how to charge a battery in and out of a vehicle.
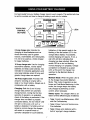
TOUCH PAD
BUTTONS
C3
2 AMP
CHARGE RATE
D
BATTERY TYPE
D
BAlrlrERY STATUS
I--] I--I1--11--1
CHECK CHARGED
LEDs
2 Amp charge rate: Intended for
charging of small batteries such as
those commonly used in garden
tractors, snowmobiles and motorcycles.
It is not to be used as a trickle charger
for larger batteries.
15 Amp charge rate: Use for charging
automotive batteries, marine starter
batteries and deep cycle batteries. Not
intended for industrial applications and
very large batteries where 20 amp and
greater charge rates are required.
100 Amp engine start: Provides 100
amps for cranking an engine with a
weak or run down battery. Always use in
combination with a battery.
Charging: Both the 2 and 15 amp
charge rates perform an automatic
charge function. Dudng the first few
seconds of operation, an analytical
check of the battery is performed. If the
charger does not detect a properly
connected battery, the red "check" LED
will light continuously until such a "
battery is detected. If a battery will not
accept a normal charge, the charger
will switch to a special mode of
operation designed for such batteries.
Indication of this special mode is the
flashing of the first amber LED in the
charge status display. If successful,
normal charging will resume. If not, a
red LED will blink indicating that
charging has been aborted. When the
amber LED is on but not flashing,
normal charging is in progress. Charge
completion is indicated by a green
LED; at this point the charger has
switched to the Maintain Mode of
operation.
Maintain Mode: When the green LED is
lit, the charger has started Maintain
Mode. This mode of operation is also
known as Float-Mode Monitoring. In this
mode, the charger keeps the battery
fully charged by delivering a small
current, when necessary.
Battery types: The charger offers a se-
lection of three different types of batteries:
• Type 1 most Low-Maintenance, AGM
and Gel Cell batteries;
Type 2 Deep Cycle and Maintenance-
Free batteries;
• Type 3 Deep cycle batteries with a
built-in 'eye-type' charge indicator.
7

With the exception of AGM and gel cell
batteries, all other battery types may or
may not have vent caps. Vent caps are
located on top of the battery and provide
a means to add distilled water when
needed. Batteries should be marked
with their type. If charging a battery that
is not marked, check the manual of the
item that uses the battery. If the battery
type is unknown, use the Type 1
position. Make sure the battery complies
with the safety instructions on page 3.
Engine cranking: When the 100A
Start rate is selected, the charger waits
until the engine is actually being
cranked before delivering 100 amps for
engine start. Note: The charger
delivers a charge of 3 to 7 amps while
waiting for the engine to be cranked and
will reset ifthe engine is not cranked
within 15 minutes. Cranking is allowed
for up to 3 seconds, then the charger
shuts down for a 4 minute cool down
period. During the cool down period the
Start LED will blink. After 4 minutes, the
Start LED will light continuously,
indicating that another crank cycle can
be performed.
Battery Status LEDs: The status of the
battery is indicated by a row of six
LED's. The first LED is red; it will light
under the following conditions:
1. The charger is not connected to a bat-
tery. Red LED lights continuously.
2. The charger is reverse-connected to a
battery. Red LED lights continuously.
3. The charge cycle was not completed
within 24 hours. Red LED blinks.
4. The battery could not be charged in a
normal manner. This could be due to a
battery with a partially shorted or open
cell, sulfated battery plates or electro-
lyte out of balance. Red LED blinks.
The next four LED's are amber. First,
only the leftmost amber LED will light.
Then two, then three, and eventually all
four amber LED's will light. Refer to
"Estimating Charge Time" on page 12
for more information.
The sixth LED is green and lights to indi-
cate that charging is complete. When the
green LED lights, the amber LED's will turn
off and the charger starts Maintain Mode.
See the Control Panel table on the next
page.
Setup and Operating: Follow all safety
and connecting procedures in this
manual. Located above each button on
the control pad is an amber LED that
lights to indicate that the selection is
active.
When first plugged in, the charger will
automatically default to the 2 AMP /
TYPE 1 position. You may then select
the charge rate and battery type. For
example, if you're charging a large 12-
volt deep cycle battery, press the
buttons labeled 15 AMP and TYPE 2.
Note: If you press a charge rate or
battery type button after charging has
started, the charger will restart the
charging process. Refer to "Estimating
Charge Time" on page 12 for more
information.
When selecting the Start position, you
do not have to select a battery type. All
indicator lights will turn off except for the
light above the Start button. The red
LED will also light if a properly con-
nected battery has not been detected.
8

¢.D
MODEL 71224
X indicates panel lights that continuously glow.
B indicates panel lights that blink on and off.
Initial power up
Battery REVERSED or NOT connected
Normal battery detected, charge started
Sulfated battery detected, charge started
Charging 0% to 25% completed
Charging 20% to 50% completed
Charging 35% to 90% completed
Charging 75% to 100% completed
Charge complete, Maintain Mode started
Engine Start, cranking or ready to crank
Engine Start, 4 minute rest period
Charge aborted
I D CH4nr_'_eou_'ruD
X
B
X
user selected
user selected
user selected
user selected
user selected
user selected
user selected
CHECK
X
X
BATrERv STATUS
D D D D D I'-]
-- CHARGED
X
user selected
user selected
user selected
user selected
user selected
user selected
user selected
B
X
B
X
X X
X X X
X X X X
X

IMPORTANT: Follow all safety instruc-
tions and precautions when charging
your battery. Wear complete eye
protection and clothing protection.
Charge your battery in a well-ventilated
area.
Charging your battery in the vehicle:
1. Avoid personal injury by keeping
clear of fan blades, belts, pulleys and
other engine parts.
2. Avoid damaging the charger by
keeping the power cord and output
cords away from the hood, door or
moving engine parts.
3. Note the polarity of the battery posts
by checking the identification marks
on the battery: POSITIVE (POS, P or
+) and NEGATIVE (NEG, N or -). The
positive post is usually larger than
the negative post.
4. Identify which battery post is
grounded or connected to the
chassis. THIS IS NORMALLY THE
NEGATIVE POST.
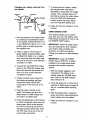
NEGATIVE GROUNDED SYSTEM
5. Connecting to a negative-
grounded system: Connect the red
(POSITIVE) output clamp to the
POSITIVE post of the battery. Rock
and twist the clamp back and forth to
be sure a solid electrical connection
.
.
is made. Then connect the black
(NEGATIVE) output clamp to a
heavy, unpainted metal part of the
chassis or engine block, away from
the battery (see figure above). DO
NOT connect clamp to negative
battery post, carburetor, fuel line or
sheet metal part.
Connecting to a positive-grounded
system: Connect the black (NEGA-
TIVE) output clamp to the NEGA-
TIVE post of the battery. Rock and
twist the clamp back and forth to be
sure a solid electrical connection is
made. Then connect the red (POSI-
TIVE) output clamp to a heavy,
unpainted metal part of the chassis
or engine block, away from the
battery. DO NOT connect clamp to
positive battery post, carburetor, fuel
line or sheet metal part.
Plug power cord into an AC outlet.
The charger will set to the default
state of 2 AMP charge rate and Type
1 for battery type.
Press the appropriate control buttons
to select the desired charge rate and
battery type. Within a few- seconds,
the red LED should go out and the
charging process should start. If the
red LED does not go out, check for
correct cable connection.
.
.
To disconnect the charger, unplug
the charger power cord before
attempting to disconnect the output
clamps. Then, standing away from
the battery, remove the output clamp
from the chassis or engine block.
Finally, remove the output clamp
from the battery post.
Clean and store the charger in a dry
location.
10

Charging your battery removed from
the vehicle:
PosrrlvE NEGATIVE
'CHARGER
POWER
CORD
24",6 GAUGE
CABLE
TO
GROUNDED
POWER
OUTLET
1. Note the polarity of the battery posts
by checking the identification marks
on the battery: POSITIVE (POS, P or
+) and NEGATIVE (NEG, N or -). The
positive post is usually larger than
the negative post.
2. Attach at least a 24-inch-long 6-
gauge (AWG) insulated battery cable
to NEGATIVE (NEG, N or-) battery
post. Rock and twist the clamp back
and forth to be sure a solid electrical
connection is made.
3. Connect the red (POSITIVE) output
clamp to the POSITIVE battery post.
Rock and twist the clamp back and
forth to be sure a solid electrical
connection is made.
4. Position yourself as far away from
the battery as possible, and then
connect the black (NEGATIVE)
output clamp to the free end of the
cable.
5. Plug the power cord into an AC
outlet. The charger will set to the
default state of 2 AMP charge rate
and Type 1 for battery type.
6. Press the appropriate control buttons
to select the desired charge rate and
battery type. Within a few seconds,
the red LED should go out and the
charging process should start. If the
red LED does not go out, check for
correct cable connection.
.
.
To disconnect the charger, unplug
the charger power cord before
attempting to disconnect the charger
clamps. Then, standing away from
the battery, remove the output clamp
from the NEGATIVE battery post.
Finally, remove the output clamp
from the POSITIVE battery post.
Clean and store the charger in a dry
location.
USING ENGINE START
Your battery charger can be used to
jump start your car if the battery is low.
Follow these instructions on how to use
the ENGINE START feature.
IMPORTANT: Follow all safety instruc-
tions and precautions when charging
your battery. Wear complete eye
protection and clothing protection.
Charge your battery in a well-ventilated
area.
IMPORTANT: Using the ENGINE
START feature WITHOUT a battery
installed in the vehicle could cause
damage to the vehicle's electrical
system.
1. With the charger plugged in and
connected to the battery of the
vehicle, press the 100 AMP touch
pad. Only the 100 AMP indicator
lamp should be lit.
,
.
.
Crank the engine for no more than 3
seconds. If engine does not start, let
rest for 4 minutes before cranking
again.
After the engine starts, unplug the
power cord before disconnecting the
output clamps from the battery.
Clean and store the charger in a dry
location.
11

This charger adjusts the charging time in order to charge the battery completely,
efficiently, and safely. The microprocessor automatically makes all necessary
calculations. However, this section includes guidelines that can be used to estimate
charging time.
The duration of the charging process
depends on each of three factors.
1. Battery state: A battery that has only
been slightly discharged could be
charged in only a few hours. How-
ever, the same battery could take 24
hours to charge if it is very weak.
Battery state can be estimated by
using a voltmeter to measure the
battery voltage or by using a State-
of-Charge Tester. The lower the
reading, the longer the charging
process will take.
2. Battery rating: A higher rated battery
will take much longer to charge than
a lower rated battery under the same
conditions. A battery's rating may be
indicated in Ampere hours (Ah),
Reserve Capacity (RC), or Cold
Cranking Amps (CCA). The lower the
rating, the quicker the charging will
be completed. For example, a very
small battery might be rated for 6 Ah
and charge in 4 hours, but a very
large battery might be rated for 100
Ah and require 24 hours to charge
completely.
3. Charge rate: The charge rate is
measured in amps. This charger
provides charge rates of 2 Amps and
15 Amps. Note: the 100 Amp rate is
intended for Engine Start only, NOT
continuous charging. A higher
charge rate results in a faster charge.
Note: The 2 Amp rate might be, too
low to charge a higher rated battery
within the 24 hour time limit the
charger allows. However, some
smaller batteries, such as motor-
cycle and tractor batteries, have a
maximum recommended charge rate
much less than 15 Amps. Such
batteries should be charged using
the 2 Amp setting.
This charger starts charging at the
selected rate (2 or 15 Amps) and
eventually reduces the charge rate in a
precisely controlled manner. After the
charging process has started, the
Battery Status LEDs can be used to
estimate the charge time as explained
below.
• Fled LED: Checking for properly
connected battery, not charging (no
output).
• 1 Amber LED: Battery detected,
charging started, 3 to 10 seconds
from start.
2 Amber LED$: Charging roughly
20% to 25% complete, 1 to 5 hours
from start.
• 3 Amber LEDs: Charging roughly
35% to 50% complete, 3 to 7 hours
from start. Battery charged enough
for use in vehicle. Note: If charging is
restarted after this point, the charger
may go straight to Maintain Mode
(Green LED).
• 4 Amber LEDs: One or two hours
left, battery virtually "good as new", 4
to 13 hours from start.
Green LED: Charge complete,
battery at maximum charge state, 5 to
14 hours from start.
12

A minimal amount of care can keep your battery charger working properly for years.
1.Clean the clamps each time you are
finished charging. Wipe off any
battery fluid that may have come in
contact with the clamps to prevent
corrosion.
2. Coil the input and output cords neatly
when storing the charger. This will
help prevent accidental damage to the
cords and charger.
3. Occasional cleaning of the case of the
charger with a soft cloth will keep the
finish shiny and help prevent corro-
sion.
13

Performance problems often can be corrected by the user. Please read through this
chart for a possible solutions to common problems.
PROBLEM POSSIBLE CAUSE SOLUTION
Indicator lights are lit in The charger may be Return to place of
an errat c manner not defective, purchase for a
] explained in the "Using replacement.
Your Battery Charger"
section.
The red abort light always
flashes before the battery
is charged.
Engine crank time is less
than specified.
The green full charge light
turns on a few minutes
after connecting to the
battery.
This will happen if the
battery did not reach full
charge within 24 hours.
May be due to a very large
battery or a bank of
batteries requiring more
than what a 15 Amp
charger can deliver within
24 hours. The battery may
also be bad.
Starter motor may be
drawing more than 100
Amps.
The battery may be fully
charged or recently
charged leaving the
battery voltage high
enough to make the
charger think the battery
is fully charged.
Reset the charger by
unplugging it or briefly
disconnecting the negative
battery clip. Select the
desired charge rate and
battery type again, if
necessary,
Charge the battery at the
15 Amp rate for 10 to 15
minutes then crank the
engine.
Ifthe battery is in a vehicle
turn the headlights on for a
few minutes to reduce the
battery voltage and try
charging again:
For information about troubleshooting, call toll-free from anywhere in the
U.S.A. 7 am to 4:30 pm CT Monday through Friday.
1-800-SEARS-64 (1-800-732-7764).
14

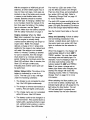
This section shows an illustration of your battery charger. Use it to become
familiar with part locations and appearance.
Item Description
1, Transformer
2, SCR ControlModule
3. Screw 8-18 xl/2" (4)
4. Touch Pad Control Board
5. Circuit Breaker
6. Output Cables
Part Number
93026557
2299001160
5199000274
2299001191
3999000104
2299001205
Item Description
7. AC Power Cord
8. Handle
9. Faceplate
10. CordCleat
Owner'sManual
Part Number
90026135
3599000270
0899001570
1199004390
0099000303
15

For information about troubleshooting, call toll-free from anywhere in the
U.S.A. 7 am to 4:30 pm CT Monday through Friday.
1-800-SEAFIS-64 (1-800-732-7764).
16
-
 1
1
-
 2
2
-
 3
3
-
 4
4
-
 5
5
-
 6
6
-
 7
7
-
 8
8
-
 9
9
-
 10
10
-
 11
11
-
 12
12
-
 13
13
-
 14
14
-
 15
15
-
 16
16


DieHard 200.71223 Owner's manual
- Category
- Car battery chargers
- Type
- Owner's manual
Ask a question and I''ll find the answer in the document
Finding information in a document is now easier with AI
Related papers
Other documents
-
ANSMANN ALCS 2-24 A User manual
-
Schumacher 260-9513 Masterforce 125A Automatic Battery Charger/Engine Starter MF187 Owner's manual
-
Schumacher DieHard 71328 6V/12V Battery Charger & Engine Starter Owner's manual
-
-
MasterForce Masterforce 260-9513 125A Automatic Battery Charger & Engine Starter MF187 Owner's manual
-
-
-
Sears 200.71211 User manual
-
-