Nikon 25498B User manual

Category
Bridge cameras
Type
User manual

This manual is also suitable for

Technical GuideTechnical Guide
ii
Introduction
This Technical Guide” details the principal techniques used
to create two of the more technically advanced photographs
in the D800/D800E catalog. Enjoy this opportunity to admire
the skills of professional photographers who have mastered
the D800/D800E.
While its high pixel count of 36 megapixels gives the D800/
D800E resolution unrivalled by previous digital SLR cameras,
a side e ect is that bokeh and blur are made that much more
obvious. Realizing the full potential of a camera with over
30 million pixels involves a thorough appreciation of bokeh
and blur, careful selection of settings and of tools (such as
lenses and tripods), and working with the best possible sub-
jects.
Table of Contents
Introduction i
Introduction i
i
i
Shooting Techniques
Shooting Techniques
1
1
Static Subjects ...........................................................................1
Lesson 1: Use a Tripod .................................................................. 2
Lesson 2: Use Live View ............................................................... 3
Lesson 3: Don’t Stop Aperture Down Too Far ...................... 5
Same Shot, No Live View ............................................................. 6
Portrait Subjects........................................................................7
Lesson 1: Choose the Right Focus Settings .......................... 8
Lesson 2: Choose the Right Exposure Settings ................... 9
Learning from Failure: Same Shot, Di erent Focus .........10
Quick Tips 1
Quick Tips 1
1
1
1. High ISO Sensitivity ........................................................... 11
2. Auto ISO Sensitivity Control ............................................ 12
3. Improving Optical Performance ..................................... 13
4. Backlit Portraits .................................................................. 14
The D800E
The D800E
15
15
1. High Resolution Images with the D800E ....................... 15
2. Adjusting Aperture for Visually Complex Subjects ..... 16
3. Color Artifacts and Moiré ................................................. 17
1
Shooting Techniques
Static Subjects
—Keeping Blur to a Minimum—
2
Shooting Techniques Static Subjects
At the high resolutions o ered by the D800/D800E, even the
slightest camera motion can result in blur. The technique re-
vealed in this section minimizes blur through a combination
of live view photography and a tripod.
Technical Data
Lens: AF-S NIKKOR 14–24 mm f/2.8G ED Exposure mode:
Manual Shutter speed: 1 s Aperture: f/8 White balance:
Choose color temp. (5000 K) ISO sensitivity: 100 Picture con-
trol: Standard
Note: This photo was shot in 14-bit NEF (RAW) and processed
using Capture NX 2.
Photo © Benjamin Anthony Monn
Lesson 1: Use a Tripod
Use a tripod to reduce blur when
photographing static subjects. It
should be as sturdy as possible;
avoid extending the legs or center
column farther than necessary. A
large head helps keep the camera
steady.
Tripod Mode
Some lenses, such as the AF-S
NIKKOR 200–400 mm f/4G ED
VR II, o er vibration reduction
with a TRIPOD option that is par-
ticularly e ective in reducing blur
at shutter speeds of ⁄–1 s and is
generally recommended when
the camera is mounted on a tri-
pod. NORMAL is however preferred
if the tripod head is not  xed or
you are using a monopod.
3
Shooting Techniques Static Subjects
Why Use Live View?
1. The mirror is raised prior to shooting, reducing blur.
At the high resolutions o ered by the D800/D800E, even the
slap of the mirror can sometimes be enough to blur photo-
graphs. In live view, the mirror is raised well before the shutter
is released, helping keep blur to a minimum.
Lesson 2: Use Live View
Live view can be used to improve focus and prevent blur.
Live View Photography
Rotate the live view selector to C and press a to raise the
mirror and display the view through the lens in the monitor.
Live view selector a button
Reducing Blur During View nder Photography
If you have trouble seeing the display in the monitor out-
doors or in bright ambient light, you can use mirror-up
mode to reduce blur while framing photographs in the
view nder. Press the release mode dial lock release and ro-
tate the release mode dial to MUP.
After focusing, press the shutter-release button all the way
down once to raise the mirror and again to release the shut-
ter. An optional remote cord can be used to prevent the
camera moving when you press the shutter-release button,
or you can select an option other than O for Custom Set-
ting d4 (Exposure delay mode) to delay shutter release un-
til about 1–3 s after the button is pressed. Use of a tripod is
recommended.
4
Shooting Techniques Static Subjects
Why Use Live View?
2. You can focus anywhere in the frame.
In live view, you can use the multi selector to
position the focus point anywhere in the frame,
regardless of the options selected for AF/MF and
autofocus.
The ability to position the focus point anywhere in the moni-
tor’s angle of view greatly increases the range of locations on
which the camera can focus.
In autofocus mode, you can focus on the subject in the select-
ed focus point by pressing the shutter-release button halfway
or pressing the B button. In manual focus mode, focus can
be adjusted by rotating the lens focus ring.
Why Use Live View?
3. You can zoom in for precise focus.
Press the X button to magnify the
view in the monitor by up to 23×
for precise focus during live view.
You will  nd this particularly ef-
fective with manual focus.
X button
A navigation window will appear
in a gray frame at the bottom of
the display. Use the multi selector
to scroll to areas of the frame not
visible in the monitor.
Navigation window
5
Shooting Techniques Static Subjects
Lesson 3: Don’t Stop Aperture Down Too Far
Stopping down aperture in manual (h) and aperture-priority
auto (g) exposure modes increases depth of  eld, bringing
both background and foreground into focus. Stop aperture
down too far, however, and di raction will cause the image to
actually lose de nition. Optimal aperture—the aperture that
produces the greatest depth of  eld with no loss of sharp-
ness—varies from lens to lens. In the case of the AF-S NIKKOR
14–24 mm f/2.8G ED lens used in this example, an aperture f/8
will produce the sharpest image.
f/8
Amount of detail visible in
window leads and frieze is
less than at f/8
f/11
Suggested Settings
White balance > Choose color temp.:
White balance can be adjusted in
steps as small as 10 K. To adjust
white balance on the amber (A)
blue (B) axis, hold the U button
and press 4 or 2 to highlight a
digit and 1 or 3 to change.
Framing guide: Using the R but-
ton, you can display a framing
guide that helps compose pho-
tographs during live view.
Virtual horizon: Alternatively, the
R button can be used to display
pitch and roll indicators to help
you keep the camera level during
live view.
6
Shooting Techniques Static Subjects
Same Shot, No Live View
Live view photography was not used in creating the second
example below; consequently, the mirror was not raised until
the photo was taken and the results are blurred.
With live
view:
Without live
view:
Edges of books
and other details
are blurred
Camera Control Pro 2
Optional Camera Control Pro 2 software can be used to
access most camera functions from a computer. To use
Camera Control Pro 2, start the computer and connect the
camera using the supplied USB cable as shown below.
Camera Control Pro 2 supports
live view; when used to zoom in
on the view through the lens in
the monitor, it shows more de-
tail than can be displayed in the
camera monitor.
Photographs are saved directly to
the computer, where they can be
inspected and retouched using
optional Capture NX 2 software.
7
Shooting Techniques
Portrait Subjects
—Focusing on a Selected Point—
8
Shooting Techniques Portrait Subjects
Use this method for sharp focus on selected points when
framing portraits in the view nder.
Technical Data
Lens: AF-S NIKKOR 70-200 mm f/2.8G ED VR II Exposure mode:
Manual Shutter speed: ½  s Aperture: f/4.5 White balance:
Auto 2 ISO sensitivity: 640 Picture control: Portrait
Note: This photo was shot in 14-bit NEF (RAW) and processed
using Capture NX 2.
Photo © Cli Mautner
Lesson 1: Choose the Right Focus Settings
Portrait subjects are mobile and more easily photographed
without a tripod, but generally remain in one spot long
enough for single-point, single-servo autofocus. This photo
shoot shows that a portrait photographer must be able to
reliably focus on a selected point; hence the choice of single-
point AF, which unlike auto-area and dynamic-area AF, en-
sures that the camera always focuses on a point selected by
the photographer.
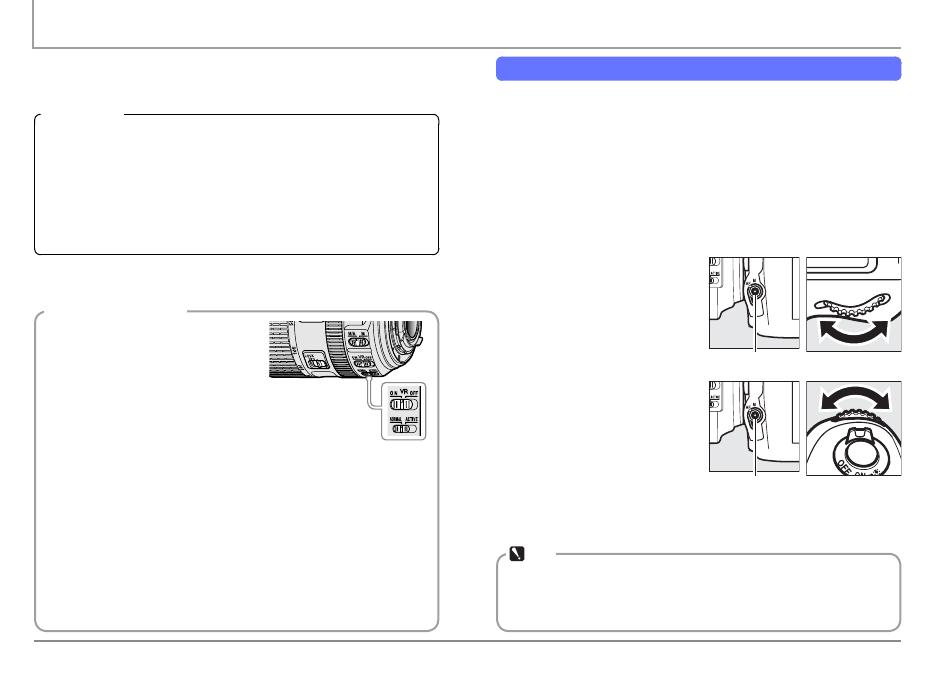
To choose an autofocus mode,
press the AF-mode button
and rotate the main command
dial.
AF-mode button
To choose an AF-area mode,
press the AF-mode button and
rotate the sub-command dial.
AF-mode button
Vibration Reduction (VR)
We recommend using VR lenses
with the vibration reduction
switch in the ON position. Vi-
bration reduction takes e ect
when the shutter-release but-
ton is pressed halfway, reducing
the e ects of camera shake on
the image in the view nder and
making it easier to frame pictures
and focus.
If the lens has a vibration mode switch, choose NORMAL for
hand-held photography or when using a monopod. Vibration
reduction should generally be turned o when the camera
is on a tripod (exceptions can be made for the AF-S NIKKOR
200 mm f/2G ED VR II and other lenses with a TRIPOD option).
Note
Even slight changes to composition may result in the cam-
era focusing on something other than your intended target.
Choose the focus point after composing the photograph.
9
Shooting Techniques Portrait Subjects
Lesson 2: Choose the Right Exposure Settings
Aperture
Choose a wide aperture for a softer feel.
Set aperture to f/4 or so to capture facial contours.
Enough depth of  eld for the lips and the corners of the
eyes, but focus gets softer from the earrings back.
Shutter Speed
Choose a speed a bit faster than the limit for camera blur.
The superior resolution of the D800/D800E makes small
amounts of focus blur more obvious. Select a shutter speed
slightly faster than you would choose when photographing
the same subject with other cameras.
A fast shutter speed has captured details of the
lace veil and brought out individual eyelashes.
10
Shooting Techniques Portrait Subjects
Light Level and ISO Sensitivity
Adjust lighting and ISO sensitivity appropriately.
After choosing both shutter speed and aperture manually,
you may need adjust lighting or ISO sensitivity.
These photos use soft, nat-
ural light instead of  ash
or studio lighting. Out-
door lighting can be  ne-
tuned by repositioning the
model or photographer
(above), indoor lighting by
raising or lowering blinds
(right).
Learning from Failure: Same Shot, Di erent Focus
With the D800/D800E, you will notice that photos seem to have
less depth of  eld than pictures shot with other cameras under
the same conditions, and that focus consequently requires more
attention. As can be seen from the examples below, changing
the focus point even slightly can blur important details.
Success
Failure
Earring is in focus,
iris and eyelashes
are blurred
11
Quick Tips
1. High ISO Sensitivity
The following sections introduce useful techniques and
camera options applicable to a variety of situations.
The D800/D800E keeps noise to a minimum for high-resolu-
tion results at even the highest ISO sensitivities.
The High ISO NR option in the
shooting menu reduces the ran-
domly-spaced bright pixels, fog,
and lines characteristic of high-
sensitivity noise, but may leave
edges less sharp. You may  nd
that settings of O or Low o er a
good balance between sharpness and noise even at high ISO
sensitivities. If you shoot in NEF (RAW) format, you can change
the setting later in Capture NX 2 (available separately).
Select the Noise Reduction tool
in the Capture NX 2 “Develop” sec-
tion (NEF/RAW images) or Adjust
menu (JPEG and TIFF images) and
adjust Intensity and Sharpness to
achieve the desired result.
High
Normal
Detail views of a single subject
shot at di erent High ISO NR
settings. Higher values reduce
the noise visible in the sky but
also reduce edge sharpness in
the main subject.
Normal
Low
12
Auto ISO sensitivity control au-
tomatically adjusts ISO sensitiv-
ity if optimal exposure can not be
achieved at the value selected by
the photographer. If Auto is se-
lected for Minimum shutter speed, the camera will also ad-
just the threshold for auto ISO sensitivity control according
to the focal length of the lens (CPU lenses only), a feature you
will  nd particularly convenient when using zoom lenses (see
sample photos at right).
To enable auto ISO sensitivity control, select On for ISO
sensitivity settings > Auto ISO sensitivity control in the
shooting menu.
Maximum
sensitivity
Choose the maximum value available for auto ISO sen-
sitivity control (200–Hi 2). The minimum is ISO 100.
Minimum
shutter
speed
In exposure modes e and g, sensitivity will only be
adjusted if shutter speed would otherwise be slower
than this value (¼ –1 s or
Auto). Highlight Auto and
press 2 to choose whether
the camera gives priority
to shutter speed (Slower)
or ISO sensitivity (Faster)
when Auto is selected.
Quick Tips
2. Auto ISO Sensitivity Control
Focal length: 24 mm
Shutter speed: ½s
ISO sensitivity: 900
Focal length: 50 mm
Shutter speed: ⁄ s
ISO sensitivity: 2500
Focal length: 70 mm
Shutter speed: ⁄ s
ISO sensitivity: 4500
Focal length: 100 mm
Shutter speed: ⁄ s
ISO sensitivity: 6400
The S Button
Auto ISO sensitivity control can be
turned on or o by pressing the
S button and rotating the sub-
command dial.
13
Quick Tips
3. Improving Optical Performance
Stopping aperture down increases depth of  eld, making the
foreground and background sharper. Stop aperture down
too far, however, and di raction will actually cause the image
to lose de nition. The e ects of di raction are partly in u-
enced by the size of the pixels in the camera image sensor,
but with the D800/D800E’s high resolution the e ects gen-
erally become noticeable around f/11. When you need more
depth of  eld, don’t just immediately stop the lens all the way
down; instead, look for the aperture that o ers the best bal-
ance between sharpness and depth of  eld. In the examples
on this page, you can see the grid lose de nition as aperture
is stopped down past f/11.
f/8 f/11
f/16 f/22
14
Quick Tips
4. Backlit Portraits
With its 91K (about 91,000) pixel RGB sensor, the D800/D800E
o ers improved face detection. Used with the view nder in
modes other than
h
, it can balance exposure between portrait
subjects and the background even when the subject is backlit.
D800/D800E:
Using face detec-
tion, the camera
meters the
subject’s face for
optimal exposure
Earlier cameras:
The subject is
underexposed; ex-
posure compen-
sation required
Flash Photography
The D800/D800E also automatically optimizes  ash output
for portrait subjects.
D800/D800E:
Flash output
is adjusted
according to
the brightness
of the subject’s
face, producing
optimal results
even with bright
backgrounds
Earlier cameras:
Flash output
is adjusted
according to
the brightness
of the back-
ground, and the
portrait subjects
are underex-
posed
15
The D800E
1. High Resolution Images with the D800E
The D800E is a good choice when you need high-resolution
photos of visually complex subjects.
Case 1: A Subject in Traditional Dress
Preserve  ne patterns in your subject’s hair and clothing.
Case 2: A Japanese Garden
Capture tiles and other  ne details in high resolution.
Case 3: Leaves
Capture individual leaves in crisp detail.
Improving Resolution
Resolution can be improved by disabling high ISO noise re-
duction (
page 11
page 11), particularly at low ISO sensitivities.
Movies
When recording movies, the D800E o ers similar resolution
to the D800. Choose the camera that best suits your style.
16
The D800E
2. Adjusting Aperture for Visually Complex Subjects
With cameras like the D800E, which are suited to visually
complex subjects, it is important to get as much sharpness
from the lens as possible. Contrast at the periphery of the im-
age can generally be increased by choosing an aperture two
or three stops from the maximum, although results will vary
from lens to lens. Below are some of the lenses you can use
for enhanced sharpness:
AF-S NIKKOR 14–24 mm f/2.8G ED
AF-S NIKKOR 24–70 mm f/2.8G ED
AF-S NIKKOR 70–200 mm f/2.8G ED VR II
AF-S NIKKOR 16–35 mm f/4G ED VR
AF-S NIKKOR 24–120 mm f/4G ED VR
AF-S NIKKOR 200–400 mm f/4G ED VR II
AF-S NIKKOR 24 mm f/1.4G ED
AF-S NIKKOR 35 mm f/1.4G
AF-S NIKKOR 85 mm f/1.4G
AF-S NIKKOR 200 mm f/2G ED VR II
AF-S NIKKOR 300 mm f/2.8G ED VR II
AF-S NIKKOR 400 mm f/2.8G ED VR
AF-S NIKKOR 500 mm f/4G ED VR
AF-S NIKKOR 600 mm f/4G ED VR
AF-S Micro NIKKOR 60 mm f/2.8G ED
AF-S VR Micro-Nikkor 105 mm f/2.8G IF-ED
The D800E o ers better resolution at apertures where dif-
fraction (
page 13
page 13) is not an issue. The e ects of aperture may
therefore be more noticeable than with the D800, and care
may be required to avoid loss of de nition due to di raction.
f/8 f/22
Note: These pictures were taken with the D800.
17
The D800E
3. Color Artifacts and Moiré
Color artifacts and moiré are less frequent at the high resolu-
tions supported by the D800/D800E, but when they do occur,
they tend to be more noticeable in photos taken with D800E.
Artifacts and moiré are not visible in the camera monitor but
can be viewed by copying photos to a computer and viewing
them at 100% zoom.
The photo on the left was taken with the D800E, that on the
right with the D800. Color artifacts are visible in the sash.
Moiré can be reduced using
Capture NX 2. For NEF (RAW) im-
ages, zoom in to 100% and select
Color Moiré Reduction.
O High
Using Di raction to Combat Color Artifacts and Moiré
Although stopping aperture
down makes the e ects of
di raction (
page 13
page 13,
16
16) more
visible, it may also help to re-
duce color artifacts and moiré.
Adjust aperture according to
whether your priority is sharp-
ness or suppressing moiré.
f/5.6
f/8
f/11 f/16
© 2012 Nikon Corporation
CS SB2B01 (11)
  • Page 1 1
  • Page 2 2
  • Page 3 3
  • Page 4 4
  • Page 5 5
  • Page 6 6
  • Page 7 7
  • Page 8 8
  • Page 9 9
  • Page 10 10
  • Page 11 11
  • Page 12 12
  • Page 13 13
  • Page 14 14
  • Page 15 15
  • Page 16 16
  • Page 17 17
  • Page 18 18
  • Page 19 19
  • Page 20 20

Nikon 25498B User manual

Category
Bridge cameras
Type
User manual
This manual is also suitable for

Ask a question and I''ll find the answer in the document

Finding information in a document is now easier with AI