StarTech.com HSB220SAT25B User manual
- Category
- Drive bay panels
- Type
- User manual
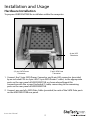
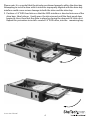
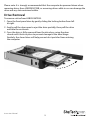
StarTech.com HSB220SAT25B is a 3.5” Dual SATA Hard Drive Hot-Swap Bay, ideal for simplifying drive removals and insertions during system building or OS image deployment. It supports hot-swapping, data transfer rates up to 6Gbps, and features a swinging, latchable door for easy drive access.
StarTech.com HSB220SAT25B is a 3.5” Dual SATA Hard Drive Hot-Swap Bay, ideal for simplifying drive removals and insertions during system building or OS image deployment. It supports hot-swapping, data transfer rates up to 6Gbps, and features a swinging, latchable door for easy drive access.


-
 1
1
-
 2
2
-
 3
3
-
 4
4
-
 5
5
-
 6
6
-
 7
7
-
 8
8
-
 9
9
-
 10
10
-
 11
11


StarTech.com HSB220SAT25B User manual
- Category
- Drive bay panels
- Type
- User manual
StarTech.com HSB220SAT25B is a 3.5” Dual SATA Hard Drive Hot-Swap Bay, ideal for simplifying drive removals and insertions during system building or OS image deployment. It supports hot-swapping, data transfer rates up to 6Gbps, and features a swinging, latchable door for easy drive access.
Ask a question and I''ll find the answer in the document
Finding information in a document is now easier with AI
Related papers
-
StarTech.com HSB220SAT25B User manual
-
 StarTech.com HSB320SATBK Owner's manual
-
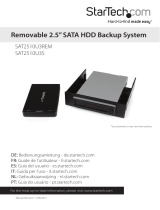 StarTech.com SAT2510U3REM User manual
-
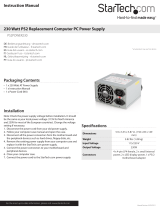 StarTech.com PS2POWER230 User manual
-
 StarTech.com PS2POWER230 User manual
-
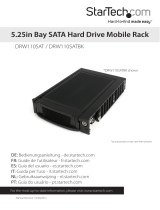 StarTech.com DRW110SATBK User manual
-
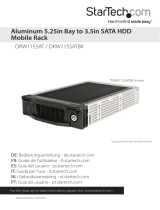 StarTech.com DRW115SATBK User manual
-
StarTech.com DRW150SATBK User manual
-
StarTech.com UNIDOCK3U User manual
-
 StarTech.com SAT2510U2REM User manual


