Page is loading ...

[[
\
\
\
,<,
OutdoorGas
Barbeque/Grill
Assemblymanual/ Use
& Care
i i ii ii ii ii ii ii ii iii
%
ii i i _i i
i _ ii i
(Propaneo
HazardousFireor Explosionmayresultif these
instructionsare ignored.
It is theuser's responsibilityto seethat this barbecueisproperly
assembled,installed,maintainedandcaredfor. Failureto follow
instructionsin this manualcouldresult in seriousbodily injury
and/or propertydamage.Anymodificationtothe grillis
dangerousandisnot permitted.
some partsmay contain sharpedges-especiallyif noted in the
manual. Wear protective gloves if necessary.
WARRANTYINFORMATION
Full Model No. fromouter carton:
Date Purchased:
Serial Number
(fromratingplate):
SAVETHIS MANUALFUR FUTUREREFERENCE
Installermustleaveinstructionswiththeconsumerforfuturereference.
KEEPYOURRECEIPTASPROOFOF PURCHASETO VALIDATE
THEWARRANTY.ATTACHYOUR RECEIPTTO THEINSIDE
COVEROFTHIS MANUAL FOREASYREFERENCE.
IF YOUSMELLGAS:
1. Shut off gas supply to appliance.
2. Extinguishany openflame.
3. Openlid.
4. If odour continues, keepawayfrom the applianceand
immediately callyour gassupplier or your fire department.
• Donotstore usegasolineor otherflammableliquidsor
vapours in thevicinity ofthis or anyotherappliance.
• An LP cylinder not connectedfor use shall not be stored in
the vicinity of this or anyother appliance.
www.blueemberc
Manufactured for
inCANADA:1-888-267-2159
FiestaBarbequesA DivisionofWolfedaleE
2 Walker Drive Brarnpton Ontario, LCT5E1
inUSA:1-800-396-3838
FiestaGasGrills, LLC.
One FiestaDrive Dickson,TN.
Made in China

THANKYOUFOR
PURCHASINGTHISBARBEQUE
We are dedicated to creating the ultimate barbeque experience
by providing you with all the right tools, starting with this
manual. It is important to readthrough the entire booklet prior to
using your barbeque to ensure you fully understand all of the
features and how to operate your barbeque for optimum
performance.
Pleaseretain this manual for the lifetime of your barbeque after
recording the serial and model number in the appropriate space
allocated on the front cover.
In Canada
• The serial number can be found on the silver rating plate
located on rear of the bottom pan resin. Serial numbers are 8
digits long e.g. 02123456
• The full model numbercanbe found on the white labelof your
barbeque box or a partial model number is located above the
serial number on the silver rating plate.
In USA
• The serial number can be found on the silver rating plate
located on rear of the bottom pan resin. Serial numbers are 9
digits long e.g. 08U123456
• The full model numbercanbe found on the white labelof your
barbeque box or above the serial number on the silver rating
plate.
FORRESIDENTIALUSEONLY.
DONOTUSEFORCOMMERCIAL
COOKING.
Combustionby-productsproducedwhen
usingthis productcontainchemicalsknown
to thestateofCaliforniato causecancer,birth
defects,or otherreproductiveharm.
SAFETYSYMBOLS
The symbols and boxes shown below explain what each
heading means. Read and follow all of the messages found
throughout the manual.
DANGER:INDICATESAIMMINENTLYHAZARDOUS
SITUATIONWHICH,IFNOTAVOIDED,WILL
RESULTIN DEATHORSERIOUSINJURY.
WARNING:INDICATESANPOTENTIALLY
HAZARDOUSSITUATIONWHICH,IF NOTAVOIDED,
COULDRESULTINDEATHORSERIOUSINJURY.
CAUTION:INDICATESANPOTENTIALLY
HAZARDOUSSITUATION,ORUNSAFEPRACTICE
WHICH,IF NOTAVOIDED,COULDRESULTIN
MINORORMODERATEINJURY.
Getting Familiar With Your Barbeque ...3
Caring For Your Equipment ........... 3
Installation
Electrical Caution
L.R GasCylinder
Hose & Regulator
Cleaning & Maintenance .............. 7
Perform A LeakTest
CleaningVenturi Tubes
Cleaning Other Parts of Your Appliance
Storage
Using Your Appliance Correctly ........ 9
Getting Familiar with the Controls
Lighting
Re-Lighting
Shutting Down
Breaking In Your Barbeque
Cooking Techniques
Providing Power to your Barbeque
Trouble Shooting Guide ............. 15
Warranty Information ............... 16
FORYOUROWNSAFETY:
• Only useyour barbequeOUTDOORSina well-ventilated areaand shall
not be usedin abuilding garageor any otherenclosed area-
preferably3m (10 feet) from your residenceor any outbuildings.
• Always keepthe area around your barbequeclearof any combustible
materials, gasoline, or other flammable liquids.
• Keepthe ventilation opening(s) of the cylinder enclosurefree and
clearfrom debris.
• DONOToperatethis barbequeunder overhead or unprotected
combustible construction.
• DONOTobstruct the flow of combustion andventilation air to the
barbeque.
• DONOTusein garages,sheds, breezeways,or other enclosedareas.
• DONOTstorea spare L.P.(propane) cylinder underor nearyour
barbeque.
• DONOTleaveyour barbequeunattended while in operation.
• DONOTallow children to operate or play nearyour barbeque.
• DONOTusewhile underthe influence of alcohol or drugs.
• DONOTinstall/use in or on recreationalvehicles and/or boats
DONOTUSECHARCOALOR
CERAMICBRIQUETSIN
THISGASGRILL,THEYARENOT
REQUIRED.
IF THEABOVEINSTRUCTIONS
ARENOTFOLLOWEDEXACTLY,
A FIRECAUSINGDEATHOR
SERIOUSINJURY MAY OCCUR.

DONOTUSEYOURBARBEQUEUNTILYOUHAVE
READANDUNDERSTOODALLTHE
INFORMATIONINTHISMANUAL.
ITIS EXTREMELYIMPORTANTTOBESURETHAT:
I Li_il
BEFOREYOUUSETHIS
APPLIANCE
• Ensureyour barbequeis properly assembled.
• Ensuretherearenoleaksinthegassupplysystem(see'LeakTesting
section).
• Ensurethe burner is properly assembledwith the venturi tubes
seatedover thevalve outlets (Figure 1) andthere are no blockages
present in the venturi tubes (seeCleaningVenturi Tubes'Section).
• Ensureall electricalsupply cords and/or gassupply hosesarekept
awayfrom all or any heatedsurfaces.
• Ensureyour barbeque is positioned in a safe location (see
'Installation' section). Figure 2.
• Ensurevalveoutlets(orifices)areassembled1cm (3/8") intothe
venturitubes.
• Checkto seethat the valve outlets andventuri tubes are parallel to
the bottom of the basecastingof your appliance.
VENTURI
VALVE TUBE
FAILURETOENSURETHEABOVEMAYRESULT
INAHAZARDOUSFIREOREXPLOSION
CAUSINGSERIOUSBODILYINJURY
AND/ORPROPERTYDAMAGE.
INSTALLATION
THEINSTALLATIONOFTHISAPPLIANCEMUSTCONFORMWITH
LOCALCODESOR,INTHEABSENCEOFLOCALCODES:
• with eitherthe NationalFuelGasCodeANSI Z223.1/NFPA54,
Natural Gasand Propane Installation Code,CSAB149.1,or
PropaneStorageand Handling Code,B149.2,or the Standardfor
RecreationalVehicles,ANSI A 119.2/NFPA119.2, and CSAZ240
RVSeries, RecreationalVehicleCode,as applicable.
• Handlingand storageof LPcylinders mustconform to LPGas
CodeNFPA/ANSI58.Grill is notfor usein or on recreational
vehiclesand/or boats.
• All electrical accessories(such as rotisserie) must beelectrically
grounded in accordancewith localcodes CSAC22.1or National
ElectricalCode,ANSI/NFPA70. Keepany electricalcords and/or
fuel supply hosesaway from any hot surfaces.
• This grill issafety certified for use in the United Statesand
Canadaonly. Donot modify for useinany other location.
Modification will result in a safety hazard.
APARTMENTDWELLERS
Checkwith managementto learnthe requirementsandfire codes
for using anLP gasgrill in your apartmentcomplex. If allowed, use
outside on the groundfloor with clearancesas stated in Figure2
from walls or rails. Donot useon or under balconies.
61cm (24")
61 cm (24inches)
from sideof unit
(SeeFigure2)
WHENDECIDINGWHERETOPLACEYOUR
APPLIANCE,FOLLOWTHESEMINIMUM
CLEARANCEDISTANCESTOADJACENT
COMBUSTIBLEMATERIALS:
46cm
(18"),
46 cm (18inches)
from backof unit
(SeeFigure2)
MODELMAYNOTBE
EXACTLYASSHOWN.
DONOTUSETHISGASOUTDOORAPPLIANCE
UNDERANYOVERHEADCOMBUSTIBLE
CONSTRUCTION.
3

ELECTRICALCAUTION
• If anyaccessoryinstalled on this barbequerequiresanexternal
electrical power source,it must beelectrically grounded in
accordancewith local laws or in theabsenceof local laws,with
the CanadianElectricalCodeCSA022.1 or in the U.S.,with the
National ElectricalCodeANSI-NFPA70.
• Thethree-prong plug provides protection againstshock hazard
and should beplugged directly into a properly grounded
three-prong receptacle.Donot cut or removethegrounding
prong from this plug.
• To ensurecontinued protection againstrisk of electric shock,
connect to properly earthedoutlets only.
• Ensureall electricalsupply cords and fuel supply hoses are
kept well awayfrom anyheatedsurfaces.
L.P.GASCYLINDER
Gascylindersmanufacturedtodayhave mechanismsto provide worry
free barbequingyear round:
Q.C.C.1 or Type1-QuickConnectCouplingValve, ensurefast tank hook-
ups requiring only handtightening. The redundantvalvesysteminhibits
the flow of gasto the burner if the connection isnot 100%correct.
O.P.D. or OverfillProtection Devicepreventsaccidentalgas leaks
causedby cylinder "over pressurization",theleadingcauseof cylinder
gas leaks.Thefloat in thetank will automatically stop filling at 80%
capacity,leavinga 20% areaforthe expansionof liquid.Withoutthis safety
feature,the reliefvalvemay openand discharge propane,creatinga
potential safetyhazard.An O.P.D.cylinder iseasilydistinguished by its
triangular handwheel valve.Figure3)
PROVIDINGPOWERTOYOURBARBEQUE
To providepower to the barbecue,plug grounded electrical cord into
rear electricalbox as shown. (page34 Fig.17)
Plugelectrical cord into properly grounded
GFI(Ground Fault Interrupt) receptacle.If
useof anextensioncord is required,be
surethat it is a minimum 16 AWG, 3 wire
well insulated cord, marked for OUTDOOR
USEONLYand properly grounded. (Fig.14)
CAUTION:To ensurecontinued protection against risk of
electric shock, connectto properly earthedoutlets only.
GUfiRnlfifiTM
Look forthe GasGuardiansymbol
to easily identify propanecylinders
withthese safetyfeatures.
1. SPECIFICATIONS
Self-contained propanegas
barbequesystems aredesigned to
be usedonly with a9.1 kg (20 Ib)
propanecylinder,equipped with a
Type 1cylinder valveand
incorporatingan overfill protection
device (O.P.D).This barbeque
cannot beconnectedto anexisting
#510 P.O.Ltype valve(oneswith
left-handthreads).The cylinderfor
your gas barbeque must be
constructed and marked in
accordancewith the specifications
of LP. gascylinders:
NEW OPD
HANDWHEEL
FILLING STOPS AT 80%
In Canada:The National Standards of CanadaCAN/CSA-B339,
Cylinders,Spheresand Tubesfor Transportationof DangerousGoods;
andCommission.
In the U,S,: U.S.Department of Transportation (D.O.T.)
DONOTCONNECTTOAPROPANEGASCYLINDEREXCEEDINGTHIS
CAPACITY,ORUSEACYLINDERWITHANYOTHERTYPEOFVALVE
CONNECTIONDEVICE.
TheType 1 valveis recognizableby the large externalthread on the outlet
part of the valve. Standardexisting valvesdo not havetheseexteriorthreads.
Any attemptto connectaregulator,with otherthanthe:
i) MatingType1connector(recognizedbythe largeblackcouplingnut) or
ii) Standard#510 P.O.L fitting,
byuseof adaptersor anyother means,could resultindamage,fire or injury
andmaynegatethe importantsafety featuresdesignedintothe Type1
system.Theconnectionofa#510P.O.L fitting will not providetheflow control
ortemperatureshut-offfeaturesbuilt intothe completeType1system.
Westronglyrecommenduseofa propanecylinderwith Q.C.C.Iand O.P.D.
safety features.
THECYLINDERMUSTALSOBEEQUIPPEDWITH:
a.Ashut-off valve terminating in a proper cylinder valve outlet specified in
current standards:
• Canada:CSA1.6-2007 Outdoor Cooking GasAppliances.
• U.S.:ANSIZ21.58-2007 Outdoor CookingGasAppliances.
b.A listed overfilling protection device (O.P.D.).
c. Asafety relief valve havingdirect communication with the vapor spaceof
the cylinder.
d.A collar to protect the tank shut off valve.
e.An arrangementfor vapor withdrawal.
f. A bottom ring for securing to tank support assembly.
THECYLINDERSHOULDNOTEXCEED472MM (18 1/2") INHEIGHTAND317
MM (12 1/2") IN DIAMETER.
SAFETY:
• Always turn off the cylindervalvetightly when your barbequeis not inuse.
• Handletank valveswith care.
• Neverconnectan unregulatedL.P. gascylinderto your barbeque.
• Neverstore a spare cylinder under or nearyour barbequewhen in use.
• Neversubject any cylinder to excessiveheator direct sunlight.
• Always keepyour in-usecylinder securelyfastenedin an upright position.
• Do not insert anyforeign objects into the valveoutlet. You may damage
the back-check.A damagedback-checkcan bethe sourceof aleak.Leaking
propanemay result in explosion, fire, severepersonal injury or death.
• Neverfill the cylinder beyond80% full.
IF THEABOVEINSTRUCTIONS
ARENOTFOLLOWEDEXACTLY,
A FIRE CAUSINGDEATHOR
SERIOUSINJURY MAY OCCUR.
4

TRANSPORTATIONANDSTORAGE:
ALTHOUGHIT IS SAFEWHENUSED
PROPERLY,CARELESSHANDLINGOFTHE
PROPANEGASCYLINDERCOULDRESULTIN
FIRE,EXPLOSION,AND/ORSERIOUSINJURY.
PROPANEGASIS HEAVIERTHANAIR, ANDWILLCOLLECTIN LOW
AREAS,INCREASINGTHEABOVERISKS.THEREFORE:
• ALWAYS usethe cylinder cap providedwith your cylinder whenever
the cylinder is not connectedto your barbeque. (Figure4)
• DONOTstore in a building, garage or any other enclosedarea. Store
in awell-ventilated area.
• DONOTstore nearany gas burning apparatus or in any high-heat
areassuch as a closed car or trunk.
• Transportandstorethe cylinderin an uprightposition- do nottip on its
side.
• Store out of reachof children.
• DONOTsmoke while transporting a cylinder in your vehicle.
WARNING
• Never fill a cylinder beyond 80% full.
• Anoverfilled orimproperlystoredcylinderis a hazarddue
to possiblegasrelease fromthe safety relief valve. This
could causean intensefire with risk of propertydamage,
seriousinjuryordeath.
• If yousee, smell or heargasescaping,immediatelyget
away fromthe LPcylinder/applianceand call yourfire
department.
FILLING:
FORSAFETYREASONS,IFAN
OPTIONALL.P. GASCYLINDER
WASSUPPLIEDWITH YOUR
BARBEQUE,IT HASBEENSHIPPED
EMPTY.THECYLINDERMUSTBE
PURGEDOFAIRAND FILLED
PRIORTO USINGONYOUR
BARBEQUE.WHENGETTINGYOUR
CYLINDERFILLED:
NEVERSTOREA SPARELP CYLINDER
UNDEROR NEARTHE APPLIANCEORIN
AN ENCLOSEDAREA.
Jl.i[_'_,JI LPTANK
CYLINDER RETAINER
CAP _ STRAP
• Allow only a qualified L.P. gas dealerto fill or repairyour cylinder.
• DONOTallow the cylinder to befilled beyond 80% full.
• Makesure the L.P. gasdealer checks the cylinder for leaksafter
filling.
ALWAYS CLOSE LP CYLINDER VALVE
AND REMOVE COUPLING NUT BEFORE
MOVING LP CYLINDER FROM
SPECIFIED OPERATIONPOSITION.
NEVER OPERATEGRILL WITH LP
CYLINDER OUT OF CORRECTPOSITION
SPECIFIED IN ASSEMBLY INSTRUCTIONS.
Do not insert any tool or foreign object
into the valve outlet or safety relief
valve. You may damage the valve and
cause a leak. Leaking propane may
result in explosion, fire, severe personal
injury, or death.
LPCYLINDEREXCHANGE
Many retailers that sell grills offer you the option of replacingyour
empty LP cylinder through an exchangeservice. Useonly those
reputableexchangecompaniesthat inspect, precision fill, test and
certify their cylinders. Exchangeyour cylinder onlyfor an OPDsafety
feature-equipped cylinder as described in the "LPCylinder" section of
this manual.
• Always keepnew and exchanged LPcylinders in upright position
during use,transit or storage.
• Leaktest new and exchanged LPcylinders BEFOREconnectingto
grill.
• Never attempt to attach this grill to the
self-contained LP gas system of a
camper trailer or motor home.
• Do not use grill until leak-tested.
• If a leak is detected at any time, STOP
and call the fire department.
• If you cannot stop a gas leak,
immediately close LPcylinder valve
and call LP gas supplier or your fire
department!
5

HOSE& REGULATOR
WARNING:INDICATESANPOTENTIALLY
HAZARDOUSSITUATIONWHICH,IFNOTAVOIDED,
COULDRESULTINDEATHORSERIOUSINJURY.
NOTE:IMPROPERLIGHTINGPROCEDURESCANCAUSETHEFLOW
CONTROLTOACTIVATE,RESULTINGINREDUCEDHEATOUTPUT.
IF THISISSUSPECTED,RESETTHEFLOWCONTROLBYSHUTTING
OFFALLBURNERCONTROLSANDTHECYLINDERVALVE.WAIT
30 SECONDS,THENTURNTHECYLINDERVALVEONEXTREMELY
SLOWLY- WAIT5 SECONDSANDTURNTHEBURNERVALVEON
ANDLIGHTASNORMAL.
PROPANEGASMODELS:
Your barbequeis designedto operateon L.P. (propane) gasat a
pressure regulatedat 2.74 kPa(11"water column). A regulator
presetto this pressure is supplied with the barbequeand MUST
be used.
This regulator isequipped with the Q.C.C.Type 1, quick connect
coupling system, which incorporatesthe following safety
features: (Figure5)
• It will notallow gasto flow untila positivesealhasbeenmade
(Figure6)
• It hasa thermal elementthat will shut off the flow ofgas between
115and 150°C (240 and300°F)
• It alsohasaflow-limiting devicewhich,whenactivated,will
restricttheflow ofgasto 0.28cubicmetresper hour(10 cubicfeet
perhour)
Prior to attachingthepropanecylindertothe hoseand regulator,be
surethecylinder valveandthe appliancevalvesare OFF.The
cylinder valve is turned off by rotating the handwheel(seeFigure
3) clockwise(left to right) until it stopsand all appliancevalves
should bein the twelveo'clock position.Whenattachingthe
regulatorto thecylinder, makesurethat the small probe in the
nipple is centered in thematingQ.C.C.1 cylindervalve(seeFigure5
& 6).TurntherighthandthreadedQ.C.C.1blacknut ontothe valvein
a clockwisemotion untilthereis a positivestop.
DO NOTUSEA WRENCH,HAND TIGHTENONLY.
Shouldthelargeblackthermallysensitivecouplingnutbeexposedto
temperaturesabove115 - 150°C,it will soften andallow the
regulator probe to disengagefrom thecylindervalve-thereby
shuttingoff theflow of gas.Shouldthis occur,do not attempt to
reconnectthe nut. Removethe entire regulatorassembly,and
replaceit with a new one.
Thecauseofthe excessiveheatshouldbedeterminedand
correctedbeforeoperatingyour barbequeagain.The regulator
probe also contains aflow-sensing element,which will limit the
flow of gas to the regulator to a manageableamount (0.28cubic
metres/hour)inthe eventof ahoseor regulatorrupture. If it is
evidentthat the flow control devicehas beenactivated,the cause
of the excessiveflow should bedeterminedand correctedbefore
usingyour barbequeagain.
• Neverconnecta propanegasbarbequeto an unregulatedpropane
gassupply or anyothergas. Donot attempt to alterthe hose
or regulator in anyway.
• Theconnectionfitting must be protected when disconnected
from the propanetank. If the fitting is allowed to drag on the
ground, nicks andscratchescouldoccur resultingin a leakwhen
connectedto thepropanetank.
PROPANEANDNATURALGASMODELS:
• Donot allow anygrease(or other hot material) to fall onto the
hose,or allowthe hoseto come in contact with anyhot surfaces
of the barbeque.
• Visually inspectthe entire length of the hoseassembly before
eachuseof the barbeque.If it is evident there is excessive
abrasion/wear,or the hoseis cut, it must be replacedprior to
usingyour barbeque.Onlythe hoseassemblyasspecified in
the Parts List should be used.
• Follow the 'LEAKTEST'instructions beforelighting your
barbequefor the first time, everytime a propanecylinder is
refilled, if anygas component is changed,if the regulatorflow-
limiting devicehas beenactivated,after prolonged periods of
storage or non-useor at least onceper season.
NATURALGASMODELS:
• Neverusewith propane,or any othergases.
• Theapplianceand its individual shut-off valve must be
disconnectedfrom thegas supply piping during anypressure
testing of the system attest pressure in excessof 3.5 kPa
(1/2 p.s.i.).
• Theappliancemust beisolated from the gassupply piping
system byclosing its individual manualshut-off valve during
anypressure testing of the gas supply piping system at
pressuresequalto or lessthan 3.5 kPa(1/2 p.s.i.).
• Thegassupply hosemust bea minimum of 3.1 m (10 ft) anda
maximum of 3.6 m (12 ft). Alwaysdisconnect hoseat quick
connectcoupling when storing your barbeque.
• Inspect and cleanquick connectcoupling, and keepit protected
when it's not in use.
FAILURETOENSURETHEABOVEMAYRESULTIN
AHAZARDOUSFIREOREXPLOSIONCAUSING
SERIOUSBODILYINJURYAND/ORPROPERTY
DAMAGE.
DONOTATTEMPTTOREPAIRORALTERTHE
HOSE/VALVE/REGULATORFORANY"ASSUMED"
DEFECT.ANYMODIFICATIONTOTHISASSEMBLY
WILLVOIDYOURWARRANTYANDCREATETHE
RISKOFAGASLEAKANDFIRE.USEONLY
AUTHORIZEDREPLACEMENTPARTSSUPPLIEDBY
MANUFACTURER.
6

Tokeepyour barbequeworkingatits peakefficiencyaswellascontribute
tothesafeoperationofthis unit,performallof theoperationsbelowat
leastonceayear- preferablyatthestartof eachcookingseason.
PERFORMA LEAKTEST
A leaktest ensures that there areno gas leaksprior to lighting your
barbeque.
WHENA LEAKTESTMUSTBEPERFORMED:
• Beforelighting your barbequefor thefirst time
• Everytime the propanecylinder is refilled
• If any gascomponent is changed
• At a minimum once per season
• After prolonged period of storage or non-use
• If the regulator flow-limiting devicehas beenactivated
Theleaktest should be performed in a well-ventilated area away
from any openflame, heator ignition sources.
DOriOTUSEAMATCH,OPENFLAMEORSMOKEDURINGLEAK
TESTING.
WHATYOU'LLNEEDFORTESTING:
1.A mixture of 50% liquid dish soapand 50% water.
2.A brush or cloth to apply the mixture.
AREASTOTESTONAPROPANEBARBEQUE:
• All propanecylinder welds (seeFigure7A)
• Propanecylindervalve- includingthreadsintocylinder(Figure7B)
• Regulatorfitting and propanecylinderconnection(Figure7B)
• All hoseconnections (Figure7C) including side burner and
Rotisserietubing,if equipped(Figure7D)
• All valve connections (Figure7C& D)
AREASTOTESTONNATURALGASBARBEQUES:
• All hoseconnections (Figure7C)
• All valve connections (Figure7C& 7D)
HOWTODOTHETESTING:
1.With thebarbequeconsolecontrolknobs inthe 'OFF'position,twist
thevalveon your propane cylinder 1 turn, or the main naturalgas
valveon.
DONOTIGNITETHEBURNERSWHILEPERFORMINGTHELEAK
CHECK.
2. Brushyour soap and water solution on all connections and
components asoutlined above.
3. Observeeachplacefor growingbubbles,which indicatethat a
leakis present.
4. Shut off theflow of gaswhile fixing the leak.Tighten any
leakingconnection and repeattest until no leaks aredetected.
5. Ifthe leak(s) cannot be stopped DONOTUSE.Shutoffthe
fuel sourceat thevalve immediately(if appropriate,remove
propanecylinder).Call a certifiedgas appliancesewice
person,ora gasdealerforproperrepairs.
TANK _)_
HAND EXTERNAL GASREGULATOR
IF THEABOVEINSTRUCTIONSARENOT
FOLLOWEDEXACTLY,A FIRECAUSING
DEATHORSERIOUSINJURYMAY OCCUR.
CLEANINGVENTURITUBES
Periodic cleaningof the venturi tubes is recommendedfor optimum burner
performance, especiallyafter prolonged storage or a period of non-use.
Howto Clean:
• Removethe burner (refer to 'ASSEMBLYPROCEDURE').
• Useaventuri cleaningbrushand insertthe brushinto theventuritube 1 inch
atatime, then removeto preventmoving thedebris upwards(Figure8).
• Asyou removethe brush head inspectand discard anydebris
• Continuethis procedure until the entire lengthsof all venturi tubes arefree
of debris.
• Reinstallburner (as perassembly instructions), ensurethe venturi tubes
areseated overthe valveorifices (Figure1).
• Perform a LeakTest.
CHECKTO ENSURETHEBURNERHASA
GOODFLAMEEACHTIME IT ISTURNEDON.
BLOCKAGE
CLEANING BRUSH
It ispossiblethatverysmallinsectscouldmakewebsor nestintheventuritubes,astheyare
naturallyattractedtothesmellof gas.Thiswillpartiallyor completelyblocktheflowofgasthrough
theventuriandisindicatedbya smokyyellowflame,and/ora burnerthatisdifficultor impossibleto
light.Ultimately,itmaycausethegastoburnoutsidetheventuris,whichcancausea fireresultingin
damagetoyourbarhequeandpotentialpersonalinjury.IFTHISHAPPENSIMMEDIATELYSHUTOFFTHEPROPANEAT
CYLINDER.Whenthebarbequehascooled,followthe"HowtoClean"stepsabove.
7

CLEANINGOTHERPARTSOF
YOURAPPLIANCE
GeneralGrill Cleaning:Do not mistake brown or blackaccumulation of
greaseand smokefor paint. Interiors of gasgrills are not paintedatthe
factory (and should never be painted). Apply a strong solution of
detergentand water or useagrill cleaner with scrub brush on insides of
grill lid and bottom. Rinse andallow to completely air dry. Do not apply a
caustic grill/oven cleanerto painted surfaces.
BURNER:
At leasttwice ayear, cleanyour burner when cleaningthe venturi tubes.
The burner canbe gently scraped cleanwith a brass bristle brush. Ensure
that all burner ports (openings) areclear(DONOTENLARGEBURNER
PORTS).If youfind cracks,abnormal holes,or damagecaused by
corrosion during your inspectionand cleaning, replaceburner. (SEE
WARRANTY).
IGNITOR:
Cleanthe ignitor clip lightly using awire brush to remove rust and
grease.DONOTUSEWATERORCLEANTHEELECTRODEWITHTHE
WIRE BRUSH.Visually inspectthe ceramicof the electrodefor cracks.The
electrode can bewiped with a soft cloth if necessary. Ifa crack isfound, a
replacementignitor systemwill be required.
CLEANINGGRIDS:
After eachuse,scrubthe cookinggridswith astiff long-handledbrassbrush.
Do not usesteelbrushes,astheycan scratchthe nickelor porcelain
coating. Gridscan alsobewashedwith mild detergent.Never use
commercial oven cleaners.If rustappears on your cooking grids, remove
the rust with ascrub padand coatthe grid with some cookingoil. If
excessivewearis evident,you might wantto replaceor upgradeyour
cookinggrid.
PORCELAINSURFACES:
Becauseof glass-likecomposition,mostresiduecanbewipedawaywith
bakingsoda!watersolutionor speciallyformulated cleaner.Usenonabrasive
scouring powderfor stubbornstains.
PAINTEDSURFACES:
Washwith mild detergentor nonabrasivecleanerandwarm soapywater.
Wipedry with a soft nonabrasivecloth.
STAINLESSSTEELSURFACES:
Tomaintainyourgrill's high qualityappearance,washwith mild detergent
andwarm soapywaterandwipe dry with asoft cloth aftereachuse.Baked-
on greasedepositsmayrequirethe useofanabrasiveplasticcleaningpad.
Useonly in directionof brushedfinish toavoid damage.Do not useabrasive
padonareaswith graphics.
SIDESHELVES:
MetalShelves:Useanyhouseholdcleaner,exceptthosecontainingacid or
mineral spirits. Besureto rinsewell after cleaning.
DO NOTUSEASA CUTTINGBOARD.
PlasticShelves:Wash with warm soapy water and wipe dry. Do not use
citrisol, abrasive cleaners,degreasersor aconcentrated grill cleaner on
plastic parts. Damageto and failure of parts can result.
PLASTICPARTS:
Washwith warm soapywater andwipe dry. Do not usecitrisol, abrasive
cleaners,degreasersor aconcentrated grill cleaner on plastic parts.
Damageto and failure of parts can result.
CASTINGINTERIORANDWARMINGRACK:
At leastonceayear removeall componentsfrom insideyour barbeque.
Loosen any cooking residue with a scraping tool for largeparticles anda
brass barbequebrush for smaller particles. Scrub with hot water and a
strong detergent, then rinse thoroughly or spray barbequedegreaser
liberally on all interior surfaces.Besure to usegloves and eyeprotection.
Let standfor 10 minutes, scrape off residue andrepeatif required.Rinse
thoroughly with water. Replaceall componentsas outlined in the assembly
instructions. DONOTUSEDEGREASERONPAINTEDORPLASTIC
SURFACES.DONOTALLOWEXCESSIVEGREASEOROTHERRESIDUE
TOBUILD UPONYOURCOOKINGSYSTEMASA FIREMAY RESULT.
GREASEPANANDGREASETRAYINSERT:Thegreasetray
andinsert are locatedon the bottom of the base casting, below the
greasepan,andimmediately belowthe hole through which any grease
will drain. Thegreasepantray insert should becheckedand replaced
andclean prior to each useto prevent greasefrom overflowing.
Ensure the
grease pan and tray
are in position and
clean before
using the BBQ.
Ensurethatgreasepan and trayare emptied
aftereach use. If excessgrease is allowed to
accumulate, a possible fire causing property
damage or serious injury may occur.
COVERYOURBARBEQUEWHENIT IS NOTINUSETOPROTECTTHE
SHELVESFROMTHEOUTDOORELEMENTS.
STORAGE
More peoplearediscoveringthe pleasureofyearroundbarbequing.However,
if youchooseto storeyour barbequeforthe winteroranyextendedlengthof
time,follow thesesteps:
• Cleanthe cookinggrids,thenoil lightlywith cookingoil,wrap in paperand
thenstorethe cookinggridsindoors.
• Followthesamecleaningmethodaboveforthe burnersandanywarmingracks.
• Coverthe barbequeif it isleftoutdoors.
• Whenthe barbequeisnotin use,the gasmust beturnedoff atthe L.P.
cylindervalveor mainshut offvalve,andstoredoutdoors ina well-
ventilatedarea.
1.Witha Propaneapplianceyou canstorethe barbequeinside,PROVIDED
thecylinderis removedfrom the barbequeand storedoutdoorsin awell-
ventilatedarea,out ofthe reachof children.Whenthecylinderis
disconnectedfrom the barbeque,ensurethe cylindervalvesafetycapis
placedovervalveopening(fig. 4).
2.With aNaturalGasappliance,thegasmust beturnedoff attheindividual
gasshut offvalveandthe hose mustbedisconnectedfrom thegassupply
pipingsystem beforestoringthe barbequeindoors.Installplasticcoversto
quickconnectfittings.
Aftera periodofstorageor non-usea leak testshouldbeperformedand
the burnerventuris cleanedpriorto use.
NEVERSTOREASPARELPCYLINDER
UNDERORNEARTHEAPPLIANCEOR
INAN ENCLOSEDAREA.
8

BEFORE USING YOUR APPLIANCE READ ALL INSTRUCTIONS IN THIS MANUAL
AND IQUEINSTRUCTION MANUAL USER GUIDE.
*INTERNAL
LIGHT
LEFTBURNER
*ROTISSERIEBURNER
CENTERLEFTBURNER
CENTERRIGHT
BURNER
*SIDE BURNER
(READWARNING)
RIGHTBURNER
WARNING:ENSURE
SIDEBURNERLIDIS
UPBEFORELIGHTING
SIDEBURNER.
MODELMAYNOTBE
EXACTLYASSHOWN.
*PARTSOPTIONAL
DEPENDINGON
MODELPURCHASED
GETTINGFAMILIAR
WITHTHECONTROLS
Prior to lighting your barbeque,ensureyou become Familiarwith
the controls (seeabove).On barbequeswith quad main controls,
the largeright control knob operatesthe right most burner,the
largecenter right control knoboperates the right center burner the
large left center control knob operatesthe leftcenter burner, And
the largeleft control knob oprates the left most burner.(Figure 9A)
If equippedwith optional side and roisserie burners, the right small
knoboperatesthe sideburnerthe smallleft knob operatesthe rear
rotisserie burner. (Figure9A)
IGNITORBATTERY
EnsureAA BATTERYis installed correctly, put - (negative) side of
batteryin first. (Figure9B)
9
DONOTLIGHTSIDEBURNERWITHLIDDOWN,
FAILURETODOSOMAYCAUSESERIOUSBODILY
INJURYAND/ORPROPERTYDAMAGE.

LIGHTING
Prior to lighting your barbeque,visuallycheckall hosesbeforeeach
usefor nicks, cracking, abrasions or cuts. If the hose isfound to be
damagedin any way, DONOTUSEYOURBARBEQUE.
A replacementhoseand regulator is required (see'PARTSLIST'in
Assembly Brochure).
IMPORTANT
• Always raisethe barbequelid before lighting.
• Do not leanover the barbequewhen lighting the burner.
• Visually checktheflames every time you light your barbeque
(Figure10). Ifthe flame is abnormally small or a smoky yellow -
shut off the barbequeand checkthe venturi tubes for blockage
(seeFigure8) or referto the Troubleshooting Guide.
IF LIGHTINGMAIN BURNERSONLY,
ENSURESIDE BURNERKNOB
IS IN THE OFF POSITION.
HIGH
-- LOW
MAINBURNERS
USINGTHEIGNITOR(Figure11A)
1.OPENTHELIDBEFORELIGHTING.
2.Turn off all of theburnercontrol knobs and close the gassupply
valve.
3.0pen the gas supply valve and wait 5 seconds.
4.Push in and turn a single main burner control knob to 'HIGH'.
All other control knobs should be in the "OFF"position.
5.Depressthe ignitor, repeatif necessary.
6.If the burnerdoes not light immediately(within five seconds),turn
burnercontrol knoboff andwait 5 minutesto clearthegas.
7.Repeatsteps 1 to 6. If burner still fails to light, referto
TroubleshootingGuideto determinecauseand solution, or try
the Match Lighting procedure (Fig.11B).
LIGHTINGTHE OTHERMAIN BURNERS
Onceone burner has beenlit, push in andturn the adjacentcontrol
knob to 'HIGH'.Theunlit burner will light automatically.
MATCHLIGHTINGPROCEDURE
1. Openthe lid before lighting.
2. Placean ignited lighter or lit match through the lighting hole,
approx. 1.25 cm (1/2") from burner. (See Figure11B)
3. Pushin andturn the left burner control knobto 'HIGH'.The
burner should light immediately (within five seconds). If it does
not, extinguishthe lighter or match, turn the control knobto off,
and wait 5 minutesto clearthe gas.
4. Repeatsteps 1 to 3. If burner fails to light, referto the
Troubleshooting Guideto determine causeand solution.
5. Onceleft hand burner is lit, light remainingburners in this
sequence:left burner, left center burner, right center burner,
then right burner.
LIGHTINGTHE OTHERMAIN BURNERS
Onceone burner has beenlit, push in andturn the adjacentcontrol
knob to 'HIGH'.Theunlit burner will light automatically.
MATCH
MATCH
LIGHTING
HOLE
BURNER
/
10

SIDEBURNER
(OPTIONAL)
USINGTHEIGNITOR
1. RAISESIDEBURNERLID.
2. Pushin andturn the side burner control knobto 'HIGH'.
3. Depressignitor. Repeatif necessary(Figure12A).
4. If burner does not light immediately (within five seconds),
turn the burnercontrol knob off, and wait 5 minutes to clear
the gas.
5. Repeatsteps 1 to 4. If burner still fails to light, referto the
Troubleshooting Guideto determine causeand solution, or
try the matchlighting procedure below.
DONOTLIGHTSIDEBURNERWITHLID
DOWN,FAILURETODOSOMAYCAUSE
SERIOUSBODILYINJURYAND/OR
PROPERTYDAMAGE.
SIDEBURNERMATCH
LIGHTINGPROCEDURE
1. RAISESIDEBURNERLID.
2. Placean ignitedlighteror lit matchnearthe ports,
approximately 1/2" (1.25 cm) from burner (Figure12B).
3. Pushin and turn the sideburner control knobto 'HIGH'.The
burnershould light immediately(within five seconds). If it
doesnot, extinguishthe lighter or match, turn the control
knoboff, andwait 5 minutes for the gasto clear.
4. Repeatsteps 1 and3. If burner still fails to light, referto the
TroubleshootingGuideto determine the cause andsolution.
SIDEBURNERCOOKINGPOTS
1. Ensurepotsizeisa maximumsizeof 9"wideonly(Figure12C).
2. Maximumweight to beusedon sideburnershould notexceed
20 Ibs(9 kg)
1/2"
PROPANEMODELSONLY
If the heatoutput from the burner(s) seemabnormally low, it
may be caused bythe regulatorflow-limiting device being
activated bya leakin the gassystem, or improper lighting
procedures. If this is suspected,shut off the cylinder valve and
all burner valves. Perform a leaktest to determine if a leakhas
causedthe flow-limiting deviceto activate.If the leaktest is
negative,then carefullyfollow the lighting proceduresstep-by-
step, ensuring all valves(including tank) are offbefore starting.
RELIGHTING
SAFETYWARNING
If the burnerflame goesoutwhenyour barbequeis inoperation,
immediatelyturn off the control valves.Waitfive minutesfor the
gasto clearbeforeattemptingto relightthe burner. Ifthe
problem persists,referto theTroubleshootingGuide.
NOTE:WHEN USINGTHE SIDE BURNER, THE MAXIMUM
POTSIZE IS 9"WIDE.
NOTE:MAXIMUM
WEIGHTFORSIDE
BURNER20 Ibs (9 kg)
MAX
11

REARROTISSERIEBURNER
(OPTIONAL)
USINGTHEIGNITOR
1. OPENTHELID BEFORELIGHTING.
2. Pushinand turn the rotisserie control knob to 'HIGH'.
3. Depressignitor. Repeatif necessary(seeFigure12D).
4. If burner does not light immediately (within five seconds),
turn the burnercontrol knob off, and wait 5 minutes to clear
the gas.
5. Repeatsteps 1to 4. If burner still fails to light, referto the
Troubleshooting Guideto determine causeand solution, or try
the match lighting procedure below.
THEWARMINGRACKSHOULDALWAYSBE
RE-MOVEDWHENUSINGTHEROTISSERIE
BURNER.FAILURETODOSOMAY
RESULTINA DAMAGEDANDWARPED
WARMINGRACK.
REARROTISSERIEBURNER
MATCHLIGHTINGPROCEDURE
1. OPENLIDPRIORTOLIGHTING.
2. Placean ignited lighter or lit match nearthe ports,
approximately 1/2"(1.25 cm) from burner (seeFigure12E).
3. Pushin andturn the rotisserie burner control knob to 'HIGH'.
The burner should light immediately (within five seconds). If
it does notturn off the control knob, extinguish the lighter or
match, and wait 5 minutes for gas to clear.
4. Repeatsteps 1to 4. If burner still fails to light, referto the
Troubleshooting Guideto determinethe cause and solution.
NOTE:DONOTUSETHEMAIN BURNERSWHENTHE
ROTISSERIEBURNERISLIT.
Please alsorefer to additionalrotisserieinstructionsthatare
suppliedwithyourrotisseriekit.
12

SHUTTINGDOWNYOUR
BARBEqUE
1.Shut off L.P.cyl nder valve.
2. Shut off burner control valves.
This sequenceprevents residualgasfrom being left in the system
under pressure.
BREAKINGINYOUR
BARBEQUE
Beforecookingonyour gasbarbequefor thefirsttime...
Beforecooking on your gasbarbequefor thefirst time,you
should "breakit in"by operatingTHE MAIN BURNERSfor a short
period of time without anyfood. To "breakin"your barbequelight
the barbequefollowing the lighting instructions asoutlined on
the console or in this manual. (seepages10, 11 & 12)
BREAKINGIN THEMAIN BURNERS:
Closethe MAINCASTINGLID ONLYand keepthe temperature on
"HIGH"for 20 minutes. DONOTOPENTHELID DURINGTHIS
PROCESS.Then raisethe lid andcontinue to operateyour
barbequeon "HIGH"for an additional 5 minutes. Your barbequeis
now readyfor cooking.
NOTE:
"Break-in"procedureis not required for Side Burneror Rotisserie
burner. Forlighting instructions for the Side Burnerfollow the
lighting instructions found on page 11 of this manual. For
lighting instructions for the rotisserie follow the lighting
instructions found on page12 of this manual.
CAUTION:THESIDEBURNERLID SHOULDALWAYSBE
OPENWHILESIDE BURNERIS LIT.
CAUTION:THEWARMINGRACKSHOULDALWAYSBERE-
MOVEDWHENUSINGTHEROTISSERIEBURNER.FAILURETODO
SOMAYRESULTINADAMAGEDANDWARPEDWARMINGRACK.
COOKINGTECHNIQUES
PREHEATINGTHEBARBEQUE
Thecooking system and grids requireheatingprior to adding
food.
1. Light your barbequeasoutlined in the 'LIGHTING'instruction
section.
2. Oncelit, preheatyour barbequeon the HIGHsettingwith the
lid down for 6 to 10 minutes.
NOTE:OPTIONALSIDEBURNERDOESNOT REQUIRETO BE
PREHEATED.NEVEROPERATESIDE BURNERWITH SIDE
BURNERLID CLOSED.
3. Turnthe burner control knobsto the appropriateheatsetting
prior to adding your food. Preheatingyour barbeque is not
requiredwhen you are cooking food using indirect cooking
techniques.
MAIN CASTINGLIDPOSITION
Although keepingthe main casting lid up or down when cooking
on your barbequeis apersonalpreference,you will find that you
will havefewer flare-ups, and your food will cook in lesstime
(therefore using less fuel) if the maincasting lid is down. Keep
the main casting lid down when cooking food that requires a long
cooking period over a low flame, such asindirect cooking.
13
COOKINGTEMPERATURES
HIGHSetting: Usethe HIGHsetting to preheatthe barbeque,sear
meatsuch assteak, & to burn off anycooking residuefrom the
grids aftercooking your meal. HIGHis rarelyusedfor extended
cooking.
MEDIUMSetting: Most grilling or roasting of meat and
vegetables,aswell as anybaking, is best doneat a medium heat.
LOWSetting: A low temperature is usedwhen cooking leanmeat
or delicate items such asfish. All smokecooking is done at low
heat.Forthe best results, invest in a MeatThermometer
BARBEQUECOOKINGMETHODS
Your barbequeis more than just a placeto grill your burgers and
hotdogs - the possibilities areas endlessasyour imagination.
But, beforeyou start experimenting, hereare some frequently
usedterms that will help:
DirectCookingis alsoknown as grilling. This isthe most popular
cooking method and involvescooking food directly overthe flame,
such as searingasteak. Othergood candidatesfor this cooking
methodare thin cuts of meat,vegetables,kabobsandfillets.
IndirectCookingmeansthe food is cookedawayfrom the direct
flame by placingiton theopposite sideof thelit burner & allowing
the heatto tumble within theclosed confinesofthe closed
barbeque,very similar to a convectionoven.Muchlikeyour oven,
you canroast andevenbake,providedyour barbequelid is closed.
WARMINGRACKS
A warming rack may be includedwith your barbequeand
providesyou with additional cooking spaceaway from direct
heat.This is useful when cooking delicate itemssuch asfish,
bonelesschickenbreasts or vegetables.Warming racksare also
a great placeto keepfood warm that is alreadydone so you can
serveyour entire mealat the sametime.
Tip: A light application of cooking oil prior to usewill help to
keepfood from sticking to the warming rack.
CONTROLLINGFLARE-UPS
Someflare-up during grilling is desirableto createthe smoke,
which gives barbequedfood its uniqueflavor and appearance.
However,excessiveflare-up can not only ruin your food, it may
leadto a dangerouscondition as well. Byexcessivelyraising the
temperaturewithin your barbeque,particularly if abuild up of
greasein your barbequeignites, theseflare-ups may result in an
uncontrolled greasefire.
TOMINIMIZEFLARE-UPS:
• Trim excessfat from meats beforecooking
• Cookfatty meatson a low setting, or by using the indirect
method asdescribed above
• Ensurethat your cooking system is free of excessgreasefrom
previous usage
• Checkthat the greasedrain hole is not blocked
• Cookwith lid down to cut down on the flow of air
• Reducethe heatsettings

PROVIDINGPOWERTOYOURBARBEQUE
To provide powerto the barbecue,plug grounded electricalcord into
rearelectrical box asshown. (Fig.15)
Plug electrical cord into properly
grounded GFI(Ground FaultInterrupt)
receptacle. If useof an extensioncord is
required, be surethat it is a minimum 16
AWG,3 wire well insulated cord, marked
for OUTDOORUSEONLYand properly
grounded. (Figure14)
CAUTION:To ensure continued protection against risk of
electric shock, connect to properly earthed outlets only.
INTERNALLIGHT
The barbequelight allows you to cook evenwhen it is dark. This
light is pre-assembledand just requiresto be plugged into the
electrical box atthe back.Tip: To ensurelight remainsclean, usea
damp spongeto get ridof smoke residuebeforelighting grill.
ILLUMINATEDSWITCH
The illuminated switch allows you to easilyturn the light on and off.
(Figure16)
ImportantSafeguards
TRANSFORMER
BOX
IMPORTANT
Assemblelight switch
wires to Internal
Transformer
box asshown.
GROUNDED
TRANSFORMER
ELECTRICAL
CORD
CORD
The following basic safety precautions apply when using electrical appliances:
a)
b)
c)
d)
e)
f)
g)
h)
i)
J)
k)
i)
m)
n)
o)
P)
q)
r)
Read all instructions.
Do not touch surfaces that may be hot. Use handles or knobs provided.
To protect against electrical shock do not immerse cord, plugs, portable appliances (or other specific part or parts)
in water or other liquid.
Close supervision is necessary when any appliance is used by or near children.
(i) Portable - Remove plug from outlet when the appliance is not in use, before putting on or taking off parts, and
before cleaning. Allow to cool before handling.
(ii) Permanently installed - Make sure appliance is OFF when not in use, before putting on or taking off parts, and
before cleaning.
Portable - Do not operate any appliance with a damaged cord or plug or after the appliance malfunctions or is
dropped or damaged in any manner. Return appliance to the nearest authorized service facility for examination,
repair, or electrical or mechanical adjustment.
The use of accessory attachments not recommended by the appliance manufacturer may cause injuries.
Do not let cord hang over edge of table or counter or touch hot surfaces.
Do not place on or near a hot gas or electric burner or in a heated oven.
Extreme caution must be used when moving an appliance containing hot oil or other hot liquids.
Where applicable, always attach plug to appliance and check that the control is OFF before plugging cord into wall
outlet. To disconnect, turn the control to OFF, then remove plug from wall outlet.
Do not use appliance for other than intended use.
Avoid contacting moving parts.
Save these instructions.
Never remove the grounding plug or use with an adapter of 2 prongs; and
Use only extension cords with a 3 prong grounding plug, rated for the power of the equipment, and approved for
outdoor use with a W-A marking.
When connecting, first connect plug to the outdoor cooking gas appliance then plug appliance into the outlet.
Use only a Ground Fault Interrupter (GFI) protected circuit with this outdoor cooking gas appliance.
14

BurnerWill NotLight (match or ignitor)
or BurnersNotHot Enough
• Blockedventuri tubes
ELECTRONICIGNITION
• Nosparksappearat anyelectrodeswhen
ignition button is pushed;no noisecan be
heardfrom spark module.
• Cylinderor gassupply valveturned off
• Venturitubes not properly seatedovervalve
orifices
• Burnerports blocked
PROPANEBARBEQUESONLY
• Low or out of propane
• Flowcontrol deviceactivated
• Regulatornotfully tightenedinto cylinder
• Batterynot installed properly.
• Deadbattery.
• Buttonassemblynot installedproperly.
• Cleanout blockage(Page7)
• Opencylinderor gas supply valve
• Ensureproperventuri assembly (Page3)
• Clean/replaceburner (Page8)
• Refill cylinder
• Followcorrect lighting procedure(Page10, 11,& 12)
• Performleaktest andcorrect leaks(Page7)
• Tighten regulatorfully (handtight) into cylinder
• Checkbattery orientation.(Page9)
• Has batterybeenusedpreviously? ReplaceBattery.
• Checkto insurethreads are properlyengaged.
Button shouldtravel upanddownwithout binding.
• If no sparks aregeneratedwith new batteryand good wire
connections, moduleisfaulty.
• Faultysparkmodule.
• Nosparksappearat anyelectrodeswhen • Outputleadconnections notconnected. • Areoutputconnections onandtight?
ignition switch is pushed;noisecan beheard Removeand reconnectall output connections atmoduleand
from spark module, electrodes.
• Sparksarepresent butnot atall electrodes
and/or notatfull strength
• Outputleadconnections notconnected.
• Arcing to grill awayfrom burner(s).
• Weakbattery.
• Electrodesarewet.
• Electrodescrackedor broken"sparksat crack".
• Areoutputconnections onandtight?
Removeand reconnectall output connections atmoduleand
electrodes.
• If possible, observegrill in dark location.Operateignition system
andlookfor arcing betweenoutput wires andgrill frame. If sparks
areobservedotherthanfrom burner(s), wire insulation may be
damaged.Replacewires.
• Allsparks presentbutweak or atslow rate. Replacebatterywith a
newAA-sizealkalinebattery.
• Hasmoistureaccumulatedonelectrodeand/orinburnerports?
Usepapertowelto removemoisture.
• Inspect electrodesfor cracks, iffound, replacecrackedor broken
electrodes.
FlamesSmokeyYellow • Partiallyblockedventuri tubes • Cleanout blockage(Page7)
• Excesscooking salts on burner • Cleanburner (Page8)
• Air shutterclosed • Openair shutter
(side burneronly)
BurnerLightsWith MatchNotWith Ignitor • Loosewire connection • Checkall connectionsaretight
(no spark) • Brokenelectrodeceramic • Replace
• Poorground • Ensurecollector box, burnerand ignitor areassembledproperly.
• FaultyIgnitor
FlameBlowsOut/DownThrough Base • High windconditions • Relocatebarbequebacktowardswind
PROPANEBARBEQUESONLY
• Propanelow • Refill cylinder
Too Much Heat/ExcessiveFlare-up • Excessivefat in meat • Trimmeat/turndownburnercontrolsand/orfuelsupply
PersistentGreaseFire • Greasedrainplugged • Cleancasting baseand burner (Page8)
• Cookingsystem cloggedwith grease • Cleansmart bars, heatdistribution plate(Page8)
• Cookingsystem not positionedcorrectly • Positioncooking system correctly
FlamesUnderHeatControl Console • Blockedventuris • Immediatelyshut off gasat source,allowgrill to cooland cleanout
venturis (Page7)
RegulatorHumming PROPANEBARBEQUESONLY • Temporaryconditioncaused by high outsidetemperatureand
• This is nota defector a hazard, usuallyafull L.P.cylinder
IncompleteFlame • Plugged, rusted,or leakingburner • Clean/replaceburner (Page8)
Flashback... • Burnerand/or burnertubes areblocked. • Turn knobsto OFF.Cleanburnerand/or burnertubes.
(fire in burner tube(s)). Seeburner cleaningsectionof UseandCare.
Unableto fill LP cylinder. • Somedealershaveolder fill nozzles • Theworn nozzlesdon't haveenough"bite"to engagethe valve.
with worn threads. Try asecond LPdealer.
Oneburnerdoes notlight from other burner(s). • Greasebuildupor food particlesin • Cleancarry-overtube(s)with wire brush.
end(s) of carryovertube(s).
Suddendrop in gasflow or low flame.
• Out ofgas.
• Excessflow valvetripped.
• Vapor lock atcoupling nut/LP cylinder
connection.
• Checkfor gas in LP cylinder.
• Turn off knobs,wait 30secondsandlight grill. If flames arestill
low, turn off knobs andLPcylinder valve.Disconnectregulator.
Reconnectregulator andleak4est.Turn onLPcylindervalve, wait
30secondsand thenlight grill.
• Turn off knobs andLPcylindervalve. Disconnectcoupling nut
from cylinder. Reconnectandretry.
15

LIMITEDWARRANTY
1. LIMITED WARRANTY COVERAGE
5 YEARLIMITEDWARRANTY- STAINLESSSTEELBURNERS
1 YEARLIMITEDWARRANTY- ALLOTHERPARTS
Blue Embergas barbeque owners havethe benefit of a limited warranty from the date of purchase against any andall defects in materials andworkmanship during
the period of warranty coverage specified. This limited warranty is extendedto the original customer/purchaser only and is not transferable.
Your Fiesta/ BlueEmber barbeque (and related equipment) have been certified for use in bythe applicable certifying authorities specified onthe ratingplate affixed
to the barbeque and related equipment. YourFiesta / Blue Emberharbeque must he usedonly in accordancewith the applicable certificationand Fiesta / Blue
Ember'sUse and Care Instructions.It musthe assembled in accordancewith applicable Fiesta / Blue Emberassemblyguide. Fiesta does notrecommendthe
conversionofthe gas supplyspecified on the rating plate toany otherfuel or equipment. Any conversion will result in the termination of the FiestaBlue Ember
warranty and thedefault of the applicable certification.
Dateand proof of purchase is mandatory for all warranty claims. Always identify the product, model number andserial number when requesting warranty coverage.
This warranty covers replacement parts only. All other costs including labor,transportation postage and other incidental service costs are the responsibility of the
applicant.
Theuse of non Fiesta/ Blue Ember replacement parts automatically voids the Fiesta BarbequeWarranty
2. LIMITATIONS
This limited warranty applies only to Blue Ember barbeques that have beenproperly assembled, operated and maintained and reasonably used as defined in the
Blue Embercareand use manual, andassembly instructions. Pleaserefer to the care and usesection of this manual for instructions on the proper careand use of
your Blue Ember barbeque.
YOURBLUEEMBERPRODUCTMUST BEUSEDONLY INACCORDANCEWITH APPLICABLECERTIFICATIONAND FIESTA'SUSEANDCAREINSTRUCTIONS
Fiestashall not be responsiblefor any indirect or consequential damages arising as a result of any defect in the barbeque whether such defect is covered by
warranty or not. This limited warranty does not applyto and INCANADA- FiestaBarbequesA Division of Wolfedale Engineering Ltd. or in USA - FiestaGasGrills,
LLC.shall not be responsible or liable for any failures or operating difficulties caused by anything other than defective materials or workmanship.
Thereare no other warranties or conditions, express or implied, statutory of otherwise (including any implied warranty of merchantability or fitness for a particular
purpose) exceptas expressly provided for herein. No person is authorized to create for Fiesta/ Blue Ember any condition or liability in connection with the
barbeque.
Exclusionsto this warranty include: 1.Normal wear and tear 2. Accidental damage 3. Abuse 4. Tampering or misuse 5. Alteration 6. Misapplication 7. Vandalism 8.
Carelesshandling 9. Improper Installation 10. Improper assembly 11. Improper use, maintenance or service 12. Deterioration or damage dueto severeweather I.e.
hail, hurricanes, earthquake,tornados 13. Surface rust, or discoloration of stainless steel 14. Discoloration or paint chipping surface rust or rust perforation due to
paint chipping resulting from normal wear and tear or causes other thandefective matterial or due to chemical exposure in the atmosphere 15. Commercial or
rental use 16. Use of improper or uncertified fuel, fuel source or equipment 17. Failure to do normal & routine maintenance or service, including (not limited to)
removal of insects within the venturi tubes. The provisions of this additional written warrenty are in addition to and not a modification of, nor subtraction from any
other statutory warranties or other rights and remedies provided by any provincial law. Warranty will NOTapply if this gas grill is used for commercial or rental
purposes.
MANUFACTUREWILL NOTREIMBURSEFOR:
Service calls to your residence.
Anyfood loss due to product failures.
Replacement part or repair labor costs for units operated outside the United States, Canadaor Mexico.
Theremoval and/or reinstallation of your product.
Theprovisions of this additional written warranty are in addition to and not amodification of, nor subtraction from any other statutory warranties or other rights and
remedies provided by any provincial law. The purchaser may have different rights which may vary from province to province in Canadaandstate to state in the
United States of America according to applicable legislation. This warranty does not exclude or limit those statutory rights except to the extent permissible in law.
3. CONDITIONSFORAPPLICATIONOFTHELIMITEDWARRANTY
Purchaser must notify IN CANADA- FiestaBarbequesA Division of Wolfedale Engineering Ltd. or in USA- FiestaGasGrills, LLC.immediately upon discovery of
any defectsin the barbeque or any parts thereof for whic h purchaser claims coverageunder this limited warranty. All warranty service and/or replacement of Blue
Emberparts must be performed by the customer service department of IN CANADA- FiestaBarbequesA Division of Wolfedale Engineering Ltd. or in USA - Fiesta
GasGrills, LLC. Customers seekingwarranty service and/or replacementshould contact Fiestacustomer service with their model number, serial number andthe
nature of their claim. A tracking number will be issued at that time. All defective parts must bereturned to Fiesta'scustomer service department, accompanied by
thetracking number. The purchaser shall be responsible for performance and cost of disassembly, packaging andshipping costs. Fiesta will repairor (at it option)
replacethe defective components if after inspection it is evident that thedefect occurred under normal domestic use.
All warranty replacement shall besubject to theterms and conditions of this warranty for the remainderof the original period of coverage.
4. REPLACEMENT
Fiesta/ Blue Ember's undertaking under this limited warranty is:
For thefirst five years for stainless burners, or one years for all other parts from the date of purchaseto replacethe defective part or parts.
When replacement parts are provided, purchaser will becharged manufacturer's approximate cost of shipping and handling replace ment parts. Re-assemblywill
bepurchaser's responsibility.
To obtain replacement parts contact:
InCanada
Fiesta BarbequesA Division ofWolfedale Engineering Ltd.
2 Walker Drive, Brampton
Ontario L6T5E1 Canada
In USA
Fiesta GasGrills, LLC.
One FiestaDrive
Dickson,TN. USA37033
16

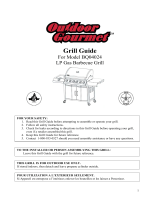
If you purchased your barbeque pre-assembled, please refer to this page for caster & tank caddy
assembly. The assembly instructions for the door and shelves are located on page 18. Otherwise please
proceed to page 19 for full assembly procedures.
TOOLSREQUIRED"
• Adjustable wrench •#2 Phillips screwdriver
STEP1
Install thefront casters using 2 people.Oneto tilt
thebarbequebackto allow the secondpersonto placethe
ice/winebucket suppliedwith your barbequeupsidedown
under thefront edgeof the basepanfor support. Thefront
casters are then installedusing awrench asshown.
CAUTION:
STEP2
Lock the front casters. Install the rear casters using2 people.
Oneto tilt the barbequebackwardto allow thesecondperson
to placethe ice/wine bucketsuppliedwith your barbeque
upsidedown underthe rearedgeof the basepanfor support.
Therear casters aretheninstalled using a wrench asshown.
DONOTTILT BARBEQUETOOFAR,
ASPERSOALINJURYMAY OCCUR.
NOTE:
Whentilting thebarbequeforward
place one footin frontofthe base pan
to helpkeepthe bottomfrom moving.
STEP1
STEP2
ICE/WINE
BUCKET
Lockfrontcastersand place
onefoot in frontofbaseto
steadybarbequewhen
tilting.
APPROXIMATELY 15 deg. angle
APPROXIMATELY 15 deg. angle
Please refer to FIG. 2 page 19 & FIG. 12 page 29 in this manual to assemble the TankCaddyonthis barbeque.
Please read all assembly pages for important warnings, providing power,and tank assembly instructions.
17

If you purchased your barbeque pre-assembled, please refer to page 17 for caster and tank
caddy assembly. The assembly instructions for the door and self are located on this page.
Other wise please proceed to page 19 for full assembly procedures.
Please refer to FIG. 9 page 26 in this manual to assemble the Door on this barbeque.
• Attach towel bars to side self & side burner shelf as shown using #10 x .75" Hex
Flange HD SELF TAP AB SCREWS.
• Please refer to FIG. 14 page 31 & FIG. 15 page 32 in this manual to assemble the side shelf
& side burner assemblies.
SP49-21 (8)
HEXFLANGE
HD SELFTAPAB
NOTE: Some parts may have
sharp edges or burrs.
Handle with care.
SP49-21 (8)
#10 x .75 HEXFLANGE
HD SELFTAPAB
Please refer to FIG. 16 page 33 in this manual to assemble the Grease Trap on this barbeque.
PLEASEREADALLASSEMBLYPAGESFORIMPORTANTWARNINGS,
PROVIDINGPOWER,ANDTANKASSEMBLYINSTRUCTIONS.
18

NOTE:
Somegrill partsshownin the assemblysteps
maydiffer slightlyin appearancefrom those
onyourparticulargrill model. However,
the methodof assemblyremainsthe same.
TOOLSREQUIRED:
• ExtraCommonNuts& Boltsare supplied.
• Referto diagramsto assembleyourgrill.
• Attach casters to bottom of base as
shown.
FIG.1
FIG.2
• InsertTank Caddyas shown
PLEASEUSECAUTION
WHENASSEMBLINGTHE
TANKCADDYTOAVOID
DAMAGETOTHETANK
SENSOR.
Assembled
View
19

• Attach Cabinet side panels to base as shown.
• Attach bottle opener to left panel as shown.
SP53-16 1/4-20
NUT HEX HDFLANGED
Assembled
View
SP83-18 1/4"-20X.50"
CARRIAGEBOLT
ill®
SP83-18 (2) 1/4"-20X.50"
CARRIAGEBOLT
L_J
SP53-16 (2) 1/4-20
NUT HEX HD FLANGED
SP84-18 (8)
1/4-20 X .5 HEX HD BOLT
Left hand
Panel
Right hand
Panel
SP84-18 1/4-20 X .5 HEX HD
BOLT
.........
FIG.3
2O
/