Page is loading ...

ELLESMERE ECG
Standard ECG Model
Balanced Flue Gas Stove
Fuel Type – LPG
INSTALLATION, SERVICING
AND USER OPERATING INSTRUCTIONS
For use in GB & IE (United Kingdom and Ireland)
.
Document No. : RH/TESC/SIN/BUR/LPG – Iss 03/01/2020
File: Ellesmere Gas ECG _User_Man.doc

2 Ellesmere Standard Model ECG – LPG
This Stove is - FUEL Type: LPG
Important Notice - please read carefully
This manual covers the fuel type LPG version
This is a Mandatary Requirement the gas feed pipe to the rear/side of this stove must be a
minimum of 16mm in diameter this will ensure the correct pressure and flow to the stove.
This stove will only operate at 37.5 mb of supply pressure (+/- 5% tolerance)
If you have other LPG appliances in your home such as cooker or central heating boiler this
stove must be fed directly from the main feed pipe to the other LPG appliances. The other
appliances must be balanced so each appliance is supplied with sufficient gas pressure and
flow to operate
For this stove to work correctly you must maintain a constant supply pressure of 37.5 mbars (+/-
5% tolerance) to the ON/OFF tap and test point at the side of this stove
37.5 mbars of supply pressure must be maintained and tested at the stove test point when
other appliances in the property are running on full flame/full heat to ensure the stove has been
fed with sufficient flow and pressure of 37.5 mbar
If you DO NOT have any other LPG appliances in your property, again you would use a 16 mill
diameter pipe to feed the stove directly from the regulator
If you’re not able to maintain 37.5 mbar of pressure at the inlet tap (with test point incorporated)
at the rear or side of this stove we recommend you do not fit this stove.
If supply pressure to this stove drops below the 37.5 mbar the flame will reduce in height and
will potentially cause black spotting on the glass - this is not covered by any warranty
Mandatory Requirement for Installing & Commissioning this stove:
Supply Pressure of 37.5 mbar to the stove
16mm diameter minimum gas feed pipe to this stove
Fitting of an ON/OFF Tap with a Pressure Test Point fitted to the side of this stove
(this tap is not supplied with the stove)
Rear Chain kit is fitted – full instructions in this stove
Flue locking screws x2 fitted into the flue collar
The stove is installed, commissioned & operated as stated in this manual

GB & IE
3
Installation Information
Please complete the following form for reference when required:
Ref.
Description
Please Complete
1
Which retailer did you purchase the
stove from?
Name & Address of Retailer:
2
What date did you purchase your new
stove?
Date:
3
What was the name of the gas fitter that
installed your stove?
Full Name:
Contact Number:
4
What is the installer Gas Safe
Registration Number?
Gas Safe Registration No.:
5
What is the serial Number of your stove?
This can we found inside the front door
above the bottom hinge
Serial Number:
6
What date was your stove installed?
Date:
7.
The AGA Name, Model & Gas Type
reference for this stove is
Name - Ellesmere
Model – ECG Standard Body Model
Gas Type – LPG Gas
Technical Data Summary:
Reference
Description
Data
1
Maximum Heat Output – High Flame (LPG Gas)
4.4 kW
2
Minimum Heat Output – Low Flame (LPG Gas)
1.8 kW
3
Efficiency %
81%
4
European Energy Label Rating (EEL Eco Labelling)
“A”
Who Can Fit My New AGA Gas Stove:
Before the Gas Engineer can commence working on this stove they must be Gas Safe -
qualified and registered for LPG Gas to install, commission and service this stove to the
Domestic Gas Safety (CCN1) standard as a minimum and also have the (HRT 1)
Category on their Gas Safe Individual Register listing which can be verified at
www.gassaferegister.co.uk
HTR 1 - Category = Fire/Space Heater - Competent in the install, exchange,
commission, disconnect, service, repair, safety checking and break down of domestic
gas fires, wall heaters, convector heaters, stoves and flueless gas fires.
The installation of this stove is Notifiable Under Building Control –
Building Regulation 2002 Part J

4 Ellesmere Standard Model ECG – LPG
Content
Section
Content
Page Number
Installation Information – please complete
3
1.0
General Notes
4
2.0
User instructions
6
2.1
Emergency Gas Isolation
6
2.2
First Time Operation & Paint Curing & Stove Dimensions
Curing the Paint
Health & Safety – Fitting the Rear Chain Kit & Securing the Flue
Stove Dimensions
6
6
7
10
2.3
Understanding the Controls to Operate this Gas Stove
Manually Turning On/Off this Stove
Understanding how to use the Remote Control
11
11
12
2.4
Care & Maintenance of the Batteries
19
2.5
What Comes with My Stove
20
3
Installation instructions
21
3.1
Gas Connection
21
3.2
Ventilation
21
3.3
Appliance Free standing Installation
21
3.4
Appliance Building into a False Chimney
Distance to Combustibles and Non Combustibles
21
22
3.5
Appliance Fireplace Opening Installation
Removing the Inner Glass to Access the Fire bed
23
3.6
Flue Connection
Fitting the Flue Collars
Rear Exit Configuration
Top Exit Configuration
Relief Valve Flap (RVF)
Terminal Locations & Flue Systems
AGA Flue Systems – Flue Kits 1 to 4
AGA Flue Kits 1 & 2 – Top Exit
AGA Flue Kits 3 – Rear Exit - Snorkel
AGA Flue Kits 4 – Renovation Kit for Existing Chimney
24
3.7
Fuel Bed Arrangements – Step By Step Log Layout
34
3.8
Commissioning the Appliance
Pilot Ignition Check
Burner Check
Pressure Check
Removing the Burner Unit
Frequency Asked Questions
Pairing the Gas Valve to the Remote
38
4.0
Servicing
43
4.1
Cleaning the Ceramics
43
4.2
Servicing the Burner
Gas Control Valve Information
Gas Control Valve Assessment
Error Codes Explained
Cleaning & Serving the Pilot Assembly
Checking the Batteries
43
5.0
Technical Information
Burner Data
54
5.1
Exploded View of the Parts
Parts List
55
5.2
Warranty Details
57
Appendix 1
Appliance Commissioning Checklist & Customer Sign Off
59
Appendix 2
Annual Servicing Records
60
Appendix 3
Energy Efficiency Label
61

GB & IE
5
1. General Notes - Important Please Read
This AGA Stoves gas appliance is a High Efficiency, Balanced Flue Log Fuel Effect appliance. It provides
radiant and convectional heat using the latest burner technology, as well as having a variable heat output.
Before Installation, check that the local distribution conditions, nature of the gas and pressure, and
adjustment of the appliance are compatible.
This appliance is intended for use on a gas installation with a governed meter.
This Gas Installation may only be installed by a registered professional competent person
(Gas Safe Registered and Qualified Installer in the UK). The installation must adhere to the
requirements of the local and national Building regulations and national standards. This installation
manual must also be followed.
Ensure that the Flue Terminal is not in any way obstructed and is clear of vegetation, i.e. trees,
shrubs etc. and that no objects are leant against the terminal or guard.
Always clean the Window Panels before the fire is ignited. Any finger prints must be
removed, as these will be burnt into the glass and will be un-removable.
Do not operate this appliance if the glass panel has been broken (or cracked), removed or with
firebox access panels open.
Only flue approved by AGA Stoves for this appliance may be used.
This appliance is a balanced flue product and is room sealed and as such requires no additional
ventilation for operation. However an adequate supply of fresh air to maintain temperatures and a
comfortable environment is recommended
This appliance is designed as a heating appliance, and as such will get very hot in operation; all
surfaces are considered to be working surfaces and as such should not be touched. The front door
window and surrounds are not considered to be fully secure guards against accidental contact. It
is recommended that an approved fire screen be used if children, the elderly or persons with limited
mobility are to be present in the same area.
Do not place curtains, laundry, furniture etc. within a safe distance of 1000mm (HOT ZONE) of this
appliance when in operation
Do not attempt to burn rubbish on this appliance.
Only use the AGA approved and AGA supplied Ceramic Logs and embers
If this appliance is extinguished (turned off), on purpose or otherwise, no attempt to relight should
be made within 3 minutes as the thermocouple inside the stove needs to reset automatically when
the firebox heat reduces accordingly
Each stove burner has been fully tested before being dispatched, the complete Gas Burner
Assembly which includes the Pilot Assembly, Gas Control Valve (GCV) and Remote Control
Handset have all be thoroughly tested and approved

6 Ellesmere Standard Model ECG – LPG
2. User Instructions – Important Please Read
2.1 Emergency Gas Isolation - Installation of the Gas Isolation Tap with Pressure Test Point
This stove must be fitted with a Gas Isolation Valve to the side or the rear of the stove which can
be easily accessed by the user
MANDATORY REQUIREMENT - When installing this stove the Gas Safe Installer must fit
a gas isolation valve at the rear or side of the stove with a pressure test point incorporated into
the ON / OFF Tap – this will used to test the gas Inlet/Standing Pressure - Please make the
customer aware of where this valve is fitted and that they can access it easily
Gas Isolation Valve – We recommend you turn the gas supply OFF to the stove if you are not using it
for a long period of time, please use the gas isolating ON/OFF valve that your fitter would have installed
when the stove was fitted.
This Gas Isolation Valve is not part of the components AGA supply with the stove, your installer will
supply this. Please note it must have a gas pressure test point built into the valve
In the event of a gas leak or if gas is smelt, the appliance must be isolated. This is done by turning OFF
the gas at the ON / OFF Isolation Tap. This Isolation Tap should be fitted to the rear or side of the
appliance, with easily access to operate.
Also turn off the Gas Control Valve via the ON/OFF slider switch which is mounted at the front of the
stove at the bottom
This stove is fitted with an 8mm diameter compression fitting on the
end of the flexible gas inlet pipe.
From this flexible inlet pipe - the gas isolation tap must be fitted. This
must be fitted so the customer is able to easily access and isolate the
gas supply to the stove if required
If any foreign objects are found in the Gas Control Valve such as
brick dust, this is not covered by the AGA Warranty
2.2 First Time of Operation
Before igniting the appliance, ensure that all packaging, safety stickers and any protective wrapping
have been removed, and that the glass has been cleaned, including all fingerprints from the glass.
Ensure that the room is adequately ventilated the first time that the appliance is ignited; we would
recommend opening windows if possible.
Curing the Paint – First Time Usage
Run the appliance at a 25% setting for a 1 hour
Then at a 50% Setting for 1 hour
Then Finally on Full Power 100% for 1 hour
This will then allow the paint the opportunity to fully cure. During this period it is possible
for some fumes and vapours to be given off.
We would recommend keeping children and pets out of the area at this time.
Please Note:
When using this stove with the manual controller, the manual controller is located at the front of
the stove at the bottom in the middle. When the stove has been running/burning for a short
period of time the stove will become HOT - please be careful if using the manual Controller when
the stove is hot, we recommend you use the Remote Handset to operate this stove
In the Hot zone at the front of the stove, do not place to dry laundry as if could cause a FIRE, if
children, the elderly or persons with limited mobility are in the room unoccupied a Fire Guard
must be installed

GB & IE
7
Health & Safety
To prevent the stove from tipping forward when the cast door is open & the flue pipe being
pulled off the flue collar
Additional Mandatory Requirements:
Fitting the Rear Chain - During the stove installation process, this stove requires a chain fitting to the
rear of the stove as per the following detailed instructions and a “screw in eye” secured into a suitably
solid wall directly behind the stove using the enclosed wall fixing for solid brickwork. A different wall
fixing would be required for a cavity plasterboard wall which is not supplied as part of this kit
When fitted correctly this will prevent the stove from tipping forward when the door is in the open position
The full installation kit for this is included inside the stove and consists of:
Chain with Snap Hook fitted to the end of the chain
Screw in Eye and wall fixing
Washer (used when screwing the chain onto the back of the stove, with the back panel flange
fixing already on the back of the stove holding the back panel in place
This chain is set up, so it can be used at its maximum length to achieve the 350 mill length required
behind the stove when the stove is fitted in front of a combustible wall/material and then you would
shorten the chain with the snap hook when fitting in front of a non-combustible wall down to the
minimum distance of 100mm from the rear of the stove to the non-combustible wall
Drilling the Flue Pipe for the 2 x Locking Screws - Additionally as a mandate we require the flue pipe
once finally fitted (regardless of whether the flue exits from the top of the stove or the rear of the stove to
be drilled from either side into the flue collar and a self-tapping screw (size No.8 x 10mm long – pan
head stainless steel posi drive) - one each side to be screwed into place so the flue pipe cannot be
pulled off the flue collar. See position of screw overleaf on diagram
When drilling the two holes into the Black coloured flue pipe we recommend putting masking tape
around the flue pipe where you wish to drill it first, then marking the 2 x hole positions, then using a
metal drill bit, drilling through the masking tape this will help to prevent any scratching of the black flue
pipe
The flue pipe and flue collar are manufactured from stainless steel when drilling only drill through the
outer skin of the flue pipe and the first outer layer (fresh air part of the concentric flue) of the flue collar
so the drill is only going in a maximum of 10 mill depth, therefore the inner exhaust flue cannot be
damaged. Please note do not drill into the exhaust pipe of the concentric flue, this is the 100mm
inner section of the flue pipe where the exhaust gases are removed
Then place a small amount of high temperature sealant onto the screws before screwing them in fully to
ensure an air tight seal is achieved, then finally fully test the flue for its integrity and the locking bands
are all fitted correctly on all joints
If you are fitting the flue to the top of the stove there is a convection cavity below the lid so the 2 x
locking screws can be fitted in here, below the lid so they are not seen. But this will involve lifting the lid
up to drill and 2 x holes then fit the 2 x self tapping screws then lowering the lid without scratching the
flue pipe
When fitting the flue out of the rear of the stove, the 2 x fixing screws at the rear can be fitted on the
outside of the back panel plate as they are not seen, but they must be drilled and fixed into the flue
collar, but again just the 150.mm outer collar of the 2 piece flue collar

8 Ellesmere Standard Model ECG – LPG
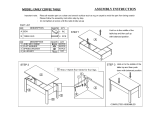
Fitting the Rear Support Chain – The Position of the Chain
Drilling the Flue for a Locking Screws
Picture showing the stove from the front
Picture showing the stove from the side
with the support chain fitted to a distance of
350mm. This is the minimum distance to a
combustible wall
Picture showing the stove from the top view
with the support chain fitted to a distance of
350mm. This is the minimum distance to a
combustible wall
As a mandate we require the flue pipe once finally fitted
(regardless of whether the flue exits from the top of the
stove or the rear of the stove to be drilled from either
side into the flue collar and a self-tapping screw (size
No. 8 x 10mm long – pan head stainless steel posi
drive) - one each side to be screwed into place so the
flue pipe cannot be pulled off the flue collar.
Refer to full instructions on previous page

GB & IE
9
Mandatory Requirement - Fitting the Rear Chain
The chain can either be fitted to the right hand side or the left hand side of the stove at the rear
Step 1 - You are required to fit this chain regardless of whether you
flue out the top of the stove or out the rear of the stove it is a
mandatory requirement to be installed correctly
Unscrew the top bolt that holds on the rear panel and bolt on the
chain provided using the washer so the chain is fixed securely to the
back of the stove
Step 1 - You are required to fit this chain regardless of whether
you flue out the top of the stove or out the rear of the stove it is
a mandatory requirement to be installed correctly
Unscrew the top bolt that holds on the rear panel and bolt on
the chain provided using the washer so the chain is fixed
securely to the back of the stove
Step 2 - Set the distance you
require at the rear of the stove
Adjust the length of the chain by
moving the snap hook into a
different link to shorten the chain if
required
Step 3 - Diagram of eye hook fitted into rear wall - Drill the rear
wall directly behind and in a straight line with the bolt holding the
chain to the rear of the stove, with a suitably sized masonry drill to
the correct depth to match the rawplug provided, then fit the rawplug
& screw the eye hook into the wall. If you are fitting the hook into a
plasterboard wall you will need a different fixing which is not
provided. Ensure the hook is solid and secure in the wall so it will
take a weight greater than 150kgs but a maximum of 250kgs
Clip the snap hook onto the eye bolt in the wall insuring the chain is
at the right length so it is straight but not over tight but not loose
Now this chain is fitted it will prevent the stove tipping forward when
front door is open

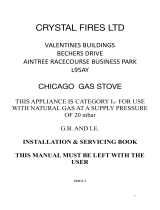
10 Ellesmere Standard Model ECG – LPG
Stove Overview & Dimensions
This stove uses the latest technology gas valve burner technology and air management hence its high
efficiency. This stove is fully remote controlled plus it has the added feature of being able to be operated
manually from the Gas Control Valve (GCV), which is located in the middle of the stove at the bottom we would
only recommend using the manual control if you have mislaid or damaged the remote control handset, (so
when the stove is cold it can we used for lightening the stove, please note when in the stove is in operation the
stove becomes HOT so CARE must be taken not top burn yourself, if you wish to adjust the flame or turn the
stove off) this gas stove uses a simple hand held remote control as shown overleaf
Front View Side View
Rear View Top View
Gas Control Valve (GCV) positioned
in the centre for manual operation &
battery replacement

GB & IE
11
2.3 Understanding the Controls to Operate this Gas Stove
Gas Control Valve (GCV)
This is located under the stove at the front in the middle, a key feature of this stove is it can be operated
using the power button to turn it ON/OFF and the - / + to increase or reduce the flame and heat output
The batteries are located in the front of the valve behind the battery cover, so they can be accessed
when they need replacing
Picture of the Handset Remote Controller 2 x AA batteries are
supplied, these fit in the rear of the rear of the remote controller –
only use the recommend batteries for the Remote and the Gas
Control Valve above
Manually Turning OFF this Stove
In the event that the appliance needs to be turned OFF manually, or if
the stove is not going to used for an extended period of time, the Sliding
Power Isolation Switch is used to turn the stove off completely.
We also recommend you remove the batteries from the Gas Control
Valve and the Remote Handset if the stove is not going to be operated
for a period of time, this will then prevent the batteries from leaking
Additionally we recommend you turn off the gas supply to the appliance
using the ON/OFF GAS TAP that you installer has fitted to the rear or
the side of the stove

12 Ellesmere Standard Model ECG – LPG
USING THE REMOTE CONTROL HANDSET.
IMPORTANT USER INFORMATION – READ THIS BEFORE ATTEMPTING TO OPERATE THE STOVE
NOTE: The handset is paired to the fire during manufacture. DO NOT ALTER THE PAIRING.
For safety reasons, the handset is designed so as to avoid accidental operation. If, during proper use, the handset
fails to communicate with the valve there is a possibility that the pairing has been inadvertently altered – in this
case the handset will need to be reset and re-paired with the valve.
For Normal Use:- This stove comes with batteries fitted into the remote handset and also in the Gas Control
Valve (GCV). However if for any reason they have been removed then prior to using the stove for the first time
insert new, Quality alkaline, AA batteries into the valve and handset such as Energizer or Duracell, but DO NOT
USE rechargeable batteries . Ensure they are mounted firmly and in the correct orientation, and that the battery
covers are replaced fully. Ensure the small isolation switch on the Gas Control Valve is switched to the ON (I)
position.
4 Quick Steps to using the Remote to Turn the Stove ON &
Adjust the Flame/Heat settings
Step 1 - Hold the handset as shown, wrapping your hand around the
handset to make good contact with both sides. The green unlock light
should illuminate, activating the buttons (if the light is not illuminated,
the buttons will not work).
Word PILOT Appears
Step 2 - Press and hold the power button, release as soon as
PILOT appears on the display in the bottom Left Hand corner
(approx. 1-2 seconds). The fire will commence ignition
sequence. If successful, the fire will automatically go to
maximum heat output (MAX FLAME).
NOTE: Releasing the power button too soon or depressing for
too long after the PILOT appear in the bottom LH corner, will
cause the fire not to light because system assumes press to
be unintentional.

GB & IE
13
Step 3 - To adjust the flame, hold handset to activate buttons, and use + and
– to increase or decrease flame power accordingly. Tapping the button will
increase or decrease flame stepwise, holding the button will skip through
steps. The fire basket display on the handset will illustrate the level of flame
being produced.
MAX Flame & Max Heat
3 Flames – Medium Heat
2 Flames – Low Heat
1 Flame – Very Low Heat

14 Ellesmere Standard Model ECG – LPG
Step 4 - To STOP the fire, hold handset to activate buttons, then
press the power button. The fire should shut off immediately
(N.B STOVE WILL STILL BE HOT residual heat will remain).
If you wish to start the fire again you must wait for the OFF
to be displayed on the handset before trying to re-start as
the thermocouple needs to cool down

GB & IE
15
Understanding the Different Functions of the Remote Control
Mode – MAN (Manual), Zzz (Snooze), Thermostat or Timed modes selected
Time (12 hour or 24 hour display)
Day of the Week
Gas Stove status Remote is in Range of the stove (logo missing if not in
range or if the Gas Control Valve is turned off)
Battery condition – RC
handset, FC Fire control
Room Temperature
Light sensor for display
(back light)
Handset Unlocked when illuminated
To change mode
To change handset settings
Press to decrease flame
Press to increase flame
Power on or /off
Please Note: The handset is designed to make remote operation of the stove as safe as possible. It has
been specifically designed to minimize the risks of accidental operation, with the express intention that
successful operation can only be achieved by a conscious, deliberate act.
Using the Remote Control – in more detail
1 - How do I Light the Stove
Important – To operate the handset it must always be unlocked, this is carried out by firmly
holding the handset in one hand, which will allow operation of all functions.
Step 1: Unlock the handset by holding it.
The green unlock light will illuminate. Keep the handset held to keep the control unlocked, to
enable operation of the buttons.
Step 2: With the other hand press the power button for about 3 seconds until:
A short acoustic beep will be heard and the unlock light on will flash, the word “PILOT” will appear at
the bottom left hand corner of the display screen. At this point release the power button.
Step 3: The Fire should be lit within a few seconds, if it fails to light then repeat the process.

16 Ellesmere Standard Model ECG – LPG
2 - Adjusting the Flame Height – this will increase or decrease the heat output of the stove
Step 1: Unlock the handset by holding it.
Step 2: Press the “+” button to increase the flame height, press the “–” button to decrease the
flame height
3 - Turning the Stove OFF
Step 1: Unlock the handset by holding it.
Step 2: Press and release the power button, this will turn off both the main burner and pilot burner.
4 - Restarting the Stove
If the Stove/fire is extinguished or goes out in use, allow 5 minutes before attempting to restart
following the lighting sequence as described in 1
If the fire shuts itself off repeatedly, do not use the fire, and have the flue and fire checked by a
suitably qualified person.
If the appliance is not lighting after 4 ignition attempts, close the gas tap and call the installer.
Close the gas tap in case of malfunctions and/or poor operation and warn the installer.
The appliance is designed to display a fault code on the handset in the event of a functional
failure, this can be identified from the Fault Finding Section.
Additional Control Functions
In addition, the remote control can also be used to set a number of additional functions:
Time and Date
Temperature display in degrees Celsius or Fahrenheit
Snooze Mode
Thermostat Function
Caution - Although highly unlikely, there might be very rare occurrences where your appliance’s
ignition process can be started unintentionally through other remote controls. For example the
remote control of your neighbours’ gas heater, but also car keys and garage door openers. The
result will be that your appliance will burn when you do not want it to.
Unintended ignition of your appliance could be solved or prevented by turning the ON/OFF switch
or closing the gas tap near your appliance. This is the safest precaution if the appliance is not is
use for long periods to turn the ON/OFF switch to the OFF position and to close the gas tap near
your appliance.

GB & IE
17
5 - Setting the Time
Enter the SETUP menu. Hold the handset to unlock the keypad and keep held throughout
the following steps.
Press and hold SET for several seconds. The symbol in the top centre will flash. Press and release
the “mode” button several times until the word “SETUP” appears flashing in the top right corner of
the display.
Press and release “set” again to enter the “SETUP” menu.
Here you can change the clock from 12 hour or 24 hour format, the day of the week, hour of the
day, minute of the day and the display in Celsius or Fahrenheit.
To navigate through the menu “SET” moves to the next parameter and “Mode” move back to the
previous parameter. “+” and “-“ change the display parameter.
Setting the display for 12 or 24 Hour display:
The H indicates that it is time to set the timer to either 24 hour display or 12 Hour (AM or PM) display.
Press the “+” or “–” button on the handset to toggle between the two settings. When you are ready to
confirm the setting you want press the “SET” button to progress to setting the day of the week.
6 - Setting the Day of the Week
Press and release the “+” and “–” buttons until the correct day of the week is shown on the display.
(Mo = Monday, Tu = Tuesday, We = Wednesday, Th = Thursday, Fr = Friday, Sa = Saturday and
Su = Sunday).
Press “SET” to accept the day of the week and to progress to setting the Hour of the day.
Note: Whilst doing this setup pressing “SET” advances to the next display and pressing “MODE”
will return you to the previous display setting.
7 - Setting the Hour
Press and release the “+” or “–” button to change the hour to the correct hour and press set to store
and to move to setting the minute. Repeat this for setting the minutes.
8 - Setting the Temperature Display to Celsius or Fahrenheit.
Press and release the “+” or “-” button to toggle between C and F. When the display shows the desired
symbol, press and release the “SET” button to store.
As the important settings above have now been done, press and hold for a few seconds the “SET”
button for a few seconds and this will exit the setup menu.
9 - Snooze Mode
Snooze mode is a time period you can set which will turn off the fire after a certain time period has
elapsed. This function can be utilised during both the manual and thermostatic modes.
The snooze time period can be set before or during manual operation of the fire. Hold the handset to
unlock as described previously and press the mode button as many times as necessary until the word

18 Ellesmere Standard Model ECG – LPG
MAN and the Zzz symbols are flashing at the top of the display. Press and release the set button and
this will put the control into Manual snooze mode.
The default time period for the snooze time period is 1:00 hour. Pressing the set button again will show
you the snooze time period remaining. This can be adjusted by pressing the “+” or “-“ buttons. The timer
period that can be set is from 1 minute to 4:00 hours.
After adjusting the time, press set again to enter the time setting required (or if left for a few seconds this
time is now stored and used).
Once this countdown timer has reached zero the fire will turn off.
10 - Thermostatic Mode
The handset has within it a thermostat sensor and this can be set so the fire will heat the room to
match he temperature set in the handset.
There are 2 temperature types that can be set:
• Day mode temperature that has a SUN symbol on the display
- the default temperature is 24 degrees Celsius.
• Night temperature that has a HALF MOON symbol on the display
- the default temperature setting is 18 degrees Celsius.
Hold handset and press and release the mode button several times as necessary until the display
has a thermometer symbol flashing at the top of the display. Press the set button to enter this mode.
Press the set button again to see the temperature setting that is set and the mode and on the left of
the display is a sun symbol showing it’s the day temperature.
If a different set temperature is required, while the display is showing this set temperature press
the “+” and “–” buttons to alter the setting. When finished either press set or leave and after a few
seconds the new setting will be accepted and the display will return to the time of day screen.
The fire will automatically turn to high or low rate depending on the set temperature. When the set
temperature is reached while the fire is in operation, the fire reduces the burner power level each
minute until the burner is off. The pilot will remain on for a further 30 minutes and if the set
temperature is still too high, the pilot will then also extinguish.
NOTE: If at any time the power button is operated during Thermostat mode, the control will cancel
any thermostat operation and return the control to manual mode.
Cleaning and Maintenance
This appliance should be inspected and serviced once a year by a qualified, competent and Gas Safe
registered person. The inspection and maintenance must at least ensure that the appliance is working
correctly and safely.
It is advisable to clean the appliance of any dust and debris before the heating season and especially if
the appliance has not been used for some time. This can be done with a soft brush and a vacuum cleaner
or a damp cloth and if required a non-abrasive cleaning agent. Do not use corrosive or abrasive
substances to clean the appliance.
Annual Service
For the AGA Warranty to be valid this stove must be services once a year by a Gas Safe Qualified
Engineer. After an annual service on this stove please complete the record sheet at the rear of the
manual

GB & IE
19
2.4 CARE & MAINTENANCE OF THE BATTERIES
WHAT SHOULD YOU DO?
Replacing the batteries at least every 12 months will help prevent damage to the valve and
handset through leaking batteries.
Only use new, high quality, alkaline batteries.
Do not use rechargeable batteries
Always replace the complete set of batteries and do not mix brands.
Keep contacts clean and do not bend.
Remove batteries from the stove Gas Control Valve & Remote handset if the stove is not going
to be used for an extended period which is greater than 12 weeks in duration
Do not operate fire without battery covers fully in place.
If handset is dropped and damaged, obtain a replacement (see spares section)
HOW DO YOU KNOW WHEN TO REPLACE THE BATTERIES?
Replace batteries at least every 12 months, during the annual service of the fire.
The display handset will show a low/empty battery symbol on the screen and produce an audible
tone.
The red indicator light on the Gas Control Valve flashes (approx. every 10 seconds).
WHAT HAPPENS IF I DO NOT REPLACE THE BATTERIES?
The fire will stop working, or will only work intermittently.
The handset (or valve) may give error codes, which may or may not be correct.
The batteries may leak and cause permanent, irreversible damage to the electronics meaning a
replacement item must be sought (this is not covered by your AGA warranty).
HOW TO REPLACE THE BATTERIES.
The control consists of a handset and a Gas Control Valve, within the fire, which both run on
batteries.
The handset requires 2 x AA batteries.
The valve requires 3 x AA batteries (unless mains powered).
The battery covers can be opened and removed without tools by pressing the tab down and
pulling the cover towards you, example images follow.
Batteries in the Gas Valve Controller Replacing the Batteries in the
Mounted at the front of the stove Remote Controller

20 Ellesmere Standard Model ECG – LPG
2.5 What Comes with My Stove
Packing List - The Following Items are placed within the Firebox for Safe keeping during transit
A - Inner Exhaust Flue Collar (100mm Diameter) with gasket seal
B - Outer Fresh Air Flue Collar (150mm Diameter) with gasket seal
C - Sealed packet of screw to fit the above flue collars consisting of:
o 4 x Stainless Steel M5 x 16mm long Cap screws – for fixing the Outer Flue Collar
o Spring locking washer - for fixing the Outer Flue Collar
o M5 x Flange Nuts – for fixing the Inner Flue Collar
D - Remote Control with battery fitted & and already paired to the stove – ready to work
E - The log set and Ember pack is in a cardboard box and placed inside the stove firebox
F – Rear Chain Fixing Kit (consists of Chain, Snap Hook, Screw Eye, Washer & Rawplug)
G – This Installation and Operating Manual
ITEM A ITEM B ITEM C
ITEM D ITEM E ITEM F
Pictures Not to Scale
You have to purchase the AGA Flue Kit separately please refer to the Flue Kits
/