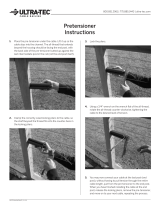
Feeney 6310-pkg Installation guide

Type
Installation guide
1/8” 5/16” 1/4” 3/8”
3/16” 3/8” 1/4” 9/16”
If desired, Quick-Connect
®
SS
posts may be through drilled at
1/4” and then counter-bored
with the recommended
Quick-Connect
®
SS drill to
countersink the fitting.
Mark drill hole locations
on posts.
To minimize cable
deflection, space
cables no more than 3
inches apart and have
a post or vertical spac-
er at least every 3 feet.
Also, straight runs of
cable (no turns/dips)
should not exceed 70
feet. Runs with corners
(2 bends at most)
should not exceed 40
feet. See Frame
Requirements on back
page.
Insert Protector Sleeves
at necessary locations.
Tap in until flush.
Protector Sleeves prevent
abrasion at angled
transitions on wood posts
(e.g. stair transition posts
or outside faces of double
corner posts).
Insert the Threaded
Terminal through the
Terminal end post and
attach a flat washer and
Snug-Grip
®
Washer-Nut.
Spin the nut 2 full
turns. Strong resistance
will be felt as the Snug-
Grip® threads engage;
so hold the Terminal
shaft with pliers.
Lace the free end of
the cable through the
intermediate posts and
Quick-Connect
®
SS
end post. Slide-on a
flat washer and
Quick-Connect
®
SS
fitting until they rest
against the face of the
post.
Use a Lacing Needle
if snagging becomes
a problem.
Drill holes in posts. Hole
diameter depends on
cable size and type of
fitting. See chart below.
Hold the
Quick-Connect
®
SS
fitting with one hand
and pull the cable
tight with the other.
The fitting
automatically locks
when you release
the cable.
Tension the cables by
holding the Threaded
Terminal shaft with Vise-
Grip pliers and spinning
the Snug-Grip
®
Washer-
Nuts with a wrench. A
Feeney Tension Gauge
may be used to check
uniform tension. See
tensioning sequence
diagram at left.
Use hacksaw, reciprocating
saw, or electric grinder
with cut-off disk to saw
off the excess threads as
close to the Snug-Grip
®
Washer-Nut as possible.
Touch-up with electric
grinder. The special
Snug-Grip
®
threads
prevent the nut from
loosening.
Use cable cutters
or electric grinder with
cut-off disk to trim the
excess cable. Grind
flush the exposed
cable ends with an
electric grinder.
Snap on end caps over
the exposed Quick-
Connect
®
SS fittings
and the Snug-Grip
®
Washer-Nuts. You’re
done.
Feeney SteelProtect
can be applied for
lasting protection of
stainless steel cable
and parts.
11
9
7
5
3
1
2
4
6
8
10
12
1 2 3 4 5
6 7 8 9 10
Cable Size
Threaded Term.
Post
Intermediate
Posts
Quick-Connect
Post
© 2016 Feeney Inc.
File 2012-520B
Step-by-Step Installation for Wood Frames
Recommended cable
tensioning sequence
Use Beveled Washers for stair termination posts with
angled holes. Available for Threaded Terminal and
Quick-Connect
®
SS fittings. Always install the Quick-
Connect
®
SS fittings in the top stair post to prevent rain
water from running down the cable into the fittings.
TOOL
CHECKLIST
Safety Glasses
Work Gloves
Pencil
Measuring
Tape
Electric
Drill
Drill Bits
Hammer
Cable Cutters
Vise-Grip
Pliers
7/16''
Wrench
Electric
Grinder with
Grinding Disk
& Cut-off Disk
Hacksaw
or Electric
Reciprocating
Saw
Cable Lacing
Needle
Feeney Tension
Gauge
Important Note: If using electric or pneumatic tools to tighten the Washer Nuts,
spin the nuts very slowly otherwise they will heat-up causing the threads to seize.
Cables can terminate or run through corner posts
Terminating
Continuous
DOUBLE WOOD POSTS DOUBLE WOOD POSTS
SINGLE WOOD POST
Offset drill holes at least 1/2”
Cable
Spacing:
Maximum 3
inches apart.
Intermediate
Posts:
Size all intermediate
posts as required for
top rail support
strength or for code.
Top Rail:
Always include a strong, rigid
top rail that is securely fastened
to all posts. Top rail size is
based on load strength needs
and local code requirements.
Set railing height per
local code.
Spacing From Walls:
Set end posts 3 to 4 inches away from the
house/wall face to allow access for attaching
cable end fittings.
End Posts:
Use minimum end post sizes noted above, and
securely bolt or screw to joists or deck surface.
Double Corner Posts:
If possible use double corner posts to allow the cable
to run continuously through the corners without
terminating
(see single corner post option below).
Securely bolt or screw posts to joists or deck surface
and use minimum corner post sizes noted above.
Maximum Post Spacing:
Space all posts and vertical
spacers
(see below)
a maximum
of 3 feet apart to minimize any
deflection that may occur if the
cables are ever forced apart.
Bottom Rails (OPTIONAL):
Bottom rails should be spaced no
more than 4 inches above the
deck surface, or as required by
local code, and should be sized
as needed for support strength
and design appearance.
Single Corner Post (OPTIONAL):
When terminating on a single corner post, be sure to offset the drill holes at
least 1/2'' to allow internal clearance for the cable fittings. Use minimum end
post sizes noted above and securely bolt or screw to joists or deck surface.
MAX. 3 FEET
MAX. 3 FEET
The Basic Frame Design
And Some Other Options
Cable
Spacing:
Maximum 3
inches apart.
CONSTRUCTION
CHECKLIST
Space cables no more
than 3 inches apart
Space posts/verticals no
more than 3 feet apart
Observe minimum
end/corner post sizes
shown above
Securely fasten all
posts and top rails
Carefully plan all
termination and
corner posts for proper
clearance, positioning,
and maximum
cable run lengths
Straight runs of cable
(no turns/dips) should
not exceed 70 feet; runs
with corner bends (2
bends at most) should
not exceed 40 feet
Wood Frame Requirements
IMPORTANT NOTE
For railings we recommend
spacing the cables no
more than 3 inches apart
and placing posts or
vertical members no more
than 3 feet apart.
Please note that since
building codes vary by
state, county and city,
our recommendations
may not comply with code
requirements in all areas.
Always consult with your
local building department
before starting your project.
Minimum sizes for all corner and end posts
All other posts should be sized as required for top rail support strength or for code
4X6 WOOD
3-1/2'' wide, 5-1/2'' thick
Railing frames need to be designed and built strong enough to support the tension of properly installed cables,
which is a load in excess of 300 lbs for each cable. Here are some basic guidelines to help you properly prepare
your railing frames. These guidelines apply whether you are using 1/8'', 3/16'' or 1/4'' cable (1/4'' cable not
recommended for wood frames).
Wood Blocking
(WOOD FRAMES ONLY):
Underneath the top
rail attach minimum
1”x 4” wood blocking
between posts to pro-
vide additional lateral
reinforcement to the
posts so that they
won’t pull out of
plumb when the
cables are tensioned.
Vertical Spacers (OPTIONAL):
Slender spacers may be used instead of some of the larger intermediate posts to
achieve a more open railing design. These are non-structural members and are
only intended to maintain cable spacing and minimize deflection. Examples are
2” x 2” wood strips, 1” metal tubing or 1/4” flat bar. Attach spacers to the top rail
and either the bottom rail, deck surface or joists.
  • Page 1 1
  • Page 2 2

Feeney 6310-pkg Installation guide

Type
Installation guide

Ask a question and I''ll find the answer in the document

Finding information in a document is now easier with AI