Page is loading ...

Questions, problems, missing parts? Before returning to your retailer, call our customer
service department at 1-866-384-9400, 9 a.m.--5 p.m., EST, Monday--Friday, Include
e-mail address if applicable.
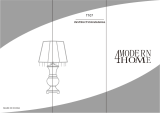
Part Description
Quantity
PACKAGE CONTENTS
A
1
B
C
D
E
F
G
1
1
1
1
1
1
Socket adapter
Spindle bracket
Canopy
Compression nut
Socket ring
Style and finish will vary by item.
Lamp cup
H
1
Decorative overlay
Shade
C
G
E
Bulb (not included)
A
B
F
D
H
Instant Pendant Light/Recessed Light Conversion Kit
Assembly Instructions
HDC#: 0845600280 MFG#: CSN-0404-4-1
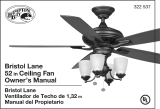
Please read over the instructions, it will be a time-saver in the long run.

Adjust excess cord by wrapping it around spindle bracket (B)
just below the socket adapter (A). Position the last wrap
so the cord will hang in the center of your recessed light
fixture.
1.
ASSEMBLY INSTRUCTIONS
A
B
Recessed
light socket
2.Screw the adapter (A) into the light bulb socket in your
recessed light fixture.
3.After finger loosening the compression nut (D) by turning it
counter-clockwise, slide the canopy (C) up the cord and
against the ceiling.
Before beginning assembly of product, make sure all parts are present. Compare parts with package
contents list and diagram above. If any part is missing or damaged, do not attempt to assemble the
product. Contact customer service for replacement parts
.
Estimated Assembly Time: 10-15 minutes
Helpful Tools:
PREPARATION
HELPFUL HINT: If the canopy does not sit tight against the
ceiling, loosen the compression nut (D). GENTLY pull down on
the cord to flex the spring arm (B), then slide the canopy (C),
back up and re-tighten.
4.To hold the canopy in place against the ceiling, finger tighten
the compression nut (D) by turning it clockwise.
Ceiling
CAUTION: Do not over-tighten the compression nut (D).
2
A
Fig.1
Fig.2
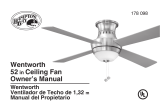
6.Attach both to the lamp cup (G) and screw on the socket ring (E)
clockwise until tight.
5.Gently slide decorative overlay (H) over drum shade (F).
Ceiling
Recessed
light fixture
C
D
Fig.3
Fig.5
Fig.6
B
C
D
Fig.4
F
H
G
E

Shut off light and let bulb and glass shade cool if necessary. Wipe glass shade with soft cloth or household
glass cleaner. Do not use abrasive cleaners. For replacement bulbs,use 100watt maximum, Type A or
suitable medium base bulb (not included) including CFL bulbs.
CARE AND MAINTENANCE
3
The manufacturer warrants against defects in materials and workmanship for one (1) year from the date of purchase to
the original purchaser. If within this period the product is found to be defective, take a copy of the bill of sale as a proof
of purchase and the product in its original packaging to the place of purchase. This warranty does not cover products
becoming damaged or defective caused by abuse, misuse, accidents, faulty installation, improper handling and/or
maintenance, or repairs not carried out by the manufacturer. Items which are not covered by warranty are those
considered as parts which are prone to failure due to general wear and tear (for example, lamps, fuses, glass materials).
There will be no obligations or liability on the part of the manufacturer for consequential damages arising from the use
of the product or any indirect damages with respect to loss of property, revenue, or costs for removal, installation or
re-installation. As some states do not allow exclusions of limitations on an implied warranty, the above exclusions and
limitations may not apply. This warranty gives you specific rights and you may also have other rights which may vary
from state to state.
WARRANTY
Printed in China
Bulb is burned out
Power is off
Bad switch
Replace light bulb (not included)
Make sure power supply is on
Test or replace switch
Bulb will not light
Loosen the compression nut (D) and GENTLY
pull down on the cord to flex the spring arm (B),
then slide the canopy (C) back up and re-tighten
Canopy does not fit tight
against the ceiling
Cord has stretched out
Problem
Possible Cause Corrective Action
TROUBLESHOOTING
3
U.S. Patent No. 7,311,425
www.WorthHP.com
WARNINGS AND CAUTIONS
WARNING
CAUTION
Risk of fire or electrical shock. Do not alter, relocate, or remove wiring, lampholders, ballasts, or any other
electrical component.
Risk of fire or electrical shock. Install this kit only in the luminaries that have the construction features and
dimensions shown in the photographs and/or drawings.
Do not make or alter any open holes in an enclosure of wiring or electrical components during kit installation.
/